Introduction
| Actiontec 54Mbps Wireless Network Camera | |
|---|---|
| Summary | Manual focus webcam with 11b / g wireless and 10/100 Ethernet connections. Image capture and record features are via Windows-only application |
| Update | None |
| Pros | • Wired and 802.11b/g wireless operation • Audio and video capture |
| Cons | • Requires ActiveX for web browser viewing • Windows only software for taking snapshots and video • No previewing of motion detection settings • No emailing of snapshots (only video) when motion is detected |
In the market for a high quality network camera, but you hate the thought of having to drag ethernet cables everywhere? Actiontec recently introduced its 54 Mbps Wireless Network Camera, which boasts MPEG-4 video and audio recording. While the installation and configuration started off well, I quickly found the product’s key limitations.

Figure 1: Mounting hardware
The Actiontec wireless camera comes with an AC Adapter, short CAT 5 Ethernet cable, removable antenna, and the mounting hardware pictured above (Figure 1).

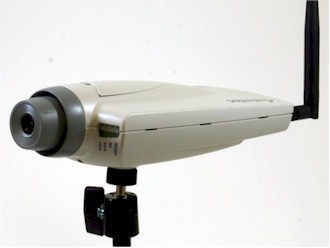
Figure 2: Front view
The front of the camera (Figure 2) has the lens, which is focused by manually turning it. Under the lens is the built-in microphone. On the right side are four LED lights (Ready, Active, LAN, Wireless) that glow amber when the camera is turned on and ready, or active on its Ethernet and wireless connections respectively. Unlike some other cameras (such Axis’), these LEDs cannot be turned off.

Figure 3: Rear view
On the back of the camera (Figure 3), going from left to right, we first see the removable wireless antenna. With the correct pigtail adapter to match the RP-TNC connector, you could upgrade to any 2.4GHz antenna you like. To the right of the power connection (5V DC) is an external microphone input, which may give you better results than using the built-in mic.
Since this is a wireless camera, you probably won’t use the 10 / 100 LAN port, but it’s there for the inital setup of the camera or if you prefer more security than afforded by a wireless connection. Note that the LAN port isn’t wired to accept Power over Ethernet, but you could get by this omission using a DIY PoE lash-up or commercially available kit.
Finally the recessed reset button will blast out all the settings and return the camera to the default settings when held for three seconds. But just quickly pressing the button will perform a soft reset including forcing a DHCP release / renew – a nice feature since many reset buttons these days are reset-to-defaults only, which isn’t always what the doctor orders.
Setting Up
The initial setup is simple – you plug in the camera to your LAN and then insert the install CD on any Win 98 SE,ME,2000 or XP computer. A setup program will autorun and find the camera without intervention – no hunting for IP addresses or guessing. You then can change the IP information or the wireless settings. The wireless security settings can also be entered using the setup utility.

Figure 4: Wireless settings
The camera supports WEP with 64/128 bit encryption and I was pleased to see it also supported the more secure WPA-PSK. If Actiontec intends to have many small-business buyers, however, they should add WPA-Enterprise and preferably WPA2 support soon. After the initial setup, you can fire up your browser and enter the IP address of the camera and go directly to a webpage where you can view live video from the web camera (Figure 5). You will also hear what is happening if you have turned on the audio feature.

Figure 5: Camera webpage view
Mozilla / Firefox users will probably not like this camera, since its webpage requires ActiveX. While there are ActiveX plugins for Mozilla, I don’t think users are likely to install them, since getting away from IE’s security problems is why many users switch to Mozilla / Firefox in the first place! I asked ActionTec if they plan on supporting alternate browsers and here is their response:
“The camera requires active-x support in the browser. Presently there are not plans to support other mechanisms (java, etc.) We only support IE 6.0 or above, but you can get active-x plug-ins for other browsers like Firefox which would then allow you to view images with the Camera.”
Administration
Settings can be changed by clicking on Administration (Figure 6). Here some basic settings and NTP (Network Time Protocol) can be set.

Figure 6: System Administration screen
(click on image to enlarge)
The logs (Figure 7) can also be accessed through the Administration screen. The log records events such as the time when the camera turned on, when motion was detected and email errors. You can copy and paste the log into your favorite word processing program, but there is no option to have a periodic dump into an alternate location. The logs are flushed when power is cut.

Figure 7: Log sample
The Network Settings (Figure 8) page is pretty standard, but has one nice feature. You can set a secondary port (other than 80) for web connections, which is great because some older routers can only do straight port forwarding with no port translation.

Figure 8: Network Settings screen
(click on image to enlarge)
I found Email Alerts (Figure 9) harder to set up than they should be. You can set email alerts to have text and / or video attachments, with alerts fired off when motion is detected in the zones you select (the screen is divided into a three by three grid, and you select the areas to sense motion in ). Videos are in MPEG4.ASF format and are can be set to be from two to five seconds in length and include audio.

Figure 9: Email alert setup
(click on image to enlarge)
Unfortunately, there is no easy way to test the sensitivity of the motion detector, i.e. no easy test button, no preview screen. So you must jump into the camera’s view and then run back to your computer and check your email.
You can configure up to three email addresses to send alerts to, with all three addresses getting the same alert. It would have been nice to set one address to receive text and the others to receive video. Unfortunately again, there is no testing of email addresses. Other webcams have a convenient test button that sends a test email so that you can verify that your email settings are good. With the Actiontec camera, though, you enter the email address information, start dancing in front of the camera and then check your email. At least if there is a problem, it will say “Send e-mail error” in the logs.
Video Settings and Features
Resolution and color adjustments are made in the Video Settings window (Figure 10). Resolution can be set to 640×480, 320×240 (default), or 160×120 with your choice of Normal, High or Very High Image Quality. The camera frequency can be set to compensate for 50 or 60 Hz flourescent lighting and you can toggle audio in the last check box.

Figure 10: Video settings
(click on image to enlarge)
One major weakness of the product is that you cannot take snapshots or record video using the built-in admin capabilities. Actiontec provides a separate viewer / recorder utility (Figure 11) to do this, but it is a Windows-only application. Single OS support aside, I think this is a big disadvantage. Let’s say you are viewing video through the webpage and you see an intruder walk by. If you wanted to record the moment, you would have to start the viewer / recorder utility and then finally be able to record.

Figure 11: Viewer / Recorder Utility
Locations for your snapshots and recordings can be set in the Preferences menu of the Viewer / Recorder Utility (Figure 12). A maximum recording time can also be set.

Figure 12: Viewer / Recorder Utility File Location Preferences
Recording can also be scheduled in advance for one time only, daily, or on specific days such as Monday only (Figure 13). Starting times and duration can also be set. Of course since the utility tells the camera when to start recording, and stores the recorded material, you will need to keep your computer on.

Figure 13: Viewer / Recorder Utility scheduling
You can judge for yourself if the video quality meets your needs via a short video I captured using the Actiontec Viewer / Recorder program. The quality is acceptable, possibly on par with some webcams, but does not come close to Axis’ cameras (which to be fair are much more expensive).
Video (.ASF – 25 Seconds – 1.5 MB – zip format)
Note: Some versions of Windows Media Player may require you to download a codec from this page to play this file.
Closing Thoughts
I ran some quick and dirty wireless range testing by putting the camera in my car (which sports an inverter for AC power) and moving it to a point in my building’s parking lot about 150 feet (46 m) away. The camera remained connected to my AP, with no discernable difference in picture quality. I probably could have extended the range if necessary, courtesy of the camera’s upgradable antenna.
In all, I found the Actiontec Wireless Network Camera to fall short of what I expect from a networked camera. The positives are its wireless and audio recording capabilities, with passable video quality. But it lacks powered focus, zoom and ability to be aimed remotely, although I wouldn’t hold those points against it, considering its $200 price point (available direct from Actiontec only).
But while the basic hardware itself seems sound, the software implementation needs work. Motion detection setup could have been much better, especially for setup and debug. And the inability to take snapshots and record video while accessing the camera’s built-in webpage is not only frustrating, but limits its customer base to Windows users. Likewise, the ActiveX requirement for webpage access will not endear this camera to buyers trying to move away from Microsoft’s IE.