Setting Up a Wireless Network
Now that you know the building blocks of a wireless network, how do you put them together into something that will let you get some work done while you’re sitting in your favorite chair? Glad you asked! The approach you take depends on where you’re starting from, so we’ll take a look at the common situations.
Case 1
Case 1) Adding wireless to an existing Ethernet network – Internet sharing via Hardware Router.
If you already have your network set up, a lot of the hard work is behind you, so congratulations! If you have installed a hardware router to handle your Internet sharing chores, you’ll just need to add an Access Point (AP) to your network to support your wireless clients.
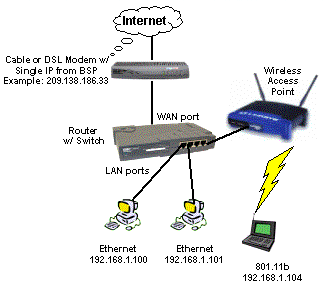
Figure 1 – Network with Router and Access Point
Figure 1 shows how you’d set up a network if you’re doing your Internet sharing with a hardware router. All you need to do is connect the Access Point of your choice to one of your router’s LAN ports, configure the Access Point, and you should be in business.
Tip: Depending on how your Access Point’s Ethernet port is configured, you may need to use a Crossover cable to connect the AP, or use a normal UTP cable and the router’s Uplink port. Just let the lights on the router port and AP be your guide. When you’ve got things connected correctly, both lights should be lit.
Case 2
Case 2) Adding wireless to an existing Ethernet network – Internet sharing via NAT software.
You can also use a software method, such as the Internet Connection Sharing (ICS) feature in Windows 98SE, Me, XP, or 2000 to share your Internet connection. In fact, this will be the only method you can use to share your Internet connection if your BSP supplies you with a cable or DSL modem that connects either via USB or plugs into a PCI slot inside your CPU’s cabinet. See Figure 2 for the connection details.
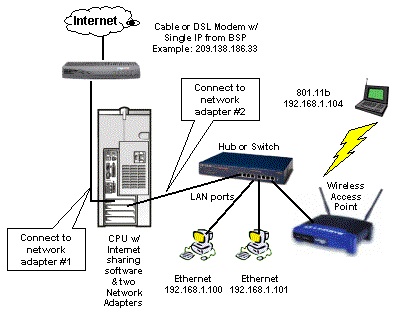
Figure 2 – Network with Internet sharing CPU and Access Point
Ositis’ WinProxy is an alternative to using ICS, and it provides a number of features that ICS either doesn’t have or are hard to use. Ositis has a little tutorial that you can check out for more info.
Case 3
Case 3) Starting from scratch
If you don’t have an existing network, and wireless clients are a part of your plan, then build your network around a wireless router. Wireless routers will share your Internet connection, provide basic firewall protection, and allow you to build your network with both Ethernet (wired) and wireless clients. Figure 3 shows you how to get hooked up using this method.
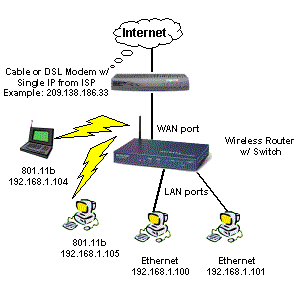
Figure 3 – Network using a Wireless Router
Tip: If you’re using a software Internet sharing method, you might consider trading up to using a wireless router. You won’t have the hassle of having to have another computer up and running in order to access the Internet, and you may find that your shared connection is zippier with a router.
Case 4
Case 4) Living dangerously
If your BSP provides you with multiple IP addresses and you don’t mind not having a firewall between your computers and the Internet, then you can use an Access Point instead of a router as the heart of your network. But since the Access Point will need an IP address of its own, be sure you get enough IP addresses to cover the number of clients that you’ll have in your WLAN, plus one IP address for the Access Point.
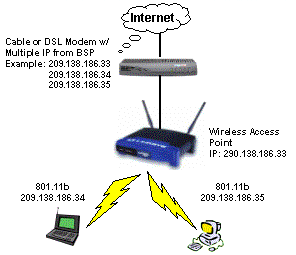
Figure 4 – All wireless network using multiple IPs and Access Point
The main advantage of this method is not cost savings, but the ability for each of your network clients to have full access to all Internet ports and services. If you want multiple LAN users to have simultaneous access to on-line games, or video or audio conferencing applications (Netmeeting, etc.), you may want to consider this method.
Warning! Warning! Warning! Warning! Warning! Warning!
Although we include this option for the sake of completeness, we really don’t recommend using it unless you are aware of the dangers of having your computers directly connected to a full-time broadband Internet connection and know how to protect yourself!
Case 5
Case 5) Bridging the Gap
A true Access Point won’t communicate with another Access Point. So if you want to use wireless technology to connect two parts of your network together, say the LAN in your garage or basement office with the bedrooms on the second floor, you’ll need to use a pair of Wireless Bridges, or Access Points with bridging features added.
As Figure 5 shows, the setup is conceptually simple. Just buy a couple of wireless bridges, plug ’em in and turn ’em on, right?
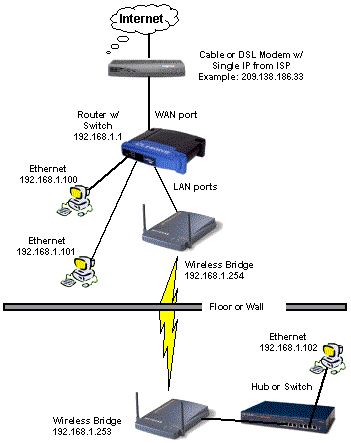
Figure 5 – Two Ethernet LANs with Wireless bridge
Well it can be that simple, but there are plenty of potential “gotchas”. So let’s take a closer look at what’s going on:
-
First, note that there are no wireless clients in this setup. That’s because pure Wireless Bridges only talk to other bridges.
-
There’s a separate router for handling Internet sharing. Wireless Bridges don’t do anything for sharing your connection.
-
Each bridge uses an IP address. That’s so that you can set them up from any LAN client.
-
Everything is in the same subnet (i.e. 192.168.1.X). This means that File and Printer sharing will work just fine for all clients, no matter which side of the wireless bridge they’re on.
- Although any 802.11b bridge should be able to communicate with any other 802.11b bridge, for the best chance of success, use the same make and model bridge for both units
But with all that wireless capability sitting there, can’t you get a wireless client to work somehow? Sure! Just go on to the next page…
Case 6
Case 6) Wireless Repeater
If you want to connect two wired LANs via a wireless link and support wireless clients on both ends, things can get complicated. But first we’ll show you how to extend the range of your wireless LAN through wireless repeating.
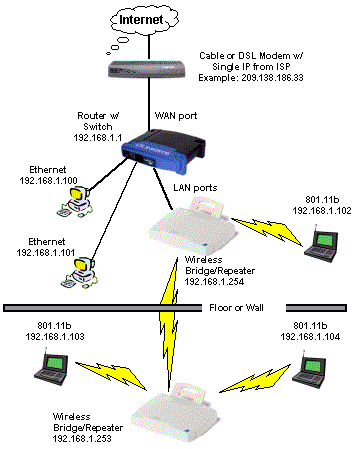
Figure 6 – WLAN extension via wireless repeating
Using Access Points that include wireless repeating capability (such as the Intel PRO/Wireless 2011) is the simplest way to extend a WLAN without having to connect the remote APs via Ethernet. The main problem is that products that include wireless repeating capability are too expensive ($500 and up) for most consumers, especially when you have to buy two! Note that this setup doesn’t also provide bridging capability to a wired LAN. For that, you need to get a little more creative. Fortunately, you can take advantage of the bridging features in consumer priced ($120-$130) Access Points to get what you need. Case 7 has the details.
Updated July 2003
Note: Some of the newer 802.11g access points and wireless routers support Wireless Distribution System (WDS) bridging at prices that are much more consumer-friendly. Examples include BuffaloTechnology’s WBRG54 router and Belkin’s F5D7130 Access Point.
Case 7
Case 7) Wireless Bridge with Clients – Harder, but less expensive
I admit that this setup looks complicated, and will take more work than using repeaters. But given that you can buy four Access Points with bridging features for the price of one repeater, it’s probably worth the effort! Figure 7 tells the tale…
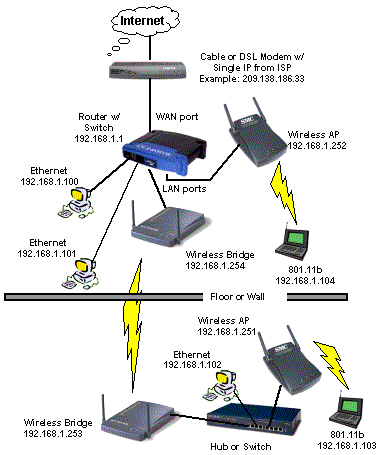
Figure 7 – Two Ethernet LANs with Wireless bridge and clients – the hard way!
This setup requires some care, so keep the following in mind if you choose this path
-
Set both bridges to the same channel, choosing channel 1, 6, or 11, and same ESSID.
-
Set both APs to the same channel, choosing channel 1, 6, or 11, but make sure the channel is not the same as the channel being used by the bridges. Set the APs and all wireless clients to use the same ESSID, but make it different than the ESSID used by the bridges.
-
Set all the APs and bridges to use a static IP addresses instead of being DHCP clients. This will make it easier to troubleshoot the network when you’re having connection problems.
-
You can use different products for the APs and AP/bridges, but use the same product for the bridges, since the AP/bridge modes may differ from product to product.
-
If you don’t have any wired clients on the “far” end of the bridge, you can connect the AP an AP/bridge together via a crossover cable. But be sure you first set both units to use static IP addresses while they are connected via Ethernet to the machine that you’re running the setup application on.
-
Updated July 2003 You can also substitute a wireless router for the wired router and Access Point at the top of Figure 7. You’ll still need the wireless bridge, however, unless your wireless router also simultaneously supports bridging. There are no consumer 802.11b routers that do this, but as mentioned above in Case 6, some 802.11g products do support simultaneous bridging and client connection.
That’s it. Enjoy your wire-free network!
