Introduction
In this earlier How To, I showed you how to convert a wireless router into an access point (AP). This how to will show you how to properly configure the second AP so that it works in harmony with your main wireless router.
1) Set the AP’s Static IP Address
This was covered in the previous How To, but bears repeating. In this example, the existing wireless router has an IP address of 10.168.3.254 and a DHCP server range of 10.168.3.100 to 10.168.3.249.
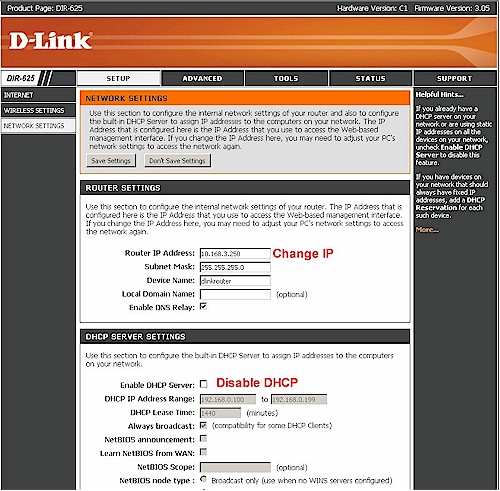
So you can set the AP to any IP from 10.168.3.1 to 10.168.3.99 or 10.168.3.250 to 10.168.3.254, which are all outside the existing wireless router’s DHCP server range. Figure 1 shows how to perform the change for a D-Link DIR-625 (or just about any D-Link router).

Figure 1: Setting the AP IP address and disabling DHCP
2) Connect the AP
This can be easy if you have Ethernet cabling at the location where you want to place the AP. But if you don’t have CAT5 run to where you want to place the AP, consider connecting it via powerline networking.
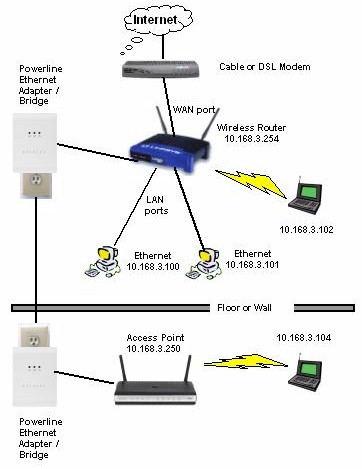
Powerline networking uses your home’s electrical wiring as the network cabling. So it provides the maximum flexibility for locating the AP. Figure 2 shows how to do it, using the IP addresses we’re using in this example.

Figure 2: Connecting the AP via powerline networking
Powerline can be a good alternative to Ethernet, but not all powerline products are the same. The powerline networking industry seems like it has gone out of its way to prevent consumers from having a smooth powerline networking experience. There are two competing technologies that don’t interoperate (HomePlug and UPA) and even versions of the same technology that don’t interoperate (HomePlug AV and earlier versions).
The solution to this is buy two of the same make and model of powerline adapters. This will guarantee that they’ll play together. And if you have problems, you won’t get the run-around from the manufacturer’s tech support. I recommend you go with either HomePlug AV or UPA 200 Mbps products. These have the best chance of not being a speed bottleneck.
When you install the adapters, they should be connected directly to wall outlets. Powerstrips with short cords and no line filtering are usually ok, but direct connection is best. Light dimmers and some fluorescent lights can generate noise that can lower powerline networking throughput. So don’t plug either of them into the same outlet or even another outlet in the same room.
Note in Figure 2 that I haven’t put IP addresses on the powerline adapters. This is because you usually don’t have to worry about configuring them. They usually plug in and just work.
If you don’t go with powerline networking, you just need to connect one of the AP’s LAN ports to one of the primary router’s LAN ports using a regular Ethernet patch cable.
Once you’re connected, fire up your favorite web browser, enter the IP address of the AP (10.168.3.250 in our example) and you should get the login prompt for the AP.
3) Set the AP SSID
After you’re logged into the AP, surf to the Basic Wireless Settings page and find the Wireless Network Name or SSID box.
If you don’t want to control the AP that your client connects to, i.e. either your main wireless router or the new AP, set all your APs to the same SSID. This is how multiple access points are set in large "enterprise" or campus installations.
But most wireless clients are very "sticky" and tend to stay associated to the first AP they encounter, even when APs with stronger signals are available. So I recommend setting a different SSID for the AP, so that you can manually control connection.
The other advantage of setting a different SSID for the AP is that you’ll be able to see both the AP and your main wireless router if you’re using the Wireless Zero Configuration utility that is built into Windows. Even in Vista, Microsoft has stubbornly chosen to not show multiple wireless networks that use the same Network Name / SSID.
4) Set the AP channel
One large network practice that you do want to follow is to set the AP to a different channel than the main wireless router. In the U.S. you should use only the non-overlapping channels 1, 6 and 11. So if your main wireless router is set to channel 6, set the AP to either 1 or 11.
You should probably do a quick site-survey first (see this HowTo), to make sure that you aren’t setting the AP channel to one used by a neighbor’s network. If you can’t find a completely clear channel, choose the weakest neighboring network and set the AP to its channel.
5) Set the AP Encryption
Although you want the option of telling your wireless client to connect to either your wireless router or new AP, you don’t want the hassle of having to set up another WEP key or WPA password. So be sure that the wireless security on the AP is set up the same as that on your main wireless router. Of course, this should be at least WPA / TKIP, but preferably WPA2.
6) Test
Now that everything is set up, fire up your wireless notebook or other client and make sure that you can see and connect to both the main wireless router and your new AP. If you’re having trouble getting your notebook to stay connected where you want it to, see these tips. You might also need to move the positions of the wireless router and AP in your client utility’s Preferred Networks list.
Now, sit back and enjoy your improved wireless network!
