Introduction
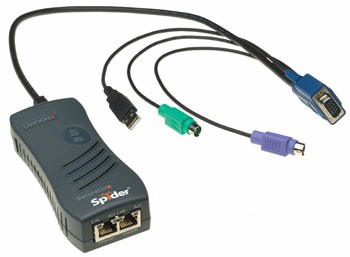
| At a Glance | |
|---|---|
| Product | Lantronix SecureLinx Spider (SLS200PS20-01) |
| Summary | IP-based KVM device enabling out-of-band remote access to all server functionality, including BIOS. |
| Pros | • Full IP access to BIOS • Server powered • Web-based client software • Small, handheld |
| Cons | • Cascade port is power dependent • Console IO lag |
We’re reviewing the recently released SecureLinx Spider from Lantronix, an innovative IP-based Keyboard, Video, Mouse (KVM) device. Let’s cover some basics first.
KVM devices are useful solutions frequently installed to consolidate Input/Output (IO) components in a server room. To conserve space and power, it is common to use a KVM switch enabling multiple servers to share the same keyboard, mouse and monitor.
Traditional KVMs can consolidate IO components for 2–16 servers. With either a soft menu or physical switch, the operator can toggle between machines using a single keyboard, mouse and monitor. For reference, Figure 1 is a picture of a basic two-port D-Link KVM switch on the left and the Spider on the right.
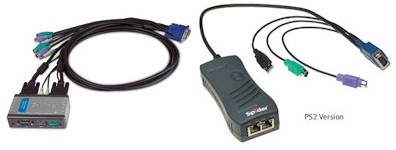
Figure 1: A KVM switch from D-Link (left) and the Spider (right)
However, with most servers accessible via IP and the concept of a headless (no keyboard, video or mouse) server common, why is a KVM even necessary? One reason is that system management may require accessing a machine’s BIOS, and to access the BIOS, the administrator usually needs to be at the machine’s keyboard and monitor.
But to access a machine via its IP address, the machine typically needs to be booted to its OS, which means you probably can’t access the BIOS. This is where the Spider comes into play. It provides IP access to the Out-of-Band (OOB) services on the machine, such as the BIOS, which typically requires at least a keyboard and monitor to access and manage.
The Spider, aptly named for its spider-like cable with multiple connections, is a small and deceivingly simple looking device. But there is quite a bit of functionality under the hood. I managed to get it working without looking at the manual, which is a good indicator to me of a device’s ease of use. Before long, however, I was reading the manual on CD, impressed by the abundance of configurable options.
Description
We received our Spider straight from the manufacturer. The packaging is very secure, with thick foam encasing the device, and the box containing everything you need to get going—including the Spider, a serial cable, a quick start guide, and a disk with the manual and other information.
It’s a handheld size, about 5″ long, 2″ wide and 1″ high. The Spider has one cable with multiple connectors, as well as three RJ45 Ethernet jacks on the device body, labeled as Ethernet and Cascade. There is also an RJ45 Serial port on the cable end of the Spider that we’ll explore shortly. (Lantronix includes a null modem DB9F to RJ45 serial cable.)
The Spider is powered via a USB connection from its host server, and no power supply is included, although one is available as an option. This is a nice space saver, but a possible limitation, which we’ll discuss.
The Spider software interfaces are completely web-based, so there is no need to install an application on your machine, which is efficient. The device doesn’t include an Ethernet cable, but considering the target customer is a small-to-medium business, this shouldn’t be an issue.
Setup
Lantronix makes two versions of the device: one version with two USB connectors and a VGA connector; the other version with one USB connector, two PS/2 connectors, and a VGA connector (Figure 2). We tested the PS/2 version in this review.
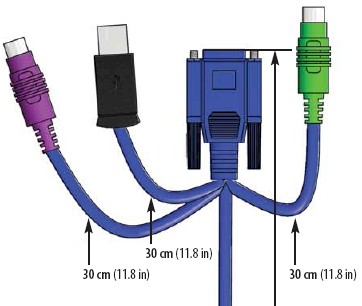
Figure 2: The connectors on the PS/2 version of the Spider
For most of my testing, I used a Windows XP Pro machine as the host, which functions as an FTP server on my LAN. I’ve configured this machine with Windows Remote Desktop Connection (RDC), and set it up to run with only an Ethernet connection, similar to how a Windows-based server may be configured.
The Ethernet port is where you connect the Spider to your LAN. The Cascade port is where you connect another device, either to daisy chain Spiders or connect another LAN device. It is good that they are clearly labeled (Figure 3). I tried connecting the Ethernet cables backwards, but the device wouldn’t pull an IP address or allow access via IP, rendering it useless. No harm done, and straightening out the connections brought it back online.

Figure 3: The Ethernet and Cascade ports
The Cascade port was useful, as for my testing I only had one LAN drop per server. The Cascade port allowed me to connect the Spider to my LAN and the target server to the Cascade port. This allowed me to access my target server both via the Spider and RDC.
The manufacturer says that up to 16 Spiders can be daisy chained via the Cascade port, but latency will increase with the number of connections. The Lantronix press release states “the Spider compresses video, keyboard and mouse signals, sending them over the network or Internet to a remote PC or handheld device running industry standard Web browsers.” I mention this because when you use the Spider’s web interface to access the desktop of the host machine, there is some slight lag to input from the mouse and keyboard. The mouse pointer lags to user input visibly. The lag is small, but noticeable.
Using the Serial Port
The device comes configured to automatically pull an IP address from a DHCP server. You can assign a static IP address to the device either via the serial connection or via its web-based menu once it is up and running. If you want to assign a static IP address via the serial connection, you will have to supply power, which requires it being connected to a target PC, since power comes through the USB port. Interestingly, it doesn’t power up unless at least the USB port and a PS/2 connector are connected. Simply connecting the USB port alone won’t trigger the device to boot.
Once connected sufficiently to power, it boots up. There is no on/off switch, or even a reset button. There are several status lights on the top of the device for power and status, see below. The device took between 60–80 seconds in my tests to completely boot up, as indicated by the status light (Figure 4) going from a blinking to solid state.
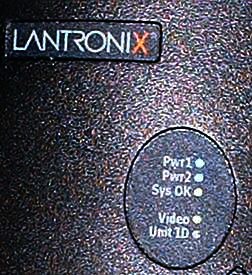
Figure 4: The Spider’s status lights
Connecting to the Spider via the serial connection requires a PC with a working COM (RS232) port, or a USB to COM port adaptor. The only time you’ll need to use the serial connection and menu is if you need to assign a static IP. IP settings are also the only configurable options via the serial connection. All other adjustments need to be made via the web interface.
The COM port connection is pretty straightforward and I was able to easily connect using a HyperTerminal session set at 115200-8-N-1-No. Assigning an IP address is pretty intuitive, as you can see from Figure 5.
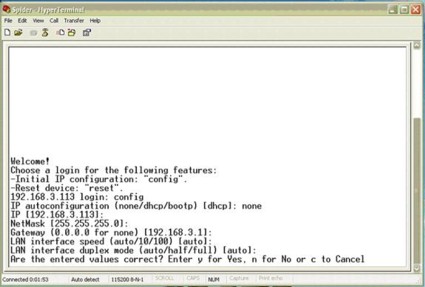
Figure 5: Setting a static IP through the serial connection
I tested the Spider by letting it pull an IP address from my LAN DHCP server, which in this case is a Linksys RV042 router, then logging into the Linksys to see what IP address was assigned to the Spider. Just to double-check, I ran a quick ping to the Spider to verify connectivity, and got immediate responses.
In Use
Once you know the device’s IP address, it is easy to access. Both IE and Mozilla worked fine: simply go to the device’s IP address using either a secure (https://) or insecure (http://) connection. If you choose to use the secure https option, you may have to tweak the security options in your browser, as neither Microsoft nor Mozilla recognized the security certificate used by Lantronix (SLS). Figure 6 is the message presented by Mozilla. IE presents similar warnings.
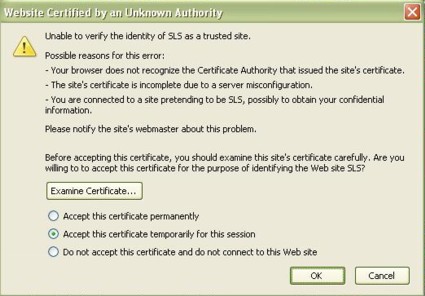
Figure 6: The security warning about an invalid certificate
Clicking OK for the numerous security warnings allows you to access the device, and these warnings can be eliminated by properly configuring your browser as directed. You can also avoid all these security warning by accessing the device using the less secure http connection. Upon access, the device immediately prompts you to change the default password—a good security option.
The menu itself is pretty clean and straightforward (Figure 7), but don’t let that fool you. The configurable options are considerable; there are 23 different submenus for adjusting parameters and viewing logs and statistics.
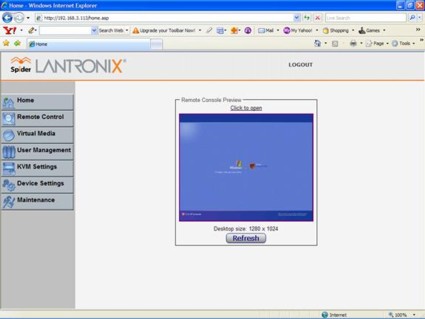
Figure 7: The main screen of the Spider
With the host server powered on, the Spider should be accessible via a browser. Simply log in, and you’re presented with the above GUI. You’ll see a picture of the host desktop, and can now interact with that machine. From the main window, selecting Click to open (or choosing Remote Control, KVM Console) will launch the desktop of your host server. Lantronix uses a Java applet for displaying the remote desktop; you may receive a security warning such as Figure 8 as your workstation loads the applet.
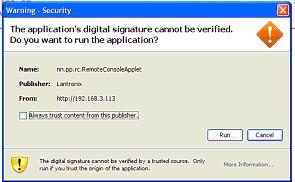
Figure 8: A warning about the Java Applet’s certificate
Clicking Run brings up the SLS Remote Console, which essentially places you at the desktop of the target server, equivalent to being at a keyboard, mouse, and monitor physically connected. You may need to adjust the resolution on the host desktop to match the machine you’re using, to optimize the display.
For example, my server desktop is set at 1280×1024, but my laptop runs at 1024×768. Via the SLS Remote Console, you can easily change the resolution on the server to whatever setting you prefer. I find having to use the side and bottom scroll boxes to scroll up/down and left/right tedious, so it was handy to be able to adjust the server’s resolution.
In Use – more
We’ve connected and powered up the Spider, and it works as advertised. Let’s try out BIOS access. BIOS access for most motherboards is a matter of hitting a key (on my host, it is the Delete key) during the power-up/boot sequence. To do so remotely, we need to tell the host to power cycle, be able to see the screen changes on the host, and then hit the Delete key at the appropriate time. The SLS Remote Console makes this easy, exactly as if you were in front of the host machine.
Choosing Windows’ Start, Turn Off Computer, Restart triggered a normal reboot. From the SLS Remote Console, you can watch Windows on the host machine shut down, and then start the boot process. From there, you can go into the BIOS, exactly as if you were there. Figure 9 is a screen shot of my host server during boot up, taken from a remote PC. Notice that the BIOS screen is within a browser window, showing that I had access to the target machine’s BIOS from my laptop.
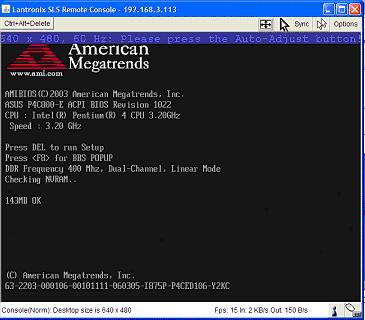
Figure 9: The remote machine booting up, as seen through the Spider
Everything is as if you’re at the keyboard of the machine you’re working on. Hitting the Delete key put me in the BIOS (Figure 10), and I had full normal access to make any changes I wanted, just as if I was on the local keyboard.
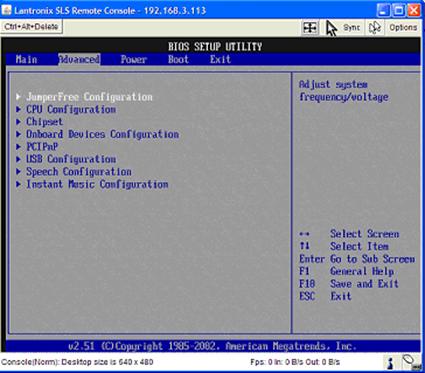
Figure 10: Accessing the remote machine’s BIOS through the Spider
Since the Spider is powered by its host, I was curious how the device functioned during reboot of its target host, so I ran a little test. I initiated a reboot of the server while running a continuous ping (ping <ip> -t) to the Spider’s IP address to test whether the Spider lost connectivity when the server rebooted. The Spider stayed online through the whole reboot with only one or two dropped pings through the reboot cycle. Its indicator lights remained lit, as well. It appears the device can sustain momentary power interruptions without losing its memory or connection.
Doing a shutdown of the server is a different story. Turning off the server results in the Spider going down, including its Ethernet ports. Without power from its host USB connection, the Spider is down, and so is its Ethernet switch. Thus, downstream devices connected via the Cascade port are inaccessible. I verified this by plugging in a live Ethernet device into the Spider’s Cascade port while the target server was down, and could get no link lights or connection. As soon as the target server is powered up, the Cascade port comes alive again.
Menu and Configuration Options
We’ve covered the essential elements of the Spider. Its main purpose is to provide OOB access over an IP connection, and this it does quite well. As mentioned, the Spider has an extensive menu of configuration options; here are some of the highlights.
From the SLS Remote Console, there is a button on the top left (Figure 11) that allows you to send a CTRL+ALT+DEL to the host—access that isn’t directly available via an RDC. There is a double-check in this feature: it prompts “Do you really want to send Ctrl+Alt+Delete?” This provides another means for application and server control.
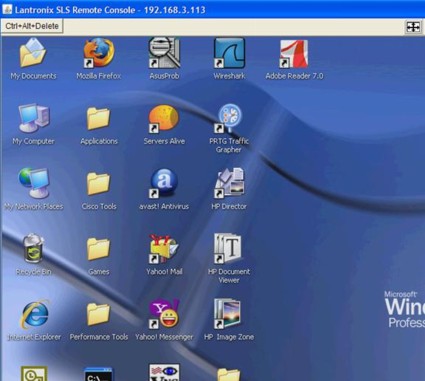
Figure 11: The Ctrl+Alt+Delete button on the SLS Remote Console
From the left side of the Lantronix menu, there are seven choices, starting with the Home Menu. Lantronix provides options for Remote Control, Virtual Media, User Management, KVM Settings, Device Settings, and Maintenance.
The Remote Control menu (Figure 12) provides options for accessing the Host desktop, the same as you would by clicking Click to open from the main screen. There is also an option for Telnet access to the host, if available and configured.

Figure 12: Spider menu
The Virtual Media functionality demonstrates that the Spider is far more than a simple KVM device. For many motherboards, updating the BIOS may require a floppy disk, a CD-ROM or a USB drive at the host machine; Lantronix provides that option remotely. The floppy drive or CD-ROM drive of the remote machine can be used to upload an image over the IP connection to the host machine.
User Management functionality is what you’d expect. Administrators can control all access levels to key machines via the Spider, through the settings selected here.
The KVM Settings Menu provides options for adjusting the User Console, Keyboard and Mouse settings, and Video settings. The Keyboard, Mouse and Video settings enable specifying the connection types (USB, PS/2) if the default auto option doesn’t correctly detect your components. I used this menu for my Linux server, as I’ll describe shortly.
The User Console menu option has a lot of choices, allowing administrators to configure the appropriate compression levels based on access to the device. The default settings assume LAN bandwidth levels, so compression is minimized to provide the best resolution and display. We’ll discuss this further in the next section.
The Device Settings Menu is another example of the vast array of configurable options delivered by Lantronix for the SecureLinx Spider. There are eight submenus here, enabling network configurations, security and certificate configurations, serial port parameters, as well as options for Network Time Protocol (NTP), LDAP or RADIUS authentication, logging, and SNMP functionality.
Finally, there is the Maintenance submenu, which enables viewing information about the Spider, viewing the Event Log, updating firmware, and triggering a reset of the USB and video ports, or the entire device.
Other OSes
The Target Server Requirements state that the Spider supports multiple operating systems, including Windows, UNIX, Linux and Mac OS X. I run a separate Linux machine as an Asterisk PBX, which served as a perfect candidate to test another OS. My Linux machine (Figure 13), running the Ubuntu distro, is also running headless, and enabled for Virtual Network Computing (VNC) remote control. Connecting the Spider was simply a matter of powering down the server, connecting the PS/2 cables, the USB cable, and connecting a LAN drop to the Ethernet port.
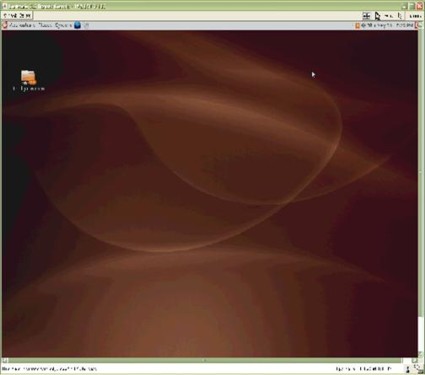
Figure 13: Linux on a remote machine via the Spider
Upon initial boot-up, it seemed everything was working; the Linux server completed its boot cycle and was fully accessible via a VNC connection. However, I couldn’t use the mouse and keyboard via the Spider Console interface as I could with the Windows machine. The fix was easy, though. Under the Spider’s KVM Settings Menu, the default for Keyboard/Mouse settings is Auto, with choices for USB and PS/2. Selecting PS/2 and clicking Apply (Figure 14) fixed the problem without rebooting either the Spider or the server.
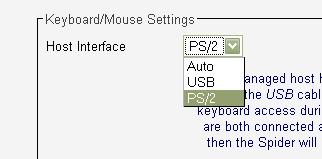
Figure 14: The fix to use a PS/2 mouse and keyboard with the Spider on Linux
The mouse lag was greater on the Linux server in Console mode than on the Windows server. There was also greater perceptible delay with the keyboard between pressing the key and seeing it displayed. You could still do what you wanted, such as select menus and click on various options on the server, but patience was required.
I found myself moving the mouse slowly and deliberately to ensure accuracy. I did all of my testing over a lightly loaded 100 Mbps LAN, so bandwidth wasn’t an issue. I tried various different compression settings (Figure 15), but I didn’t find any to significantly improve the lag condition.
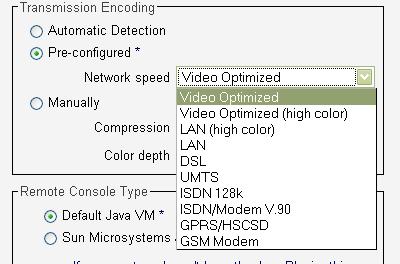
Figure 15: Compression settings for various link speeds
I didn’t consider lag an issue, however, as the Spider isn’t intended solely as a direct server access tool. RDC for the Windows server and VNC for the Linux server function without lag, even with the Spider connected, so I could easily interact with my servers. The Spider’s primary goal is to provide OOB/BIOS access over IP, something you can’t do with RDC and VNC.
Conclusion
The Spider isn’t the first single-port IP KVM, but it is the first with a compact form-factor and “distributed KVM” approach. Other single server IP based KVMs, such as DLink’s KVM-410 (priced at $621.28–758.99 online) require a management application loaded on the PC for interaction with the KVM. Kudos to Lantronix for making their product software completely web-based. It is certainly a plus for administrators to not have to load and master another application.
To get IP connectivity to a small Belkin KVM requires an add-on module (Omniview, $749.99), taking up more space and adding another element to the server room. The Lantronix Spider is a small, handheld-size device with a minimal footprint.
Power is both a pro and con for the Spider. The fact that it is powered by the target server is great for cable and AC power management, but could be an issue when deploying multiple daisy-chained Spiders. If a server up the chain dies, all LAN connectivity downstream from the Spider’s Cascade port is down. However, Lantronix sells a separate power supply, which would be a smart purchase for cascaded Spiders. You also can skip the Cascade port and connect each Spider to its own switch port.
The main functional negative for the Spider is its lag, which will be an issue if you plan on using the Spider as your sole source of direct server access. You’re better off having a direct software-based (Remote Desktop, VNC, etc.) connection to your server in addition to the Spider access.
The other potential negative is its price. While $495 is very competitive for a single IP KVM port, if you need a lot of ports, the cost can quickly outpace multi-port alternatives. But that’s where Lantronix is counting on the Spider’s other advantages—no single point of failure, cabling flexibility and non-blocking user access—to win the day.
If you’ve been thinking of experimenting with KVM over IP as a remote management tool, the Lantronix Spider provides an easy and inexpensive way to dip your toe into that water. And if you’re unhappy with your current IP KVM solutions, you really should give the Spider a look.
