Introduction
| Linksys BEFVP41 EtherFast Cable/DSL VPN Router | |
|---|---|
| Summary | VPN version of the popular Linksys 4 port router. Includes built-in IPsec endpoint with hardware co-processor at a very aggressive price! |
| Update | 4/30/02 Corrected error regarding IPsec pass-thru capability. Router can support a small number of IPsec pass-thru sessions. |
| Pros | • Hardware IPsec co-processor at an amazing price! • Fast routing speed |
| Cons | • No PPTP or L2TP endpoint support • Limited VPN pass-through capability |
The world is looking for more security and corporations are moving all external access to VPN-based networks. Although routers with VPN capabilities have been around for awhile, you faced a choice of either expensive (>$500) solutions with per-user licensing, or less-expensive products that only handled pass-through based VPN.
Linksys changed the economics of Internet sharing a few years ago with the lauch of their “BEF” series of Cable/DSL routers and it looks like they’re out to this time shake up the VPN router market with their BEFVP41. Let’s see why
The Basics
The VP41 comes in the signature purple and gray stackable Linksys cabinet, with all connectors on the rear. All indicators (Link/Activity, Full Duplex/Collision, and 100Mbps for each of the four LAN ports, Link, Activity, and Diag for the WAN, and Power) are on the front. You don’t get any cables, but you do get a printed User Guide, and “Creating a Tunnel”, and “Quick Installation” sheets. A copy of the standard Tech Helper CD is included too.
The VP41 doesn’t support UPnP, or the optional PC-cillin / ZoneAlarm bundle that you can get with their older four and one port routers, but comes with all their other goodies.
Setting Up
The Linksys admin interface has evolved somewhat over the years, and the present version has some nice improvements from the last time I looked. I found navigating among the screens to be pretty quick, and I especially liked not having to wait for the router to reboot after each configuration change.
Opening the router’s default address of 192.168.1.1 brings you to the main screen shown below.
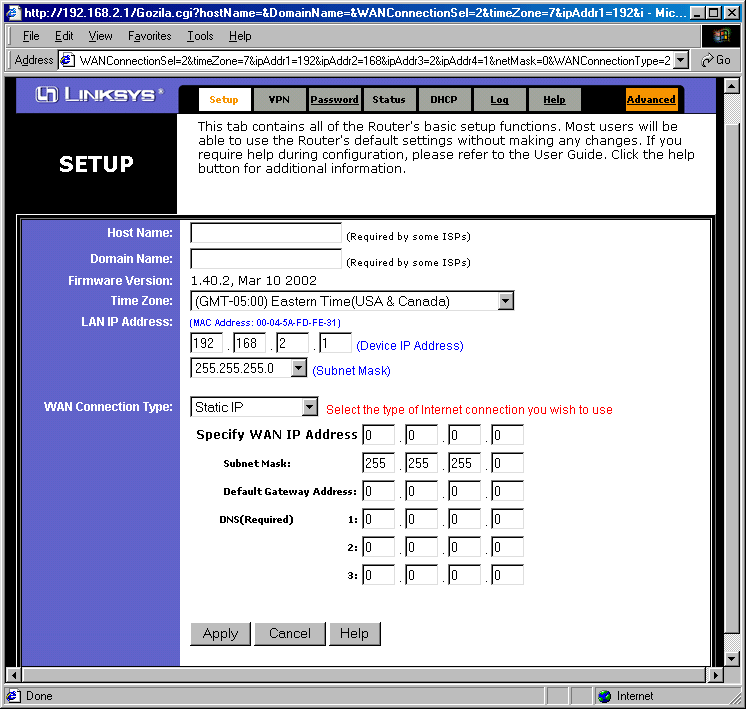
A key improvement is the organization of the WAN Connection Type into separate screens for DHCP, Static IP, PPPoE, SingTel RAS (special for SingTel), and PPTP (for some European BSPs). When you select the WAN Connection Type via a drop-down selector, the Setup screen changes, presenting only the options you need for that particular type of connection. The full range of popular authentication methods is supported, including Host and Domain Name and ability to set the WAN MAC address.
Tip: The VP41 comes with its LAN DHCP server enabled and its WAN side set to be a DHCP client.
Like other current generation routers, the VP41 automatically checks a NNTP server (you can’t select which one, however) for the correct time once it gets connected to the Internet. So all you have to do is select your Time Zone on the Setup screen and all your log entries will be properly date/time stamped.
That’s about it for the basics. Let’s go check out the firewall’s features…
Firewall, Port Mapping, & Filters
The VP41’s firewalling comes from its NAT router, but you can enable an optional SPI (Stateful Packet Inspection) mode. The User Manual’s explanation of this feature is pretty terse and I found quite a bit of confusion about what it does in my quick scan of the newsgroups.
The port forwarding features include both static port ranges (with protocol selection), dynamic (triggered) ports, and a DMZ feature that allows you to virtually place one computer on the WAN side of the firewall.
I usually like to check to see if the port filtering feature (sometimes called Access Control) of a router gives some indication to the user who is being blocked. While checking for this, I discovered that the Linksys’ Filter features didn’t work as I’d assumed they did. First, a user who is being blocked doesn’t get any indication that they’re being blocked, other than the fact that their application just hangs or doesn’t work. Then I discovered that the outbound Log doesn’t log anything for a blocked IP address or Port range. Third, there’s no interaction between the Filtered Private IP Range and Filtered Private Port Range settings. This means you can filter Internet access to specific services and applications for all LAN users by ports, or you can filter access to all Internet services for specific users by IP address, but you can’t filter specific services for different groups of users. You can, though, block access to all services for up to fifty MAC addresses. Finally, the filters can’t be left defined and enabled and disabled. To disable a filter, you have to clear its settings.
There are a few other settings on the Filters page worth noting. You can set the router to not respond to ping requests (Block WAN Request), enable Multicast Pass Through and set the MTU (Maximum Transmission Unit) size (helpful for getting some DSL/PPPoE connections to work).
Like its siblings, the VP41 has a mixed bag of remote administration, i.e. from the WAN, features. You can enable access to the router’s admin interface (Remote Management) and separately allow upgrading (Remote Upgrade) from the WAN side.
On the minus side, you can’t limit Remote access to specific IP addresses or ranges and surprisingly, you can’t access the admin interface of the router at the other end of an IPsec tunnel (or at least if you can, I couldn’t figure out how!). You also can’t soft reboot the router remotely (although you can force a reset to factory defaults). You can also have multiple users logged into the admin interface at the same time without getting a message telling you that you’re not alone. Finally, you can’t change the admin interface time-out (looks like it’s set to 5 minutes of inactivity), and you can’t log-out of the router.
Now that we’re done with the firewall, let’s go see where the action really is for this puppy… its VPN features!
VPN
So what exactly do you get in an IPsec VPN endpoint that costs under $150? Actually, it looks like you get a lot! The first screenshot below (click on it for a full-sized view) shows you the main VPN configuration page, where you configure each “tunnel” between your Local Secure Group, i.e. clients on your LAN, and Remote Secure Group, i.e. clients on another LAN that you want to securely connect to. You can define up to 70 of these “tunnels” and you can enable/disable a tunnel without having to clear its settings.
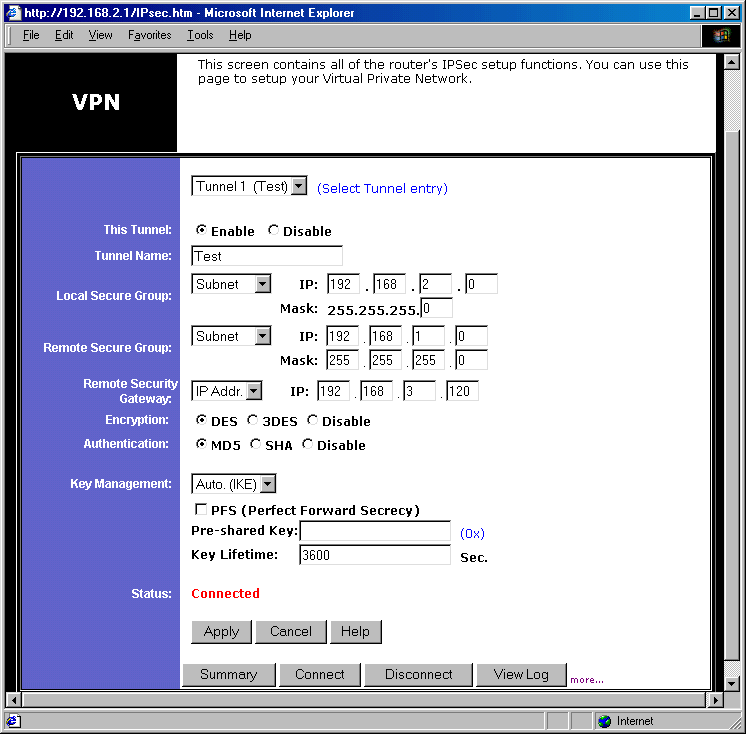
VPN Settings
Your “local” group can be a single IP address, range of IP addresses, or an entire subnet, as can your “remote group”. The “remote group can also be set to Host or Any modes. The Remote Security Gateway setting lets you enter the IP address, or Fully Qualified Domain Name (FQDN) for the remote VPN device. You can also use the “Any” setting if the remote device has a dynamic IP address. You can choose between DES (56 bit), 3DES (168 bit), or disabling Encryption, and MD5, SHA, or disabling Authentication.
Key Management settings include choice of Auto, which uses IKE, or Manual Mode. In Auto mode, you specify a Pre-shared Key (23 alphanumeric characters max) and a Key Lifetime (from 300 to 100,000,000 seconds). You can optionally enable PFS (Perfect Forward Secrecy), to further enhance security during connection negotiation. If you want to handle your keys manually, you can enter Encryption and Authentication Keys (23 alphanumeric characters max), and Inbound and Outbound SPI (Security Parameter Index) values (from 0 to 4294967295).
If you’re setting up a connection between two VP41’s, the above selections should be more than enough to get you set up. But if you’re trying to connect to a different make or model IPsec remote gateway, you might need to get into the Advanced Settings screen shown below and accessed by clicking on the little “more…” text to the right of the View Log button.
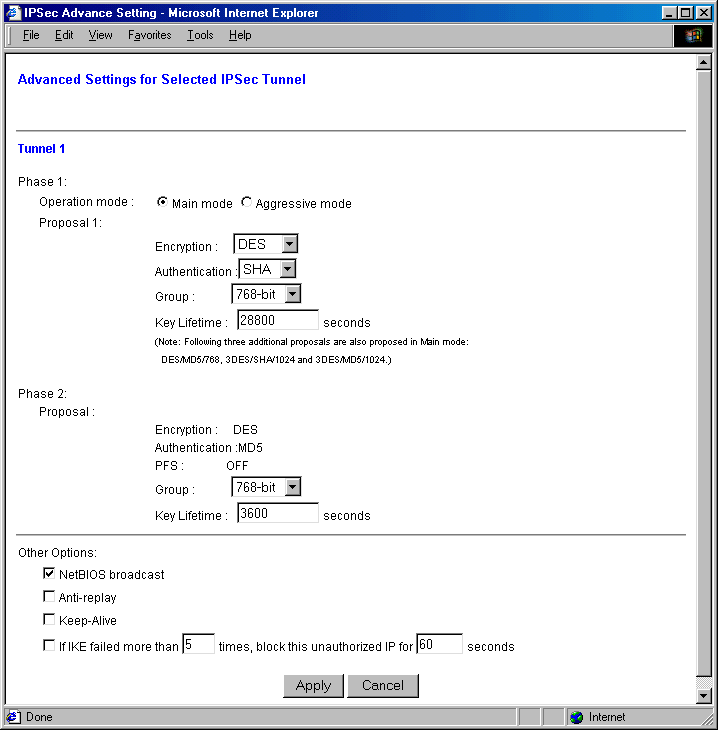
Advanced VPN settings
The settings on this page may not be self-explanatory, but at least you can see what your options are! This page essentially gives you control over what happens in Phase 1 and 2 of the IPsec tunnel setup. But at the bottom of the page are some other settings that may prove helpful, so take note!
When you finally get set up, you can click the Connect button, and if everything is ok on both ends of the tunnel, you’ll be rewarded with a “Connected” Status indication. Once the tunnel is successfully configured, the VP41 will automatically re-establish connection when traffic is detected that wants to go through the tunnel. I found that when this auto reconnect happened, the Status indication didn’t always correctly indicate the Connection status, but clicking on the Summary button would bring up the screen shown below, which faithfully indicated the correct connection status.

VPN Connection Summary Screen
If you don’t successfully connect, the View Log button will bring up a log of the IPsec connect and disconnect activities. Essential for debugging the connection problems that many folks will have when dealing with their first VPN setup!
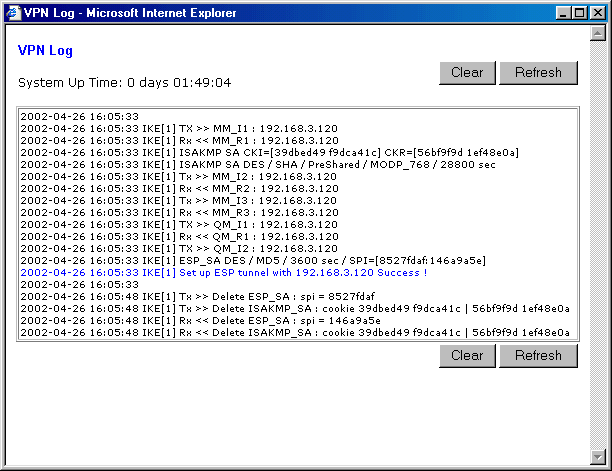
VPN Log screen
VPN Performance
Now that you’ve hung in through all the gory configuration details, I’ll tell you how well the VP41 actually works! Linksys was kind enough to send me two VP41s so that I could do some performance testing. (Click on the link under the test results table below for details of the test setup.) I didn’t really have any problems getting a tunnel successfully set up on pretty much the first try. I used the Subnet mode for both the Local and Remote group, and left one router set to its default 192.168.1.1 base address and set the other to 192.168.2.1, to put its LAN clients into a different subnet. Otherwise I accepted the Encryption, Authentication, and Key Management defaults (and didn’t even enter a Pre-shared key), hit the Connect button and I was up and running!
The results show essentially the same performance in the two directions, except for the UDP streaming test, which I thought was odd. So I repeated this test, substituting a different computer on one end of the tunnel. Using this different computer, I got different results, so my conclusion is that the variance in the UDP streaming results is computer/OS dependent and not due to the VP41.
At any rate, the performance through the IPsec tunnel is plenty fast and given the 1 to 1.5Mbps (on a good day!) speed of most broadband connections, probably won’t even be an issue for most all users.
IPsec VPN Performance Test Results
| Test Description | Transfer Rate (Mbps) [1 MByte data size] |
Response Time (msec) [10 iterations 100 Byte data size] |
UDP stream [10s @ 500kbps] |
|
|---|---|---|---|---|
| Actual throughput (kbps) | Lost data (%) | |||
| Local to Remote | 4.0 | 5 (avg) 5 (max) |
411 | 17 |
| Remote to Local | 4.0 | 5 (avg) 5 (max) |
499 | 0 |
| Firmware Version | 1.40.2 Mar 10 2002 | |||
See details of how we test.
Logging and other Features
The VP41’s logging is the same as provided in the rest of the Linksys router product line. Logging is disabled by default, but once you turn it on, it will separately log Outbound and Inbound traffic. LAN IP, Destination URL/IP, and Service/Port Number are logged for Outbound traffic, and Source IP and Destination Port Number are logged for Inbound requests.
NOTE! If you change any of the VP41’s settings, both logs will be cleared when you Apply the changes.
If you want an ongoing record of the logs, or need log analysis features, you can set an IP address that the logs will be sent to. Linksys uses SNMP TRAP messages broadcast on UDP port 162 to send the logs, and there are a number of applications available from both Linksys and third parties that will crunch the logs to your heart’s delight.
Let’s see, what else can I tell you? How about:
- you can set the router’s MTU (Maximum Transmission Unit) value (useful in getting some PPPoE-based connections to work)
- you can set static routes (useful in networks that have more than one subnet)
- dynamic routing protocols RIP1, RIP1 compatible (transmit only) and RIP 2 send and receive are supported
- you can save and load the router’s configuration
- firmware upgrades are done entirely via web browser (after you download the zipped firmware file).
Routing Performance
Speed is in line with most current generation routers and is more than adequate for virtually any broadband connection. Although the results show better performance in the LAN-WAN direction, I wouldn’t consider that to influence a purchase decision one way or another.
Routing Performance Test Results
| Test Description | Transfer Rate (Mbps) | Response Time (msec) | UDP stream | |
|---|---|---|---|---|
| Throughput (kbps) | Lost data (%) | |||
| WAN – LAN | 4.6 | 1 (avg) 2 (max) |
495 | 1 |
| LAN – WAN | 6.8 | 1 (avg) 2 (max) |
499 | 0 |
| Firmware Version | 1.40.2 Mar 10 2002 | |||
See details of how we test.
Wrapping it up…
Given Linksys’ virtual domination of the SOHO router retail channel, and the fact that they appear to have delivered what they advertise, i.e. a 4 port 10/100 switched router with built-in IPsec hardware coprocessor based endpoint and no per-user licensing for under $150, I’d say that they’re going to be doing some damage to folks like Sonicwall, Watchguard, and others who charge much more for their VPN-endpoint products and have expensive per-user licensing.
So what’s the catch? Well, if experience is any guide, and judging from the tone of newsgroup and forum messages, Linksys will have trouble handling the tsunami of support calls that a product like this requires. Setting up a Virtual Private Network between two VP41’s should be within the capability of many novice-level users if they carefully follow the information in the User Guide. But establishing a tunnel between a single computer and VP41, or VP41 and your company’s firewall, may require knowledge and troubleshooting skills that only folks who have been in the VPN business a long time possess, and Linksys is just starting up the learning curve.
But what the heck, isn’t enduring some aggravation worth saving a couple of hundred bucks?