Introduction
I originally got sucked into the wonders of RAID storage by a friend who needed a better way to store thousands of digital images accumlated through his business. I helped him out by putting together a NAS not unlike the one I described in Build a Cheap and Fast RAID 5 NAS. Since that article, I’ve fielded numerous inquiries about DIY RAID NAS building, with many of them focused on pushing the performance envelope to infinity and beyond!
But if you really want fast storage, logic would dictate that you go with direct attached storage (DAS). It’s not just the bandwidth of the buses that can make DAS leave NAS in the dust, but the fact that DAS doesn’t incur the performance hit from network filesystem protocols that burden NAS.
But what DAS giveth, it also taketh away. Because while DAS provides gobs of performance for the computer that it’s attached to, anyone else wanting access to those files will be thrown back to relatively stone age speeds when a network-shared folder is created—no matter which OS you use.
The end goal of this article is to provide a sense of the speed differences of DAS vs. NAS. The idea is that armed with this knowledge, you’ll be able to better judge the speed vs. convenience trade-off that you are considering. The DAS that will be used for comparison is Norco’s DS-500 (Figure 1). My adventures with the DS-500 were, uh, interesting, enough that you’ll also get a review of it, too.

Figure 1: Norco DS-500
Norco makes a family of storage hardware products that are mostly physically larger than the DS-500, which is a five drive desktop external SATA RAID system. The DS-500 is 6.8" x 9.5" x 11" in size and comes in a box that is 1/2 to 2/3 the size of a computer case box (Figure 2). I found the DS-500 for as low as $451 (without drives) delivered on the net.

Figure 2: DS-500 box
So the direct attached 5-drive array compares favorably in cost to many NAS RAID array products such as the Synology CS-406 that I reviewed last year (and have been thinking of buying ever since, even though it is not the fastest NAS on the block). The CS-406 without any drives is approximately $570 delivered and it holds 4 drives.
Inside the box (Figure 3) is the hard drive case, an external PCI-X SATA adapter card, an installation disk, an external SATA cable, a power cable, packet of bolts, and a Phillips screw driver to install one of the bolts in the PCI-X adapter card to hold it in. I think that Norco is also assuming that the end user will probably need bolts to install hard drives into the drive trays that go in the external drive cage. The system I was provided for testing included five 250 GB hard drives, so I did not use the extra bolts provided.
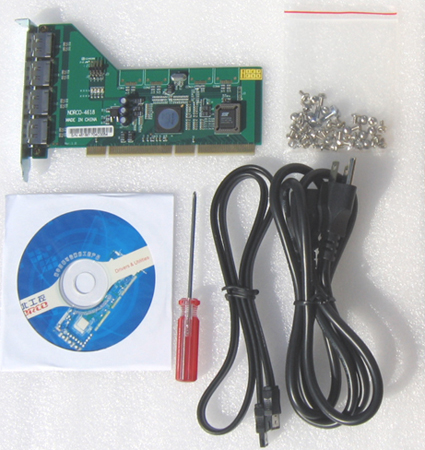
Figure 3: DS-500 STCW ("Stuff That Comes With")
Hardware Setup
The hardware setup for the DS-500 is straightforward. The PCI-X card installs in either a PCI-X or a PCI slot. The test computer I used contained only a PCI slot so all test results were generated by the controller in PCI mode. Once you install the controller card, hard drives into the trays and then trays into the external drive cage, you connect the SATA cable from any port on the controller card to the single eSATA port on the back of the DS-500 (Figure 4).

Figure 4: DS-500 Rear View
One concern I have with eSATA II is how fragile the connectors are. Figure 5 shows what the eSATA II connectors look like when new.

Figure 5: "Normal" eSATA II connector
Figure 6 shows an eSATA II connector that I used approximately 10 times. Note on Figure 6 the wear marks around the corners and contact points of the connector. Note also in Figure 6 that the outside contact plate of the connector is peeling away from the body of the connector. It is only a matter of time before this plate will bend into an L when inserted. eSATA II connectors wear out? When was the last time you wore out a firewire or USB connector?

Figure 6: Worn eSATA II connector
If you are going to use an eSATA II device to move data among computers, you will need spare cables and cable management strategy. That is, buy backup cables for each location where you will use the DS-500. And then buy one cable for each computer you use the DS-500 on. This will spread the wear of connecting eSATA cables over as many cables as is practical, to postpone the day you will plug the cable in and bend that face plate back.
The 20 inch eSATA II cable included with the DS-500 costs about $9 shipped from Cables Direct. So, for about $60 you can build up an inventory of cables to manage the wear and tear of moving data back and forth.
Software Setup
Once you’ve gone through a basic installation procedure with the components of the DS-500, you will have a computer with an external hard drive unit attached. Next, you need to install the drivers for your operating system (Windows, Mac OS X, and Linux drivers are included).
I don’t want to be too hard on Norco, but while I found the quality of the DS-500 hardware to be good (I don’t think the weakness of eSATA II connectors are Norco’s fault), the architecture and quality of the DS-500’s software is bad. Setting up the DS-500 compared to one of my home-brew RAID5 systems or the Synology CS-406 RAID5 NAS, was like playing a game of pick up sticks with a strobe light flashing. The software setup can be done, but it takes time. You have to put it down when you get frustrated, then come back later. And the way Norco architected this software is just plain irritating.
Given the terrible performance of the DS-500 when configured for RAID 5 (as I’ll show later), the way that makes the most sense to me to use the DS-500 is to stripe all the drives into RAID 0. So that’s how I’ll proceed.
The first thing you must not do is to put the installation CD into your Windows computer until after it has booted up. If you forget, and your computer boots from CDs by default, your XP box will boot up into Caldera DR-DOS 7.05 complete with OAK extensions (Figure 7)!

Figure 7: DR-DOS 7.03 Leave the CD in the CD Drive on Boot and This Happens
Yes, DR-DOS 7.03. But wait, there’s more. The reason the installation CD is bootable by a Windows machine is that the adapter card in the DS-500 must be flashed in order to switch between RAID 0 and RAID 5! The firmware flash method chosen by Norco is to have the user boot up in DR-DOS and then run the flash utility.
I believe that Mac people will be unable to switch between RAID 0 and RAID 5 because Macs can’t boot DR-DOS (my MacBook Core Duo made a valiant attempt to boot DR-DOS [Figure 8], but ultimately failed). It is possible that Intel-based Mac desktop computers may be able to boot Norco’s installation CD and flash the adapter card, but I was not able to test this as my Mac desktop is a dual G5 machine.

Figure 8: MacBook attempting to boot from Norco installation CD
So don’t pop the installation CD into your Linux or Windows machine or you will be taken off into the DR-DOS weeds.
Once you have the adapter in your computer, the eSATA II cable is connected to the external cage, power on your computer WITHOUT THE NORCO INSTALLATION CD in the computer. Note that the external drive cage always seemed to want to be powered on. I would plug in the power cable, and the drives would spin up. But once the power cable was in, the power on/off switched worked as expected. I did not have any problems if the external enclosure was on before the Windows computer, or vice versa. So I don’t think power order matters.
Once the computer boots, you will get a prompt from XP that your computer has new hardware in it. But I was not able to install the adapter card drivers by following the automatic install procedure in the Norco manual. So you’ll need to point the installer to the Norco Installation CD to /Drivers/Win2k-XP/Base/32bit and then install the driver as usual in XP.
Another installation hassle is that the adapter included in the DS-500 kit is labeled "Norco-4618". But when you point the XP driver installer to the proper file, you will see a driver for "Silicon Image Sil 3124 SATALink Controller" (see Figure 9). The 3124 is the driver to install for XP even though it does not match the 4618 labeling on the controller.
 Array")
Figure 9: Driver for XP Stripe (RAID0) Array
RAID 0 Setup
If you’ve gotten this far, when you reboot after the driver installation, you will have one of the five hard drives available. Figure 10 shows what your XP "My Computer" will look like once the adapter driver is installed. You can see the NORCO-4618 installation CD in the D: drive. Then you see "Local Disk (E:)" which is the 2nd (?) disk of the 5 in the external drive cage.

Figure 10: XP My Computer with Adapter Driver Loaded
To set up a stripe / RAID 0 set, you need to run the Windows Disk Manager (right mouse button click on My Computer, then select Manage, then select Disk Management). When you do this, Disk Manager will see new drives and immediately prompt you with the "Welcome to the Initialize and Convert Disk Wizard." Cancel the disk wizard, let Disk Manager load, and take a look at what your computer sees of the five new disks attached. Figure 11 is what my XP machine looked like.

Figure 11: Disk Manager View of the DS-500 with adapter driver installed
To build a stripe array, you convert all disks to "dynamic" (right mouse click on the left column of each disk and choose Make Dynamic) and then create a partition (right mouse click on the right column of each disk icon and choose New Partition). After all the disks are Dynamic (on the left column) and Unallocated (on the right column), you can right click on the disk icon in the left column and see the menu in Figure 12. You then choose New Volume….

Figure 12: Creating Stripe (RAID0) Volume
RAID 0 Setup – more
The New Volume Wizard will start (Figure 13). Click Next > and choose the flavor of new volume you want. *Hint* choose Striped (Figure 14).

Figure 13: New Volume Wizard

Figure 14: Volume Flavor Dialog
Once you select Striped and then Next >, you’ll see a drive picker to select which drives are gathered into the striped (RAID 0) array. I selected all five hard drives in the DS-500 for my stripe array (Figure 15). I then clicked Add > and surfed through the next two dialogs choosing the default (E:) for the array’s drive letter, and NTFS quick format.

Figure 15: Drive Picker for Stripe Array
Once you click Next > in Figure 15, Figure 16 will appear and each drive indicating "Formatting" in the right column. Once formatting is finished, you’ll see Figure 16 where each drive now appears as "Healthy".

Figure 16: Completed RAID 0 Array in XP Disk Manager
Since we just set up the array with Disk Manager in Windows XP, I think what we have at the end of this process is a software RAID 0 / striped array. So, even though you bought a DS-500 which looks like a piece of hardware, this is not a hardware RAID 0. That was a little confusing to me, but when I saw the software RAID 0 performance, I got over it.
RAID 0 Performance
Because I was curious about how fast and how repeatable the DS-500 is, I ran the iozone benchmark tests on the DS-500 stripe array 22 times. The machine that the DS-500 was attached to was a homebuilt box with Foxconn 761GXK8MB-KRS motherboard, SIS 761GX and 965 chipsets, AMD socket 939 with AMD Athlon 64 3200+ processor, 1 GB of RAM and 238 GB SATA hard drive running Win XP.
Each green line in Figures 17 and 18 represents one run of the iozone test. The black line represents the numerical average of the 22 runs.

Figure 17: DS-500 Stripe Write Speed Repeatability
Variation in write speed seemed to me to be low. There did not seem to be any systematic bias where early runs were slower than later runs.

Figure 18: DS-500 Stripe Read Speed Repeatability
The same seemed to be the case in the read speed. The three low data series in Figure 18 were runs 2, 8, and 18 of 22. If the array were formatting itself in the background (LSI Logic’s MegaRAID hardware cards for example, define the array and then format it in the background) I would expect speeds to start low and then speed up. This pattern does not seem to be the case.
Comparison Tests
Figure 19 compares the speed of the DS-500 to probably the most common fast external storage solution used today, Firewire 400. The solid black line is the average write speed of a striped DS-500 array over 22 replications. The blue line is the average speed of a Maxtor external firewire drive over 6 replications. The dingy orange line is the speed of the Ubuntu RAID 5 NAS I built in this article. The broken black line is the write speed of the DS-500 in a RAID 5 configuration.

Figure 19: DS-500 Write Comparative Speeds
Clearly, RAID 0 directly attached storage (DAS) kicks NAS, Firewire 400, and directly attached RAID 5—at least in the case of the DS-500. The difference between the solid and broken black lines in Figure 19 are the first solid data that I’ve seen on the costs of RAID 5 in software. It would be interesting to see a directly attached hardware RAID 5 implementation for comparison. The Ubuntu RAID5 NAS system I built used an LSI Logic hardware RAID card but, as a NAS, the Ubuntu system was not directly attached.
Figure 20 displays the comparative read speeds of the DS-500. Again the solid black line is the DS-500 in a striped configuration, the broken black line is the DS-500 in RAID5, the blue line is the Maxtor external firewire drive, and the dingy orange line is the Ubuntu RAID5 NAS.

Figure 20: DS-500 Read Comparative Speeds
The surprise in Figure 20 is that the Firewire 400 drive narrowly beat the directly attached stripe array. But the striped array is 1.13 TB in size while the Firewire 400 array is 279 GB. There are a lot of jobs for which you can buy an external firewire drive that is big enough and fast enough for all your needs. But there are jobs, with very large data sets, where the DS-500 would provide really big, amazingly fast storage.
Flashback: My Ph.D. was written using UPC scanner data from A.C. Nielsen and Information Resources Inc. In 1991 when I was crunching numbers, Nielsen had 1 TB of storage for all grocery stores, all UPCs, and all weeks in the USA. Because of cost and limitation of storage at that time, Nielsen used many tricks to save disk space. One trick was to track decimal points implicitly. Another was to encode dummy variables in hexadecimal. Another trick was to store only 3 years of data online. The Norco DS-500 gives home users today the ability to store and process massive quantities of data. The Nielsen data set, for example.
Conclusion
For those who need huge storage spaces to process, version control, and organize data, the striped DS-500 (once you get it running) is very compelling. Table 1 shows the relative read speeds of DAS and NAS across the six file sizes tested by iozone. Given the astronomically higher speeds of reading (DAS was from 6.6 to 145.8 times as fast as NAS in these comparisons) and substantially higher speeds in writing, directly attached storage should be able to carve out a significant niche for itself.
| File Size | DAS RAID0 / NAS RAID5 |
|---|---|
| 32768 | 24.2 |
| 65536 | 24.8 |
| 131072 | 24.5 |
| 262144 | 76.0 |
| 524288 | 145.8 |
| 1048576 | 6.6 |
Table 1: DAS RAID0 Divided by NAS RAID5
But, the Norco DS-500 itself is a buyer beware product. The software that comes with it is just plain bad. Using DR-DOS to flash firmware in an adapter when a Windows program could do easily do it is below the professional standards of Norco’s competition and the computer industry in general circa 2007. This was OK in 1994, but it is laughable to see today. And having to change firmware in the eSATA adapter in the first place, when switching from RAID0 to RAID5 is again, cumbersome, unprofessional, and uncompetitive.
I also encountered the following problems in getting the DS-500 to work:
- The Norco install disk’s directory structure when booted up under DR-DOS is not the same as than the install disk’s directory structure when viewed with Windows. Very confusing.
TIP: I haven’t used DOS since 1990, but in order to flash the DS-500’s BIOS to run RAID5, I had to learn a new DR-DOS command. When DR-DOS dumps you to the A> prompt, you need to type D:<enter> to find the partition that has the BIOS flashing tools.
While Norco does tell you to go to the /bios directory, I could not find the instructions to go to the D: drive to find this directory. This cost me a couple hours to figure out. In the process I had to shift out of "fun to install new products and play with them mode" and into "trick the system into giving up its secrets" mode. If you hate products that make you shift out of "fun to install new products and play with them mode" the DS-500 is not for you.
- The BIOS flash utility on my evaluation card did not work. Norco sent me a second card with the RAID5 BIOS pre-installed. Given the terrible performance of RAID5 on the DS-500 (see next bullet point) Norco defaulting to the RAID0 BIOS in the adapter is understandable. Having to flash your adapter to get RAID5 is probably an important cue. If you need high performing RAID5, you are going to have to work to make it happen. And I would guess that the DS-500 will never be in the same league with a RAID5 ATA or SATA controller.
- Norco’s instructions for setting up RAID arrays with the DS-500 are not good enough for newbies. The word that comes to mind for the instructions is "disjointed." That is, the DS-500 manual is long on pointers and short on the step-by-steps many home users need to make a RAID system productive. I’ve learned from the many back-channel thank-you letters from the DIY RAID5 article, that step-by-step instructions are indispensable for people seeking to set up RAID5.
- The adapter Card Number (4618) and the product number referred to by the driver (3124) are not the same. This is needlessly confusing.
Once you get through the painful installation process, the DS-500’s DAS RAID 0 performance gives us small net builders something to think about. Where should we directly attach and where should we network attach our storage? If we’re editing movies we’ll definitely want DAS. If we’re just watching them over the LAN, then NAS is probably fine.
For example, I have a friend who bought a 2 TB RAID 5 NAS to organize thousands of digital images captured in the course of his business. Before the NAS, my friend had 30 linear feet of CDs with the images burned on them and a fleet of 5 GB, 10 GB, 20 GB, 40 GB, 80 GB, 120 GB, and 250 GB ATA hard drives that he was constantly swapping into and out of 4 firewire external enclosures. For my friend, the 2 TB of space were necessary to have the degrees of freedom to organize his digital images.
After he got his system up and running, however, he complained, "This is just too slow to work on." When I asked him why he thought so, he said that a 1 GB image in Photoshop takes "forever" to open. I have observed that many people like my friend buy NASes and then be disappointed with their slow speed.
So when you need fast opening, fast saving, huge spaces to work in, direct attached is the way to go. When you need huge spaces and care more about access from anywhere than speed, NAS is the way to go.