Introduction
It’s been a while since I last wrote about the NSLU2. In that article, I hinted about the availability of a 1500 application repository that would be available for installation on the NSLU2. Well, due to some directory structure incompatibilities, those 1500 packages are still over the horizon, but that doesn’t mean that progress has stopped – far from it.
The development community is thriving, and at my last count, there were 277 packages available, including biggies such as gcc, Apache, MySql, PHP and Perl. So If you’re looking for a inexpensive, light-use LAMP server that fits in the palm of your hand and uses about as much power as a night-light, then maybe the NSLU2 will fit the bill.
There have been a few other changes since my last article where we installed the Unslung alternate NSLU2 firmware. The Unslung firmware now boots entirely out of flash, and the root filesystem itself is contained in flash. This means that if you only need a couple of small packages, you can install them in the flash filesystem and run the box without a hard drive at all.
Alternatively, instead of using a hard-drive for additional storage, support is in-place for using a flash disk for the extra storage. This little box is flexible! If you’d like to see just how flexible it is, check out this list to see what people are doing with their NSLU2.
As for myself, I’ve kept my NSLU2 busy as a media server. It’s been quite handy when testing devices such as the Buffalo Link Theater, the Netgear MP115, and the Viewsonic WMA 100. All of these devices, and many others on the market, support the standard UPnP protocol for streaming audio and video files. There’s even a free UPnP client/server plug-in for Windows Media Player.
In my case, a UPnP server running on the NSLU2 feeds content across the network to client devices connected to my stereo and television. But, if you look through the list of packages available for the NSLU2, you won’t find a UPnP server. That’s because there don’t appear to be any viable open-source implementations of the audio / video portions of the protocol. But there’s at least one company out there who sees the potential of using the NSLU2 as a media server.
German company Twonkyvision is marketing a UPnP server that, among other platforms, supports an Unslung-modified NSLU2, and is the server that I’ve been using for my reviews. In this article, I’ll walk you through the process of setting it up on the NSLU2 so it can serve content to your UPnP-compatible device.
Twonkyvision
Installing the Twonkyvision server implies that you’ve upgraded your NSLU2 firmware to Unslung. So for the remainder of this article, I’m assuming that you’ve upgraded to the latest Unslung firmware, which as of this writing was 3.18-beta. If you haven’t upgraded, then do it now, starting with the instructions here.
Additionally, I’ll assume that you’ve followed the Unslung directions to enable telnet so you can log into the box, and that you can use the standard NSLU2 functionality to copy files to the NSLU2 hard drive. Once that’s done, let’s get started.
|
The initial step is to get the UPnP server. Twonkvision has two different versions available – a music-only version available for free, or a server that supports music, photographs and video you can purchase for around $20. I’m using the full-featured version and my instructions will be geared toward it, but the setup is the essentially the same for both.
Updated May 28, 2005
Since the article was published, Twonkyvision has changed the free version of its server. For embedded platforms such as the NSLU2 and the Linkstation, it now has a trial version of the media player instead of a free musicserver. This new version runs for 10 minutes and then quits.In the new free version, the NSLU2 server resides in an “embedded/armv5b_333_225/” directory.
Visit Twonkyvision, and buy the paid version. Unzip the downloaded file and you’ll find a number of subdirectories for the various supported systems. We’re interested in the NSLU2 directory.
Inside this directory you’ll find several files including the UPnP executable itself, mediaserver, plus the music-only version: musicserver. Along with the executables, the directory contains various README and install scripts. I looked the scripts over, and they may work in some cases, but I decided it would be better to install the server our own way to better fit into the Unslung environment.
Installation
The first step in the installation is to move the mediaserver executable over to your NSLU2 by either copying it using the built-in file server, or by FTP’ing it over. Once it’s there, make sure it is executable by typing the following from a NSLU2 command prompt:
chmod +x mediaserver
Next, we need to create a directory for our configuration files. I created a directory that will hold my media as well as my configuration files:
mkdir /share/hdd/data/Media
Then we’ll create subdirectories for our content. You may want to experiment with this a bit, because the media server will create its own virtual folders based on media type and categories such as artist, genre, etc. In addition, your client device may reorganize the content in its own way, but here’s what I started with:
mkdir /share/hdd/data/Media/Music
mkdir /share/hdd/data/Media/Photos
mkdir /share/hdd/data/Media/Video
Depending on how you intend on populating the the media directories, you may need to change permissions. In my case, I opened the permissions up fully so that any of my NSLU2 users can read and write content. I did this with a recursive chmod command. For example:
chmod a+rwx -R /share/hdd/data/Media
Normally, executables in the Unslung environment are stored in one of the binary directories under /opt, but for whatever reason, the Twonkyvision server expects to find its configuration files in the same directory as the executable. Instead of cluttering up one of the binary directories with configuration files, I put the mediaserver executable in my Media directory:
mv mediaserver /share/hdd/data/Media/
Next, we need configuration files. If they don’t exist, default versions will be created the first time the server is run. So start the server up, let it run for a few seconds, then kill it with a <ctrl>c:
cd /share/hdd/data/Media
./mediaserver
<ctrl>c
After the server is stopped, you’ll find a couple of new files, twonkyvision-config.html and twonkyvision-mediaserver.ini. First, we’re interested in the “.ini” file.
Edit this file and look over the various, well-documented options. The server will run with all of the defaults, but you can make a few changes such as setting the “friendlyname” name to something meaningful. This is the name that will show up on client UPnP devices. I changed mine like so:
friendlyname=NSLU2 UPnP Server
For completeness, I changed the content directory, even though by default the server uses the directory where the executable resides:
contentdir=/share/hdd/data/Media/
The Web interface
I should also mention that the configuration can also be changed from a web browser. But to do this, you’ll still have to initially change the “.ini” file to allow it. Close to the top of the file you’ll see a variable called “enableweb”. If you set this to “2”, you’ll be able to re-configure the server using a web interface.
If you want to try this out , change the enableweb and then restart the server as specified previously, except add an ampersand to the command in order to start it in the background, i.e:
./mediaserver&
Next look into the Twonkyvison created “.html” file that’s in our Media directory. In this file, you’ll find a URL that points to the configuration server. The port in the URL can change from run to run, but mine looked like so:
http://192.168.1.70:9000/configpage/index.htm
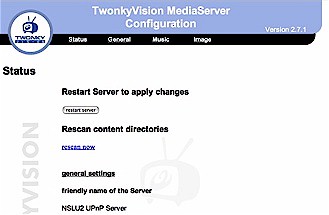
Enter the URL into your browser and you should see something like Figure 1. Now you should be able to change most of the settings that appear in the “.ini” file. After you’re satisfied with the configuration, enter “fg” from the command prompt to bring the server back into the foreground. Then type <ctrl>c once again to shut it down.

Figure 1: Configuring the Twonkvision server from a web browser
Finishing Up
Next, we need a way to fire up the server at boot time. We’ll make a new script in the normal location for Unslung startup scripts, /opt/etc/init.d/, and call it S99mediaserver. The S99 indicates that it will be one of the last servers to start up at boot time. Here’s the content:
#!/bin/sh


# if the server is already running
if [ -n "`pidof mediaserver`" ] ; then


# kill it
killall mediaserver 2>/dev/null


# give the server time to shutdown
sleep 2
fi


# this is all one line, watch for line wraps!
( cd /share/hdd/data/Media; /share/hdd/data/Media/mediaserver -D >/dev/null 2>&1 )
Then mark it as executable:
chmod +x /opt/etc/init.d/S99mediaserver
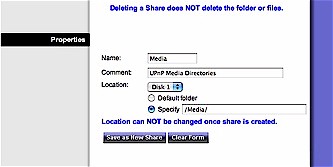
Next, we’ll need to set up the NSLU2 to share our Media directory so that we can add content. For this we’ll use the standard NSLU2 configuration screen accessed through the web interface. Go to the Administration/Advanced/Shares menu to add a new share that will point to our media directory.
In this menu, fill out the Properties section. The important item is Location. Use Disk1 and select the Specify radio button. Fill out the location as “/Media/” and hit the Save as new share button (Figure 2).

Figure 2: Setting up a Media share on the NSLU2
At this point we should have a new network filesystem share that equates to our directory that the media server will use to serve content. Network mount the directory and add some mp3 files, images or video to the appropriate sub folders. If you have any permission errors, consult the NSLU2 documentation to make sure that the appropriate network users have read/write permission.
Serve it Up!
Now we’re ready to try it out. First, we’ll just execute the script we created earlier:
/opt/etc/init.d/S99mediaserver
After a couple of seconds, type a “ps -ax” and you should see a list of processes that includes a number of threads for mediaserver. If you don’t see the server, double check the script to make sure all paths are correct and no errors are generated when it runs. Once you’re satisfied the server is running properly, issue the “reboot” command on your NSLU2 to verify our script will bring up the server when it boots.
I currently have a Buffalo Link Theater, a NETGEAR MP115, as well as a UPnP-enabled Microsoft MediaServer on my LAN. Selecting a server varies from device to device, but they are all straightforward. Since UPnP is a self-discovery protocol, the NSLU2 should automatically show up in whatever server selection list the client provides.
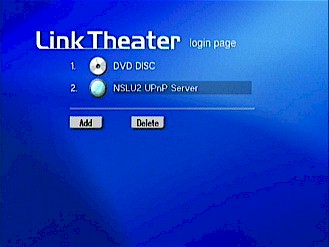
Figure 3 shows what server selection looks like on my Link Theater. Once you’ve selected the server, you should be able to browse and play the content from your NSLU2 (Figure 4).

Figure 3: Server selection with the Buffalo Link Theater
The server provides fairly basic functionality, and the capabilities of your client device will decide what media you’ll be able to handle. I’ve been using mine for viewing Divx5 movies, playing MP3s, viewing JPEG slide shows and listening to Internet radio stations.

Figure 4: Browsing movies from my NSLU2
If you need some additional guidance, visit Twonkyvision’s web page for questions on usage or visit a forum page to discuss issues with other users.
Closing Thoughts
The mixture of a media server and a NAS like the NSLU2 is a powerful combination. When you use small, low-powered LAN devices, it gives you the flexibility to mix, match, and upgrade individual pieces as needed. Most of the UPnP devices on the market are designed to be fed content from a server running on a PC. But I think using a NAS is a better model, because I don’t want to start up a noisy, expensive, power-hungry PC just to listen to music or watch a movie.
The NSLU2 makes an ideal platform for serving digital media to your local LAN. It’s silent, cheap, extendable and has a thriving development community adding new features on a daily basis. Give it a try and use your PC for more useful tasks.
