Introduction
Be sure to check out:
More Cheap and Fast RAID 5 NASes
How To Build a Really Fast NAS Series
RAID (“Redundant Arrays of Independent Disks”), especially RAID level 5, is particularly compelling to geeks, even wannabe geeks like me. What’s not to love? You lose one disk, throw in another and your data rocks on! This is the RAID 5 dream. RAID 5 reality, however, is not so compelling. In fact, many people who know they should be using RAID 5 systems do not or cannot use the technology.
The purpose of this article is to build an inexpensive RAID 5 Network Attached Storage (NAS) system. I’ll then compare the home-built system to off-the-shelf products to see how they compare in terms of performance. If we cut enough cost and produce enough value, we might convert some of the RAID 5 procrastinating masses into RAID 5 users.
For this project, I chose a RAID card from LSI Logic’s MegaRAID family of RAID 5 adapters. I found the MegaRAID family based on a Tom’s Hardware review (Cheap and Reliable RAID 5 Storage Compared) of the SATA 4 port adapter; I have been using these adapters since late 2004. After building my first RAID 5 system on the MegaRAID SATA 4, I noticed on the ‘net that the older IDE/ATA generation of MegaRAID cards was available on eBay at a fraction of the price of the SATA card. (At the time of this writing, I can buy an ATA card for $80 on eBay, while the LSI MegaRAID SATA card on froogle.google.com is $260.)
Those of you who are very frugal may wonder why I’m not using a software RAID 5 solution. Well, I tried to use software RAID 5 and even bought the O’Reilly book Managing RAID on Linux in order to learn how. Recovery is the single most important aspect of RAID 5 to be sure you understand before implementing RAID 5. But even with the O’Reilly book, I could not figure out how I would recover from a drive failure, step by step. So instead, it’s a hardware RAID 5 solution for me.
After using hardware-based RAID for two years, I’ve successfully recovered from drive failures, but just as importantly, I’ve learned that hardware RAID gives you a degree of freedom in designing your NAS. A hardware RAID card insulates you from operating systems and their issues. Since I use a well-supported hardware RAID card, I have installed Windows 2003, freenas, Ubuntu, ClarkConnect, and SUSE, on the same hardware, without having to learn each operating system’s setup for RAID and how to perform RAID recovery.
The LSI Logic MegaRAID Card
The LSI Logic MegaRAID adapters are ROM-based. So the usage model is to boot the computer and then start the controller’s software with a control-key sequence. The controller’s software is a BIOS-style menu-driven interface that allows you to set up, upgrade, or repair your RAID 5 array. When your computer boots up, you will see the LSI Logic adapter’s control instructions flash on your monitor, as shown in Figure 1.

Figure 1: Splash screen
When you press <Ctrl>+M in response, the LSI Logic MegaRAID will start its software from ROM to allow you to manage your RAID 5 array. Figure 2 shows the main menu of the MegaRAID software.

Figure 2: MegaRAID main menu
Figure 3 shows how menus pop up in the MegaRAID software.

Figure 3: MegaRAID menu pop-ups
Note that in Figure 3 I have moved the cursor to “Configure” and then pressed the <Enter> key, to pop up the “Configure” menu. I then moved the cursor to “New Configuration” to initialize the RAID 5 array of drives. The MegaRAID software has then popped open a third menu that says “Proceed?”. To finish configuring a new array I would then move the cursor to “YES” and hit <Enter>. While the interface is a flashback to the days of MS-DOS, it is functional and reliable.
The MegaRAID cards allow what I call the “sane” RAID 5 repair procedure:
Step 0: Hear the shrill wailing of the MegaRAID card
Step 1: Identify which hard drive has failed
Step 2: Shut down the RAID NAS
Step 3: Remove the failed hard drive
Step 4: Get in your car
Step 5: Drive to your local computer retailer and buy a replacement hard drive
Step 6: Return home
Step 7: Install the new hard drive
Step 8: Kick off the RAID controller’s recovery procedure
Step 9: When the recovery is complete, reboot the server and carry on
I named this the “sane” procedure after looking at software RAID and concluding that recovering a drive under software RAID was (for me) insane.
Parts List
The hardware for this do-it-yourself project is shown in Table 1. To keep this project simple, there are only two hardware options: the default configuration with the motherboard’s built-in 10/100 Ethernet, and a secondary configuration with gigabit Ethernet. If you’re a good shopper, you may be able to beat my cost, especially if you use a retired computer that’s just gathering dust in your closet.
By way of comparison, Buffalo Technology’s 1TB TeraStation is selling on the web for around $650 and the “Pro” version is about $230 more.
| Component | Cost | |
|---|---|---|
| RAID Controller | LSI Logic MegaRAID i4 (ATA) | $80 to $160 on www.ebay.com |
| CPU | Sempron 2200+ | $59 (for 2600+; 2200+ is no longer available) |
| Motherboard | ECS 741GX-M | $110 |
| RAM | 512 MB DDR 400 SDRAM Running at 266 MHz |
$40 |
| Power Supply | CoolerMaster RS-450-ACLX 450W | $80 |
| Ethernet 1 | 100 MB on ECS 741GX-M | – (included in motherboard) |
| Ethernet 2 | 32 bit 10/100/1000 Trendnet TEG-PCITXR |
$19 |
| Hard Drives | 4 300 Gigabyte 7200 ATA IDE | 4 x $105 = $420 |
| Case | Cheapest @ CompUSA | $30 |
| CD ROM to Boot | ASUS 52x | $10 |
| OS | Ubuntu 6.06 Desktop | $0 |
| Total System Cost | $829 – 928 | |
Table 1
For this project, the most important thing to be sure of is that the motherboard does not mask interrupt 19. Masking interrupt 19 prevents the <Ctrl>+M keystroke from starting the MegaRAID firmware. If you have a motherboard that blocks interrupt 19, you have to boot the computer to an OS close enough to MS-DOS to allow LSI Logic’s megaraid.exe program to run. (The megaraid.exe program starts the firmware in the MegaRAID card, which then allows you to manage your disk array.) This is annoying to do when you are working on a machine for several hours, so a motherboard that does not block interrupt 19 is highly recommended.
The RAM for this system is 512 MB of DDR400 SDRAM running at 266 MHz. The ECS motherboard theoretically supports 333 MHz, but I’ve never been able to get memory to run that fast on this board. The power supply is a 450 watt CoolerMaster model. A power level of 450 W is more than is needed – each of my drives draws about 9 watts of power – but because you are building a RAID 5 array, you will need a lot of power connectors. A 450 W supply usually has the two extra power connectors cables needed for a 4 drive array.
I used Ubuntu 6.06 because it installs beautifully. My favorite build of Linux is ClarkConnect, but it would not install on the LSI Logic MegaRAID i4 controller. This is because ClarkConnect is based on Fedora 4, which pulled support for the MegaRAID i4 cards last year.
Assembly
You need a case that will allow four hard drives with a full hard drive’s worth of space between them. Figure 4 shows the #1 feature I look for in a case: a drive tower that runs from the floor of the case all the way up to the underside of the externally mountable devices (i.e., the floppy and optical drives). I have found that trying to squeeze hard drives into a case that does not have extra space is a sure way to cook them.
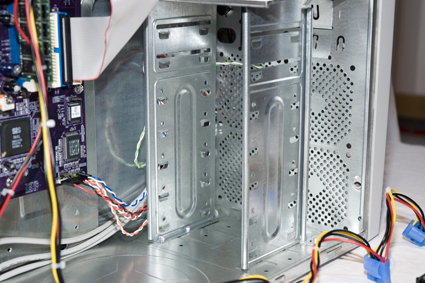
Figure 4: Case detail
Next, lay out the RAID 5 components. To make the NAS you need to basically start with a standard desktop computer without a hard drive. In Figure 5 I’ve already installed the motherboard, RAM, CPU, optical drive and power supply, to make a standard desktop computer that is ready to go except for the hard drives.
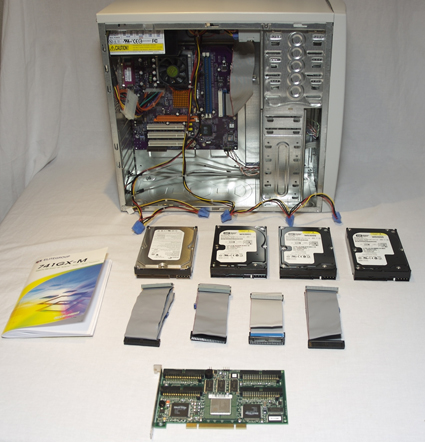
Figure 5: Ready for assembly
Then, install the hard drives one at a time and hold them in place with one screw. I leave a full drive’s worth of space vertically between drives in the case, for better cooling.
Install the power cables to each drive, then install the ribbon cables on the MegaRAID i4 card and insert the card into the PCI slot. Figure 6 shows the four drives installed and powered, and the MegaRAID card with 4 IDE/ATA ribbon cables hanging off, ready to be attached to the 4 drives.

Figure 6: Drives installed waiting for RAID cable connection
TIP: I advise installing the cables before you put the MegaRAID card into the computer. The connectors on the MegaRAID card can crack if you wiggle the ribbon cable towards and away from the face of the card. Installing the cables while the card is outside of the case greatly lowers this risk.
After the MegaRAID i4 card and cables are installed, connect the ribbon cables from the MegaRAID i4 to the hard drives (see Figure 7).

Figure 7: Drives cabled up
At this point you can add the second screw to each hard drive and button up the case. I’ve never set a jumper on a hard drive when using a MegaRAID card. I simply take the hard drives out of the box, put them into the computer case and don’t even look at how the jumpers are set.
RAID Array Configuration
With hardware assembly out of the way, we now can create the drive array. To do this you need to connect a keyboard, monitor, and power to the computer. Boot up the computer, and when you see the message shown in Figure 8 appear on the screen, hold down <Ctrl>+M to kick off the MegaRAID’s ROM software.

Figure 8: MegaRAID splash screen
I’m going to go through the RAID set up step by step because I found that the biggest stressor in building your own NAS is figuring out the MegaRAID user interface. I stumbled around for several days before getting my first disk array up and running because I could not find any step-by-step instructions. So now there are!
Step 1: Figure 9 shows the MegaRAID Management Menu that will pop up on your screen after you hold down <Ctrl>+M while your computer boots. Move the cursor to “Configure” on this menu, and press <Enter>.
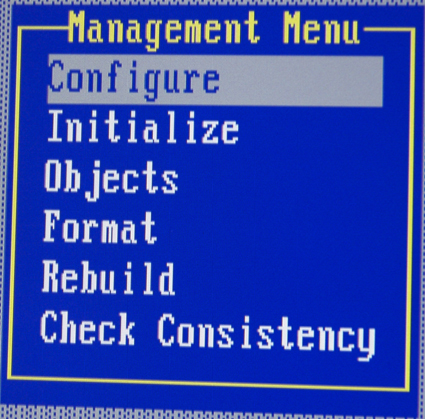
Figure 9: MegaRAID Management menu
Step 2: Your screen will now appear as in Figure 10. Move the cursor to “New Configuration” and press <Enter>.
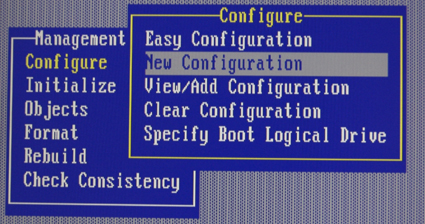
Figure 10: Select New Configuration
Step 3: When the “Proceed?” menu pops up (see Figure 11) move the cursor to “Yes” and then hit <Enter> again. The MegaRAID card will then begin to scan all the hard drives attached to it. After a moment, the screen will go from looking like Figure 11, back to looking like Figure 10. If you try to move the cursor, it will seem like your system is locked up. Don’t panic.
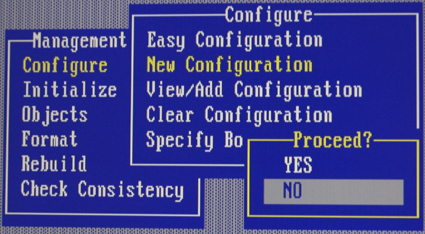
Figure 11: Select Yes or No to proceed
The trick is to watch the bottom row of characters on your computer screen. Figure 12 shows the messages that flash by on the bottom row. What is happening here is that your MegaRAID card is scanning the hard drives attached to it.
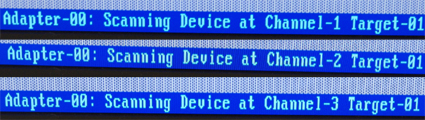
Figure 12: Status messages
RAID Configuration, Continued
Step 4: After the MegaRAID software is finished scanning, your screen will look like Figure 13.
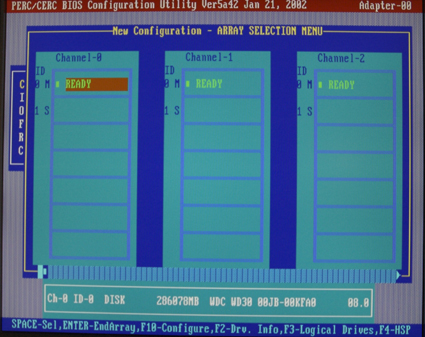
Figure 13: Array selection menu screen
You’ll now select the drives for your array. In Figure 13, you can see three of the four hard drives attached to this computer. The first row, with “M” underneath each Channel column, shows “Master” hard drives. The second row is “S” for “slave” hard drives. Because the MegaRAID i4 is an IDE/ATA device, you can have up to 8 drives per card in a 4 master, 4 slave configuration. The missing hard drive in Figure 13 is Channel-3 (i.e., the fourth hard drive) which is not shown because an 80-column character-based screen is not wide enough to show four drives.
Now that we see all the drives that are going into our disk array, we need to tell the MegaRAID software which of these hard drives to use. Not all hard drives have to be used in the RAID 5 array. If you have four drives, you can put three drives into a RAID 5 array, and use the fourth drive as a hot-spinning spare for recovery.
To select all the drives for our array, we use the arrow keys in Figure 13 to move the cursor to a hard drive that says Ready, and then we hit the “Space” bar to toggle the drive’s status from “Ready” to “Onlin” (yes, the “e” is missing!).
Figure 14 shows what the screen looks like after I’ve scrolled through each of the hard drives and hit “Space” to select each hard drive for the array. It actually is the same as Figure 13, except that the drives have changed from “Ready” to “Onlin”.
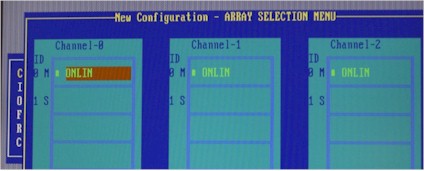
Figure 14: Drives selected for the RAID array
To select the hard drive on Channel-3 (not shown off to the right of the screen) just use the right arrow to scroll to the right to find it, and then hit space bar.
As you can see, the MegaRAID user interface is clunky, but it’s not too bad once you get the hang of the implicit rule of this interface: “when in doubt, look at the bottom row of the screen.” The black magic around RAID 5 then disappears, and you can become comfortable with the MegaRAID.
Once you have all the disks showing a status of “Onlin”(as in Figure 14) look at the bottom row of the screen (see Figure 15).
![]()
Figure 15: Status line after drives are selected
Step 5: Then convert the selected drives into an array. Hit “Enter” to tell the MegaRAID software you are done selecting drives. After this, the screen will remain unchanged. Next, hit <F10> to configure the RAID 5 array.
RAID Configuration, Continued
Step 6: Your screen should now appear similar to Figure 16. This is a confusing screen, because the hard drives you identified as your disk array in the previous step, are invisible. The array is not yet shown.
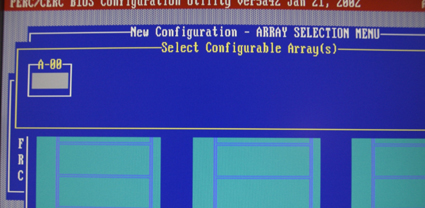
Figure 16: Select Configurable Array screen
Again, don’t panic! The cursor is actually on the array in dialog box “A-00” of the figure, but it isn’t displayed. Can you guess what to do to select the array? Hint: read the bottom row of the screen. That’s right! Hit the “Space” key, and you will see the array in the A-00 box in the upper left hand corner of Figure 17. After you hit the space bar, you will see “Span-1” appear in the A-00 dialog box (Figure 17). This is your RAID array. Next we need to make it into a RAID 5 array.
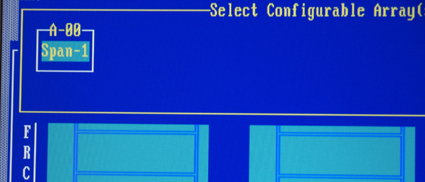
Figure 17: Screen after hitting space bar
Hit <F10> to configure the array, which means telling the controller what kind of RAID you want the array to use. A dialog will open, as shown in Figure 18. The default is RAID 5, which is what we want. Move the cursor down 3 rows to “Accept”, and hit <Enter>.

Figure 18: RAID array configuration dialog
Another dialog will now open, which asks you if you want to “Save Configuration” (see Figure 19). Choose “Yes” and hit <Enter>. The last thing to do in this step is to push the <Esc> key repeatedly to bring the cursor back to the main menu.
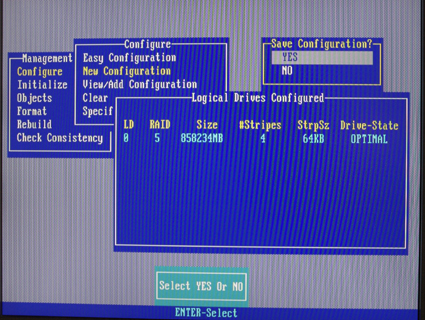
Figure 19: RAID Configuration confirmation
RAID Configuration, Continued
Step 7: From the MegaRAID Management menu, hit the down arrow one time to the second option, “Initialize”. Hit <Enter> next hit the space bar to select “Logical Drive 0” (see (Figure 20). Next, hit <F10> to initialize the drive.
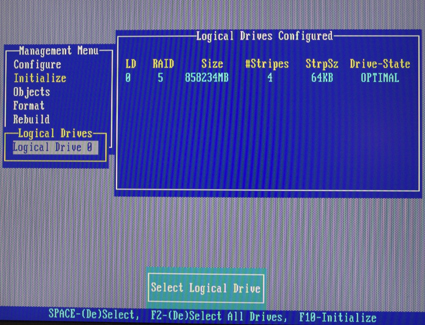
Figure 20: Initializing the array
A dialog will pop up that says “Initialize?” as shown in Figure 21. Move the cursor to “Yes” and hit <Enter>.
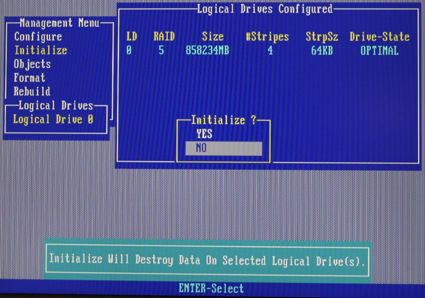
Figure 21: Confirm array initialization
Initialization takes about 5 seconds on my system. During the process, it pops up an initialization meter that goes from 0 to 100 (see Figure 22).
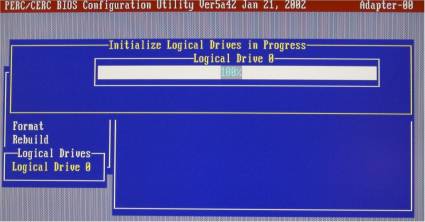
Figure 22: RAID initialization progress
After the drive is initialized, go back out to the main menu and reboot your system (see Figure 23).
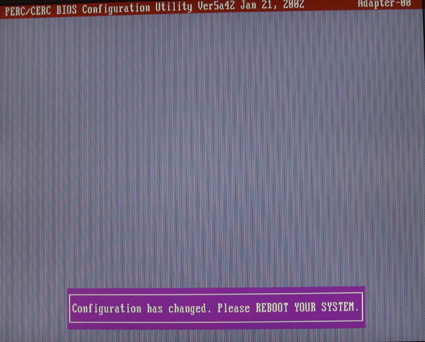
Figure 23: RAID array initialization completed
We’ve now taken the four hard drives and turned them into a RAID 5 array that operating systems will see as a single hard drive. The next step in building your DIY RAID 5 NAS is to install the operating system you will use.
Install The OS
As mentioned earlier, I used Ubuntu 6.06 desktop for the main operating system for my NAS. I’m not going to provide step-by-step instructions on how to install Ubuntu 6.06, but I will provide a few tips:
- Let Ubuntu format the RAID 5 partition, since it sees the MegaRAID card and drives as a simple hard drive. It takes Ubuntu an hour to format a 1.2 TB partition on the hardware configuration I’ve described.
- You also should be aware that Ubuntu 6.06 desktop does not have its SAMBA server installed in its default configuration. This means that the NAS won’t be visible to Windows or other operating systems that support SMB / CIFS. So here’s how to install SAMBA after you have Ubuntu 6.06 installed.
Step 1: Click on the “System” menu at the top of the screen, to the left of the globe icon.
Step 2: Select “Administration”, which is second from the top.
Step 3: Click on “Shared Folders”, which is about halfway down the menu.
Step 4: The “Shared Folders Settings” dialog will open up, and then a “Sharing services are not installed” dialog will pop up. Click on “Samba to share folders with Windows/Linux systems”. Then, click “Apply” and Ubuntu will install the Samba server for you.
Step 5: Now click the “+Add” button on the “Shared folders settings” dialog.
Step 6: A “Share folder” dialog pops up. Type the name of the share you want to create, next to the “Name” field. Check “Allow browsing folder. Then, click on the “General Windows Sharing” button.
Step 7: A dialog named “Windows sharing settings” will open. In this window, set your domain/workgroup to whatever your workgroup is (the default is MSHOME). Then click OK.
Step 8: Open the terminal window and go to the home directory by typing cd /home. Then type:
chmod 0777 name
where name = your login name in Ubuntu. For example, my login name is bill so I typed:
chmod 0777 bill
Now You Have It, So Share It
I think the best way to define shares for a home network depends on two factors: the operating systems on your PCs, and how people really use the shares.
If you are a Windows person, you can define many shares and not suffer too much by doing so. Windows sets up a share and reattaches it by default every time you reboot the client machine. Mac OS X, however, does not automatically restore SAMBA shares. So, if you have OS X machines, you probably want to define fewer shares and then put sub-folders into these shares so you have less network drive attaching to do. If you are a both Windows and OS X person (as I am) fewer shares still wins, because the Mac’s shortcomings still dictate the optimal system settings.
As far as how people use shares, a typical teenager or wife will give you at most one byte of in-the-brain memory regarding how your beautiful RAID 5 NAS works. If you keep your network shares simple enough, your family will use them. If you define your shares by a business-process or using complex logic, the shares will require more than one byte of memory to explain and your family will ignore them.
I have three teenaged boys and one wife in my house. When I first put a NAS box in, I had shares for accounting, downloads, pictures, kid1, kid2, kid3, wife, etc. What I’ve found over two years of using the NAS is that we use about three shares: “pictures”, “everythingelse”, and (update and open source) software downloads. So over the past two years, I’ve evolved to a “fewer shares that we really use” mentality, with zero security in setting up NAS shares.
My zero security approach has the downside of letting kids create folders within shares for projects, but it has worked well so far. The nightmare scenario here is having a teenager in a fit of rage erase everything in a share or two. Although RAID 5 is cool, it won’t protect against that, so it is not sufficient as a stand-alone backup strategy…even if you don’t have teenagers! I would recommend setting up a simple share structure; say, pictures, accounting and downloads. Then your NAS is ready to use (famous last words!)
Mount The Shares From Clients
I’ve found that mounting shares from client computers is the last 20% of the process, but can be 80% of the work. After creating a share on your DIY RAID 5 NAS with Ubuntu, go to a client PC on your network and try to log in. You’ll find that the log-in won’t work. This is because every NAS has a trick to allowing clients to mount shares. This sick torture, inflicted while we wannabe geeks are at the finish line, is the price we pay for using open source products.
The trick to making your RAID 5 NAS share mountable on other computers is the /etc/samba folder. One great resource for getting little things going on your Ubuntu installation is Ubuntu dapper. The SAMBA tricks are located in the Samba Server section.
First open a terminal window and check to see whether Samba is in fact, installed when you used the administrative menu click-to-install process I described previously. The acid test is to type:
sudo /etc/init.d/samba restart
If you get a “samba not found” message you’ll need to install Samba manually. To do this, make sure you can reach the Internet from the Ubuntu machine (open a web browser), then type:
sudo apt-get install samba
Ubuntu will then prompt you for password. Just give it the password you set up when you installed Ubuntu.
Next type sudo apt-get install smbfs then sudo /etc/init.d/samba restart again and you should see the services stop and then start.
Now you can enter cd /etc/samba and then ls to verify you can see smb.conf. If you can, type sudo nano smb.conf and enter your password when prompted and hit return. Then type <Ctrl>+<w> to search for a text string and type in security = user.
The search will bring you to the part of smb.conf that looks like this:
####### Authentication #######
# “security = user” is always a good idea. This will require a Unix account
# in this server for every user accessing the server. See
# /usr/share/doc/samba-doc/htmldocs/Samba-HOWTO-Collection/ServerType.html
# in the samba-doc package for details.
; security = user
take out the ; at the beginning of the security = user line and then change user to share, i.e. security = share
Then, scroll down to the very bottom of your smb.conf file where you should find the following:
[test]
path = /home/bill
available = yes
browseable = yes
public = yes
writable = yes
Note that the last part of the path name, i.e. /bill, will probably be different, as noted earlier. Now add these lines:
create mask = 0777
directory mask = 0777
force user = nobody
force group = nogroup
The final product will look like this:
[test]
path = /home/bill
available = yes
browseable = yes
public = yes
writable = yes
create mask = 0777
directory mask = 0777
force user = nobody
force group = nogroup
Type <Ctrl>+<x> to exit the Nano editor, then hit Y to save the changes. Finally, restart SAMBA by typing:
sudo /etc/init.d/samba restart
To log on to my RAID 5 NAS I needed to authenticate with no username and no password. This is not a very secure Linux SAMBA configuration by any means, but it will get you started. If you still can’t mount your NAS share after following all of this, you’ll need to consult the Ubuntu dapper links above. Also be sure that you run chmod 0777 [sharename] on the directory you are trying to share.
RAID 5 NAS Performance
Updated 8/1/2006
So, how good is the DIY RAID 5 NAS? Figures 24 through 27 compare the performance of the DIY RAID 5 NAS to Buffalo Technology’s 1 TB TeraStation NAS. The same iozone procedure was used to take all of the data shown, but I ran iozone on a Windows XP Pro, 2.4 GHz Celeron P4, 1 GB RAM machine. So while the results aren’t exactly apples-to-apples, the test machines used are close enough in configuration to allow a reasonably accurate comparison.
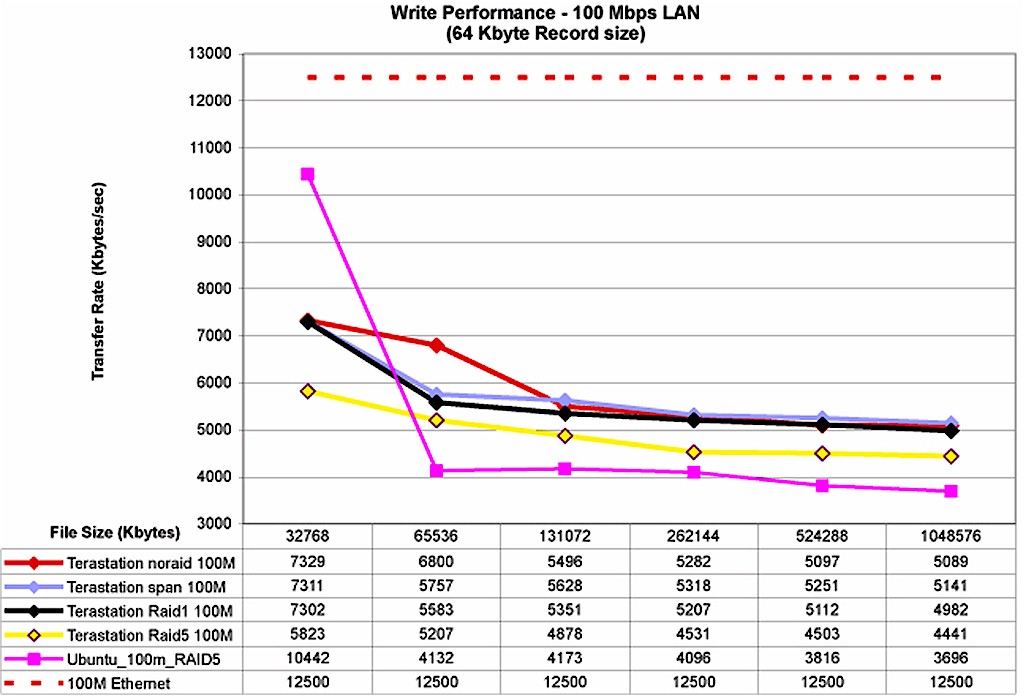
Figure 24: Write Performance w/ 100 Mbps LAN (click to enlarge)
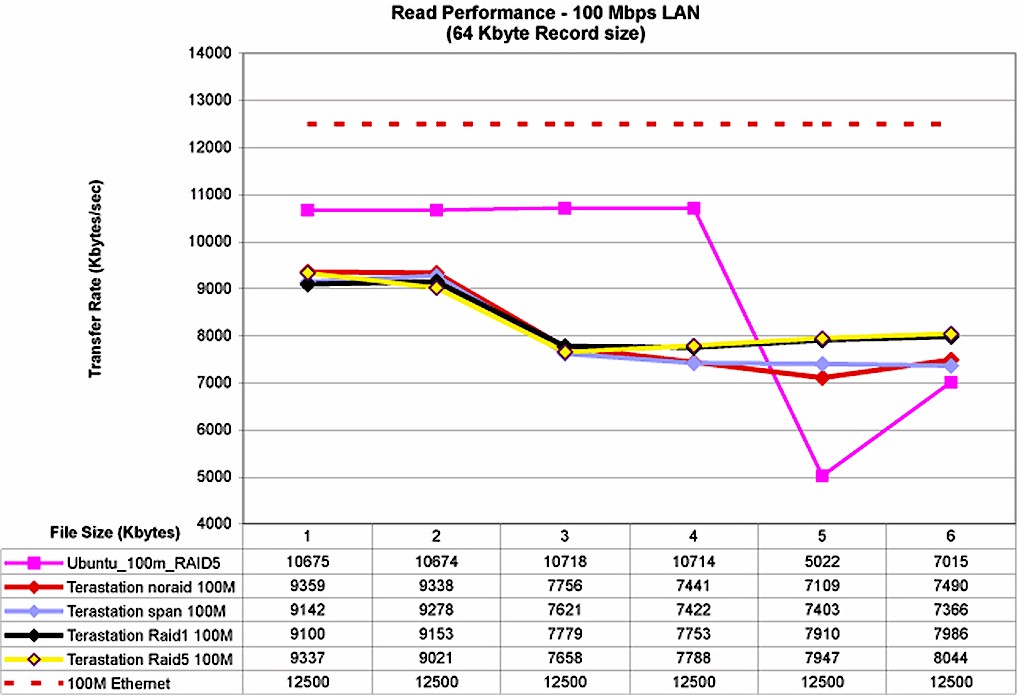
Figure 25: Read Performance w/ 100 Mbps LAN (click to enlarge)

Figure 26: Write Performance w/ 1000 Mbps LAN (click to enlarge)
From the benchmark results, it is clear that if you are going to build your own NAS, you want to build it with a gigabit Ethernet card. On smaller file sizes, the gigabit-equipped DIY RAID 5 NAS is clearly superior on both writes and reads. But on very large files, it is slower than the TeraStation.
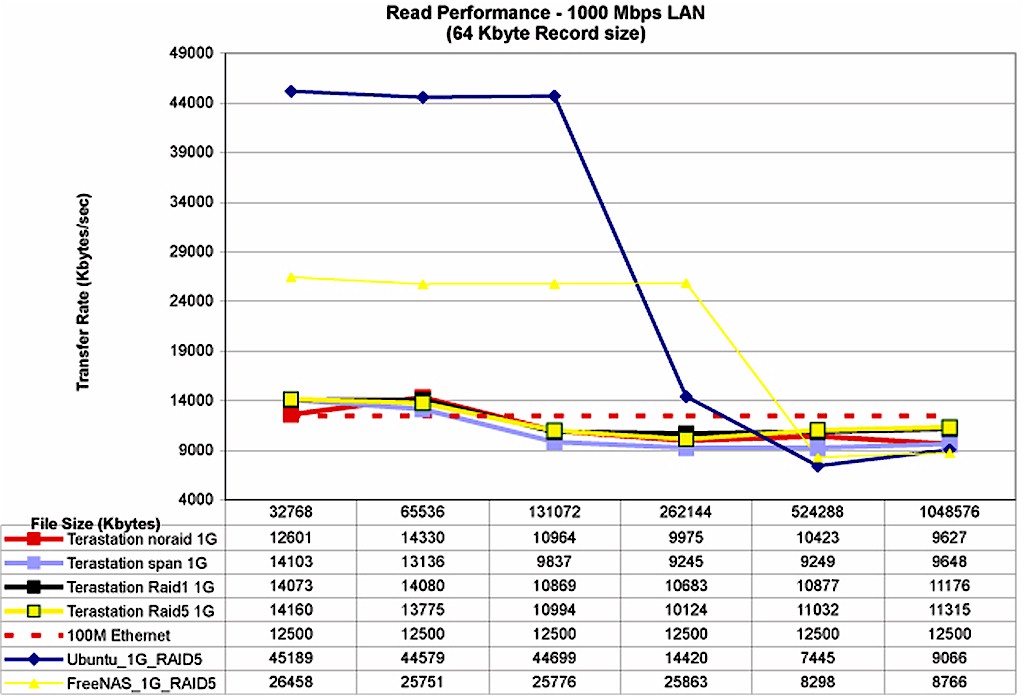
Figure 27: Read Performance w/ 1000 Mbps LAN (click to enlarge)
This behavior holds up regardless of operating system used on the DIY NAS. Just for fun, I installed Free NAS.671 to compare with the Ubuntu results. Averages tend to hide things, but I’ve computed the average read and write speeds for the TeraStation and the DIY RAID 5 NAS using Ubuntu and FreeNAS.671 and summarized the results in Table 2. The read and write results represent the average of 32, 64, 128, 256, 512 and 1024 MB file size runs using 64 kB record size.
The averaged results show that the DIY server using Ubuntu comes out a little faster with a 100 Mbps connection, but blows away the Terastation with a gigabit Ethernet connection – even without using Jumbo frames! Since a gigabit Ethernet NIC costs less than $20, its inclusion in any DIY NAS is a no-brainer.
| Test Configuration |
TeraStation NAS 1.0 TB | DIY RAID 5 NAS | |
|---|---|---|---|
| Ubuntu 6.06 DT | FreeNAS.671 | ||
| Avg Write 1000 Mbps |
7,036 | 23,940 | 4,479 |
| Avg Read 1000 Mbps |
11,900 | 27,566 | 20,152 |
| Avg Write 100Mbps |
4,897 | 5,059 | Not Tested |
| Avg Read 100Mbps |
8,299 | 9,136 | Not Tested |
Table 2: Average Performance Summary- DIY NAS vs. Buffalo Terastation
Conclusions
A RAID 5 NAS can provide everyone in your home with a simple way to back up and move large amounts of data. My household’s NAS is a critical piece of infrastructure to support the evolution of self-expression in schools. Where I wrote papers by hand for middle school and high school classes, my sons cut CDs, use desktop publishing, and create movies – using the NAS to move iMovie and iDVD projects from computer to computer. And, because the kids forget about the projects and leave them on the server, an archive of their creativity is automatically made. (I also secretly horde my kids’ art projects in paper form!)
So should you buy or build a RAID 5 NAS? The better question is, “why should I put off moving my data to RAID 5?” As we acquire gigabytes (and in some cases Terabytes) of valuable content in digital form, the robustness of that data becomes an increasingly important issue. Anyone who has had his or her iTunes library wiped out due to a hard drive failure already has felt the sting of relying on a single drive for data storage.
Storage and / or backup on a RAID 5 NAS can provide a step up in keeping your data safe from hard drive failure, but can’t protect against fire or theft or an angry teenager out to teach the folks a lesson. So it can be an important part of a data security plan, but not a complete substitute for a comprehensive backup strategy.
The make versus buy decision is likely to be shaped by the size of your pile of old equipment. Many people already own all the hardware needed except the hardware RAID card. Any old “too good to throw out, but not good enough to use” PC is a candidate for becoming a RAID 5 NAS. With an $80 MegaRAID card (and maybe a cheap gigabit NIC) you can turn “ol’ dusty” into a very good RAID 5 NAS for a very low price.
Be sure to check out More Cheap and Fast RAID 5 NASes