Introduction
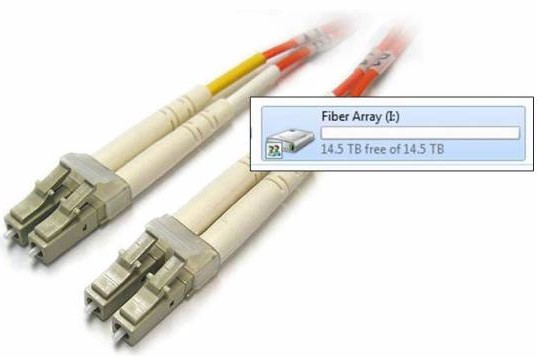
Sitting in the corner of the office is a Thecus N5200, dusty and filled to capacity – been around for more than five years. It was one of the first five disk consumer NASes, very quick for its time, as Tim’s review stated eloquently in late 2006:
My bottom line is that if you’re looking for the fastest NAS for file serving and backup and don’t mind a funky user interface, sparse documentation, and immature firmware then you might take a chance on the 5200…
Thecus has succeeded in raising the feature bar for “prosumer” NASes to include five bays, RAID 6 and 10 and speeds that make good use of a gigabit LAN connection. But its reach has exceeded its grasp in producing an all-around polished product that anyone could feel comfortable buying.
When initially unboxed and loaded up with five new shiny and quick drives, a home network RAID 5 NAS was then an uncommon sight. Flash forward to now and the dusty Thecus is slow, stores a little more than a single 2 TB drive, and with the rise of home theater automation, is now not unusual to see a NAS in someone’s home. In other words, ripe for replacement.
Home media requirements have also started to exceed what most NASes can provide. Storage guru Tom Coughlin of Coughlin Associates predicts that by 2015 you’ll have a terabyte in your pocket and a petabyte at home. And there are now folks with multiple NASes at home. My own home network has well over 11 TB and growing, much of it unprotected by either redundancy or backups. Do you have the means to back up that much data?
To solve this, to quote Roy Scheider in Jaws, “We are going to need a bigger boat.”
A Fibre Channel SAN/DAS/NAS
The plan is to first build a disk array RAID NAS, then configure it as a SAN node and use fibre channel to connect it directly to a DAS server, which will attach the newly available storage to the network. A terabyte version of Tinkers to Evers to Chance – a perfect double play.
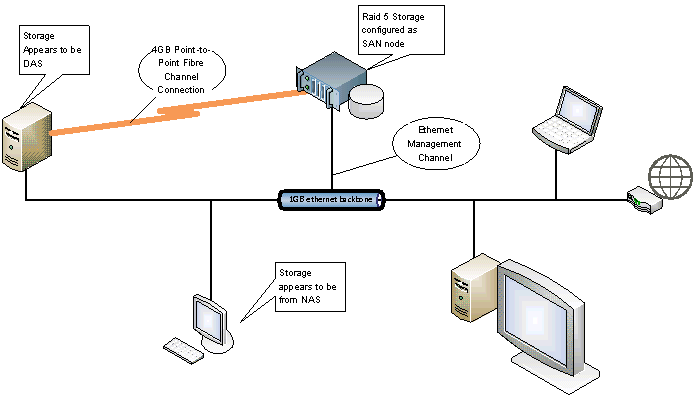
Figure 1: Block diagram of the Fibre Channel SAN/DAS/NAS
So what is the difference between a SAN and a NAS and what are the advantages of a SAN over a NAS? The primary difference is that in a SAN, the disks in the RAID array are shared at a block level, but with NAS they are shared at the filesystem level.
A SAN takes SCSI commands off the wire and talks directly to the disk. In contrast, a NAS utilizes file level protocols such as CIFS and NFS. This means that with a SAN, filesystem maintenance is offloaded to the client. In addition, SANs generally uses a wire protocol designed for disk manipulation, whereas NAS uses TCP/IP, a general purpose protocol.
Comparing the Ethernet to fibre equivalent, i.e. 10GbE to 10gig fiber channel, significantly more payload is passed with fibre because of the lack of inherent TCP/IP overhead. Combine that with a fat cable like fiber and you have one lean, mean transport layer.
Additionally, if you are running your NAS in a strictly Windows environment, you have the added overhead of converting the SMB protocol (via Samba) to the native filesystem, typically EXT3/4, XFS, etc. On a SAN, no such conversion takes place because you are talking directly to the server-assisted RAID controller. Less overhead, better performance.
The downside of this is that TCP/IP is ubiquitous, and fibre channel is expensive, requiring special hardware and software. Hardware being Fibre Channel host bus adaptors (HBA) and fiber switches and cables and software such as the SAN management suite from SANMelody. SAN infrastructure can run into the tens of thousands; a new single 10GB fibre channel HBA can be as much as $1500. The software is often twice as much.
That is unless you are willing to go open source, buy used equipment, and work with outdated interfaces. If you are, you can get the necessary hardware and software for a song.
Right now there is a glut of used fibre channel hardware on the market. You can pick up a 2 GB fibre channel HBA for $10 on EBay, $50 for 4 GB. The catch is that it is PCI-X hardware. PCI-X was an extended version of PCI for servers, providing a 64-bit interface at up to commonly 133 MHz.
The half-duplex PCI-X bus has been superseded by the faster full-duplex PCIe bus. This, plus the economy, and the move away from fibre, means that what was an exclusively enterprise technology is now available for your home network at reasonable prices; one-tenth its original cost.
![]() For software, we are going with Openfiler, which dates back to 2004 and is based on rPath, a branch of RedHat linux. The compelling feature of Openfiler is SAN and fibre connect Host Bus Adapters (HBA) support. Openfiler is also a complete NAS solution.
For software, we are going with Openfiler, which dates back to 2004 and is based on rPath, a branch of RedHat linux. The compelling feature of Openfiler is SAN and fibre connect Host Bus Adapters (HBA) support. Openfiler is also a complete NAS solution.
The Plan
We are going to take a low risk approach to achieve our goals, which are:
1) Build a Fibre Connect SAN for less than $1K
On the cheap, one thousand dollars, excluding disks and embellishments. Think of the build as sort of a wedding: something old, something new, something borrowed, and something black. We’ll buy older generation used PCI-X server hardware including motherboard, CPUs, memory and interface cards mostly from EBay. The new components will be the power supply and our disks. Something borrowed are pieces from previous builds, the system drive, fans, and cables. Black of course is the hot swap system chassis.2) Exceed the capacity of any consumer grade NAS
The largest consumer grade NAS is currently eight bay QNAP TS-809 Pro which will support 3TB drives. In RAID 5, that is about 18-19TB. We are shooting for a max RAID 5 capacity of 35TB.3) Beat the Charts
Our goal is to exceed the current SNB performance chart leader, both as fibre channel and as a logical NAS, as measured by Intel’s NAS Performance Toolkit for RAID 5.
Low risk means putting the pieces together, insuring they work, and then bringing up a NAS array. Once we have an operational RAID array, we’ll look at NAS performance. We’ll then add the fiber HBAs and configure the array as a SAN. Even if we can’t get fibre connect to light, we’ll still have a respectable NAS.
 Part of the fun in these builds is in the naming. We’re calling our San/NAS array Old Shuck, after the wickedly fast ghostly demon dog of English and Irish legend (with eyes in the 6500 angstrom range). We did toy with calling our build Balto, after the famous Alaskan hero sled dog, but that was not nearly as cool.
The Components
Building this from pretty much scratch, we need to buy most major components. For each component I’ll provide our criteria, our selection and the price we ended up with. Price was always a foremost criterion throughout and hitting our $1K target does require some compromises. We have budgeted $700 for the NAS array portion of this project.
Motherboard
The motherboard was probably our most important buy, as it determined what other components, and the specs of those components, were going to be needed. We wanted as much functionality built into the motherboard as possible, with networking and SATA support as the more integrated, the less we’d have to buy, or worry about compatibility. The baseline requirements were:
- Three PCI-X slots, preferably all running at 133MHz: one slot for the fiber card and two slots for RAID controllers. Very high capacity RAID controllers, support for 12 plus drives, are often more than twice as expensive as those supporting fewer drives. Generally we can get two 12 port controllers for less than a single 24 port controller.
- PCI-e slots for future expansion. Good PCI-X hardware will not be around forever, and though unlikely, we might find cheap PCIe controller cards.
- For CPU, the latest possible generation 64-bit Xeon processor, preferably two processors. Ideally, Paxville (first dual core Xeons) or beyond.
- Memory, easy – as much and running as quick as possible. At least 8GB.
- Network, if possible integrated Intel Gigabit support, dual would be nice.
- SATA, preferably support for three drives, two system drives and a DVD drive.
- Budget: $200
What we got: SuperMicro X6DH8-G2 Dual Xeon S604 Motherboard, with:
- Three PCI-X, two slots at 100Mhz, one at 133Mhz
- Three PCIe slots, 2 x8 and one x4
- Nocona and Irwindale 64-bit Xeon Processor support
- Up to 16 GB DDR2 400MHz memory
- Dual integrated gigabit Lan, Intel Chipset
- Two Integrated SATA ports
Price: Total $170 from Ebay (offer accepted), Motherboard, Processors & Memory
We got very lucky here, we were able to get a motherboard that hit most of our requirements, but also included two Xeon Irwindale 3.8GHz processors installed. Additionally, the same helpful folks had 8x 1Gig DDR2 400MHz memory for $90.
What we learned is that you should ask Ebay sellers of this sort of equipment, what else they have off your shopping list that may fit your needs. Since they are often asset liquidators, they’ll have the parts you are looking for, without worry of compatibility. And you can save on shipping.
The RAID Controller
A high capacity RAID controller was key to performance, the criteria were:
- Support for at least nine drives, to exceed the eight bay consumer NAS contender. Which may require more than one RAID controllers.
- At least SATA II, 3.0Gbps
- Support for RAID 5, or even better RAID 6.
- Support for at least 2TB drives, and not be finicky about drive criteria so we can buy inexpensive 2TB drives
- Have at least 128 MB cache, preferably upgradable
- Industrial grade, preferably Areca, but 3Ware/LSI or Adaptec were acceptable. Need Linux support, and because the checksum is proprietary, be easy to replace if the controller goes belly up.
- PCI-X 133 MHz or PCIe Bus Support
- If Multilane (group cables), come with the needed cables
- Budget: $150
What we got: 3WARE 9550SX-12 PCI-X SATA II RAID Controller Card, with
- Support for 12 SATA II drives
- RAID 5 Support
- 256M Cache
- 133Mhz PCI-X
- Single ports, no cables
- Support for up to just under 20 TB in RAID 5 (11×1.8 TB) with inexpensive 2 TB drives
Price: Total $101 from Ebay (winning bid)
This was a nail biter. Attempts at getting two 8 port Areca cards exceeded our budget, so we settled on the 3ware card and were quite pleased with the price.
The 3Ware 9550SX(U) controllers appear to be everywhere at a reasonable price, and one should be able to be had at around $125 (avoid the earlier, much more limited, 9500S cards). Here is a nice review, including benchmarking, of this generation of SATA RAID cards.
Drive Array Chassis
The case was a bit of a search, with an interesting reveal. Our criteria:
- Support for at least 16 drives
- Good aesthetics, not cheap or ugly
- Handles an EATX motherboard
- Budget: $180
The initial supposition was that to hit the budget, Ebay was the only option. Looking for a used chassis, we encountered multiple folks selling Arrowmax cases for less than $75. Checking with the source, Arrowmax.com, we found two cold swap cases, a 4U server case that handled twenty drives, and a beer fridge-like case that handled 24 drives. Both met our criteria and were dramatically under our budget, the larger case being $80.
We were all set to push the button on the 4U case when we encountered one of those weird internet tidal eddies, an entire subculture (mostly based over on AVS Forums for HTPC builders) arguing the ins and outs of builds using the Norco 4020 hot swap SATA case.
Take a look at The Norco rackmountable RPC-4020: a pictorial odyssey. On another site, I swear I found a guy who had carved a full size teak replica of the 4020 and another who had his encrusted with jewels – a religious fervor surrounds this case.
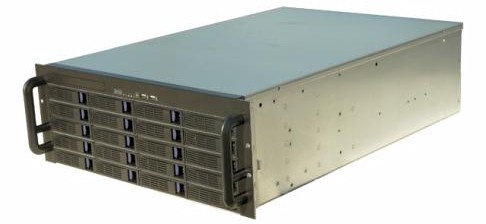
Figure 2: Norco RPC-4020 case
Well, that was the one for us, how could a case have better mojo? It is inexpensive by hot swap case standards and supports twenty drives with a built-in backplane and drive caddies. Bonus: a community more than willing to help and opine about various optimizations.
What we got: Norco RPC-40204U Rackmount Server Hot Swap SATA Chassis, with:
- Support for 20 SATA drives, hot swappable
- Clean Design, acceptable appearance
- Ability to handle numerous Motherboard form factors
- Drive caddies and activity lamps for each drive
- Lost cost, high utility
Price: Total $270 from NewEgg (Retail)
I recommend this case. If you read the various write-ups about the case, its true virtues are its design and price. Every corner has been shaved to make this affordable: the card slots are punch out, the back fans sound like the revving engines of a passenger jet, the molex connectors are not solid. But for what you get, it is a great deal. Because less expensive options exist, the budget overage of $90 is considered an embellishment.
Power Supply
We went with a 750W single rail, modular power supply with an exceptional seven year warranty, a power supply that could handle system power needs and those of 20 drives. This was the Corsair HX750 which happened to be on sale. Less expensive PSUs at the same power rating are available.
Price: Total $120 from NewEgg (with Rebate)
Hard Drives
Though not included in our target cost of $1,000, we need nine drives for both performance testing and to reach our goal of exceeding the number of drives supported by the largest consumer NAS. We went with the least expensive Hitachi 2 TB drives we could find, across a couple vendors. They get high ratings and have a three year warranty. There were WD drives for a few dollars less, slower and with only a one year warranty, a penny-wise, pound-foolish alternative. Warning, the Green WDs have reported RAID card compatibility issues.
What we got:
6 x 2TB HITACHI Deskstar 5K3000 32MB Cache 6.0Gb/s and
3 x 2TB HITACHI Deskstar 7K3000 64MB Cache 6.0Gb/s
Price: Total $670 from Various sources
You may ask if why SATA III speeds, why not SATA II 3.0 Gbps drives? They were the cheapest. Given the age of the 3Ware card, we also couldn’t verify our drives against the last published list of compatible drives in 2009, although Hitachi and this family of drives were listed.
Incidentals
When buying new pristine components, you’ll find all the parts you need already included in the sealed boxes. But this is not the case when buying used. Luckily, most of the same parts pile up after several builds, or you end up with perfectly good parts that can be reused. You will probably still need to buy a few bits and bobs to pull everything together. Here is a table of other needed parts:
| Slim SATA DVD Drive + Cable | New, Media Drive | $33, NewEgg |
|---|---|---|
| A-Data 32Gb SATA SSD | Reused, System Drive | $0 |
| 20 SATA Data Cables | New, Wiring Backplane, Data | $24, Local Store |
| Norco Molex 7-to-1 Cable | New, Wiring Blackplane, Power | $8, NewEgg |
| Molex to MB P4 | Reused, Supermicro additional connector | $0 |
| IO Shield | New, Supermicro MB specific | $8, EBay |
Table 1: Odds and Ends
Price: Total $73 from Various sources
Total Cost NAS RAID Array
Let’s add up our purchases and see how much the NAS portion of our project cost, are we still under our goal of less than $1000?
| Component | Paid |
|---|---|
| Motherboard, CPUs, Memory | $170 |
| RAID Controller | $101 |
| NAS/SAN Array Chassis | $270 |
| PSU | $120 |
| 9 x 2TB HDD | $670 |
| Incidentals | $73 |
| Subtotal, Expended | $1404 |
| Adjustments, not against goal | $760 |
| Total | $644 |
The total of $644 is an excellent price for 14GB+ RAID 5 high performance NAS. But, I’m getting ahead of myself.
Putting it All Together
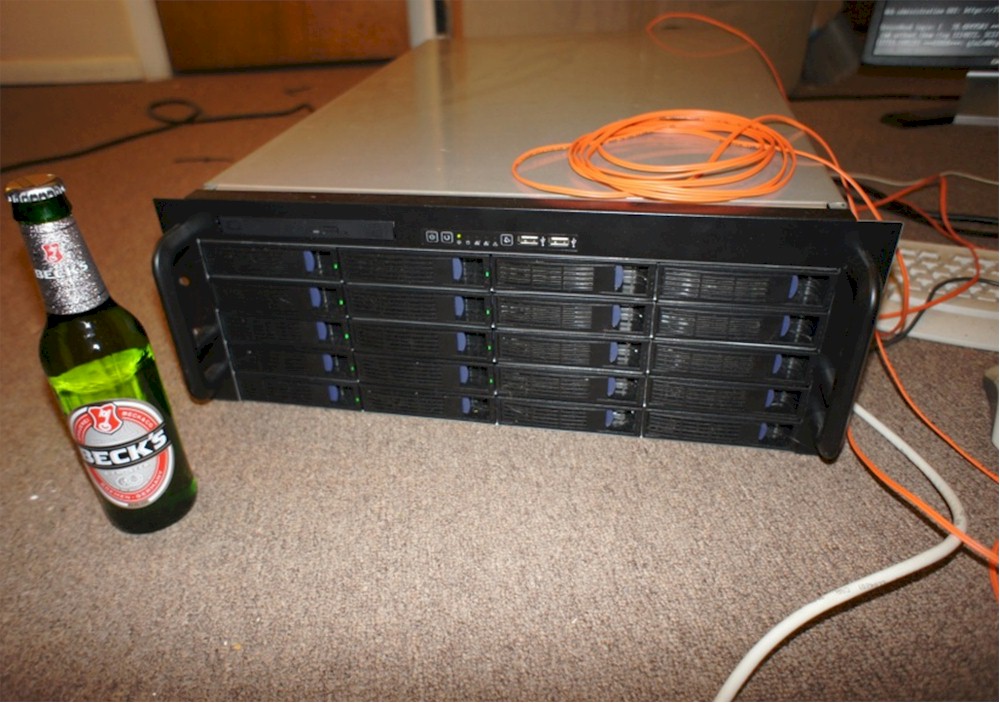
Figure 3: Old Shuck with refreshment
Now that we have our components, we only have three steps to convert a bunch of brown boxes into a full-fledged NAS:
- Assemble: Build our the server, put the hardware pieces together
- Install: Set up the RAID controller and install Openfiler
- Configure: Define our volumes, set up the network and shares
Assembly
The cobbling part of this went really smoothly, with only a couple of unpredictable gotchas.
Following the advice over in AVSForum for the Norco 4020, the fan brace was removed first, the motherboard installed and power supply screwed into place. While wiring the power supply to the motherboard, we ran into our first gotcha.
Supermicro server boards of this generation require the 24-pin ATX connector, an 8-pin P8 connector, and a 4-pin ATX12v P4 Connector. Our new Corsair power supply, which came in a weird black velveteen bag, could only handle two of the three—there is no modular connector specifically for the P4 jack. So we had to scramble to find an obscure Molex to P4 adaptor. Advice to Corsair: Drop the bag and add a P4 connector (Want to keep the bag? Drop the two Molex-to-floppy connectors.)
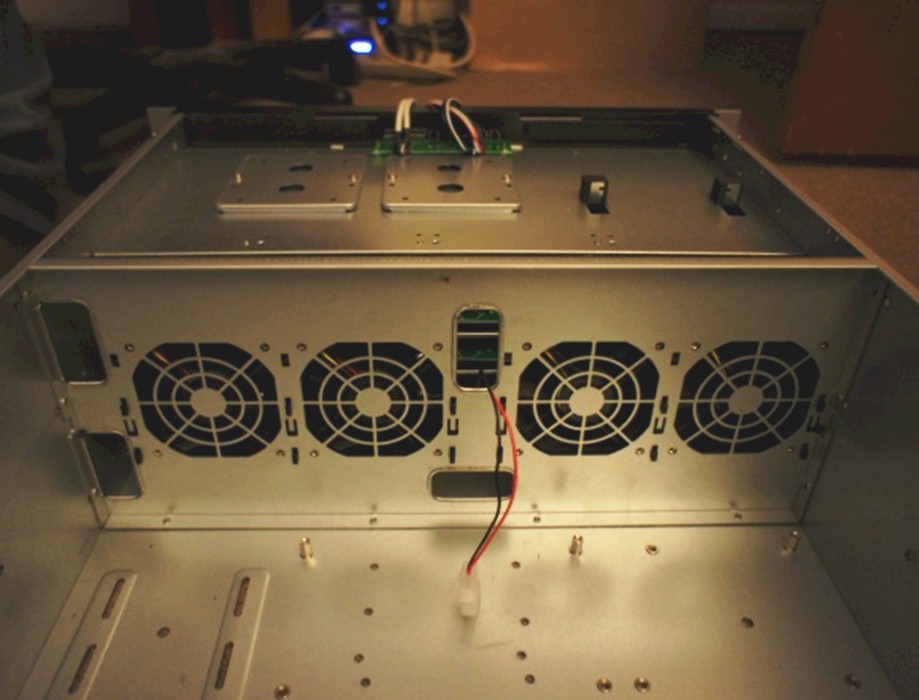
Figure 4: Rear view of drive bay
There is no documentation for the Norco chassis, which doesn’t help explain redundant power connectors on the SATA backplane. You only need to fill five, the rest are redundant.
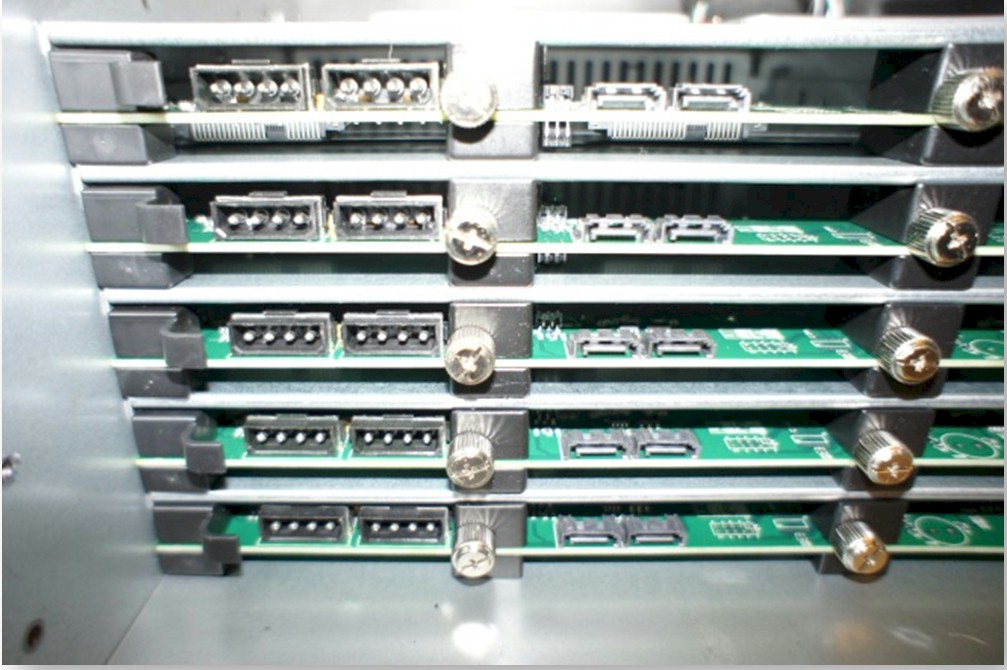
Figure 5: SATA backplane ready for wiring
The other gotcha was the CMOS battery, which I discovered was limping on its last legs and required replacement. This is a common problem if a motherboard has been sitting fallow for a number of months, like many swapped out servers. With a dead CMOS battery, the system wouldn’t even blink the power LED.
Additionally, care should be taken to exit the BIOS before powering down. It is tempting to do a power-up test of your just arrived parts, even though you don’t have everything you need to do the build. But powering off while in the BIOS may require a CMOS reset.
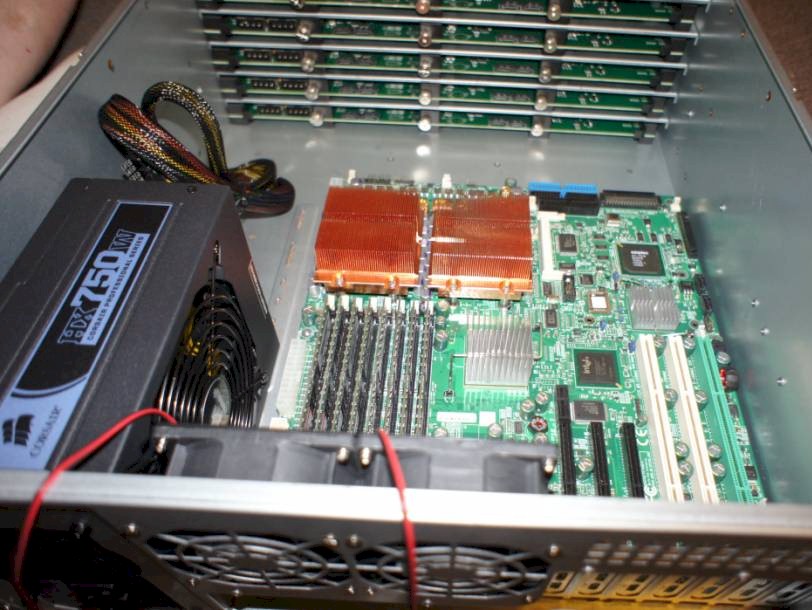
Figure 6: Inside view with Supermicro motherboard mounted
To avoid this, take my advice, wait for all the components to arrive before embarking on the build. I’m sure there is some suitable coital metaphor for the anxiety that ensues when you are left waiting for that last critical thing to come together. Just put the boxes aside and listen to some Blues.
Fair warning about the SATA cables: buy simple flat drive cables. Odd angles, catches, and head sizes often are not compatible with connector-dense RAID cards. When connecting your cables, threading them through the fan brace to your RAID card before mounting the card or the brace, eases things along.
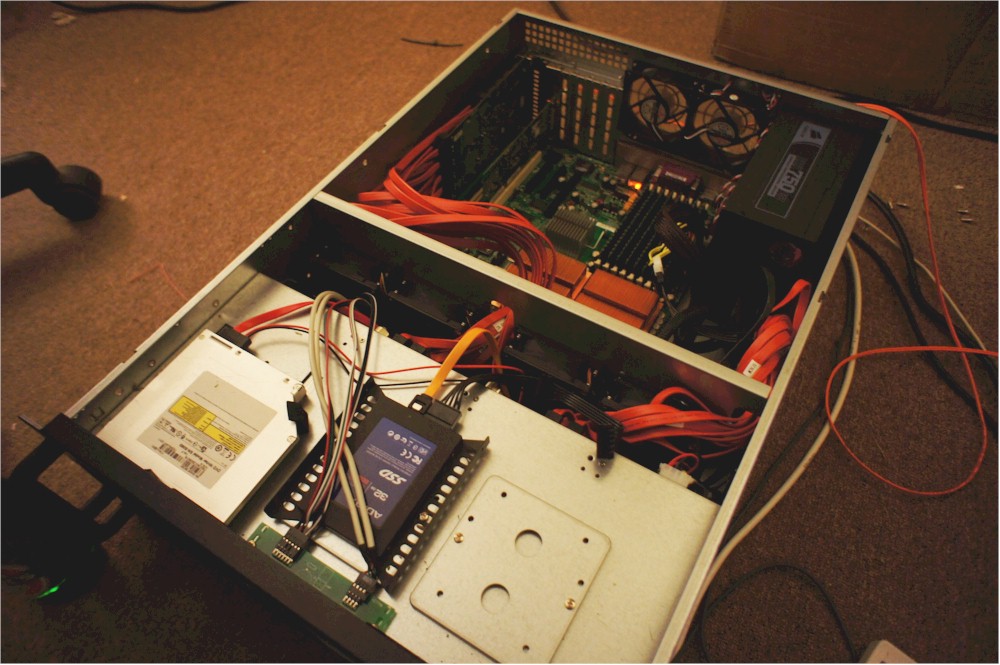
Figure 7: Inside view of full assembly
You are going to want to put the RAID card in slot #1 which runs at
100 Mhz, leaving slot #3 for the fiber card. If you put the card in the
faster slot, you are probably going to see a blast from the past, an IRQ
conflict error. Disabling the onboard SCSI will resolve this, probably a good idea anyway, since it is an extra driver layer we won’t be using.
On the case, care should be taken with the Molex connectors, they are a bit flimsy. When connecting them, treat them gingerly and maybe tie them. I had a near meltdown when a loose connection took out the fan brace.
The drive caddies are not the tension type, and putting in the four eyeglass screws needed to mount each drive is a little time consuming.
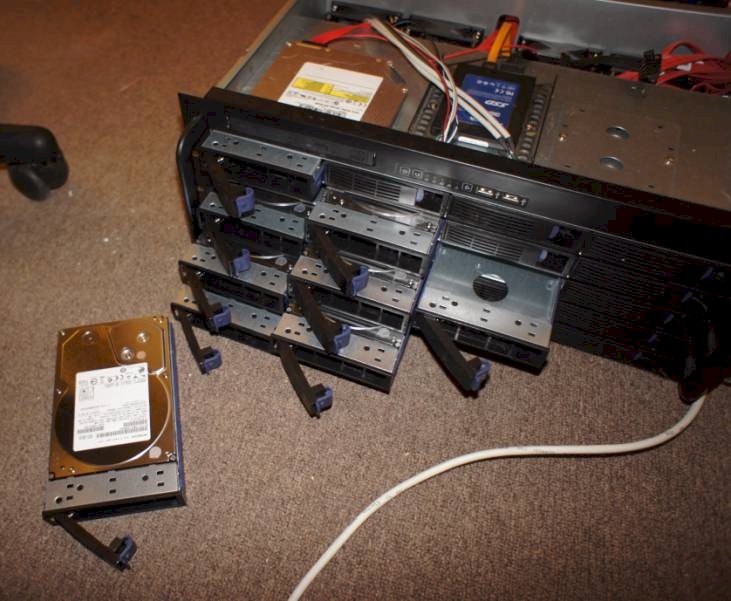
Figure 8: Old Shuck with nine drives
Important! Even if you have a fiber card already, do not install it yet. It will cause conflicts at this point.
RAID Installation
First we are going to configure our RAID-5 array, and then install Openfiler on our system disk. The install process is long; it took about eight hours, largely waiting and more waiting. Have that music handy.
With Openfiler, you can go with software RAID, which requires processor muscle, especially with potentially twenty drives. The catch here is that as far as I know, there are no 20 port SATA motherboards. So you’d have to buy several SATA HBAs. Given the price of our 3Ware board, you’d end up paying more for less performance.
Stick with a quality used, processor-based RAID card (unlike High Point or Promise, which are more like RAID hardware assist cards) and you’ll get a highly reliable and performant solution. The downside is that you are tightly coupling your data to a hardware vendor. While RAID is standard, the checksum mechanism is proprietary to each vendor, such as 3Ware in our case.
The setup of the 3Ware card held no gotchas, and required just a few decisions, documented in Figure 9. I created a single unit of all nine drives as RAID 5. The largest decision is the stripe size and I went with the largest, 256K. I also selected write cacheing. Even without battery backup, power is not an issue here and my use patterns mean critical data loss is very unlikely. The Hitachi drives support NCQ, so drive queuing is enabled. We are going for performance, so I used the Performance profile, natch.
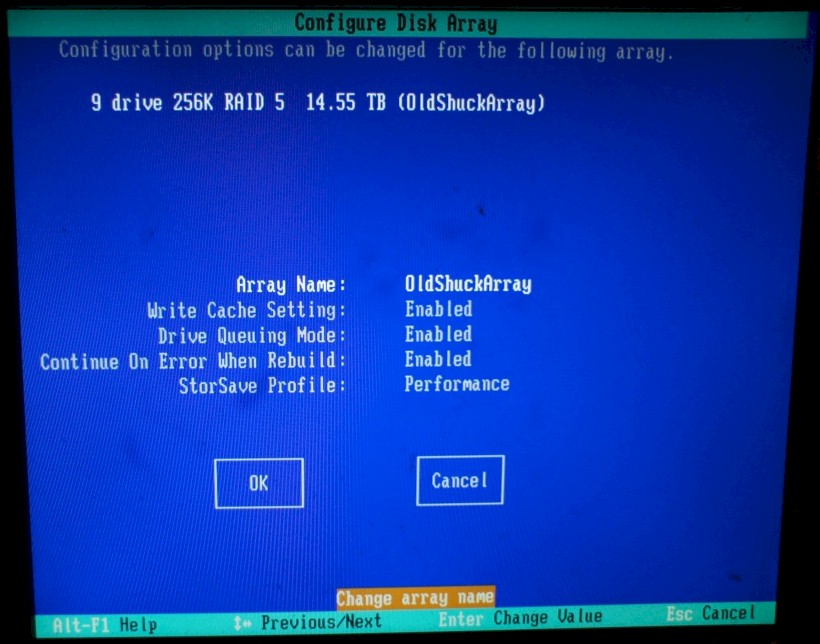
Figure 9: 3Ware RAID array configuration
There are long running discussions and mysteries associated with the selection of stripe size and its impact on performance. There is a complex calculus around drive speed, number of drives, average file size, bus speed, usage patterns and alike. Too much for me – I used the simplistic rule of thumb, “Big files, big stripes, little files, little stripes.” I plan on using the array for large media files. This decision, stripe size, does impact our performance as you’ll see later.
Once you’ve configured the array, you’ll be asked to initialize the unit. Initialization can take place in the foreground or the background and the first time through I recommend doing it front and center. This allows you to see if there are any issues around your drives. But it does require patience – it took about six hours to initialize all the drives, and waiting for 0% to tick over to 1% is a slow drag. If you choose, you can cancel, and it will take even longer in the background.
Have your Openfiler Version 2.3 install CD (2.99 isn’t quite ready for primetime), downloaded from SourceForge, sitting in the server’s DVD drive so that once the RAID initialization is complete, it will boot.
Given the age of the 3ware card, and LSI’s acquisition of them, docs can take awhile to find. There are several useful PDF files available, linked below for your convenience.
Openfiler Install
Openfiler is a branch of RedHat Linux and is a breeze to install. Boot from CD. You have the choice of Graphical Installation or Text Installation. Installation directions are at Openfiler.com.
The simplest is the Graphical install (Figure 10) and you’ll be stepped through a set of configuration screens: Disk Set-up; Network Configuration; and Time Zone & Root Password.
Unless you have unique requirements, such as mirroring of your boot disk, select automatic partitioning of your system disk (usually /dev/sda). Be careful to not select your data array; the size difference makes this easy.
Automatic partitioning will slice your system disk into two small partitions, /Boot and Swap – allocating the remaining space for your root directory (“/”). You should probably go no smaller than a 10 GB disk for your system disk.
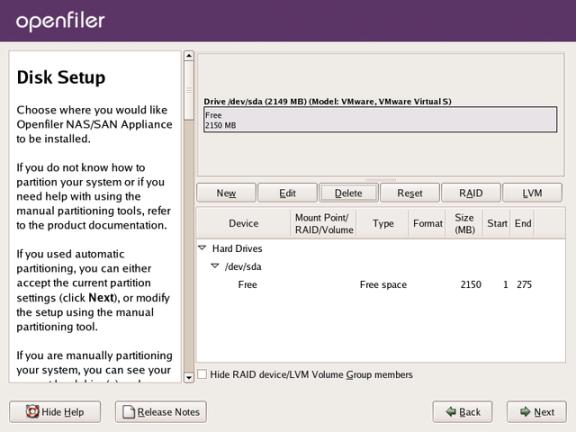
Figure 10: Openfiler disk setup
For network setup (Figure 11), you can choose either DHCP or manual. With DHCP you’re done. Manual is no more difficult than basic router configuration. You’ll need an IP address, netmask, DNS server IPs and a gateway IP.
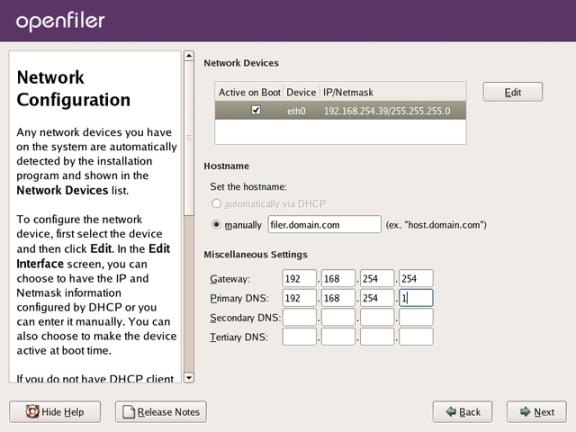
Figure 11: Openfiler network setup
Unless you are in one of those time zones that are oddball (for example Arizona), setting the time zone is just a matter of point and click on a large map. Zeroing in on a tighter location can be a pain.
Your root password, not that of the Web GUI, should be an oddball secure password. Once set you’ll see the commit screen shown in Figure 12.
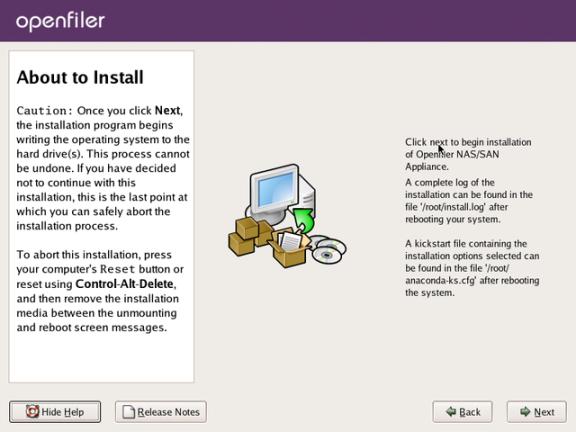
Figure 12: Openfiler install confirmation screen
Once you hit the Next button it is time to go out for a sandwich—it took more than an hour to format the system disk, and download and install all the needed packages.
When complete, you will get a reboot screen. Pop the media out of the drive and reboot, we have a couple more steps.
Once Openfiler is up, you’ll see the Web GUI address – note it, we’ll need it in the next section. Log in as root with your newly-set password, we are going to do a full update of the system software and change the label of the RAID array.
The version of Linux, rPath, uses a package management tool call conary. To bring everything up to date, we will do a updateall, by entering the following line at the command prompt:
conary updateall
This update for Old Shuck took about twenty minutes.
Once complete, we just need to change the label of the RAID array, which for some mysterious reason, Openfiler defaults to msdos, limiting our volume size to no more than 2 TB. The label needs to be changed to gpt via this command:
parted /dev/sdb mklabel gpt
Make sure you change the label on the correct volume! mklabel will wipe a disk, which can be useful for starting over, but catastrophic for your system disk.
After rebooting our prepped and updated Old Shuck, we are ready to do the NAS configuration, which means making a journey through Openfiler’s Web GUI.
Openfiler Configuration
We are going to share our entire array and make it visible to all machines running Windows on our network.
First let’s get to the Web GUI. If you look at your console, you’ll see just above the User prompt an IP address based https URL. Your browser might complain about certificates, but approve the link and sign in. The default user and password are openfiler and password.
The NAS configuration requires setting up three categories of parameters:
Network: Make the server a member of your windows network
Volumes: Set up the disk you are sharing, in our case half the array
Sharing: Create a network shared directory
Once you’ve logged in, you’ll have the Status screen (Figure 13):

Figure 13: Openfiler status screen
We need to set the network access parameters to that of your Windows network, then set the Windows workgroup, and finally your SMB settings.
Go to the System tab and verify your network configuration is correct. At the bottom are the network access parameters you need to configure (Figure 14). These set the IP range you’ll be sharing your disk with. Enter a name, the network IP range, and a netmask, finally set the type to share. The name is only significant to Openfiler, it isn’t the name of your Windows workgroup or net domain.

Figure 14: Openfiler network access setting
A bit of a warning, in the middle of the page you’ll see your network interfaces. Since our motherboard has dual Gigabit network ports, there is a temptation to set up a bonded interface, not a bad idea. The problem is, if you start the bonding process, you have to finish it properly. Backing out or making a bad guess at settings will kill your network – and you’ll have to resort to the command line to reset your configuration.
We now have to set the Workgroup so our server can join the network neighborhood on each machine. Select the Accounts tab, the second set of options are those for your Windows domain (Figure 15), check the box to use Windows domains, select NT4-style Domain (RPC), set your workgroup name, and select Join domain. Submit at the bottom of the page.
.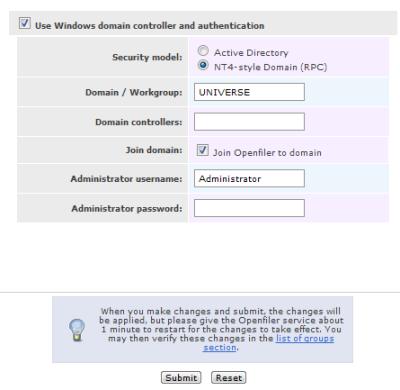
Figure 15: Openfiler Workgroup setting
The final step in completing the network set up is to configure the SMB service. Select the Services tab and click SMB/CIFS Setup on the right-hand menu. Once there (Figure 16), all you need to do is set your Netbios name and select Use Default Domain as a Winbind policy. Don’t worry about any of the other settings.
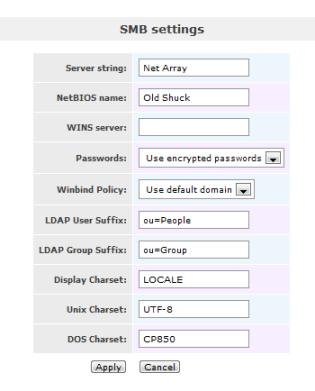
Figure 16: Openfiler SMB service setting
Apply and return to the Services tab. Go ahead enable the SMB / CIFS service (Figure 17). You should now be able to see your server on your Windows machines.

Figure 17: Openfiler enable SMB server
Of course there is nothing there to share yet; we have to define some shares first. And to do that, we need to define a volume that we can share.
Volume Setup
Under Openfiler, volume groups are composed of physical volumes and contain user defined logical volumes that can have shared directories on them.
We are interested in setting up a single volume group, called nas, made up of all 14.55 TB of our RAID array, which has a single volume, called NetArray. NetArray will have one shared folder called Shares.
First we create the Volume Group by creating a new physical volume which will house our volume. Go to the Volumes tab.
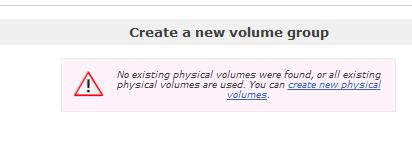
Figure 18: Openfiler create volume group
Selecting Create new physical volumes leads us to our block devices (Figure 19). We want our RAID array, /dev/sdb. Telling the difference is pretty easy, look at the sizes.

Figure 19: Two very different size block devices
Clicking our array will bring us to the partition manager (Figure 20), where we can create a single primary partition composed of all available space. This is anachronistically done by cylinders. The defaults are the entire array, just click Create.

Figure 20: Partition creation
This will spin a bit, once done, go back to the Volumes tab so we can give a name to our volume group (Figure 21).
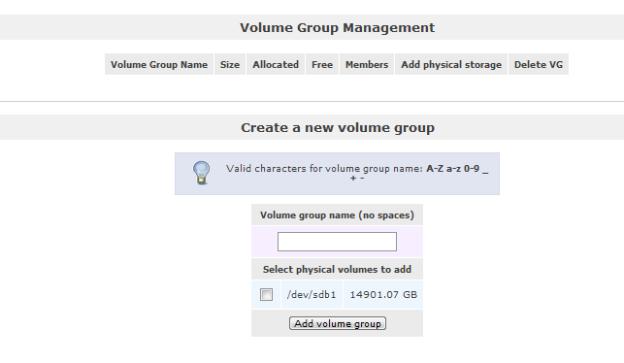
Figure 21: Naming volume group
Here we need to enter NAS as a name, and select our only partition. Commit by clicking Add volume group. Couldn’t be more straightforward.
Ok, we have a volume group, now we need a volume. On the right side menu select Add Volume. You’ll see an odd abbreviated page which allows you to select your volume group. Just click Change.
You’ll now get the Volume Creation page. To create our NetArray volume, enter the name, and push that slider all the way to right (….way past eleven), leave the filesystem type as XFS. Punch Create and the cursor will spin.
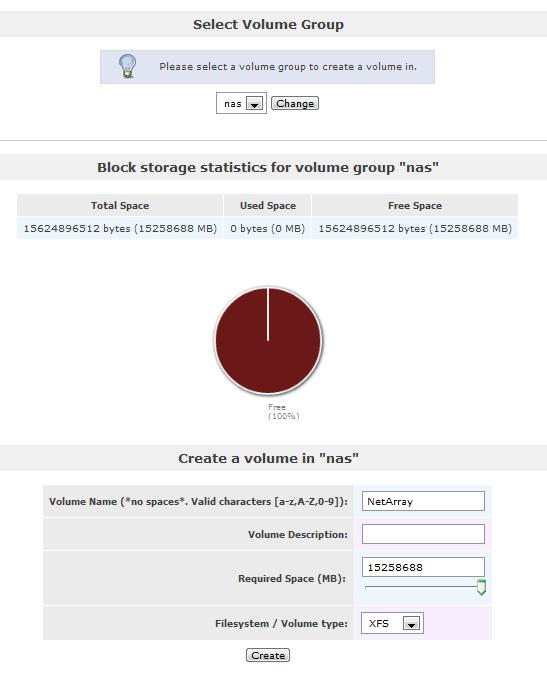
Figure 22: Logical volume creation
Share Setup
With our volume in hand, we can now create a network share. Go to the Shares tab. Clicking on our volume, NetArray, will get a dialog (Figure 23) that allows us to create a directory. Name the directory Shares.
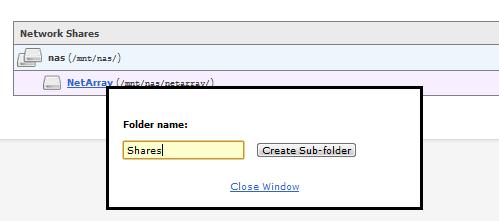
Figure 23: Share creation
Clicking the Shares directory will give us a different dialog (Figure 24), this is the doorway to the Edit Shares page where we can set a netbios name and set up permissions for our directory.
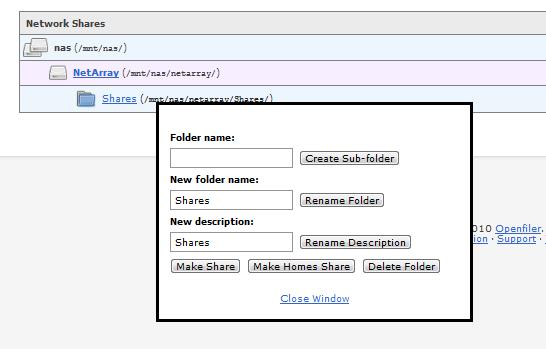
Figure 24: Share edit gateway
Just click Make Share and the edit page (Figure 25) will come up.
Each item is updated separately on this page. First we want to override the default name, which would look like a path specifier ( nas.netarray.shares) with just Shares. Once entered, click Change.
We want Public guest access, i.e. we don’t have any kind of authentication
set up at this point. Check it and click Update. You’ll notice that the bottom of the page
has changed, you can now configure the permissions for our WoofPack network.
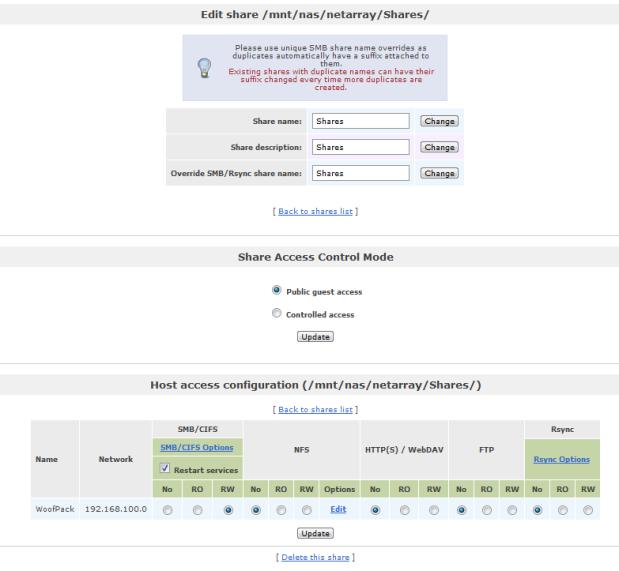
Figure 25: Share edit page
We want to grant read & write permissions to everyone on the WoofPack network, and by extension everyone in our Windows workgroup. Under SMB/CIFS, push the radio button for RW. Click Update which will restart Samba with the new permissions. Our job here is finished.
As you can see we’ve taken the path of least resistance: one volume group, the whole singular array, one volume, one share, and read/write permissions for everyone. This makes sense because in the next installment of this article we are going to tear all this up. We took a low risk approach of creating our SAN, and this NAS is the first step. Creating the NAS allowed us to set up our initial disk array, familiarize ourselves with Openfiler, and create a performance baseline.
Now travel over to Windows, and you be able to mount Shares as a drive (Figure 26).

Figure 26: Share mounted from Windows
Our build, Old Shuck, delivers 14 TB. All that is left is to take a measure of the performance strictly as a NAS and sum up, so we can get to the cool part, the SAN configuration.
Performance
Using Intel’s NAS Performance Toolkit (NASPT), we are running the same tests that new entrants to SNB’s NAS chart go through. This will let us determine if we hit our performance goals. We are not going for the gold here, we are just getting a feel for the kind of performance we can expect with our future NAS to SAN tests, and so we can see the kind of improvement that moving to a SAN offers.
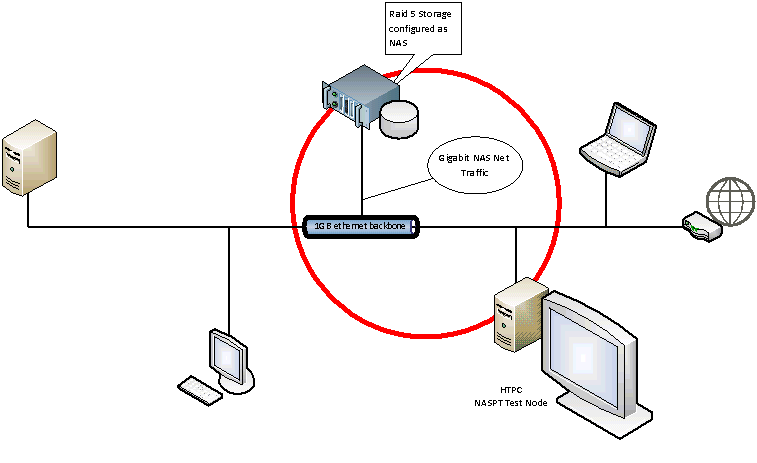
Figure 27: NAS Performance test configuration
This is the first of three tests, NAS performance. The second will be SAN performance, and the last, SAN as NAS performance. All NAS performance tests are going to be done on a dual core 3GHz Pentium with 3 GB of memory running Windows 7, over a Gigabit Ethernet backbone. The SAN performance will be done from the DAS Server.
Each test will be run three times, the best of the three will be presented, a slight advantage, but you’ll get to see a capture of the actual results instead of a calculated average. Figure 28 shows the results of the plain old NAS test:
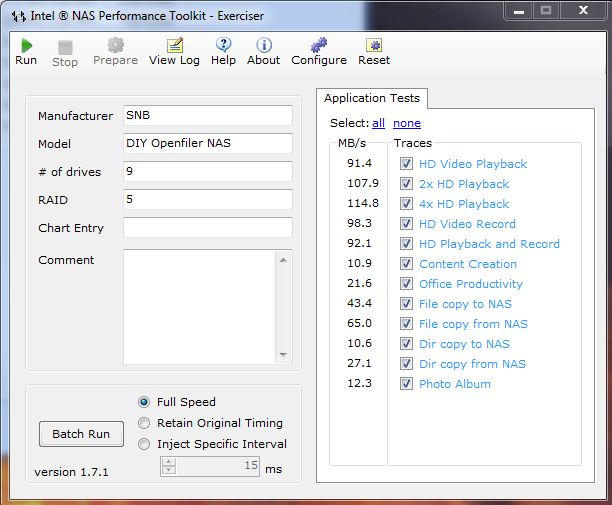
Figure 28: NAS Performance test results
You may remember, when we formatted the 3Ware RAID Array we selected a stripe size of 256K, largely because the array is going to store compressed backups and media files, in other words, large files. You can see the hit we take in performance here. Media performance is outstanding, but the benchmarks around small files (Content Creation, Office Productivity) suffered. The oddest result was ‘File Copy To NAS’ which varied from 59 to 38 in our tests.
Let’s see how these numbers compare to some current SNB chart leaders in Figure 29.
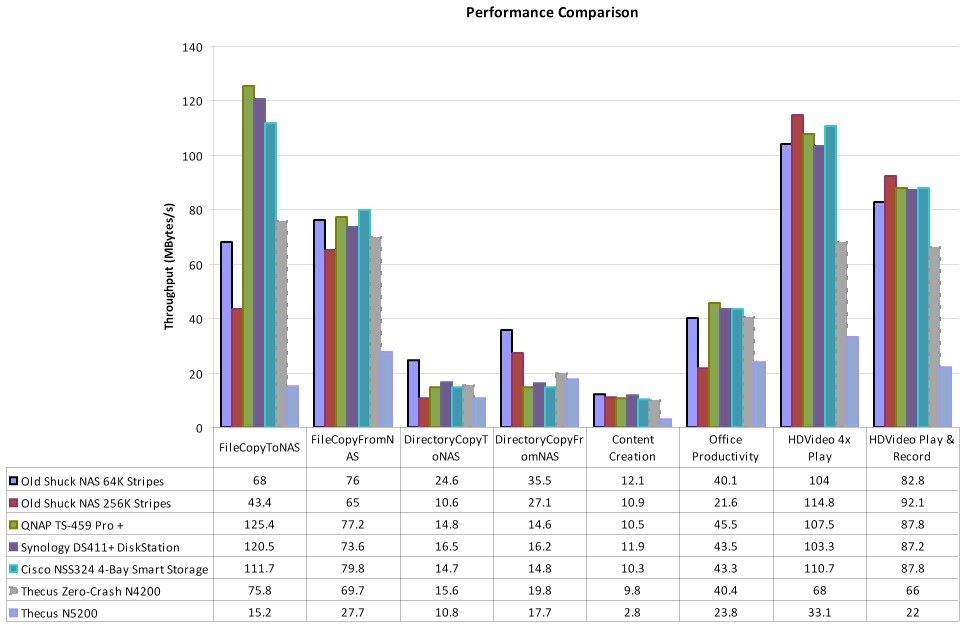
Figure 29: NAS Performance comparison
Other than the odd File Copy To NAS results and a poor performance around the small file centric office productivity, we were with the pack throughout, besting the charts in directory copy from our NAS, and in the media benchmarks which is wholly expected.
Summary
Other than some disappointments with Openfiler, which we’ll cover in our conclusion, the NAS build was very straightforward. All of our components went together without a hitch and performance was more than acceptable – especially given the fact that the next closest consumer NAS in capacity is $1700 and delivers less performance. I don’t know about you, but I’m looking forward to the next set of tests.
In the next part of our series, we’ll buy and install our fiber HBAs, and configure Old Shuck as a SAN. Will it work? Will we be able to hit our price and performance goals? Stay tuned…
In putting together the build, I’d like to thank some vendors, this is unsolicited and without compensation of any sort:
Ravid, from the The620Guy Store @ EBay, a big help in steering amongst unfamiliar hardware, the source of much of the PCI-X hardware.
The guys at Extreme Micro in Tempe, AZ. One of those local computer shops that you thought were long gone. Good prices and handy help.
