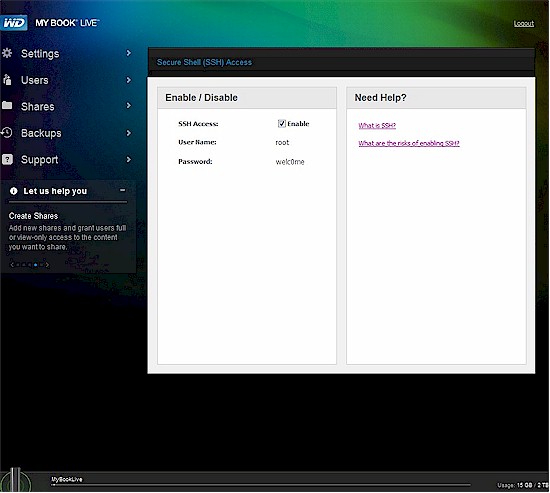
WD My Book Live Hidden SSH enable
Introduction
Update 9/18/2012 – Added information on making rsync start upon reboot.
The storage and backup strategy here at the SmallNetBuilder Labs (my humble home office) has evolved over time. I originally relied on the very flexible backup features built into NETGEAR’s ReadyNASes using an old NV. I had a backup routine set up on the NETGEAR that backed up my main work file directory a few times during the workday and another that backed up less frequently updated files once a day.
This worked fine until one day the NV power supply died and I realized the folly of having only one backup device. So I wrote Smart SOHOs Don’t Do RAID and moved on to use a pair of single-drive NASes—a QNAP TS-109 Pro and Synology DS109+. Since neither of these can back up to or from a networked SMB share, I had to bring 2BrightSparks’ SyncBackSE into the mix.
This program ran on my Windows work machine, doing the same frequent backups that the ReadyNAS NV had done, but now to the QNAP NAS. I then used the rsync network replication features on the QNAP and Synology to run daily incremental backups of the QNAP to the Synology and all was good.
When I reviewed WD’s My Book Live Duo, I really liked its WD2go remote access service. It was painless to set up and provides easy-peasy remote access to my files from any web browser or through its iOS and Android apps. The downside is that it doesn’t do all the tricks that the QNAP and Synology do, such as rsync backups and serving the Logitech Squeezeboxes I have scattered around the house.
Actually, I had moved Squeezecenter serving over to an Acer Revo Nettop some time ago by installing Logitech Media Server on it. This provided access to the latest versions of the server instead of lagging a few releases back as the QNAP and Synology versions frequently did. The other reason for bringing a Windows machine into the mix was for running other media servers (PlayOn, PlayLater) not available on the QNAP and Synology platforms. I was also trying to think ahead and provide maximum flexibility in choosing a cloud-based offsite backup service, which I have yet to decide on.
Setting Up Rsync
This leaves rsync support as the piece missing from the My Book Live, but that turns out to not be a problem. WD provides a hidden page to enable SSH access, which, once enabled, provides full root access and the ability to modify its Debian-based OS, assuming you are willing to discard warranty protection.
Entering http://mybooklive/UI/ssh (case sensitive!) into your browser brings up the hidden page shown in the opening graphic above, complete with login info.
WARNING! WD provides full root access with the ability to modify any system files and save the changes. This means that you can brick or mess up your My Book Live if you are not careful.
The first thing you need to do after logging in with an SSH client such as PuTTY or WinSCP is enable the rsync daemon. Edit /etc/default/rsync and make it look like the code below. All you really need to do is remove the # in front of the RSYNC_ENABLE=true line.
# defaults file for rsync daemon mode
# start rsync in daemon mode from init.d script?
# only allowed values are "true", "false", and "inetd"
# Use "inetd" if you want to start the rsyncd from inetd,
# all this does is prevent the init.d script from printing a message
# about not starting rsyncd (you still need to modify inetd's config yourself).
RSYNC_ENABLE=true
# which file should be used as the configuration file for rsync.
# This file is used instead of the default /etc/rsyncd.conf
# Warning: This option has no effect if the daemon is accessed
# using a remote shell. When using a different file for
# rsync you might want to symlink /etc/rsyncd.conf to
# that file.
# RSYNC_CONFIG_FILE=
# what extra options to give rsync --daemon?
# that excludes the --daemon; that's always done in the init.d script
# Possibilities are:
# --address=123.45.67.89 (bind to a specific IP address)
# --port=8730 (bind to specified port; default 873)
RSYNC_OPTS=''
# run rsyncd at a nice level?
# the rsync daemon can impact performance due to much I/O and CPU usage,
# so you may want to run it at a nicer priority than the default priority.
# Allowed values are 0 - 19 inclusive; 10 is a reasonable value.
RSYNC_NICE=''
# Don't forget to create an appropriate config file, # else the daemon will not start.
We are using the default location of the rsyncd.conf file, which is in /etc. So navigate there and create the file as shown below.
pid file = /var/run/rsyncd.pid
lock file = /var/run/rsync.lock
log file = /var/log/rsync.log
[rsync]
path = /shares/rsync
uid = root
gid = share
read only = no
list = yes
auth users = root
secrets file = /etc/rsyncd.secrets
The first three lines are not essential. But I would recommend at least defining the log file, since it’s handy to have while you are trying to figure out why you can’t connect to your rsync target!
The essential part starts at the [rsync] line. This configuration defines the rsync module named rsync, which is a share you need to create in the My Book Live root share directory as shown below. I created the share via the My Book Live admin and gave it Public access, as are all my other shares. If you want to name your rsync directory differently, just change the [rsync] name in brackets and set the path variable accordingly.
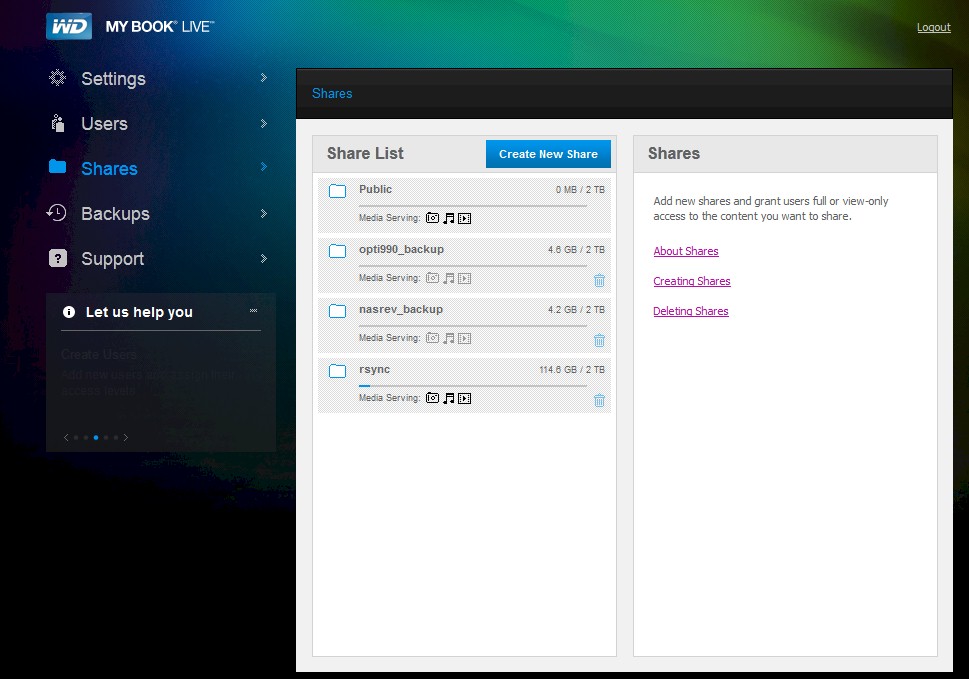
WD My Book Live shares with rsync share
I got the uid and gid settings by navigating to the /shares directory and doing a listing as shown below. The uid (user id) is listed first, followed by the gid (group id).
My BookLive:/shares# ls -al
total 388
drwxr-xr-x 7 root share 65536 Aug 1 09:52.
drwxr-xr-x 25 root root 4096 Jul 31 15:36..
drwxr-xr-- 2 root root 65536 Aug 1 09:55.mediacrawler
drwxrwxr-x 5 root share 65536 Jul 7 16:19 Public
drwxrwxr-x 30 root share 65536 Jul 31 15:11 nasrev_backup
drwxrwxr-x 4 root share 65536 Jul 8 11:09 opti990_backup
drwxrwxrwx 6 root share 65536 Mar 23 15:17 rsync
The rsync apps in the Synology and QNAP both require username and password to be entered, so I set root as the user (auth users = root in rsyncd.conf). The password needs to be entered in the rsyncd.secrets file, which is also located in /etc. I entered:
root:root
This is in the form username:password. Note that because the password is in cleartext, I had to limit access to only the file owner, which I did by entering the line below while in the /etc directory:
chmod 600 rsyncd.secrets
At this point, everything we need has been defined, so we need to start rsync with this command:
/etc/init.d/rsync restart
The first time you run this you will get a warning that rsync was not running. You can ignore this and you won’t get the warning on subsequent restarts. If you make changes to any of the files described, be sure to restart rsync to get the changes to take.
Update 9/18/2012 – A helpful reader pointed out that you can make rsync automatically start at boot time.
Navigate to the /etc/rc2.d directory, then enter the following at the command line:
ln -s../init.d/rsync S91rsyncWhen you reboot, rsync will automatically be started and you will not get
a warning that rsync is not running.
Using rsync
Now it’s time to use our rsync-enabled My Book Live. Most of my files live on a trusty old QNAP TS-109+, so I needed to move the files over to the My Book Live. I could have just done a folder-to-folder drag and drop, but didn’t want to tie up my Windows system.
So I set up the following remote replication job on the QNAP. This copied all the files and folders in the Qmultimedia folder on the QNAP over to the rsync directory on the WD. (The obscured password is "root" as defined in the rsyncd.secrets file.)
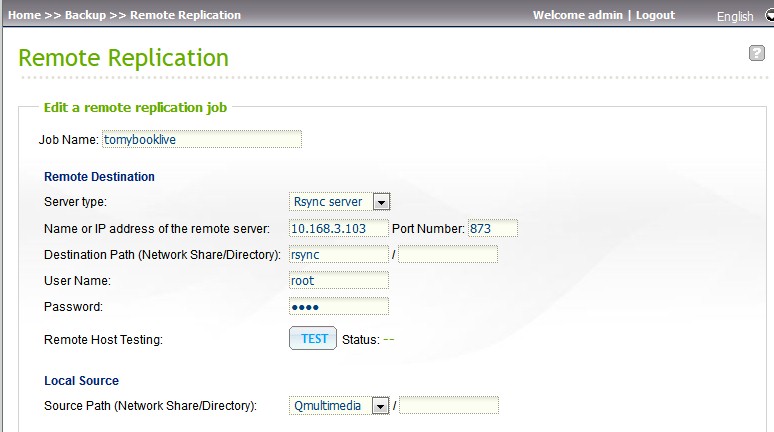
QNAP Remote Replication settings to access the My Book Live rsync target
Backing Up The My Book Live
This next part isn’t really about rsync, so you can stop reading if that’s all you needed. But now that the My Book Live is my primary NAS, it needs to be backed up. You could write a cron job for this and run it on the My Book Live. But WD has built in a flexible "safepoint" backup feature, which is a whole lot easier to use.
WD defines safepoints as NAS snapshots that include "the collection of users, shares, WD SmartWare/Time Machine, or Windows 7/Vista backups, and associated device configuration details". When you create a safepoint, the My Book Live scans the network for SMB shares, which are then displayed as shown below.
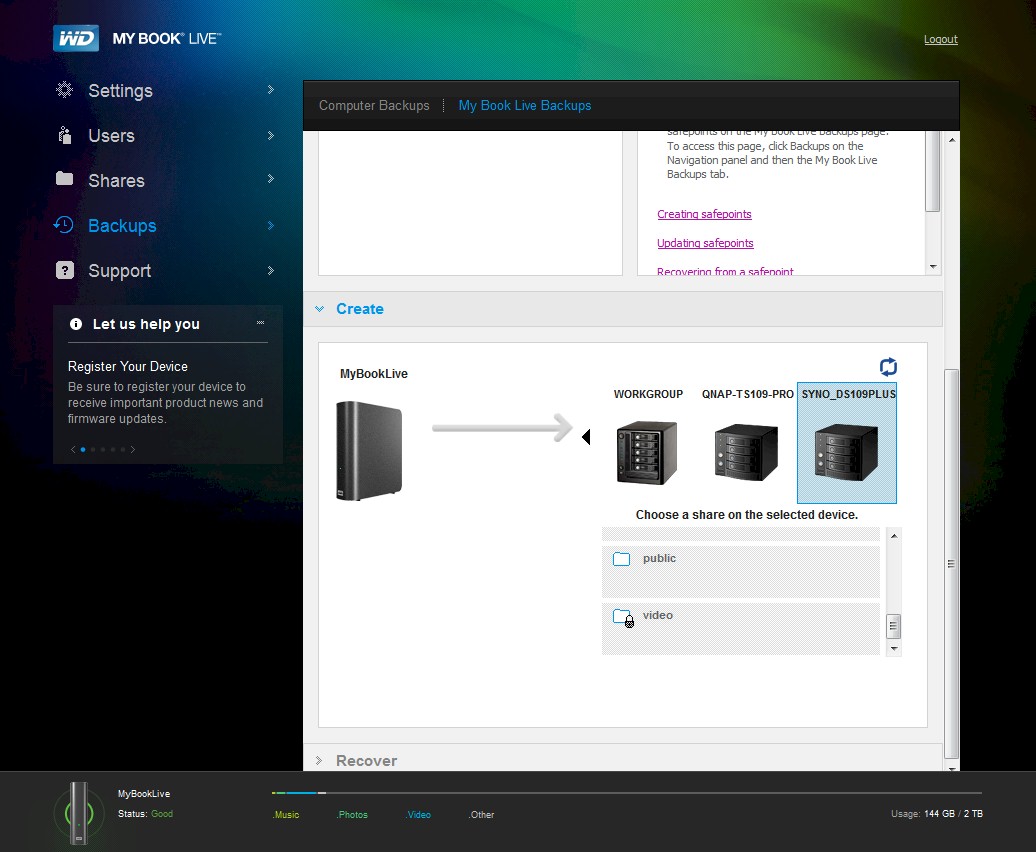
Safepoint target share selection
Safepoint destinations can be password protected and the safepoint creation dialogs prompt for username and password information if you select a protected share. You can also schedule incremental updates of the safepoint as shown below. You can define multiple safepoints, but note that safepoints don’t keep multiple versions of files.
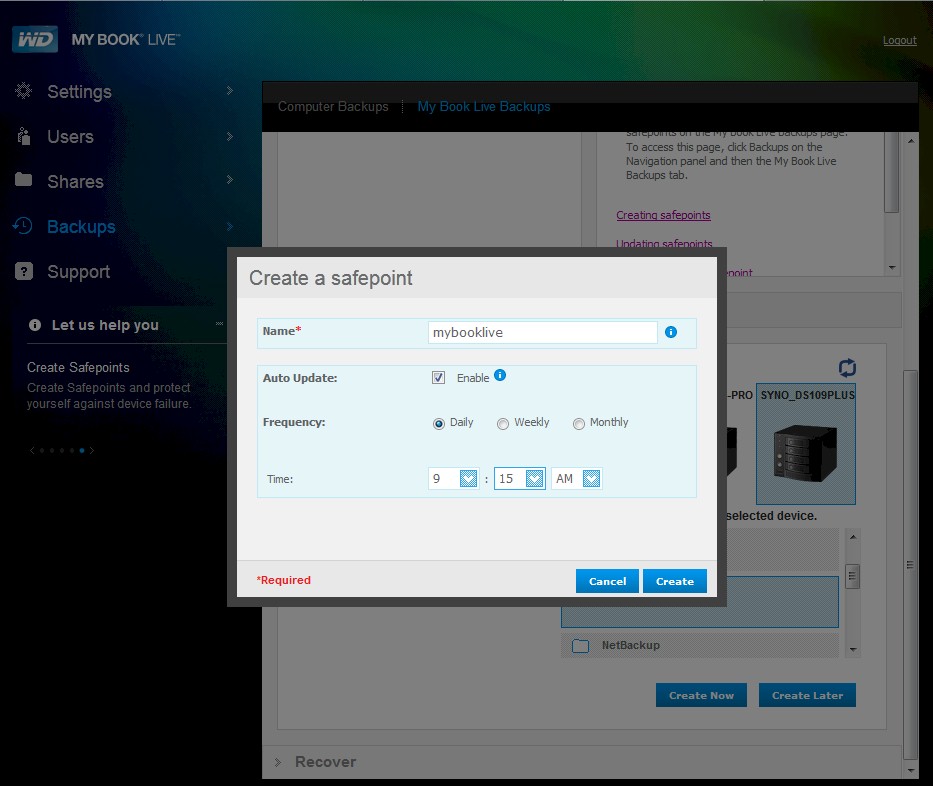
Safepoint creation
Closing Thoughts
Although the WD My Book Live and My Book Live Duo aren’t the fastest NASes, ~40 MB/s write and 60+ MB/s read for large sequential files is much faster than the old QNAP it replaces. The biggest gain is that I now have flexible and secure remote access to all my files via WD2go. And now rsync is always there if I need it.
