Introduction
| Iomega StorCenter Network Hard Drive (33271) | |
|---|---|
| Summary | NAS with built-in UPnP media server and gigabit Ethernet port with decent performance. |
| Update | None |
| Pros | • Windows, MacOS, Linux supported • Gigabit Ethernet • USB printserver • UPnP AV server |
| Cons | • Noisy fan • Only slight speed boost from gigabit Ethernet |
I’ve made extensive use of Network Attached Storage (NAS) devices on my network, but I’ve always had the feeling they were only up to light duty applications. Transferring or backing up gigabytes of data is painful on a 100 Mbits/s network, so when I need to do mass transfers, I’ve always directly hooked up a USB 2.0 or Firewire drive, both of which are rated in the neighborhood of 50 MBytes/s.
I thought that maybe, with the advent of 1000 Mbits/s (gigabit) networks, I could leave my storage down in the basement where it belongs, even when I’m doing heavy-duty transfers. In this review, I’ll try out the Iomega StorCenter, a NAS device with support for gigabit networks. As a bonus, it also includes a network print server and a UPnP media server. The StorCenter comes in either 250 GB or 160 GB models. For this review, I’ll be using the 250GB model.
Design And Construction
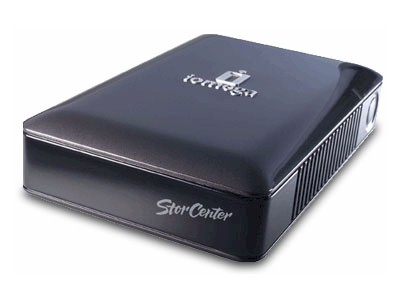
The StorCenter is constructed of black plastic with rounded corners, and is only slightly larger than the 3.5 inch drive it contains. The front of the box is plain, with only a logo. The rear has two USB ports, a power connector, an on/off button and a network connection (see Figure 1).
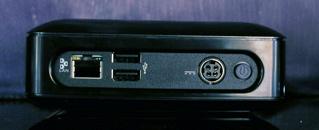
Figure 1: StorCenter rear panel
As small as it is, heat is a concern, so an internal fan is used. Venting for the fan appears on the sides of the case, which means it has to be mounted on its base. Interestingly enough, the single LED used to indicate power status is also on the side, instead of on the front where you’d find it on most units.
Setting Up
Hooking up the StorCenter is as easy as plugging in a network cable and a power cable, and then turning it on. When I first powered the unit up it ran fairly quietly, but I found that when the fan does fire up, it’s very noisy. (My wife compared it to the sound of a distant hair dryer.)
For Windows users, installation software is provided that will find the unit on the network, perform basic configuration and assign it a drive letter. If that is all you need, then you’re done – it will be mounted when you log onto your computer and you can use it like any other drive. For Macintosh users, a similar utility is provided for finding and mounting the drive.
It was nice to see that even Linux users weren’t left out – a Linux utility was also provided to locate and mount the drive. I think this is the first time I’ve seen a home NAS vendor provide Linux installation software. Kudos to Iomega!
In all cases, for advanced configuration, a web interface was available for complete control and configuration. Whether or not you intend to use the advanced features, it’s still a good idea to at least log in and set the administrative password because there isn’t one by default (see Figure 2). Without a password, anyone on your network would be able to re-configure or even erase the drive.

Figure 2: Login screen
As I installed the software on my Windows system, I saw an option to install a backup software package. This package was not an option when I installed on my OSX or Linux boxes, however. The backup software was full-featured with the ability to do manual, scheduled, compressed and encrypted backups.
Exploring the configuration pages, I found options for standard network settings like fixed network address vs. DHCP assignment, computer name, workgroup name, and so on. There was an option for setting the date and time (see Figure 3), but I noticed that there was no way to set up an NTP server to keep the time in sync.

Figure 3: Setting the time
File And Printer Sharing
The default sharing configuration of the box features a single shared folder with wide-open permissions. For more complete control, users can be defined (as shown in Figure 4) and directories created and restricted to certain users. There was no option for creating groups of users.

Figure 4: Adding a new user
Quotas can also be assigned to users if you want to restrict how much space any one user can take up. As a test, I assigned a small quota to a user and then attempted to exceed it. Once I passed my quota, I got a “disk full” error when trying to write, as shown in Figure 5.

Figure 5: Disk Full
The StorCenter can also act as a network print server, using a combination of LPR and Samba print services. When I went into the printer configuration page, it basically said, “Plug your printer into a USB port” as shown in Figure 6. All real configuration was accomplished on the client computer, not on the StorCenter itself. Instructions were provided for setting up the printer under Windows and Macintosh. Linux users were advised to consult the documentation specific to their distribution.
As a test, I plugged my printer into one of the available USB ports, and using the supplied instructions, added a network printer to my Windows laptop. A quick print test I ran worked fine. I assume it would work under Macintosh and Linux as well, as long as the proper printer driver was available.

Figure 6: Setting up the Print Server
File And Printer Sharing – More
Iomega’s documentation specifies that up to four external drives can be supported simultaneously by using a hub plugged into one of the USB ports. The drives can be formatted as either FAT/FAT32 or NTFS, but NTFS is only supported in a read-only mode. As a test, I plugged an external USB drive into one of the USB ports. When I did this, the drive was mounted and made available, and I was able to define a network shared folder that mapped to the drive.
This all worked fine, with one exception. For some forgotten reason, I had previously partitioned the USB drive into four parts. And when I plugged it in, only the first partition was recognized and made available for sharing. The other three partitions were missing in action, and I never was able to find any way to mount them. Moving on, under a FolderShare menu (see Figure 7) there was a description of how to set up a service that appeared to allow you to access and synchronize your files on the StorCenter while away from home.

Figure 7: FolderShare Settings
Unfortunately, the company that provides this capability has been purchased by Microsoft and is shutting down the service (see Figure 8). So at this point, the capabilities provided under this menu are moot.
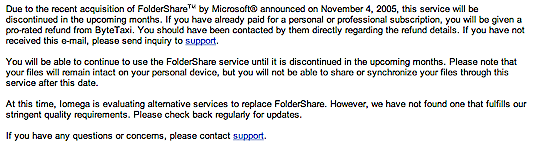
Figure 8: FolderShare is no more
As a final note, the 1.09 firmware version that I tested did not support file access via FTP. But Iomega said that FTP support has been added in version v1.27 firmware.
Media Serving
Next I explored a StorCenter maintenance menu, which provided several options, including formatting the internal drive, repairing the internal drive, and updating the firmware. One of the more interesting features on the StorCenter was its ability to act as a media server. Basically, the idea is that you use the StorCenter to hold your music, photographs and videos.
The StorCenter then employs the UPnP protocol to serve the files to a multimedia device hooked into your entertainment center, with your TV becoming the user interface. This allows you to build a large multimedia library on a small, low-powered device, and store it somewhere out of the way.
I’ve been using my NAS devices this way, but I’ve had to do a hack to install the software myself, rather than using pre-loaded software that is supported by the manufacturer. There are a number of multimedia devices on the market that support the UPnP protocol, but for my testing I used a Buffalo LinkTheater. Figure 9 shows the main menu from the LinkTheater when communicating with the StorCenter.

Figure 9: Buffalo LinkTheater talking to StorCenter
The media server was fairly easy to use. All I had to do was populate the shared disk with my music, pictures and movies, and the server would see my files and make them available through the LinkTheater’s menu. Automatic music groupings were made for artist, album and genre. The server tried to do the same with my movies, but it wasn’t able to categorize them, so I ended up with everything in a single folder. Configuration of the server was limited to turning it on or off, or restricting it to certain directories.
One more item found in this menu was the ability to “repair” the media server database (see Figure 10). I found this a bit curious, since it indicated that there have been problems with database corruption, but at least Iomega provided a way to correct problems that might crop up.

Figure 10: Repairing the Media Server
There were a couple of things missing that I usually like to see in the configuration menus. First, I didn’t see any way to set the spin-down time on the drive. My NAS appliances sit idle most of the time, so it’s nice to be able to tell them to spin the drive down when not in use; this might also keep the loud fan from coming on so often. Another thing I usually like to see is some sort of alert mechanism. For example, if the drive starts filling up, it would be nice to get an email, or at least a warning LED.
Performance
When I started this review, I hoped that I’d be able to use this device across the network for heavy duty transfers, instead of using an external USB or Firewire drive. To see how well it performed, I used iozone to check the StorCenter’s file system performance as described here.
The test was run under Windows XP on a Dell Inspiron 1000 laptop with 384 MB of RAM. For my network setup, I used a Netgear GA511 gigabit PC card in my laptop, which was directly connected to the StorCenter with a network cable.
NOTE! How fast a computer can read or write data to a drive depends on many factors specific to the system running the test, so this test may not represent actual performance you’d see on your own system. The maximum theoretical data transfer rate one would expect to see on a 100Mbit network is around 12,000 kBps, so any values that exceed that number appear as a result of caching behavior, not network speed.
Figures 11 and 12 show read performance for a range of file and record sizes, using 100 Mbps and 1000 Mbps Ethernet connections.

Figure 11: StorCenter Read Test results – 100 Mbps
(click for larger image)
If you look closely at the two plots, you can see that gigabit read performance peaks at close to 9,000 kBytes/sec, while peak read performance using 100 Mbps Ethernet tops out closer to 8,000 kBytes/sec.

Figure 12: StorCenter Read Test results – 1000 Mbps
(click for larger image)
Write test results for 100 and 1000 Mbps connections are shown in Figures 13 and 14 and exhibit similar high peak transfer writes due to filesystem caching.

Figure 13: StorCenter Write Test results – 100 Mbps
(click for larger image)
The real difference in non-cached performance can be found in the flat area at the front of the plots, which we’ll be able to see better when we look at the comparison plots coming up next.

Figure 14: StorCenter Write Test results – 1000 Mbps
(click for larger image)
Performance, Continued
To put these results into perspective, the plots shown in Figures 15 and 16 include data taken with the same iozone computer from previous reviews of similar-class drives:
The comparison is done with a 128MByte file size, which is large enough to bypass OS caching effects and show the real performance of the NAS devices. I’ve also included the StorCenter’s results with a gigabit Ethernet connection along with all the other results, which were taken with 100 Mbps Ethernet.

Figure 15: Comparative Read performance with 128 MByte file size
(click for larger image)
The StorCenter comes in at the top of the pack for both read and write, slightly besting the Synology DS-101. The gigabit connection appears to provide a performance bump for both reading and writing, which means that the StorCenter’s CPU is fast enough to keep up with the faster network connection.

Figure 16: Comparative Write performance with 128 MByte file size
(click for larger image)
Under The Covers
Like most other consumer-level NAS devices on the market, the StorCenter was clearly running Linux. A network port-scan of the device turned up no interesting open ports, but a fingerprint scan identified the TCP/IP stack as being from a Linux kernel. Connecting to the UPnP server port manually from a Telnet window gave me the following string:
SERVER: Linux/2.6 UPnP/1.0 Iomega TwoPeas UpnP/1.0.0.53
To verify my findings, I found that Iomega included Linux 2.6.12 and other GPL source code on the installation CD. The Linux configuration file included indicates that a Realtek 8169 provides the gigabit Ethernet support. Digging a bit into Iomega’s documentation, it appears that the StorCenter has 64 MB of RAM, and is running on a Freescale MPC8241 processor. The internal drive runs at 7200 RPM and is formatted with the EXT2 file system. (This was changed over to XFS as of firmware version v1.27.) The 250GB model I tested had 8 MB of cache, while the 160 GB model has 2 MB.
While I was browsing the folder sharing options, I noticed the following parameter tacked on to the end of the URL: “list_dir=/nethdd”. Thinking that perhaps changing it would allow me to get some more visibility into the operation of the system, I manually removed the “nethdd” portion and re-submitted. Bingo! I was rewarded with a display of the top-level directory structure of the operating system, shown in Figure 17. Using this menu, I was able to share the operating system directories as well as the normal data directories.

Figure 17: Directory listing via simple modified URL
Browsing through the read-only directories showed me a standard Linux system with PowerPC binaries and fairly heavy use of busybox for utilities and Samba for file sharing; this is a pretty standard combination with this type of device.
To check out what optional capabilities were provided in the busybox toolkit, I copied it over to my Power PC based KuroBox and verified that it would run there. Running it showed me that it didn’t have a Telnet daemon included, which might have given me the ability to get a command shell on the running box. I suspect that with more effort, a user willing to risk his warranty could figure out a way to add custom code for additional functionality.
Closing Thoughts
In general, the StorCenter was well implemented and had a nice balance between features a simple user would need and those that would help fulfill the requirements of a power user. I was glad to see multi-platform support, which allowed me to use the device on all of the computers in my house.
The built-in UPnP AV multimedia server was also a nice touch for those of us who have devices (like the Buffalo Link Theater) that can automatically detect one on the network and bring up its shared multimedia folders. On the downside, the StorCenter fan’s whine means that it probably won’t be gracing any living room media equipment shelves and will instead be tucked away someplace where it won’t interfere with your listening and/or watching pleasure.
This was my first experience with a 1000 Mbit NAS unit, and I had hoped that it would be substantially faster than the other products I currently run on my 100 Mbit LAN so that I could avoid having to use external Firewire or USB drives for large media file transfers. But while the performance tests showed that the StorCenter did outperform my other NAS devices, it didn’t come anywhere near the theoretical limit for a gigabit LAN, or even my own expectations for speedier file transfer.
Still, the StorCenter’s performance is better than other similarly-priced products, even when used on a 100Mbps LAN, and its built-in printer and media servers further sweeten the deal. So while you’ll need to drag out the ol’ external USB and Firewire drives when you need to quickly move your expanding media library around, the StorCenter’s other features make it a good choice for a mid-range NAS.