Introduction
| At a Glance | |
|---|---|
| Product | TRENDnet USB 2.0 IDE Network Storage Enclosure (TS-I300) |
| Summary | BYOD single drive IDE NAS with 2 USB 2.0 ports for expansion. |
| Pros | • 2 USB 2.0 port to expand storage • Easy set up • FTP and UPnP AV servers • Quiet |
| Cons | • Clunky interface for user and network access management • No FTP server logging • No gigabit Ethernet • Relatively expensive for what it does |
NAS devices are available in many different configurations ranging from multiple-drive devices that support RAID (RAID0, RAID1, and in some cases RAID5) to simple single-drive devices. NAS devices are also available with pre-installed drives or sold as "BYOD" (Bring Your Own Drive).
Aimed at the budget-conscious consumer who wants to add network storage to their home network, TRENDnet’s TS-I300 USB 2.0 IDE Network Storage Enclosure is a single-drive BYOD NAS enclosure that offers two USB 2.0 ports for added storage capacity.
With online prices for the TS-I300 hovering around $100 and the availability of cheap IDE drives, you can add a lot of storage to your network for well under $200. Of course, since this is a single-drive device, you won’t have the option of setting up a RAID configuration for fault tolerant storage.
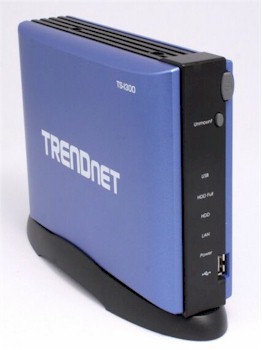
The front panel of the TS-I300 has a power switch, a single USB port, LED indicators for power, LAN activity, disk activity, and hard disk full, and a USB indicator.
The hard disk full LED blinks orange when the drive is filled to 95% of its capacity, and remains illuminated when the drive is full. The multicolored USB LED indicates mounting (blinking green), good connection (solid green), USB connection failed (solid orange), or dismounting (blinking orange). The Unmount button allows you to safely dismount attached USB devices.
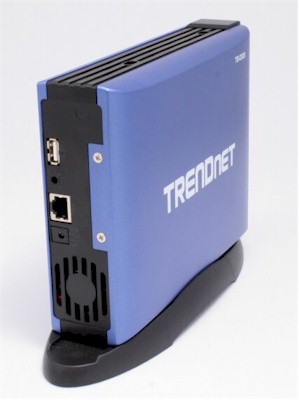
Figure 2: Rear panel
The rear panel (Figure 2) has an opening for the fan, a power connector, the second expansion USB 2.0 port, a Reset button, and an RJ45 auto-sensing Ethernet port. Unlike some of the more expensive BYOD NAS enclosures that have gigabit Ethernet ports, the TS-I300 only has a 10/100 port.
TRENDnet also markets the TS-I300W, a wireless version of the TS-I300. The “W” version supports 802.11b/g, 64/128 bit WEP, and WPA-PSK. The single antenna on the “W” version is located above the USB port on the rear panel.
Installation of the IDE drive is fairly simple and requires only a Phillips head screwdriver and a little manual dexterity. To install the drive, you unscrew the two screws on the back panel and slide the case off. Sliding off the case reveals the drive tray and power/data connectors.
Figure 3 is a view of the drive tray and power/data cables.
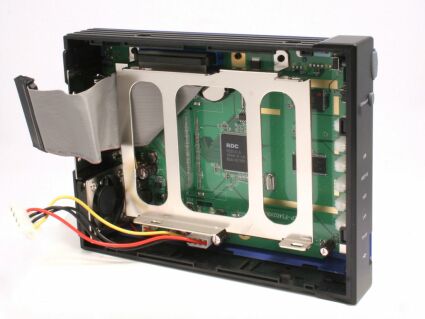
Figure 3: TS-I300 drive tray and power/data cables
The quick start guide instructs you to ensure that the jumper on your IDE drive is set to Master. Like all power and IDE data cables, the cables are keyed so that you can’t connect the cables incorrectly. A close inspection of the circuit board reveals that the TS-I300 is powered by a 150 MHz RISC-based RDC 3210 processor, which is shown in Figure 4 below.
Figure 4: RDC 3210 150MHz processor
The RDC 3210 is a SOC (system on chip) that runs the i486 instruction set. The underlying operating system is Real-Time-Embedded-Linux based on a 2.4.25 Kernel and the internal drive is formatted with EXT2. The other key components are 4 MB of flash and 32 MB of SDRAM.
You mount the drive to the drive tray using the four screws that were supplied with your drive. Probably the most difficult part of the installation is starting the screws through the holes in the side of the case.
Even though a magnetic Phillips head screwdriver would facilitate the mounting, you do need a bit of coordination; although, you won’t need the manual dexterity of a brain surgeon to get the drive mounted.
Figure 5 illustrates how to secure the drive to the mounting plate through the holes in the side of the case.
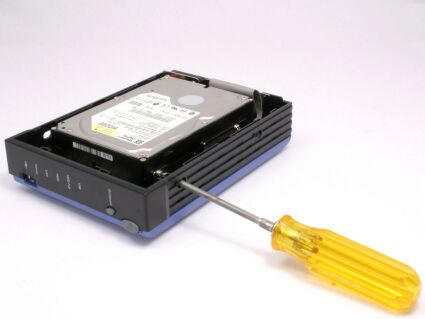
Figure 5: Securing the drive to the mounting plate
Setup and Features
For Windows users, TRENDnet supplies a utility named Easy Search. When I first launched the utility, it was as if I were having a flashback to the installation of the D-Link DNS-323 that I recently reviewed. The Easy Search utility was identical to the one supplied by D-Link. In fact, when I launched the TRENDnet utility, in addition to the TS-I300, the utility also discovered the D-Link DNS-323 that is still on my network.
Unlike the D-Link NAS, however, the TRENDnet defaults to the DHCP disabled and assigns an address of 192.168.1.2. Even though my network has a different addressing scheme, Easy Search found the TS-I300 and allowed me to change the configuration to DHCP.
Easy search also lets you change the Workgroup Name, map a drive letter, and connect to the web-based configuration and management page.
Interestingly, although the quick guide recommends using the Easy Search utility for initial discovery, the user manual (supplied on CD as a.PDF file) first goes through the process of having you change your network settings to 192.168.1.0 network and connect to the Web browser page on the NAS for further configuration.
The instructions left out a few steps, such as browsing the network and connecting to the drive, and probably should have been listed after the Easy Search configuration method.
Figure 6 shows the Easy Search utility with TS-I300 discovered on the network.
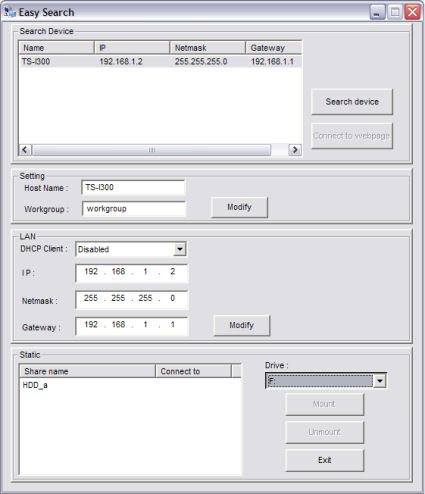
Figure 6: Easy Search utility discovering TS-I300 on the network
By default, the TS-I300 is configured to allow all user full access to the root of the volume. You can change default configuration settings using the browser-based configuration pages. The menu system is quite simple. The Home page provides you with four options: Basic; Advanced; Maintenance; and Logout.
The Basic page includes options for renaming the TS-I300, changing workgroup assignments, configuring LAN settings and setting the time zone. The TS-I300 gives you options of setting its real-time clock from either your computer or from an NTP server on the Internet. It appears to refresh the time only when you click the Test button.
The Advanced section has seven sub-menus, the first being Account. Account allows you to configure up to 50 users. Options allow you to add users, delete list, or modify users. The only modification allowed is change password.
The next sub-menu is Session. If you choose to assign access based on user login rather than allowing everyone access to the whole drive, the Session menu allows you to define, at a sub-directory level, what each user can access. For example, you could allow User1 read-only access to the Media directory, but full access (read/write) to a directory containing his files.
Unlike the D-Link DNS-323 that supports group rights (although not very well), the TS-I300 does not support groups. Each assignment of rights requires its own “session” entry. Though supported by the underlying Linux operating system, a “no access” option does not exist. The only choices are Read-Only and Read/Write.
Figure 7 shows the network access (Add Session) screen.
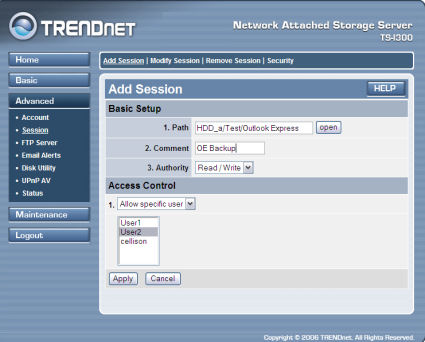
Figure 7: Add session screen
I found the web interface for sessions somewhat difficult and confusing to use. Though most home consumers will probably just allow everyone on the network full access to the NAS device; in small offices, you might want to restrict access.
The Modify Sessions view (shown in Figure 8 below) allows you to see the defined sessions, but there isn’t a view that shows access privileges by user. The Session tab also provides some additional security in the form of an IP filter. You can choose to allow or deny up to 32 specific IP addresses. Your choice of allowing or denying IP addresses applies to all addresses in your list.
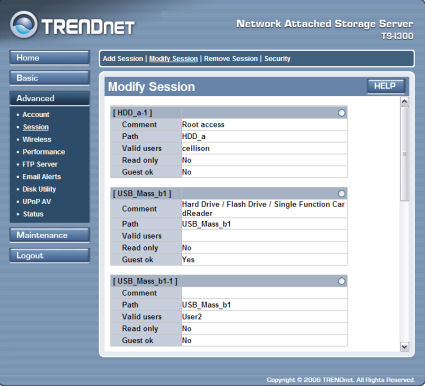
Figure 8: Modify session screen
Initially, I was confused when I browsed the network neighborhood and saw multiple entries in some cases for shares on the TS-I300. (Refer to Figure 9 below.) In these cases, there were multiple session profiles with different rights assigned to users. By default, the HDD_a profile grants full access to all users.
If you decide to implement network access control at the directory level, you’ll need to change the default HDD_a profile. When you generate a session with different access rights, those shares will appear as HDD_a-1, but at the same level as HDD_a.
The creation of multiple session profiles was not explained in the instruction manual and most likely will be confusing to a novice who wants to set up more than basic “full access” rights.
Figure 9 illustrates the different session profiles for the attached Seagate_b1 share.
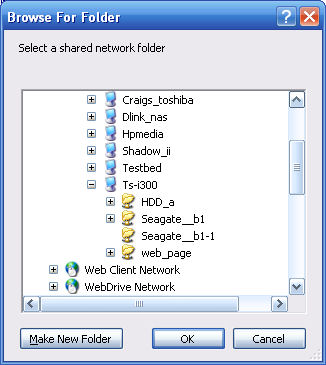
Figure 9: Different session profiles
Feature Tour – more
Like the D-Link DNS-323, the TRENDnet TS-I300 has a built-in FTP server. In fact, the controls on the FTP servers (Figure 10) are virtually identical on the two products. You can set rights globally for all users, or assign rights for individual users, including anonymous.
The FTP server configuration allows you to change the port from the default port 21, set flow control, set session timeout, and limit the maximum number of users (up to 10).
Like the D-Link DNS-323, the TS-I300 lacks an FTP log, so you have no idea who is downloading or uploading on your server.
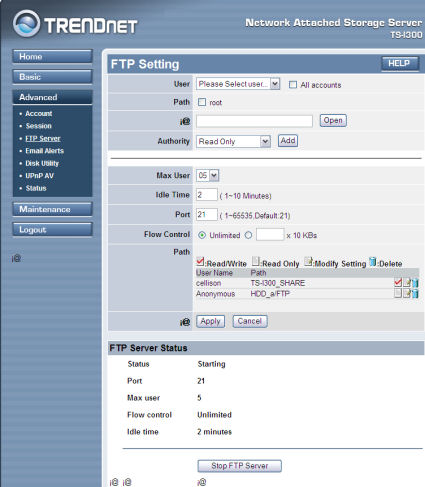
Figure 10: FTP server settings
Note how I created read/write access for user "cellison" at the root of the drive, and read-only access for anonymous users at the /FTP subdirectory level. Also note some miscellaneous artifacts (i@) scattered around the screen.
Next in the Advanced sub-menus is Email Alerts. The TS-I300 lets you set up email notifications to an individual email address. You can set the time between notifications of space status or be alerted when the disk is full, a critical error has occurred, the administrator’s password has been changed, when the firmware has been upgraded, or when the disk temperature exceeds a defined threshold. (Note that not all disks support temperature reporting.) The email engine allows for anonymous or authenticated SMTP.
Figure 11 shows the specific conditions that you can have selected so that email alerts can be sent if the conditions are met.
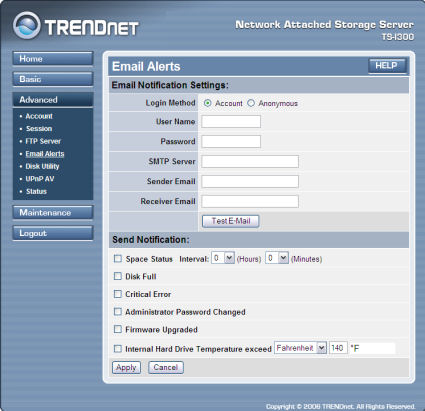
Figure 11: Email Alerts
The Disk Utility sub-menu lets you format, scan, or repair a disk. For the internal drive, you are limited to the EXT2 format. For external drives attached via USB, you can choose EXT2, EXT3, FAT, or FAT32.
The TS-I300 has a built-in UPnP AV server that’s very similar to the one found in the D-Link DNS-323. It doesn’t support a UPnP password found on the D-Link, but otherwise it’s the same. You define the path to your media files and click Refresh.
There is no automatic refresh interval, so if you add new media content, you’ll have to log into the TS-I300 and manually refresh the content to make it available to your UPnP media player. Unfortunately, without a media player, I was unable to test this function.
The final sub-menu, Status, was disappointing. It shows only very rudimentary information about the TS-I300 such as network settings, disk status (size, bytes used, bytes remaining), basic Samba status (Name, workgroup, and description) along with drive temperature if the drive supports it. It did not show, for example, users currently logged in or FTP status.
The main admin section is Maintenance, which has two sub menus. One lets you upgrade the firmware, and the other resets the I300 to factory default.
Unfortunately, the Upgrade Firmware page does not have a link to a Trendnet upgrade page on the web. Your only choice is to browse for firmware that you’ve previously downloaded and saved.
If you log out of the TS-I300, you can access the I300’s scheduled HTTP / FTP download feature. This feature could be handy as a primitive backup as long as you don’t mind copying entire folders and included subfolders without the ability to exclude files.
The TS-I300 has two USB 2.0 expansion ports: one on the front panel and one on the rear panel. These ports allow you to connect either external USB drives or flash drives to expand storage capacity. The external drives can be formatted with FAT, FAT32, EXT2, or EXT3 file systems.
I rummaged through my drawer and pulled out a handful of flash drives, as well as a 4 GB portable Seagate drive. All of the drives mounted without incident. When you first plug in the drive, the I300’s front panel USB light flashes green. A few seconds later, if the drive successfully mounted, the light remains on solid. Once mounted, the connected USB drives show up as additional shares on the TS-I300.
Figure 12 shows the TS-I300 with the hard drive and its subdirectories, as well as a Seagate USB hard drive and a flash drive plugged into the 2 USB ports.
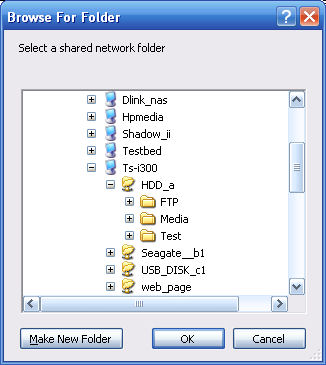
Figure 12: TS-I300 with hard drive, subdirectories, and Seagate USB hard drive
It’s important to note that if you have devices attached to both USB ports, and press the Unmount button on the front panel, both devices will be dismounted.
Performance and Closing Thoughts
As with all our NAS testing, IOzone was used to check out the file system performance on the TS-I300. The full testing setup and methodology are described here.
NOTES:
- Firmware version tested was 1.10.0619.2006
- Drive used was a Western Digital Caviar WD200BB-75CAA0 200 GB 7200RPM EIDE hard drive with 2 MB of cache supplied by TRENDnet
- Keep in mind that the maximum raw data rate for 100Mbps Ethernet is 12500 Kbytes/sec and 125000 Kbytes/sec for gigabit
- All comparison products were tested on a different IOzone test system that produces results slightly slower than the system used to test the TS-I300
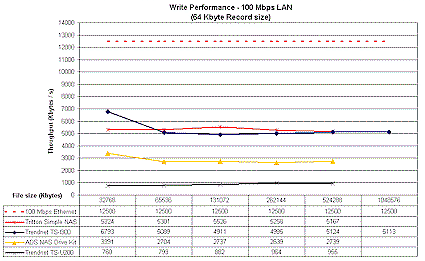
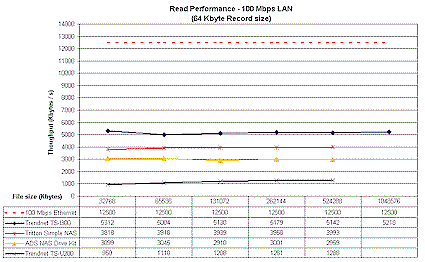
Figures 13 and 14 show write and read results respectively with a 100 Mbps LAN connection. Included in the plots are results from previous tests of similar single-drive BYOD NAS devices: the Tritton Simple NAS, ADS NAS Drive Kit and TRENDnet TS-U200.
Figure 13 shows that the I300’s write performance is about the same as the older and less-expensive Tritton Simple NAS. And if you take into account the slower test system used for the Simple NAS, it actually would have slightly better performance than the I300. TRENDnet’s earlier NAS offering, the TS-U200, which uses USB 2.0 drives comes in dead last with very unimpressive performance.
Figure 13: Write performance comparison (click image to enlarge)
The Read performance test results in Figure 14 show a ranking similar to the write results, but with the I300 outdistancing the Tritton Simple NAS by a wider margin. Taken together, these results show performance similar to inexpensive low-end BYOD NAS devices that have been around for more than a year. You can also use the NAS Charts to compare the I300 against many other tested NASes.
Figure 14: Read performance comparison (click image to enlarge)
In addition to the IOzone read/write tests, I tried a “real world” test of copying a 3 GB video file from my computer to both the TRENDnet TS-I300 and to the D-Link DNS-323. Though the D-Link unit has a gigabit Ethernet port, for the sake of this comparison, both devices were connected to a 100Mbps port.
It took 401 seconds (6:41) to copy the file to the D-Link NAS and 641 seconds (10:41) to copy to the TRENDnet NAS. That translates to almost 60% longer to copy the same file to the slower TRENDnet TS-I300.
Summing up, TRENDnet’s TS-I300 is an entry-level BYOD NAS for people who need simple networked storage or archiving and don’t need high performance. Its built-in FTP server provides a bit of flexibility for file sharing among a small group of users and the UPnP AV server seems like a nice feature. But the I300’s low performance will limit its use to still image and music serving only.
The bottom line is that while the I300 has a decent low-end feature set, there is little value added to justify its significant price premium over older products such as the Tritton Simple NAS.

