
Introduction
Recently, Tim reviewed the features and performance of NETGEAR’s new ReadyNAS 104. In that review, he promised this more in-depth look at NETGEAR’s new ReadyNAS OS 6 software that powers not only the RN104, but NETGEAR’s family of ReadyNAS products. Without further ado, let’s dive into the features of the new OS 6.
Setup
Tim’s review noted setup problems associated with formatting disks to use NETGEAR’s “Flex-RAID” mode that lets you manually configure your device for traditional RAID configurations such as RAID0, RAID1, RAID5 and RAID 6. By default, NETGEAR uses X-RAID which allows for simple and automatic volume expansion.
Your setup experience will strongly depend on whether you purchase a diskless “BYOD” model to use with your existing disks, a BYOD model to use with brand-new disks or one of the models that come with drives pre-installed and ready to go. In the four bay RN 104 family, NETGEAR offers a diskless model (NR10400), 2X1TB (model RN1-431D), 4X1TB (model RN10441D) and 4X2TB (model RN01442D).
If you use new disks in the diskless version, or purchase a device with factory-installed disks, your setup experience should be the same. However, if you use disks that contain any data, expect to do some additional work before you can start setting up your device. Upon booting, the screen will display an error message indicating “corrupt root”. Likewise, if you use the RAIDar utility to “find” the device it will also display a Corrupt Root error, and the setup option will be grayed out. Though NETGEAR could just automatically reformat these drives, they chose not to in order to protect your pre-existing data.

RAIDar Utility showed corrupt root
If you encounter this message, let me save you some time. You to need to reboot the NAS into “Boot” mode and reset the device to Factory default. This will re-format all of the disks and, depending on the number of disks installed, install either X-RAID (which supports automatic volume expansion) or Flex-RAID which supports traditional RAID configuration.
But first, you’ll need to download the Hardware User’s guide, and you’ll need a paper clip. You’ll find the links to the User guides on the supplied CD, or you can go to NETGEAR’s download center, type in the model number of your NAS and download the Hardware manual. You’ll find the information needed starting on Page 23 (for the RN104).
The hardware manual covers all of the models in the ReadyNAS – just look for your model in the table of contents. While you’re on the download site, you might as well download the software manual, too. It’s an extensive manual that provides step-by-step instructions for virtually anything you’ll need to do.
One of the new features of ReadyNAS OS6 is cloud-based setup. For standard installations, ie, those that are performed with new drives, or on a device that is supplied with drives, this is what you’ll use. Using your internet connection, all you have to do is point your browser to http://readycloud.netgear.com.
All of the hard work of setting up remote access and identifying your device is invisible to you. ReadyCloud will find your device, prompt you to login to ReadyCloud or create a new account. You name the device, set the time zone and you’re finished. Just click on the Admin tab to make additional changes the NAS, or click on access to access the public shares created. If all goes as expected, the complete setup process should be under a couple of minutes.

NETGEAR’s ReadyCLOUD
The gallery below shows the setup process.
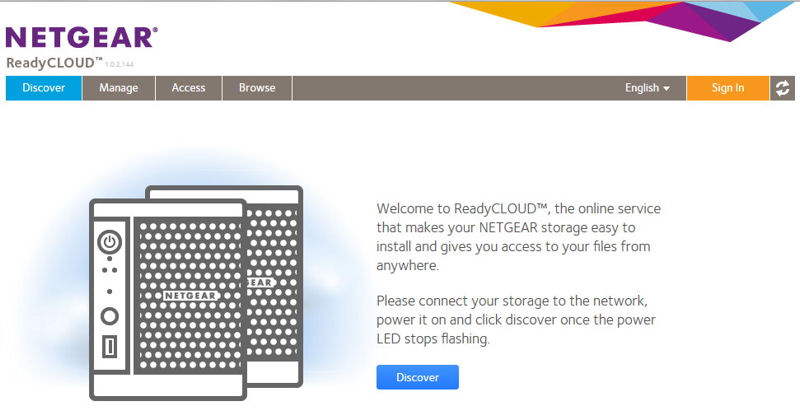
Go to http://readycloud.netgear.com. When the power light quits blinking, click on discover.

If your NAS and your browser connected computer are on the same network, the device will be discoverd.

To continue online setup, select Join Now and click Next
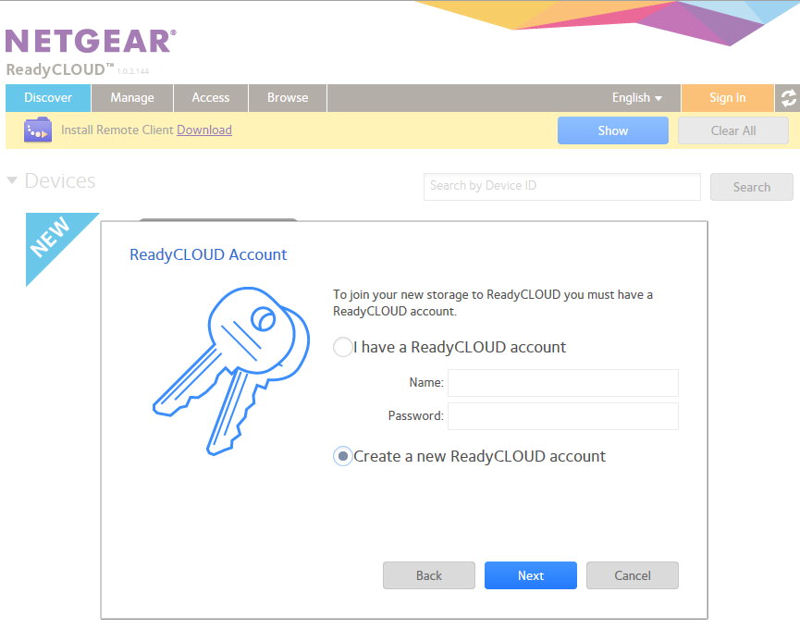
Either sign into an existing account or create a new account.
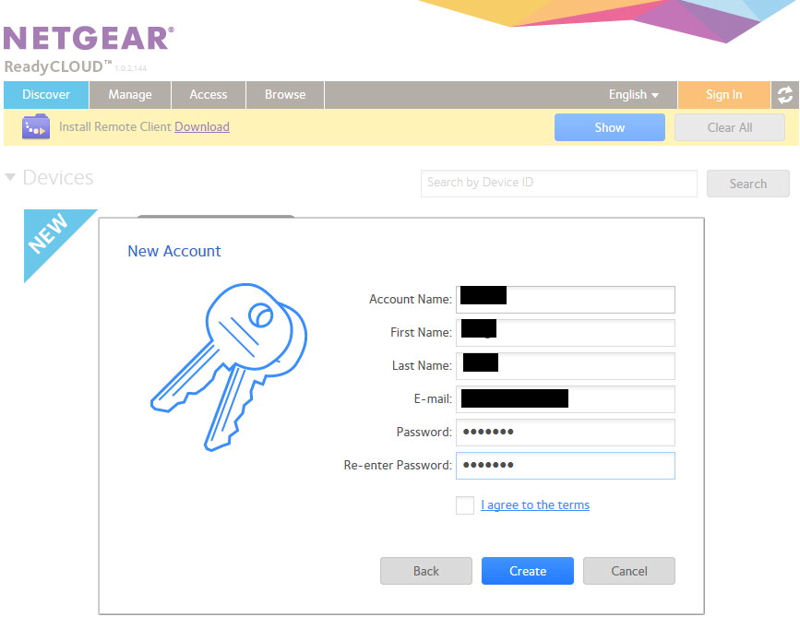
Enter in account information, agree to terms and click Create
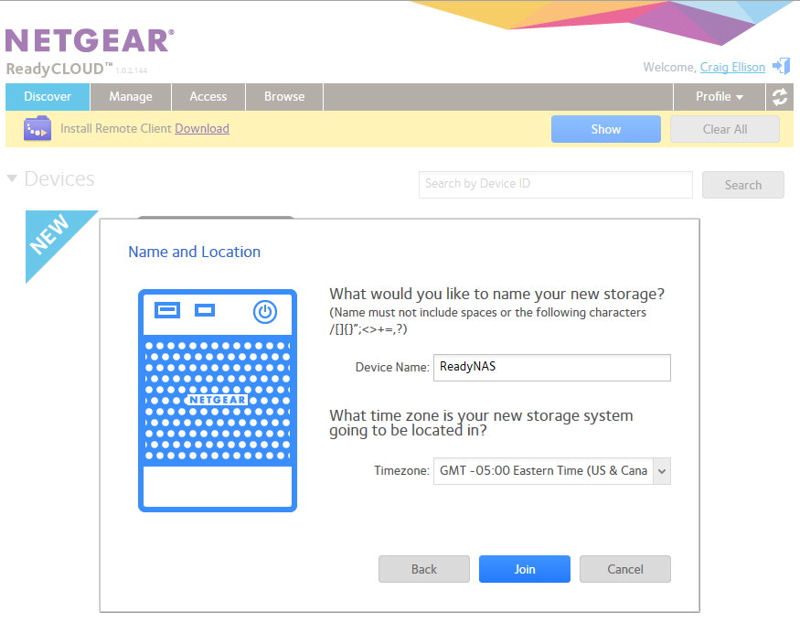
Create a device name and select your time zone.
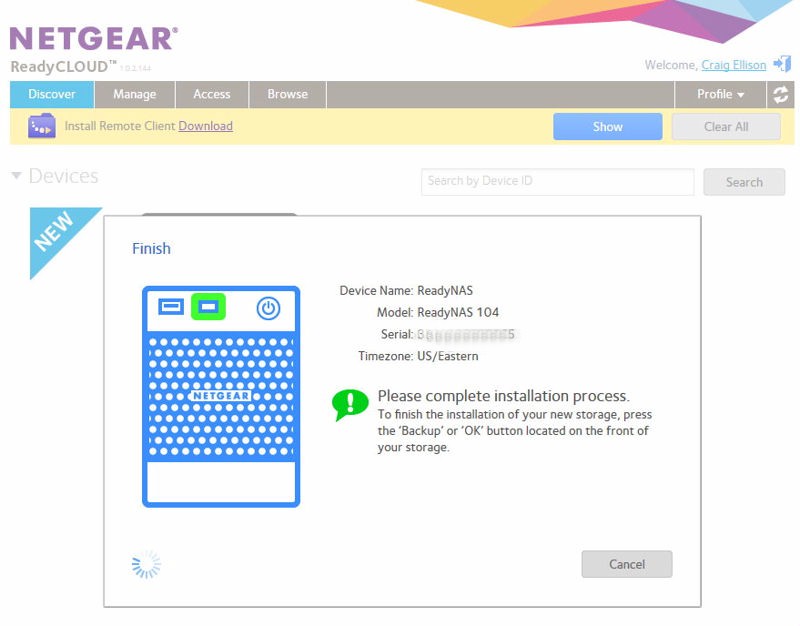
Press the backup or OK button to complete installation. This is a security measure to ensure that you have physical access to the device.
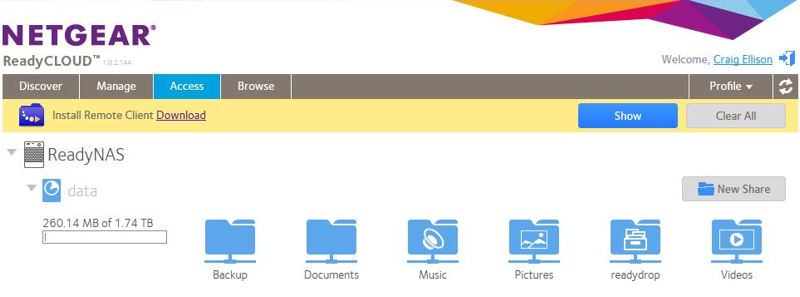
Click Access to browse public shared folders. Click on Manage to go to the management UI.
Snapshots
A few of OS6’s features deserve special focus, so I’m going to cover them first. NETGEAR’s ReadyNAS OS6 breaks new ground – at least for NASes targeted at home and small business users. While most NAS devices are Linux-based and have relied on the EXT4 file system for quite some time, OS6 is based on Btrfs – a file system that some are saying is the future file system for Linux. Btrfs, (B-tree file system) according to Wikipedia, “…is intended to address the lack of pooling, snapshots, checksums and integral multi-device spanning in Linux file systems, these features being crucial as Linux use scales upward into the larger storage configurations common in enterprise.”
Indeed, since I found the snapshot features, enabled by the use of Btrs in ReadyNAS OS6 to be one of the most compelling features of the new release, I’ve included a short gallery to demonstrate how it works.
Go to http://readycloud.netgear.com. When the power light quits blinking, click on discover.
If your NAS and your browser connected computer are on the same network, the device will be discoverd.
To continue online setup, select Join Now and click Next
Either sign into an existing account or create a new account.
Enter in account information, agree to terms and click Create
Create a device name and select your time zone.
Press the backup or OK button to complete installation. This is a security measure to ensure that you have physical access to the device.
Click Access to browse public shared folders. Click on Manage to go to the management UI.
When you create a share, you have the option of enabling snapshot protection. Your choices are for hourly, daily or weekly snapshots. Brtfs supports a virtually unlimited number of snapshots. But unlike snapshots on a conventional file system, they are just pointers into the file system and take up only a negligible amount of space. After creation, only block level changes are added to the snapshot. And the snapshots are very quick to create.
The gallery demonstrates that once you have enabled snapshots, you can roll back a share to any of your snapshots. In addition, you can create a clone of your volume based on any of your snapshots that you mount (map a drive) to check if the contents of the snapshot are what you need. The clone is read/write, but takes no incremental space unless you actually write files to it.
Like the snapshot, a clone is very quick to create. Imagine being able to mount a 600 GB clone snapshot of a share from an earlier time almost instantly if your NAS only has 200 GB free. With Btrfs, you can. Typical examples of uses for a snapshot would be to recover a corrupted share, or to recover files or folders that were accidentally deleted.
When you roll back a share to a previous time, you lose any data and snapshots created after the rollback snapshot time. If you just want to recover a couple of files and don’t want to go through the clone process you have two choices. Open Windows explorer and select the network drive. Right click and select Properties and then select the Previous Versions tab. (Snapshots are fully integrated with Windows Explorer.) All automatic snapshots appear. (Manual snapshots do not.) Click on any of those snapshots to access a read-only copy of the share. (Note – this doesn’t take any additional space on the NAS.) From there, you can copy files/folders back to the original share.
For the second method, make sure that ”Allow Snapshot Access” is selected for the share. This will unhide the snapshot folder that is located off the root of the share. Open the snapshot folder and click on one of the snapshot directories. Again you’ll have read-only access to files and folder in the snapshot.
One caveat: snapshots are only available on the default public shares and shares that you create. Private shares, created when you create users don’t have snapshot capabilities. My wish list for future releases of ReadyNAS OS6 includes snapshots for private shares.
Cloud Services
When you click on the Cloud tab of the user interface, you land at the cloud services page. From this page, you can manage and access your enabled cloud services.

ReadyNAS Cloud
ReadyNAS Remote – ReadyNAS remote isn’t really new. Remote provides secure over-the-internet access to your shared files from Window, Mac, Android and iOS platforms. For Windows and MacOS, you have to install a client. The client installs a virtual network adapter (from Leaf Networks – acquired by Netgear in 2010). Using a VPN and your ReadyCLOUD account, you tunnel into your network.
From the client, you have access to shares. You can drag and drop files as if you were on a local network. If you are using a Mac with the ReadyNAS remote installed, you can also use a remote ReadyNAS device as a Time Machine backup target. Of course, over a WAN connection, it would take a very long time to create the initial sparsebundle, but subsequent Time Machine backups would be only incremental changes.
ReadyDrop – Using the same ReadyNAS Remote access client on a Mac or
PC, you also have access to your ReadyDrop share on the NAS. ReadyDrop claims to keep your files in sync, but in reality, ReadyCLOUD
allows only one concurrent connection at a time. So, if
you’re like me and have multiple computers, only the last one logged in has access to Readydrop and shares.
You can also access the Readydrop share on your device using a web browser pointed at http://readydrop.netgear.com. For mobile devices, your access is also web based. (See slide 22 in the gallery below.) While the single concurrent session limit may suffice for many users, I’ll stick with Dropbox and SugarSync.
ReadyNAS Replicate – This used to be a premium feature on business-grade ReadyNASes only. But NETGEAR now includes it on all ReadyNASes at no additional charge. ReadyNAS Replicate lets you replicate a share to another ReadyNAS on a remote network. Unlike the replication services on Buffalo TeraStations, ReadyNAS replication is at the file level, not the byte level. So replicating large files with only small changes could be time-consuming over a WAN connection. Replicate is also not intended to replicate between ReadyNASes on a LAN.
ReadyCLOUD – ReadyCLOUD ties all of these services together with a single user account login. Using your ReadyCLOUD account, you can access ReadyDrop, ReadyReplicate, or ReadyNAS remote services. You can also log into ReadyCLOUD directly to remotely access the Admin page, access shares, or browse shares. While ReadyCLOUD is a step in the right direction to a single login, NETGEAR still has a way to go. There are still too many URLs to remember.
- http://replicate.readynas.com – ReadyNAS replication
- http://readycloud.netgear.com – ReadyCLOUD admin/browse/access
- http://remote.readynas.com – Manage your account information
- http://readydrop.netgear.com – access your readydrop share via a web browser.
- Finally, the Genie+ Application market, a place where you can buy, download and install NETGEAR and third party apps for your NAS, has a separate login of http://genie.netgear.com.
Within the next couple of releases I’m hopeful that NETGEAR will whittle the list of URLs down to one or two.
There are also a few other cloud-based features hiding on other tabs.
ReadyNAS Vault – NETGEAR also offers a premium cloud-based backup service for your ReadyNAS. This feature is available from the backup tab on the main Admin page. There are three plans available:
- On Demand – 5 GB costs $5.95/month with each additional GB costing $0.40.
- Personal – Plans start at 100 GB of storage for $9.95/month
and range up to 2 TB of cloud storage for $169.95/month. This plan allows for up to 2 devices and ha a file size limit of 1 GB - Business – Plans start at 50 GB for $19.95/month and go up
to 200 GB for $64.95/month. This plan allows for unlimited
devices, multiple users with separated/shared storage, file size limit of 5 GB, and support for open and locked files.
Dropbox – There is also an option on the Backup tab to enable Dropbox support. You can select a share and enter your Dropbox credentials to sync the selected share to your Dropbox account.
Antivirus – When activated from the System > Settings menu,
Antivirus scans files locally as they are written to the device. Antivirus support is provided by
Commtouch. I did not test this feature.

Anti-virus architecture
Other Features
Now that we’ve looked at the OS6′ unique features, here’s a concise rundown of everything:
Volume Types, File Systems, Services
- Internal File System: BTRFS
- External File System: EXT3, EXT4, NTFS, FAT32, HFS+
- Copy-on-write filesystem
- Microsoft Network (CIFS/SMB)
- Apple OS X (AFP 3.3)
- Linux/Unix (NFS v3)
- Single Disk, JBOD RAID Levels: 0, 1, 5, 6, 10 (RAID level support depends on number of drives/bays)
- RAID Global Hot Spare
- X-RAID2 (automatic single volume online expansion)
- eSATA Expansion
Accounts
- Max # Users: 8192
- Max # User Groups: 8192
- Max # Share Folder: 1024
- Max # Concurrent Connections: 1024
- Share Folder Level ACL Support
- Advanced Folder Permissions with Subfolder ACL support for CIFS/SMB, AFP, FTP
- Microsoft Active Directory (AD) Domain Controller Authentication
- Local access list
- ReadyCLOUD based ACL
- Domain user login via CIFS/SMB, AFP, FTP
Backup
- Unlimited block-based snapshots for continuous data protection
- Restore Snapshots to any point in time
- Restore Snapshot data from local admin GUI, ReadyCLOUD, or native Windows File Explorer
- Scheduled and manual snapshots
- rsync
- Encrypted Remote Replication
- Cloud managed Remote Replication (ReadyNAS to ReadyNAS). No licenses required for ReadyNAS OS 6 devices
- Backup to external storage (USB/eSATA)
- USB One-Touch Copy
- Apple Time Machine support
- Remote Apple Time Machine backup and restore (over ReadyNAS Remote)
- ReadyNAS Vault Cloud backup (optional service)
- ReadyDROP file synchronization (sync folder on Mac/Windows to a folder on ReadyNAS)
- DropBox file synchronization (requires DropBox account)
Multimedia
- ReadyDLNA (UPnP DLNA Media Server)
- ReadyDLNA Streams to any compliant device including PS3/Xbox 360
- ReadyDLNA mobile clients for remote media streaming (iOS, Android)
- ReadyDLNA supported music formats (wav,wma, pcm, ogg, mp3, m4a, flac, aac)
- ReadyDLNA supported photo formats (jpg,jpeg)
- ReadyDLNA supported video formats (3gp,mp4, wmv, xvid, vob, ts, tivo, mts, mpeg, pg, mp4, mov, mkv, m4v, m4p, m2t,m2ts, flv,flc, fla, divx, avi, asf)
- ReadyDLNA supported playlist formats (pls,m3u)
- ReadyNAS Surveillance (free trial, licenserequired) supports over 40 brands and1000 models of IP cameras
- iTunes Server
- iTunes supported audio formats (mp3, m4a,m4p, wav, aif)
- iTunes supported video formats (m4v, mov,mp4)
- iTunes supported playlist formats (m3u,wpl)
- TiVo Archiving
- Plex Media Server streams to DLNA andPlex clients (mobile, desktop, Google TV,Roku, Samsung & LG TVs)
Power
- UPS Support
- Scheduled shutdown/startup
- Wake On LAN
- Auto-restart after power recovery
Other Features – more
Networking
- TCP/IP
- IPv4
- Next-generation Internet Protocol (IPv6)
- Static IP Address
- Dynamic IP Address
- Multiple IP Settings
- DHCP Client
- UPnP Discovery
- Bonjour Discovery
- Link Aggregation IEEE 802.3ad
- Port Trunking (balanced round robin, active backup, balance xor, broadcast, 802.3ad link aggregation LACP, transmit load balancing, adaptive load balancing)
- Hash Types IEEE 802.3ad LACP or XOR (Layer 2, Layer3, Layer 4)
- Jumbo Frames
- Virtual LAN (VApple OS X (AFP 3.3)LAN)
- SSHLinux/Unix (NFS v3)
- Internet (HTTP)
- Secure Internet (HTTPS)
- File Transfer Protocol (FTP)
- FTP over SSL / TLS (explicit)
- FTP Passive mode with port range
- FTP Bandwidth control
- FTP Anonymous
- FTP Transfer Log
- Secure Shell (SSH)
- SSH File Transfer Protocol (SFTP)
- Web Authoring (WebDAV)
- Storage Array Network (iSCSI)
- File Synchronization (rsync)
Admin Features
- Email alerts
- Logging
- SSH access
- SNMP management
- Resource monitor
- Device capacity, performance, resource and health monitoring
- Bad block scan
- Hard Drive S.M.A.R.T.
- File System Check
- Disk Scrubbing
- Disk Defragment
- Alerts (SMTP email, LCD, SNMP, syslog, local log)
- Auto-shutdown (hard drive, fan, UPS)
iSCSI/Virtulation
- Unlimited iSCSI LUN Snapshot
- Thin or Thick provision LUNs
- Multi-LUN per target
- LUN mapping
- LUN masking
- SPC-3 Persistent Reservation (iSCSI)
- MPIO (iSCSI)
- MC/S (iSCSI)
- Max # iSCSI Target: 256
- Max # iSCSI LUN: 256
- VMware vSphere 5
- Citrix XenServer 6
- Windows Server 2008 Hyper-V
- Windows Server 2008 Failover Clustering
- Windows Server 2012
Supported Operating Systems: Microsoft Windows Vista (32/64-bit), 7 (32/64-bit), 8 (32/64-bit), Microsoft Windows Server 2008 R2/2012, Apple OS X, Linux/Unix, Solaris, Apple iOS, Google Android
Supported Web Browsers: Microsoft Internet Explorer 9+, Mozilla Firefox 14+, Google Chrome 20+, Apple Safari 5+
To get a better feel for the user interface and some of the features, check out the gallery below. It contains screenshots with commentary of many of ReadyNAS OS 6 menus and sub menus.
Go to http://readycloud.netgear.com. When the power light quits blinking, click on discover.
If your NAS and your browser connected computer are on the same network, the device will be discoverd.
To continue online setup, select Join Now and click Next
Either sign into an existing account or create a new account.
Enter in account information, agree to terms and click Create
Create a device name and select your time zone.
Press the backup or OK button to complete installation. This is a security measure to ensure that you have physical access to the device.
Click Access to browse public shared folders. Click on Manage to go to the management UI.
Final Thoughts
The disks that Tim included with the RN104 apparently had some data that the ReadyNAS detected upon bootup, so I didn’t have the smooth, hassle-free setup experience that NETGEAR had promised with ReadyCLOUD. When I used the brand-new 2 TB disk NETGEAR sent, my setup experience was as promised. I was completely set up in less than 2 minutes, which included copying a file to one of the shares on the NAS.
ReadyNAS OS 6 was built from the ground up to take advantage of the Btrfs file system. As Tim pointed out, since it’s a completely new OS, there are some features missing such as JBOD support, idle drive spindown, print serving, WebDAV and bundled Windows and MacOS client backup software. But many of those features are planned for the next major release (6.1).
The basic features you that expect to find in a NAS targeted at the home are there, however. The ReadyNAS DLNA and iTunes servers worked as expected. I tested the ReadyNAS DLNA services using my usual testbed – a WDTV Live media streamer. I streamed video, audio and images without a problem. The iTunes server was discovered by both my Mac and Win7 computers and streamed music flawlessly.
Some of the features such as WordPress, MySql Server, PHP and a Bittorrent client, missing as compared to Synology and QNAP devices, can be found in NETGEAR’s Genie+ app store as third party add ins. I did not try any of them.
My favorite OS6 features are its virtually unlimited snapshot and rollback capabilities, as well as the ability to quickly mount a complete clone of a share based on an earlier time with virtually zero overhead. Features like these are what you might expect to find in large data centers, not in your home. Yet the entry price point for a diskless RN102 (2 bay) is under $200.
I’m sure it was a lot of work to develop OS6, while keeping the old RAIDiator OS supported and running. NETGEAR got the important stuff ported over, added key new features and did its best to make a disparate array of previously-developed applications hang together in a cohesive "cloud" feature set.
The last task, however, is a work in progress, as is the transition from the old ReadyNAS Add-on system to the new genie+ marketplace. If you’re expecting everything you had on the old OS to be up and running on the new ReadyNASes, you might want to wait for a release or two, as in any new OS. But if you like what you see in the new ReadyNAS 100, 300 and 500 hardware, you’ll find that the new OS6 is a full-featured and capable match.