Introduction
| At a Glance | |
|---|---|
| Product | Snap Server 110 (5325301978) |
| Summary | High performance single-drive NAS intended for enterprise use |
| Pros | • High Performance • Gigabit Ethernet • Simple Setup • HTTP/HTTPS management • Mac/PC compatible with support for legacy Macs • NFS/NIS client support • iSCSI/NDMP support (optional) • Domain/ADS support |
| Cons | • Expensive • Extended function licenses are all optional on entry level Snap Server NASes and drive up the cost |
Snap Servers have been around for a long time. When I first reviewed a Snap Server many years ago, it was a simple NAS device with a single drive. A lot of time has passed, and today’s Snap Servers from Snap Servers by Adaptec, a division of Adaptec, Inc., are designed to be an integral part of an enterprise storage solution. If you’re looking for an inexpensive, cost-effective NAS for your home network, this review isn’t for you. Check out some of the other reviews of products like the LinkStation Live or the LinkStation Pro. Our entry level Snap Server 110 with a single 250 GB drive sells for $825 in Adaptec’s online store and from other e-tailers for up to $200 less.
Product Tour
The Snap Server 110 is the least expensive model in the Snap Server line. Available in four models, with storage capacities of 160GB, 250GB, 500GB, and 750 GB, the 110 measures 10.1″ X 6.1″ X 3.1″ and weighs 6.5 lbs. It’s powered by a 12VDC @ 5A external inline “brick” power supply, so there’s less heat to dissipate inside the case. The power supply is auto switching and has a range of 100-240 VAC 50/60 Hz.
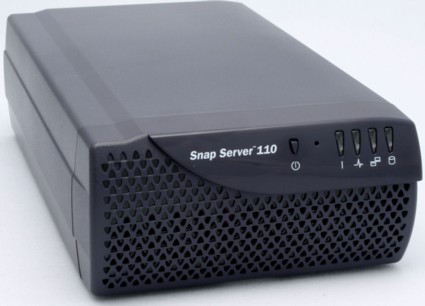
The front panel has a power switch, a reset “hole,” and LEDs for power, status, network, and disk. The status LED blinks green to show normal system operation, and blinks yellow to show a thermal problem or other system problem. The disk LED is also a dual function indicator. Blinking green indicates drive activity, and solid amber—something you don’t want to see—indicates a drive error.
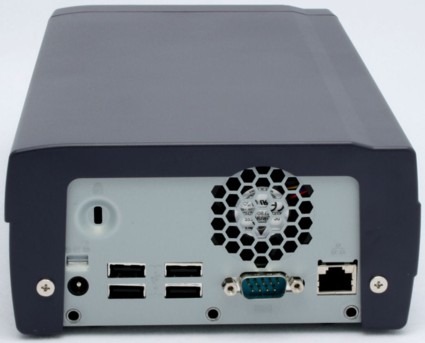
Figure 1: Snap Server 110 Rear View
The rear panel (Figure 1) of the 110 has a slot for a Kensington-style security cable, a power connector, the vent for the fan, an auto-sensing Gigabit Ethernet port, four USB ports, and a DB-9 connector that the instruction manual identifies as a service port for “Snap Appliance technical support use only.” The USB ports are for connecting an APC UPS, USB printers, and for “future expansion.” They don’t currently support external USB hard drives.
Under the Covers
It’s quite simple to disassemble the Snap Server 110. Just two screws on the rear panel and two screws on the bottom hold it together. You’re probably not going to want to disassemble your unit though, as you’ll void your three-year warranty. A piece of holographic tape seals the case to the chassis, and even if you’re careful not to tear the tape, the word VOID is transferred from the tape to the chassis upon removal. Still, I forged ahead and opened the case so I could show you the interior.
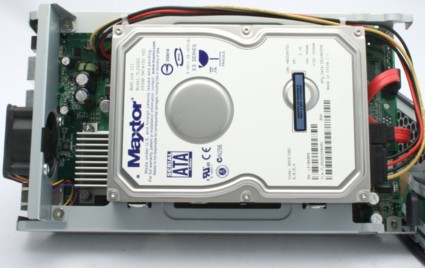
Figure 2: Interior view of the Snap Server 110 with drive mounted
Once the four screws are removed, the front panel pulls out, and then the entire chassis can be removed from the case (Figure 2). This model is powered by a Maxtor MaxLine III 250 GB SATA 150 drive (Model 7L250S0). It’s held in place by four screws that attach the drive to vertical mounting tabs on the chassis.
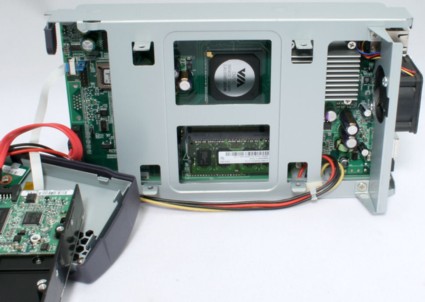
Figure 3: Snap Server Interior view with drive removed
Removing the four mounting screws of the drive and setting it aside reveals the motherboard (Figure 3). The 110 is powered by a VIA Esther processor running at 1 GHz, and 256 MB of memory. This combination of hardware enables the 110 to turn in some great performance numbers, which I’ll get to later. Power consumption, at 24 W, is a bit on the high side for a single-drive NAS. There are no idle spin-down or timed shutdown/startup options for energy-conscious users.
Setup
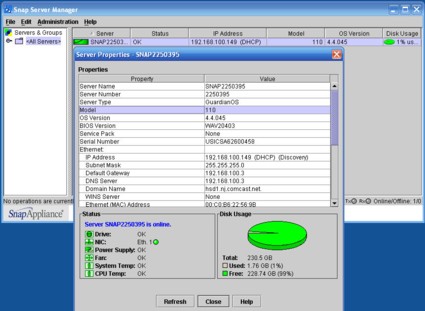
Setup of the 110 is, forgive me, a snap. Once connected to your DHCP enabled network, you can either enter http://SNAPnnnnnnn into your browser, (where “n” is the server number found on the bottom of the case) or you can install the Snap Server Manager. The Snap Server Manager (Figure 4) is a Java-based tool that lets you manage either a single Snap Server, or, with the purchase of an additional license, multiple servers from a single console. Double-clicking on a server opens a window with summary information on your server. From the administration tab, you can launch your web browser to administer the server.
Figure 4: Snap Server Manager console
Administration
When you first connect to the Snap Server with your web browser, you’ll see a screen that lists all of the shares. Optionally, you can force users to authenticate before they see the shares. Web users can click on public shares that have unrestricted access and view the files using web view. You can connect via either HTTP or HTTPS, and you have the option of disabling HTTP (unsecured) access. When you connect via HTTPS, you’ll get a certificate error, and I didn’t find a way to install your own certificate through the web UI. The home page also has a link to the administration interface.
Figure 5: Snap Server Administration Home Page
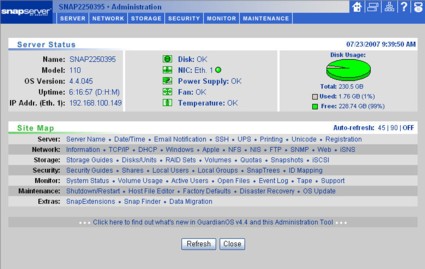
The administration landing page shows you a summary of the server and displays a horizontal navigation menu across the top of the page (Figure 5). The six top-level menu items are: Server, Network, Storage, Security, Monitor, and Maintenance. A handy site map lets you jump to any of the submenu items without having to navigate through the top-level menus. I’ll briefly highlight some of the functions for each top-level menu.
![]() Check out the slideshow for a tour of the 110’s admin interface.
Check out the slideshow for a tour of the 110’s admin interface.
Server—In this menu tree, you can change the server name, set time/date, configure email notification, enable/disable SSH, and configure how the server works with an APC UPS. Through the Advanced tab on the time and date menu, you can configure the server to get time/date information from NTP servers, but you can’t specify the frequency for updates. However, you can check the log files to confirm that NTP is working.
I was a bit disappointed in email alert setup. You have to specify the SMTP mail server by IP address, not host name, and the SMTP engine does not support authenticated SMTP. You can send notifications to up to four addresses and select from seven types of alerts.
Network—There are a lot of settings in this menu. Of course, there are the standard TCP/IP settings, and you can also enable/disable the built-in DHCP server. It’s quite basic, as you can only set a range of addresses for the DHCP pool. DHCP reservation is not supported.
Of particular importance is the Windows submenu. Here, you can set the workgroup, NT domain, or Active Directory domain. In this submenu, you can also enable/disable Opportunistic Locking for the server, or enable the server as the Master Browser. You can also enable AFP, AFP over TCP/IP, and AFP over AppleTalk for legacy Macs. Other options include enabling NFS, NIS, FTP and configuring SNMP. Snap Servers also support iSCSI, but for models 110, 210, and 410, you have to purchase an optional license ($225) to enable it in this menu.
Storage—In this menu, you can create RAID sets and volumes, set disk quotas, and enable Snapshot technology. Available as a $225 option on the 110, 210, and 410, Snapshot technology takes an immediate or scheduled image of any volume on a Snap Server running GuardianOS. Since the 110 is a single-drive system, there’s not much to say about configuring it. It shows up incorrectly designated as RAID 0. Adaptec agreed that the drive was not really configured as RAID 0 and said that the nomenclature was an artifact of the RAID focus of most of the Snap Server line.
Administration – more
Security—Submenus of this top-level menu let you create/manage/delete shares, local users, and local groups. Under advanced properties for each share, you can select which protocols are needed to access each share. You can individually select Windows (SMB), Unix (NFS), Apple (AFP), Web (HTTP/HTTPS), and FTP. Interestingly, I determined that you couldn’t browse to a share on a Mac running OSX unless you have AFP enabled for the share. However, even if AFP is not running, the Mac can connect to the share using the format smb://ip_address/share_name.
Monitor—This menu gives you a snapshot of system status, showing disk usage, active users, open files, and the event log. There’s also an item for attached tape drives, (though locally attached tape drives aren’t addressed in the User guide) as well as the option of sending configuration settings to Snap Server technical support. The Monitor menu also contains the event log. You have the option of viewing errors only, errors and warnings, errors, warnings and info, and everything. The Snap Server does not appear to support Syslog through the web interface.
I noticed a few interesting things in this menu. First, it appears that web users aren’t included under active users, even if they have authenticated. In addition, when I opened a media file through web view and played it, it didn’t show up as an open file. Files opened via a mapped share did appear to be properly enumerated under open files, however. I also noted that my Mac showed up as two separate users – once for the share mapped via SMB, and once for the AFP-mapped share.
Maintenance—In this menu tree, you’ll find options for shutdown/restart, resetting to factory defaults, updating the operating system, and disaster recovery. The disaster recovery feature allows you to save server and volume information (but not data) so that you can restore your server to previous settings. You can also add entries to the host file to make your backup server known to the current server.
Snap Extensions—All of the Snap Servers are capable of extended functionality by licensing additional software modules that are built into the GuardianOS. For the less expensive servers, i.e., the 110, and the 210, all of the modules are optional. Here’s a brief summary of the Snap Extensions available for the 110. As you can see, the cost to fully license all of the modules could approach the cost of the Snap Server 110 itself. Though expensive, the added functionality can make even the entry level 110 part of an enterprise storage architecture.
- BakBone NetVault—(contact Sales for pricing)—enables data backup and restore from up to five clients to four single tape drives locally attached to a Snap Server.
- CA Antivirus—$45.00—provides antivirus protection for a workgroup. Optional for the 110, 210 and 410.
- iSCSI—$225.00—allows you to manage, store and distribute block data across your Ethernet network using industry-standard iSCSI initiators. Optional for the 110, 210 and 410.
- NDMP—$225.00—all Snap Servers support NDMP (Network Data Management Protocol) that enhances backup performance and maximizes data transfer over the network. Optional for the 110, 210 and 410.
- Snap Server Manager—$170.00—a Java-based program that allows configuration and management of multiple Snap Servers from one console. You can manage a single Snap Server without a license.
- Snapshot—$225.00—allows for either on-demand or scheduled images of the file system without interrupting users. Optional for the 110, 210 and 410.
Performance
The 110 was tested with 100 Mbps and 1000 Mbps LAN connections using our IOzone-based test procedure. Although the 110 actually does support jumbo frames, we didn’t test in that mode since it requires SSH access to a command-line interface to configure.
TEST NOTES:
- Firmware version tested was GuardianOS 4.4.045
- The full testing setup and methodology are described on this page
- To ensure connection at the intended speeds, the IOzone test machine and NAS under test were manually moved between a NETGEAR GS108 10/100/1000Mbps switch for gigabit-speed testing and a 10/100 switch for 100 Mbps testing.
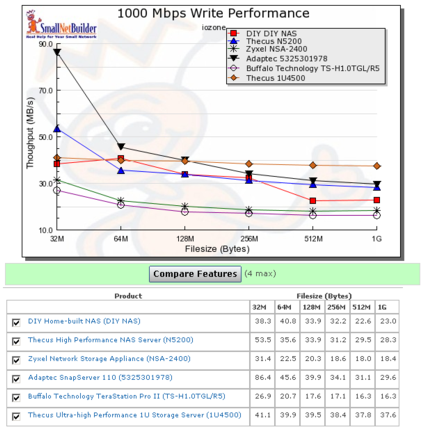
The tagline for the Snap Server 110 is “Compact High-Performance Desktop Storage.” Indeed, the Snap Server 110 does deliver on its promise of high performance. In fact, we have a real arm-wrestling match for top honors in the 1000 Mbps performance test. In the average 1000 Mbps write performance tests (Figure 6), the Snap Server 110 wrestled the top spot away from the Thecus Ultra High Performance 1U Storage Server with winning numbers of 44.5 MB/s as compared to the Thecus’ 39.1. For large file sizes, here’s a comparison of the top six performers in our charts.
Figure 6: 1000 Mbps write test
For the 1000 Mbps Write Performance test, the Snap Server 110 holds a clear advantage over the Thecus 1U Storage server for file sizes up to 128MB. Above 128MB, the Thecus gains the advantage.
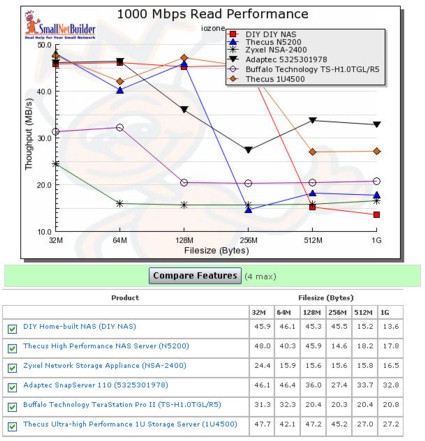
For the average 1000 Mbps read tests (Figure 7), the Thecus 1U storage server retains bragging rights, but just by a hair. The Thecus turned in performance numbers of 39.4 MB/s as compared to the 110’s 37.1 MB/s. Here’s the comparative chart for large files sizes on the 1000Mbps read tests:
Figure 7: 1000 Mbps read test
On the 1000Mbps read tests, the Snap Server 110 compares favorably with the Thecus 1U on file sizes of 32MB and 64MB. On 128MB and 256MB file sizes, the 110 is at a clear disadvantage, but outperforms all others on the largest file sizes (512MB and 1GB).
Of course, you can use the NAS Charts to perform further comparisons.
Final Thoughts
Without question, the Snap Server 110 is the most expensive single-drive 250 GB NAS we have ever reviewed. However, as a “snap in” storage module in an enterprise storage architecture, the 110 has the features that enterprise IT managers are looking for. Moreover, as noted above, its performance rivals or exceeds the “best of breed” NASes reviewed.
However, there are some minor “nits” that you could pick with some of the choices in the user interface. In addition to those identified, the Snap Server 110 does not support enabling jumbo frame support through the web UI. However, tech supports says that there is a way to enable jumbo frames through the CLI with SSH enabled.
For an initial purchase of an enterprise storage solution, or as a workgroup expansion of an existing Snap Server storage network, the 110 is a good choice. If you just want to store some MP3s on your home network, however, the Snap Server 110 is overkill.
![]() Check out the slideshow for a tour of the 110’s admin interface.
Check out the slideshow for a tour of the 110’s admin interface.

