Introduction
| At a Glance | |
|---|---|
| Product | Buffalo LinkStation Pro Duo (LS-WTGL/R1) |
| Summary | Two SATA Drive NAS with support for RAID 0, 1. Only available in 1 TB model. |
| Pros | • Gigabit LAN with jumbo frame support • Easy setup wizard • Very quiet • Remote Web Access • Built-in backup to other Buffalo NAS Devices |
| Cons | • Disappointing performance • Single USB port • Problematic RAID 1 fail and recovery • No USB Print server • No FTP or Web Access logging |
Buffalo Technology has been in the NAS (Network Attached Storage) business for many years. Over the last two years, they revamped their LinkStation product line with newly designed cases, and, more importantly, gigabit Ethernet ports. The LinkStation Pro earned high marks for good performance, while the LinkStation Live turned in slower performance, but added FTP and streaming media servers.
Noticeably missing from Buffalo’s lineup, however, was a dual drive RAID 1 model. Buffalo has plugged that hole in their product line with the new LinkStation Pro Duo.
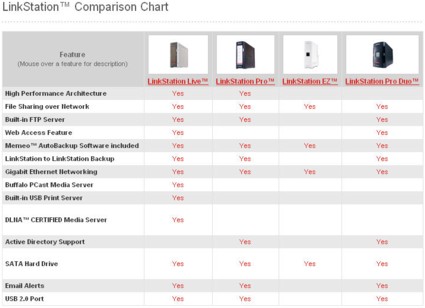
The Pro Duo is a bit of a hybrid between the LinkStation Pro and Live. The comparison chart (Figure 1, below) from Buffalo’s website gives a good top-level comparison between the various models in the LinkStation product line, including the new LinkStation EZ.
Figure 1: Buffalo Technology chart showing a comparison of LinkStation models
Like the Pro, the Pro Duo has support for Domains and Active Directory, but it also features Web Access, a feature added via a firmware update to the LinkStation Live subsequent to our review. (More on Web Access later). Moreover, like its Pro sibling, the Duo lacks the PCast media server, the DLNA media server, and a USB print server.
Product Tour
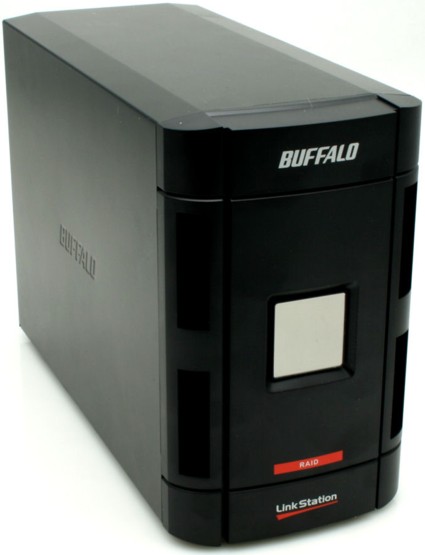
The LinkStation Pro Duo, like the LinkStation Pro, ships in a handsome black case. The center of the front panel is adorned with a shiny reflective square, which I assumed might have been the power button. It’s not. It’s decorative, but status LEDs shine through it to indicate power and link/activity.
The troubleshooting section of the 63-page manual that’s supplied on CD also contains a chart that correlates LED “flash codes” to specific types of hardware problems.
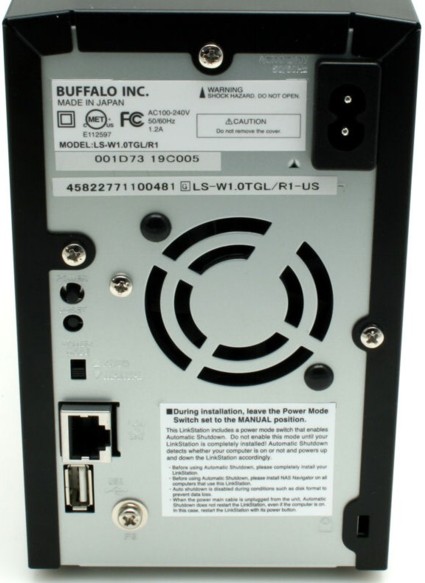
Figure 2: LinkStation Pro Duo Rear Panel
The rear panel of the Pro Duo (Figure 2) has a power switch, a recessed reset button, a gigabit Ethernet port, and a single USB port. Like other LinkStations, the power supply is built in (see slide show), so you merely have to plug in the power cord. There’s no external power “brick” cluttering up your desk, unlike some competing products.
There’s also a manual/automatic power mode switch. When placed in automatic mode, the Pro Duo can put itself into hibernate mode when it detects that the computer running the NAS Navigator utility has been shut down. Restarting NAS Navigator will wake up the Pro Duo. For most cases, you want to leave the switch in “Manual” mode.
On the rear panel, there is only a single USB port, which the instruction manual says can be used either in conjunction with a UPS, or for connecting an external USB drive. Unfortunately, there’s not a list of supported UPSs. However, a call to Buffalo’s Marketing department confirmed that most APC UPSs are supported.
Like the LinkStation Pro, the Duo also doesn’t have a built in print server. The single port also appears to support only a single drive. As a test, we plugged in a USB hub and connected multiple USB “flash drives.” Only the last drive plugged in was recognized. It’s interesting to note that the LinkStation Live and Pro both have two USB ports to which you can connect multiple drives, or, with the LinkStation Live, use one as a print server.
On the Inside
While some NAS manufacturers such as Synology and D-Link produce BYOD NAS enclosures, all of Buffalo’s NAS products ship with drives pre-installed, and are ready to use out of the box. Currently, the only model of the Pro Duo is equipped with two Samsung Spinpoint HD501LJ 500 GB SATA drives.
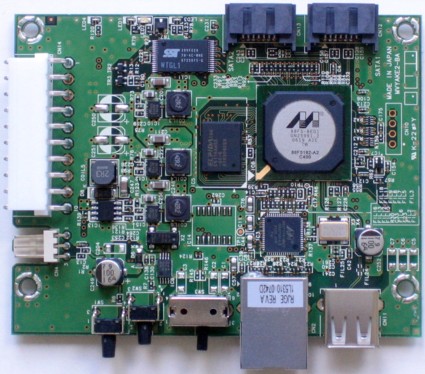
If you check out the slide show, you’ll see that Buffalo didn’t really break any new ground with the Duo. True, as a two-drive device, it now supports RAID 0 as well as RAID 1. However, the Marvel Orion 88F5182 Media Vault processor (Figure 3) is identical to the one used in both the LinkStation Pro and Live.
Figure 3: The main board of the Pro Duo
The Marvel 88E1111 Gigabit Ethernet controller is also the same in all three models. The Pro Duo seems to have only 64 MB of memory, as compared to the 128MB found in both the Live and the Pro. This might help account for its somewhat lackluster performance as compared to the Pro, and, on some tests, the Live.
Setup
The setup of the LinkStation Pro Duo is virtually identical to other LinkStation products. A simple four-step wizard guides you through connecting the NAS to your network and to power. The wizard also installs NAS Navigator, a simple utility that lets you change the address of the LinkStation, map drives, display shares, and connect your web browser to the management home page of the NAS.
With the exception of the RAID and the Web Access configuration menus, the user interface on the Pro Duo is identical to the one found in the LinkStation Pro. It has the same strengths, and yes, weaknesses we’ve previously identified. There’s still no way to log FTP sessions or web access sessions. Moreover, for the “green” crowd, you still can’t set drive activity spin down to conserve power.
Nor does the relatively limited email alerting support authenticated SMTP. It does, however send out status and backup alerts through SMTP servers that don’t require authentication. (Most likely, your ISP doesn’t require SMTP authentication for computers on their network.) Buffalo has added a timeout for administrative sessions, but we didn’t find a way to change the default setting. Since we’ve covered the Buffalo interface exhaustively in multiple previous reviews, we’ll only touch on the differences here.
As previously noted, the Duo supports both RAID 0 (striping) and RAID 1 (mirroring). For users who really value their data, the RAID 1 capabilities of a two-drive system may justify the incremental price increase over a single-drive system. When using RAID 1, you’ll only be able to use half of the total capacity of the two drives because your data is being written to both drives simultaneously. Thus, the 1 TB Pro Duo actually yields the same usable capacity as a 500 GB single drive LinkStation.
More importantly, with RAID 1, your data is automatically mirrored on two drives without any user intervention. If one of the drives fails, you’ll still have access to all of your files. The web browser interface will let you know that you need to replace a drive and that you are operating in a degraded condition.
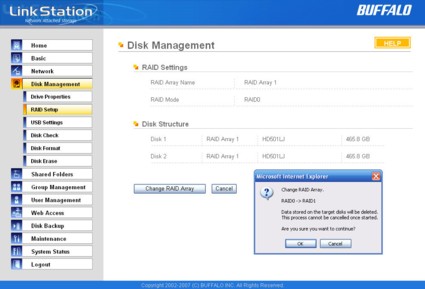
Figure 4: Disk Management RAID Setup
You really need to decide when you initially set up your NAS whether you want the maximum amount of storage (RAID 0) or the fault tolerance offered by mirroring the drives (RAID 1). In Figure 4, above, the Pro Duo is configured for RAID 0. In order to change to RAID 1, you can see that you receive a warning that all data will be deleted.
Web Access
Web access is a relatively new feature for Buffalo. They rolled it out as a firmware upgrade on the LinkStation Live, but as noted in the introduction, it’s also included on the Pro Duo. With Web Access enabled, you can configure the Pro Duo to allow you remote access to files residing on the NAS. Since we haven’t covered this feature before, it’s probably worth exploring.
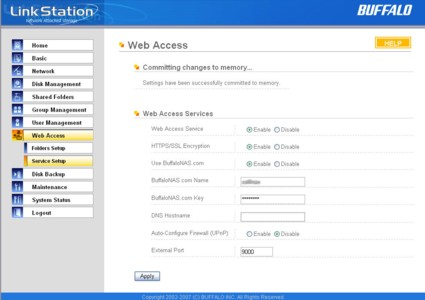
Figure 5: LinkStation Pro Duo Web Access Service Setup
First, you need to enable Web Access on the Service Setup menu (Figure 5). You have a choice of using either standard HTTP or secure HTTPS. If you do choose secure HTTPS, be aware that you’ll receive a certificate error when you remotely connect to your Pro Duo. Another challenge of connecting remotely is figuring out your network’s public IP address. Buffalo’s Web Access solves this by including a built-in DDNS (Dynamic Domain Name Service). Once you set up a BuffaloNAS username and key, their DDNS service will keep track of the public IP address where the Pro Duo resides.
Next, you have to set up port forwarding on your router so that traffic intended for your Pro Duo gets forwarded to the IP address of your Pro Duo. If your router has UPnP enabled, you can either let the LinkStation configure your router automatically, or you can configure port forwarding manually.
Web Access – more
Figure 6: Web Access Restrictions
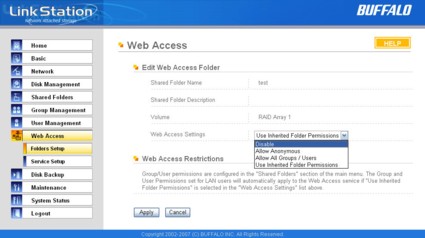
Finally, you need to set up access rights to each share. By default, web access is disabled for each share (Figure 6). Your choices are Disable, Allow Anonymous, Allow All Groups/Users, or Use Inherited Folder Permissions. Note: This last option does not appear in the drop-down box unless you have actually set user rights to the share you’re currently configuring.
Once you’ve finished with this configuration, you can test it by typing the following address into your browser:
http://192.168.xxx.yyy:9000 (x=your subnet and y= the host address of your Pro Duo)
From an external network, say a Wi-Fi network at Starbucks, you can type in
http://www.buffalonas.com
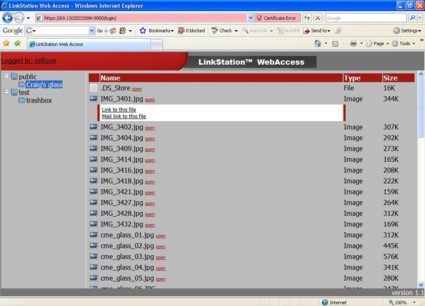
Fill in the user name/key you configured or a username/password if you set up web access to use inherited folder permissions. If everything is working, after login, you’ll see a screen that looks like Figure 7, below.
Figure 7: Buffalo Technology Web Access on the LinkStation Pro Duo
Adjacent to each file name is an open link. Depending on the file type, clicking on the open link will open the file in the appropriate application on your computer. Alternatively, clicking on the icon to the left of the filename gives you the option of linking to the file, or creating an email link.
Performance
Our interactive NAS charts allow you to make your own comparisons between all of the NAS products we’ve tested. To judge the performance of the Pro Duo, we first compared it to all of the two-drive NASs we’ve tested.
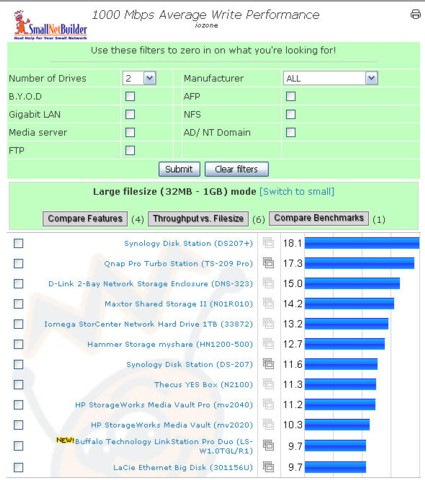
In 1000 Mbps average write performance (Figure 8), it ranked near the bottom of the chart with 9.7 MB/s—a little over half as fast as the two-drive performance winner, the Synology DS207+ that yielded 18.1 MB/s.
Figure 8: 1000 Mbps Average Write Performance for Two-Drive NAS Products
Performance – more
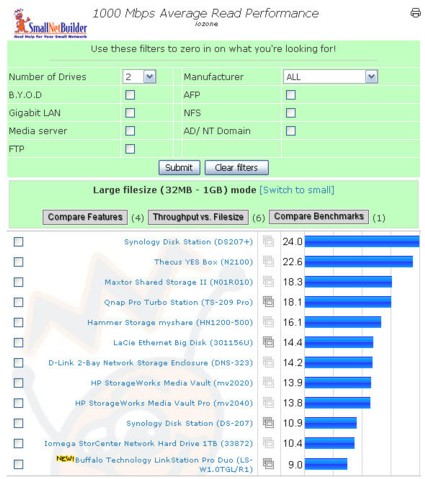
Similarly, in gigabit average read performance (Figure 9), the Pro Duo came in last at 9.0 MB/s compared to the DS207+ at 24 MB/s.
Figure 9: 1000 Mbps Average Read Performance for Two-Drive NAS Products
We also thought it would be useful to compare the Buffalo products to each other to see how the Duo stacked up against the rest of the product line. Again, we looked at average performance results with a gigabit LAN connection.
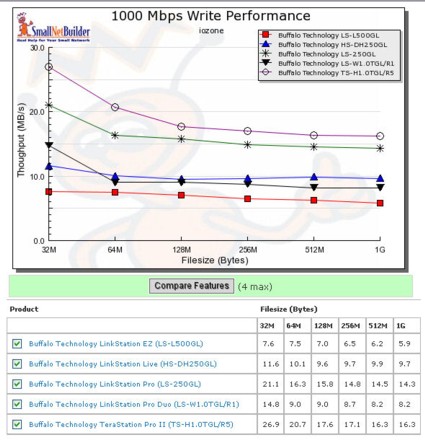
For large file size writes, you can see that the Pro Duo never achieved the performance of its single drive LinkStation Pro sibling (Figure 10). It turned in a slightly better performance than the LinkStation Live did at the 32MB file size, and then dropped below it for larger file sizes. Only the new entry-level LinkStation EZ had consistently lower performance.
Figure 10: Write Performance Comparison of Five Buffalo NAS Products
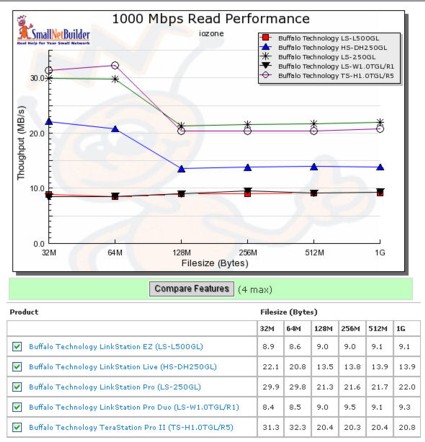
In the large file read performance tests (Figure 11), the Pro Duo also turned in disappointing results. From the chart below, you can see that it tracked the performance of the entry-level LinkStation EZ. At the 32MB file size, it achieved 38% of the throughput of the LinkStation Live and only 28% of the LinkStation Pro.
Figure 11: Read Performance Comparison of 5 Buffalo NAS Products
RAID Fail Test
One of the reasons you buy a two drive system is for the fault tolerance that RAID 1 provides. In order to test the Pro Duo’s fault tolerance, we first re-formatted the array from RAID 0 to RAID 1. Of course, all data was wiped during this process. We then recreated a share and loaded about 9 GB of data to it.
In order to simulate a drive failure, we removed that combined SATA power/data cable from Disk 1. Our expectation was that the Pro Duo would give a visual indication of an error and continue working. That’s not what happened. The Pro Duo did send out four emails indicating write errors as well as one indicating that it had entered degraded mode. Each of the emails recommended an immediate change of disk.
Then, the unexpected happened. The Pro Duo shut down. We attempted to reboot the device and it never came back online. At this point, the power switch didn’t shut the device down, so we disconnected the power. We then reconnected the power/SATA cable to the drive (Disk 1) we had failed and rebooted.
The Pro Duo came back online and a third LED, located between the power and link/activity LEDs and not normally seen, started flashing red. Over the course of the next 13 minutes, a total of 9 emails were received. One indicated that the Pro Duo had entered degraded mode while the rest of them indicated the start and completion of what appeared to be various portions of the array. Here are two sample emails:
Email #1
RAID re-build notice
Target array:System field (md0)
Target disk:Disk 1
RAID array re-build has started.
[LinkStationInformation]
LinkStationName: LS-WTGL005 (LS-WTGL/R1)
Time: 2008/01/30 08:22:36
Setting Screen: http://192.168.100.192/
Email #2
RAID re-build notice
Target array:System field (md0)
Target disk:Disk 1
RAID array re-build is complete.
[LinkStationInformation]
LinkStationName: LS-WTGL005 (LS-WTGL/R1)
Time: 2008/01/30 08:23:10
Setting Screen: http://192.168.100.192/
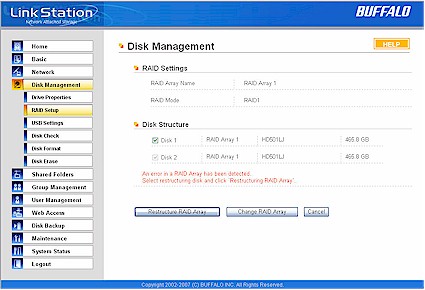
Though the emails stopped coming, the error condition LED was still blinking red, so we assumed that the device had not completely healed itself. It turns out that that was a correct assumption. When logging into the Pro Duo, the home page indicated a disk error. Clicking on the error message took us to the Disk Management page.
Figure 12: Disk Management page showing error
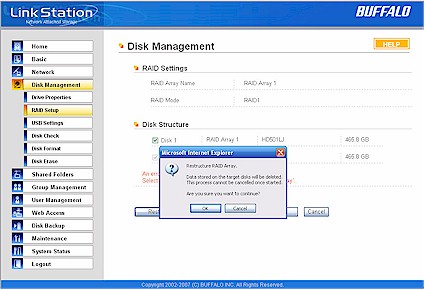
We selected Disk 1 (Disk 2 was greyed out) and clicked on Restructure RAID Array. We received a warning that all data on the target disk was going to be deleted.
Figure 13: Restructure RAID Array warning message
RAID Fail Test – more
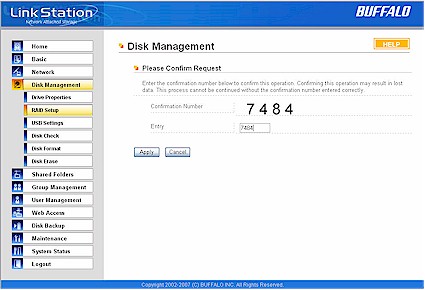
When making a major change to the disk that will result in data loss, such as deleting a share or changing RAID configuration, Buffalo first gives you a warning. Then a second screen is presented with a four digit number. You have to type in the four digit number and click “Apply” before the action that will wipe out data can proceed. After confirming the number, the RAID rebuild process began and another email was sent indicating the start of the rebuild.
Figure 14: Confirmation screen
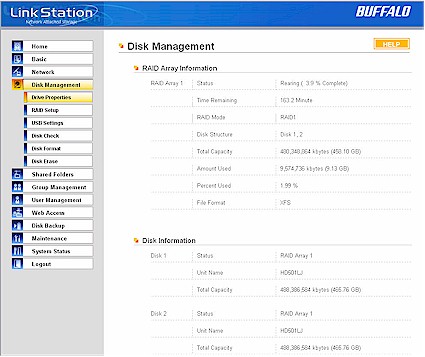
Subsequent logins to the home page of the Pro Duo indicated that the RAID was in the process of being rebuilt. During this entire time, the Pro Duo was online, and its shares were available. And, while the array was being repaired, the error status LED flashed yellow. Clicking on the information link (“Repairing RAID Array 1”) on the home page takes you to the Disk Management page where you can see the status of the rebuild. The status shown, “Rearing” is probably a typo in the UI and should say “Repairing”.
Figure 15: Disk Management page showing status of Array rebuild
When the array repair was completed, the Pro Duo sent a final email notification, the error status LED ceased blinking and the Pro Duo resumed standard, non-degraded operation. Total time to rebuild the array with 9 GB of data was 2 hours 48 minutes.
Conclusion
If you’re looking for a two-drive NAS, it’s likely that you’re considering it because you want the fault tolerance that RAID 1 offers. Otherwise, you could buy a single-drive NAS with more usable storage capacity for significantly less of an investment. The Pro Duo does offer a turnkey solution for those who don’t want to purchase and install their own drives into a competing BYOD NAS enclosure.
However, you do pay a price when choosing the LinkStation Pro Duo—both in features and in performance. The performance ranks at the bottom of our two-drive charts and near the bottom of Buffalo’s own products. While you might not save any money with a BYOD solution, you can typically pick up significant performance improvements and a richer feature set. Many comparably-priced BYOD products include “business features” that the Pro Duo has, like Active Directory support, and “consumer” features that the Pro Duo lacks, such as media servers and built-in download clients.
I also felt that the RAID recovery process was sub-par. There are two reasons to have fault tolerance in a storage system: to ensure that no data is lost and ensure access to data. On the first account, the Pro Duo did, in fact, ensure that no data was lost when we failed the drive. Although our method of “failing” the drive while in operation may have caused some problems, drives tend to fail when they are in use, not turned off.
But on the second account, the Pro Duo failed the test. The device should have continued operating in a degraded mode until we could have replaced the drive. We were surprised with the Pro Duo shut down, and even more surprised when it wouldn’t reboot with the single drive of the RAID pair. This seems to be a design shortcoming.
There are several ways that manufacturers can choose to rebuild a failed RAID array. Some manufacturers such as LaCie and QNAP, automatically detect a new replacement drive and automatically start a rebuild. Buffalo, on the other hand, chooses to involve the user, which we first discovered when we reviewed the TeraStation Pro II.
Unfortunately, there is no guidance in the user manual on what to do if a drive fails and how to rebuild the array. In fact, the only mention of RAID setup in the manual is on page 24. There is just a screen shot of the Disk Management Raid screen with the instructions: “Configure your RAID settings here”. Since devices that support various levels of RAID are more complicated than single drive units, manufacturers should include additional information about how to set them up, as well as how to recover in the event of hardware failure.
Buffalo continues to differentiate its LinkStation product line by splitting them into a consumer line (Live and EZ) and a business line (Pro and Pro Duo). With the exception of the EZ, all of the LinkStations use the same processor, so it seems like the differentiation is more based on marketing than technology. So w hy not include the richest possible set of features in a single product line? Manufacturers like Synology and QNAP have done that, and are gaining traction in the US market.

