Introduction
| At a Glance | |
|---|---|
| Product | HP Media Vault (MV2020) |
| Summary | Dual-drive NAS with RAID 0, 1 and built-in media and print servers |
| Pros | • High performance • Gigabit ethernet • RAID • Powerful backup capabilities |
| Cons | • Physically large • Windows-only backup utility |

If you’re in the market for a consumer-level network-attached storage (NAS) device, you have a lot of options these days. The available NAS devices are handy and flexible enough to handle the massive amount of data that people accumulate. Also, if you want extra protection for your data, options are available for that as well, since manufacturers are beginning to offer RAID features in consumer devices. RAID adds redundancy to help reduce your loss if a disk failure occurs.
There are several options in the market for RAID-capable NAS devices. In this review, I’m going to check out the Hewlett Packard Media Vault (MV), a device from one of the heavyweights in computers and consumer electronics.
The Media Vault, HP’s initial entry into the consumer or “small-office” NAS market, offers gigabit Ethernet and RAID mirroring and comes in two models: one with a 300GB drive and one with a 500GB drive. For this review, I was supplied with the 500GB model.
Physically, the MV is larger than most consumer NAS devices on the market. Instead of being the size of an external drive, the Media Vault is comparable in size to a “thin client” or managed PC. The size is in part due to the expansion bay where you can add an additional SATA drive for additional storage or a RAID array. My review MV2020 also had a 500GB drive installed in the expansion bay; thereby giving me a total of 1TB of storage.
Much like a PC case, the exterior of the device is constructed of two-tone lightweight plastic and metal. The front panel has a door for the expansion bay, several status LEDs, a USB 2.0 port, and a power button with a blue LED that is bright enough to cast shadows at night. The back panel, shown in Figure 1, provides a Gigabit Ethernet port, two USB 2.0 ports, a Reset button, fan vent, and a power connector.
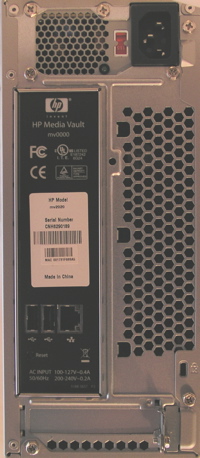
Figure 1: Media Vault Back Panel
Setting Up
When I plugged in my Ethernet cable and powered up the MV2020, I expected the fan to make as much noise as a fan in a tower PC, but instead I found it to be fairly quiet. Once the device started up, I installed the Windows-only configuration software in my MacBook Pro, which was running Windows XP natively—courtesy of its Intel Core Duo processor. After the installation, I was greeted with a screen from the new application (shown in Figure 2).
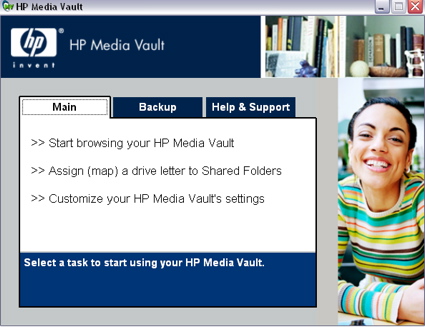
Figure 2: Media Vault Application
The browsing option from the Main menu brought up the Windows explorer where I could explore the default shares of the device. The second option allowed you to map a drive letter to the shares for more permanent access. For consumers with simple needs, setting up the first two options would complete their installation. Additional configuration options are available under the “Customization” selection for more advanced users.
Like nearly all NAS devices on the market, the real configuration of the device was performed using a web browser. If you selected the customization option, a web browser appeared and connected you to the Media Vault. Figure 3 shows the initial screen where you are presented with the option to configure the device or browse your shared folders.
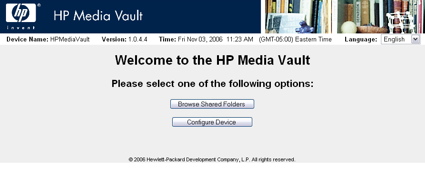
Figure 3: Configuration Web Page
When I selected Browse Shared Folders, a screen appeared, showing the status of the device’s shared folders (as shown in Figure 4). The Shared Folders screen showed that along with two internal drives, I had an external FAT-formatted drive plugged into one of the USB ports. HP supports disks formatted in FAT32 and ReiserFS, and NTFS in read-only mode. Note that the total supported capacity from all drives cannot exceed 1.2 Terabytes.
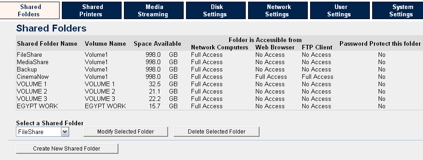
Figure 4: Shared Folder Configuration
Along with status, the screen also enabled me to create new network shares, restrict network access and delete shares, among other options. A submenu had some interesting features related to setting up a shared folder. Along with the standard SMB support, the folders could also be set up for access via NFS, web browser, and FTP.
Even though the Media Vault is geared toward Windows users, the support for these other protocols meant that other operating systems can also use the device. My compatibility tests showed that the shared folders could be mounted and used from both my Macintosh and Linux systems.
Print and Multimedia Serving
The next option I explored was the Shared Printers menu. Figure 5 shows that the Media Vault recognized the HP LaserJet that I plugged into the USB port and made available to the other computers on my network. Note that if you have a multifunction printer with fax, scanner, and other options, the additional capabilities won’t be available across the network.
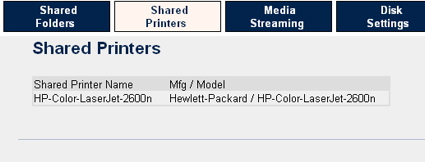
Figure 5: Shared Printers
An interesting feature that HP and several other manufacturers are starting to support is media streaming and that’s where the “Media” in Media Vault comes into play. Figure 6 shows the Media Vault configuration menu where options are available for enabling or disabling streaming from the various folders. The industry-standard for this type of functionality is the UPnP AV protocol.
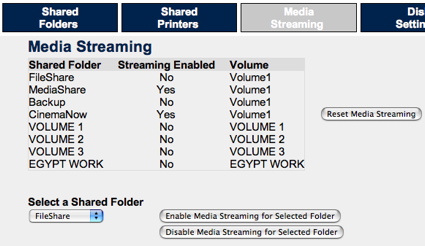
Figure 6: Media Streaming Configuration
I have a Netgear EVA700 UPnP multimedia device on my network that is attached to my entertainment center, and my tests showed that the Media Vault worked fine with it. The concept is that you can use the NAS device to store your movies, pictures, and music; and then, stream the content to a player that is hooked up to your entertainment center.
Figure 6 shows the presence of a “CinemaNow” folder. HP evidently has a marketing agreement with CinemaNow that allows HP to pre-load the Media Vault with a full-length digital version of the “The Bourne Identity”. After jumping through some DRM-installation “hoops,” entering a provided username, a password, and accepting some “scary” legal agreements, I was allowed to view the movie using Microsoft Media Player on my laptop. Although he movie appeared in the menu of my Netgear EVA700, I wasn’t able to view it. I only got a black screen.
Share and User Configuration
Figure 7, which is from the Disk Settings menu, shows a graphic representation of how the drives in the Media Vault were configured. In this case, the two 500GB drives were configured to act as a single, logical 1 terabyte disk.
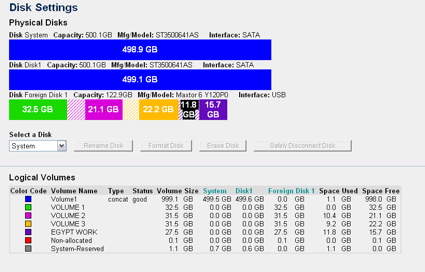
Figure 7: Disk Settings
Figure 7 also shows four partitions on the external USB disk. This screen also enables you to change the internal disk configuration to support mirroring (RAID Level 1). With mirroring enabled, your storage capacity will be cut in half, but you’ll have additional protection in case of disk failure. A test I ran to see if the Media Vault could recover from a failed secondary disk was successful, but it took 13 hours (!) for the replaced drive to be fully restored. Like other RAID-capable NASes, the Media Vault was available for use during the rebuild period, but with reduced performance.
Note that only the secondary drive (the drive in the expansion bay) is designed to be easy to replace. The internal drive can be replaced in cases of failure, but additional “hoops” have to be gone through. More on that later.
Figure 8 shows the Network Settings menu. Using this menu, you can change the normal settings such as DHCP vs. static address, workgroup name, and others.
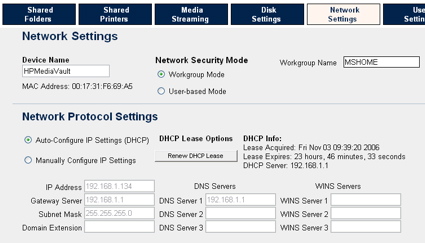
Figure 8: Network Settings
The Network Settings menu also allows the device to be configured in Workgroup Mode so that a single password can control everything or in user mode so that you can define individual users and folder protection levels based on each user. Figure 9 shows the user creation menu where you can create new users and assign privilege levels.
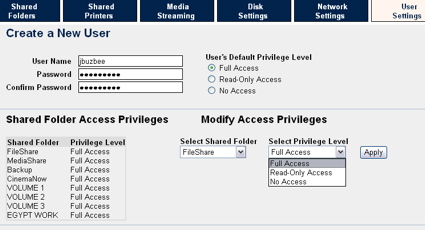
Figure 9: User Creation
Other Settings and Backup
Figure 10 shows the System Settings menu where a number of settings can be examined or changed.
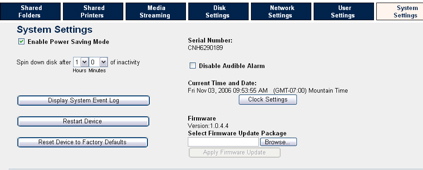
Figure 10: System Settings
You can enable the “Audible Alarm” so that the device notifies you when system events occur. According to the documentation, if a drive fails you’ll start getting “beep” notifications. When this occurs, descriptive messages will also be directed to the Windows control application so you can diagnose the problem. An option for emailing these status messages to a specified account does not exist.
A nice settings feature is “Power Saving Mode” because it allows the drives to spin down when they’re not in use. On my LAN, most of the time my NAS devices are idle; therefore, allowing them to spin down saves both power and minimizes noise. My power meter showed that with my two-drive setup, the device drew about 30 Watts when active and half of that when idle.
Figure 11 shows the device’s logging feature. If you’re storing important data on a device, it’s important to monitor it to make sure it’s operating smoothly.
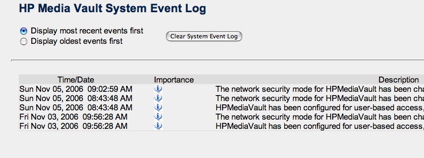
Figure 11: Logging
A final option available under the System Settings menu is the time adjustment for setting the time manually or via an NTP server.
After the Media Vault is configured, you can map the network shares and use them normally, but the device also allows access via a web browser. Figure 12 shows the access of the “CinemaNow” folder via a browser interface.
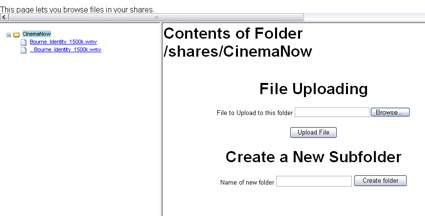
Figure 12: Web Browser Interface
Using the browser interface, you can roam around the directory structure uploading and downloading files. The feature worked, but I wouldn’t want to spend much time roaming. In general it seemed a bit clunky, but that’s not too surprising for this type of interface. One aggravation I had with this interface was the Back button on my browser. Due to the way the page was designed, oftentimes my Back button takes me nowhere.
The one nice thing about having a web-based interface to your shares is the possibility of accessing your files remotely. With a little bit of port-forwarding setup in your router you’ll be able to get to your files when you’re away from home. Just make sure you turn on password protection on and have the proper limitations set if you’re going to open up your device to the Internet at large. Note that by putting HTML in your directories, you can also serve up your own web pages using the device.
Since NAS devices are frequently used for backup purposes, HP provides a few Windows-only options. The first is a fairly standard backup feature in which you specify which folders should be backed up and then either set a backup schedule or specify that the backups be continuous, i.e. whenever a file changes. The second backup feature is one that I’ve never seen before in a NAS device. Figure 13 shows the Drive Backup screen that allows you to back up your entire Windows drive for recovery purposes.
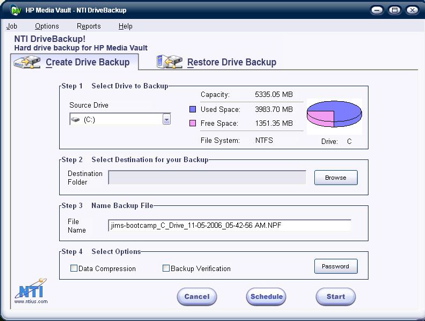
Figure 13: Backup Utility
HP then provides a Windows boot CD to restore the backup image. So when the drive on your Windows system fails, you replace it, boot off the CD; and then, restore it from the backup image. Slick.
Performance
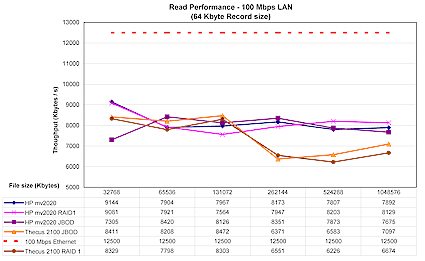
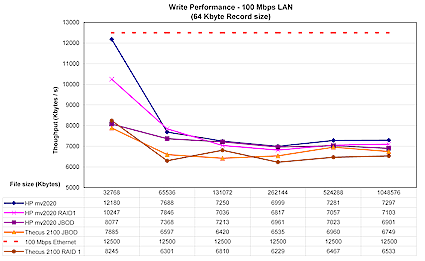
In order to see how well the Media Vault performed, several tests were run using our standard NAS test procedure. The MV was tested using 1.0.4.4 version firmware that came installed. Figures 14 and 15 show the NetCenter’s performance on a 100mbit network using a 64kByte record size and file sizes from 32MB to 1GB, plotted along with a comparable Thecus 2100 NAS.
Tests were run with the device in standard mode (where each drive is accessed individually), in concatenation mode (JBOD), and in mirroring mode (RAID 1).
Figure 14: 100 Mbit Read (click image to enlarge)
The Thecus and Media Vault read speeds track pretty well for file sizes 128 MB and below. But the MV pulls ahead on larger file size reads, mainly because it doesn’t demonstrate the typical throughput fall off that the Thecus (and many other consumer NASes) have. The MV comes out on top on the write tests, but not by a huge margin over the Thecus.
Figure 15: 100 Mbit Write (click image to enlarge)
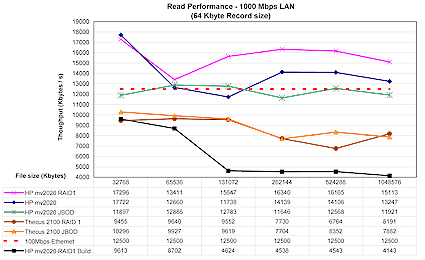
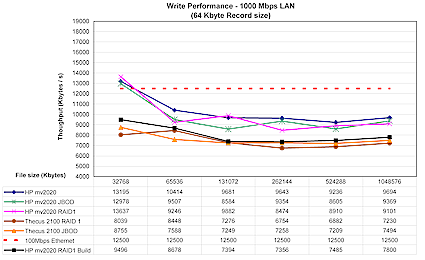
Figures 16 and 17 show the same tests run on a 1000Mbit network. These results show a much wider separation of read performance, with the MV beating the Thecus by a wide margin. Note the lowest plot line, which shows the results of a test run during the 13-hour RAID 1 rebuild.
Figure 16: 1000 Mbit Read (click image to enlarge)
The Gigabit write performance shown in Figure 17 once again illustrates that the MV is a better performer than the Thecus.
Figure 17: 1000 Mbit Write (click image to enlarge)
To give a user perspective on performance of the MV2020, I performed a simple drag-and-drop test where I moved a directory tree back and forth to the Media Vault using a different computer than the iozone tests. The machine I used was a MacBook Pro, 2 GHz Intel Core Duo with 1.5 GB of RAM running Windows XP SP2 natively. The directory tree I was copying contained 4100 files using up just over a gigabyte. Table 1 shows the results of these tests.
Moving from XP to the Media Vault (write) took (on average) 3 minutes and 30 seconds on a 100 Mbit network and 2 minutes 45 seconds on a 1000 Mbit network. Moving the same directory back to my XP system (read) averaged four minutes even on a 100 Mbit network, and three minutes ten seconds on a 1000 Mbit network.
| 100 Mbps LAN | 1000 Mbps LAN | |
|---|---|---|
| Write to MV | ~ 210 sec | ~ 165 sec |
| Read from MV | ~ 240 sec | ~ 190 sec |
Table 1: File Copy Test Results
If you want to compare the MV against all of the other NASes we’ve tested, just click over to the NAS Charts.
Under the Covers
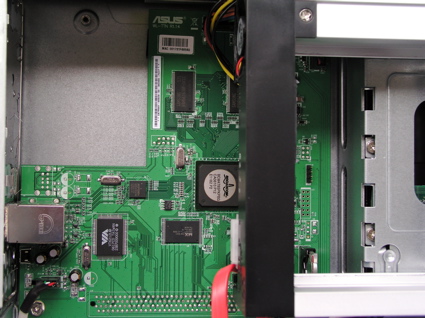
Figure 18 shows the inside of the Media Vault. The MV is constructed internally like a PC so getting a good picture of the mainboard was difficult. From the photo, you can see that the main functionality of the MV is provided by a Broadcom 4785 integrated processor, which is similar to the 4780. The Broadcom chip includes the main CPU, disk controller, and Ethernet. The USB support is provided by a Via VT6212 4-port USB 2.0 Host Controller.
Figure 18: Inside the Media Vault (click image to enlarge)
In terms of software, it’s no secret that the MV is running Linux internally—the reference to the Reiser filesystem told us that. Searching the Internet for more information on the MV, I found a web page detailing the internals of the Media Vault that had been put up by an HP employee.
Information is provided on a number of different ways to extend the capabilities of the MV starting with how to get a Telnet server running so you can log in remotely. There is information on overclocking, on how to attach a serial console device, and even how to build your own custom firmware. As mentioned above, there are even instructions on how to replace and reinitialize the internal drive. With many consumer-level NAS manufacturers, if the internal drive dies, the MV becomes a doorstop. It can be a bit tricky because portions of the Linux operating system are oftentimes resident on the drive. Kudos to HP for allowing their employee to provide all of this information!
By poking around, I found information provided by Linux that showed a device with 64MB of ram that was based on a 300 MHz Broadcom embedded MIPS chip using busybox for utilities, vsftpd for the ftp server, and Samba for Windows filesharing.
Conclusion
The MV is HP’s initial entry into the consumer-level NAS market, and they’ve come out strong. The device performs well. It has expansion capabilities via its USB ports and for more secure backups, it supports RAID 1 mirroring. The UPnP AV server on the device was a nice feature that allowed me to stream media to my entertainment center.
Besides being pleased with having the standard Windows network filesharing available, I appreciated the support for NFS and FTP so my Macs and Linux computers could play along. HP didn’t include any backup software for systems other than Windows, but the software they did supply had the unique disk restore feature that could be a lifesaver in the event of a catastrophic disk failure.
As far as a comparison to its peers, the most direct comparison would be to the Thecus 2100 which is also a two-disk NAS device or D-Link’s new DNS-323. As shown above, the Media Vault “bested” the 2100 in performance. Unfortunately, complete results from DNS-323 testing weren’t available at the time of this review, so I wasn’t able to include that product in the throughput comparison plots. A check of the NAS Charts shows the two products to be comparable in performance with the DNS-323 having a bit of an edge. The Media Vault also has a more extensive feature set than the 2100.
In terms of price, you can purchase the 2100 without any drives online for around $275, whereas you can purchase a Media Vault with a 300GB drive from HP’s online store for $350. The 2100 was quite a bit smaller and more attractive to my eyes than the MV.
Overall, the Media Vault has the upper hand in the comparison, and I have no problem recommending it if you’re looking to wrap up a home network storage device to put under the tree this holiday season.

