Introduction
We have been reviewing Buffalo Technology’s TeraStation products for a long time. Recently, Buffalo announced the End of Life for the TeraStation Pro family of products. The Pro family is being replaced by a new TeraStation 5000 series. From Buffalo’s website, here’s a summary of the 5000 series TeraStations:

Buffalo TeraStation 5000 Series Family
The screenshot below is a top level comparison of now terminated TeraStation Pro and the new TeraStation 5000’s.

TeraStation Comparison
Tim recently reviewed the hardware and performance of the new TeraStation 5800. In that review, he indicated that like several other NAS makers, Buffalo has also refreshed their OS, adding some new features and polishing up the user interface. This review will focus Buffalo’s new NAS OS, so let’s get started. Note that I used a TS5200 for this review.
The tested version of firmware was Version 2.31-1.14. Buffalo has indicated that a new version, 2.41, will be released soon that will include performance enhancements.
Setup
Very little, if anything, has changed with the setup of a TeraStation. Buffalo still points you to a CD-based setup process, which launches and / or installs programs. However, this is a no-no in today’s world dominated by tablets, smartphones and ultra-light (and optical drive less) notebooks.
Fortunately, if you can follow the instructions on the printed quick start sheet to get the right cables plugged into the correct holes, you can bypass the CD and point your browser at the IP address of the NAS shown on the front panel screen (assuming your LAN has a DHCP server).
If you opt for the CD process, you run tsnavi. exe from the included CD, and have options of “Begin Installation” or “Install Nas Navigator 2”. The “Begin Installation” option launches a wizard which guides you though connecting cables and powering the NAS. At the end of the wizard, you can also install NAS Navigator 2.
Nas Navigator 2 discovers all LinkStations and TeraStations on your local network. If you right-click on one of the devices, you have the option of browsing shares, mapping shares, viewing properties and settings. Clicking on Settings takes you to landing page of the web UI.
There’s a default share named “Share”. The default administrator credentials are admin with password as the admin password.

Nas Navigator 2
Here’s a look at the landing page of the new UI. You have a choice of either “Easy Admin” or the Advanced UI. Buffalo chose to make the Advanced UI the default. The advanced UI gives you full access to all configuration options, whereas the Easy Admin contains a subset of options and has wizards to help you through some of the tasks.

TeraStation Easy Admin landing page
I like that the login dialogue provides you with several options: First you can choose to stay logged in, or you can select automatic timeout after 10 minutes. You can also select a secure connection and choose the Easy Admin interface. Clicking OK takes you to the advanced UI. Optionally, users can log in with their user ID. Non admin user’s configuration options are limited to changing their passwords.

TeraStation Login Options
Across the top of the screen, you’ll see three icons with drop down arrows. The “?” takes you either to context sensitive help or provides a link to the online manual. The “i” icon shows you a very basic status of your device. This icon changes to an orange flashing “!” to indicate an error condition. Finally, at the far right, the power icon lets you gracefully shutdown or restart the TeraStation.

TeraStation Advanced UI
The icons in the red bar in the advanced UI perform the following functions:
- Settings icon with propeller (far left) – takes you to the easy admin interface
- Music note – plays a tune on the TeraStation’s speaker to help you locate it.
- Name: displays the current name of the TeraStation. You can’t change it from here.
- User icon – shows the currently logged in user
- Language – lets you change the language for the user interface
- Logout – log out of the administration interface.
My initial reaction to the advanced landing page was, “Where’s the status page?” Though I realize that might be a personal preference, many devices use the landing page to give you a top line, or in some cases, depending upon the manufacturer, a detailed status of the device. Compare Buffalo’s landing page with the new ReadyNAS landing page and you’ll see what I mean.

NETGEAR ReadyNAS landing page shows a good summary of the device status
Some menu items make sensewhere they are, but others seem like they should located under different top level menus. For example, on the file sharing page, all of the items below “Group” are services, so you might expect to find them in the Services menu.
Still, looking at a screenshot (below) of the previous generationof TeraStation firmware, you can see that the new UI represents a significant improvement. The new UI features top-level menu items arranged in a vertical column with sub menus displayed to the right. On/off switches, such as you see for services such as SMB, AFP, etc make it easy to see the status for each. The black boxes with diagonal arrows take you to additional configuration options.

Prevoius generation TeraStation landing page
But as Tim pointed out, you do a fair amount of navigating and clicking to configure some options. It seems like every function you click on opens a small window where the real settings are located. This gets old after awhile.
The best way to get a feel for a new user interface is to see each of the menu options. In the gallery below, I’ve included screenshots for each of the top level menus for the advanced interface as well as some of the more interesting configuration options.
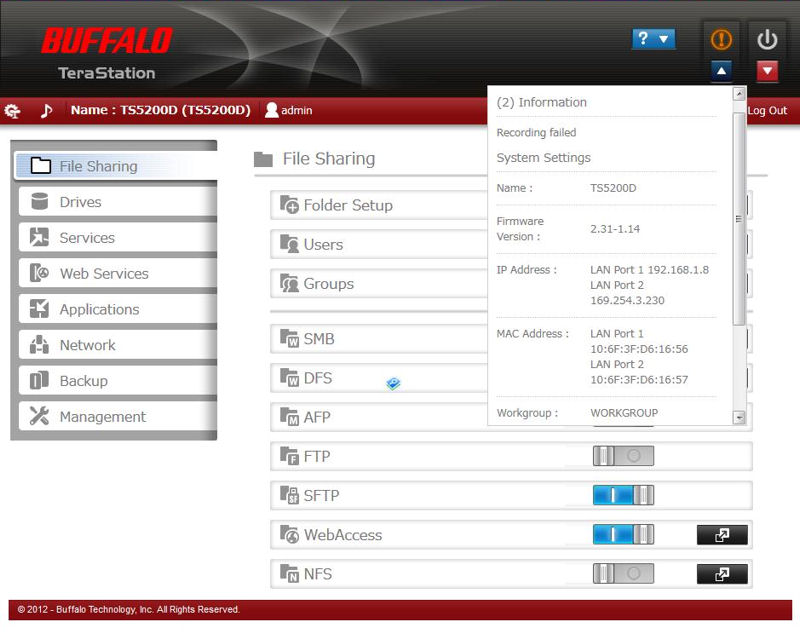
Clicking the dropdown arrow next to the "!" icon reveals the device status. The icon is flashing orange since I disconnected a configured surveillance camera.
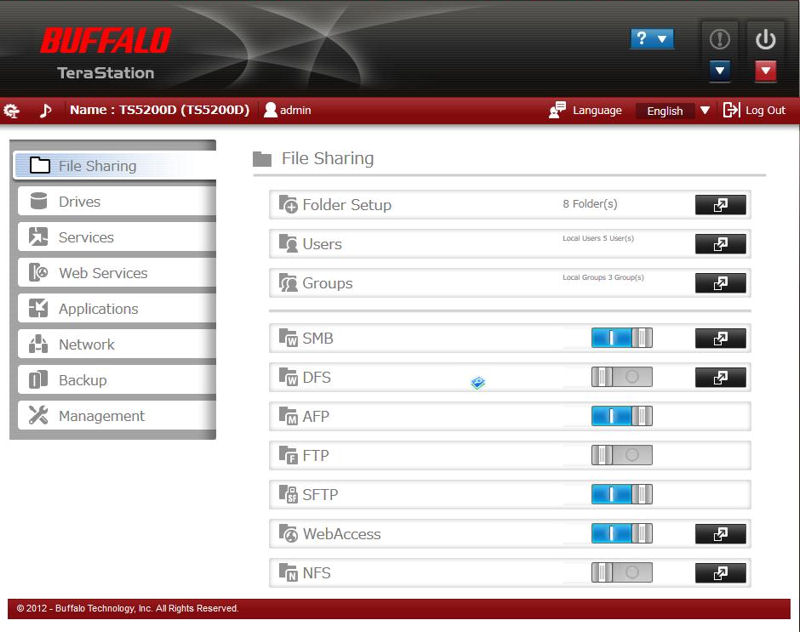
This is the landing page for the advanced interface. The first three items let you set up folders, access rights, users and groups.

Clicking on the black box next to Folder Setup opens the shared folder menu. For each share you can enable/disable services. Check marked services are enabled.
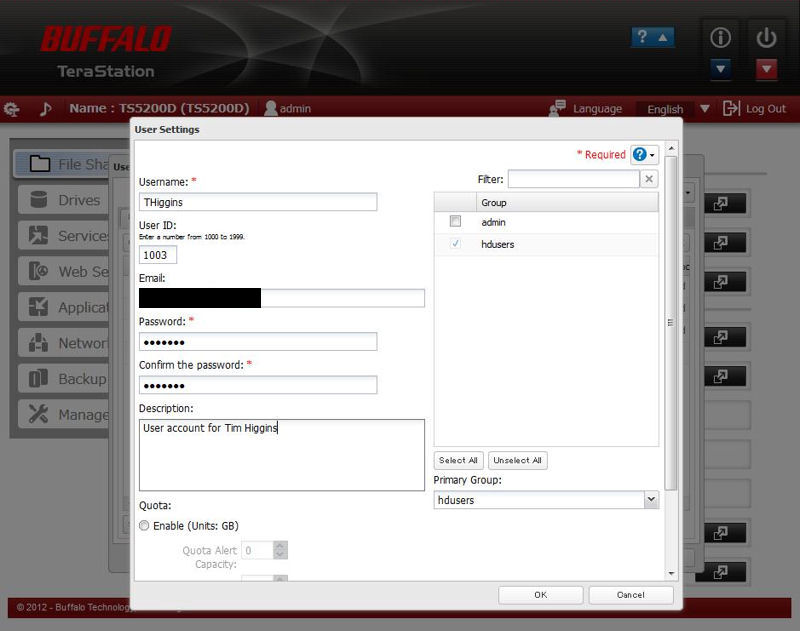
Here you can create/edit user accounts and asign them to groups. You can also assign quota alert and quota restrictions.
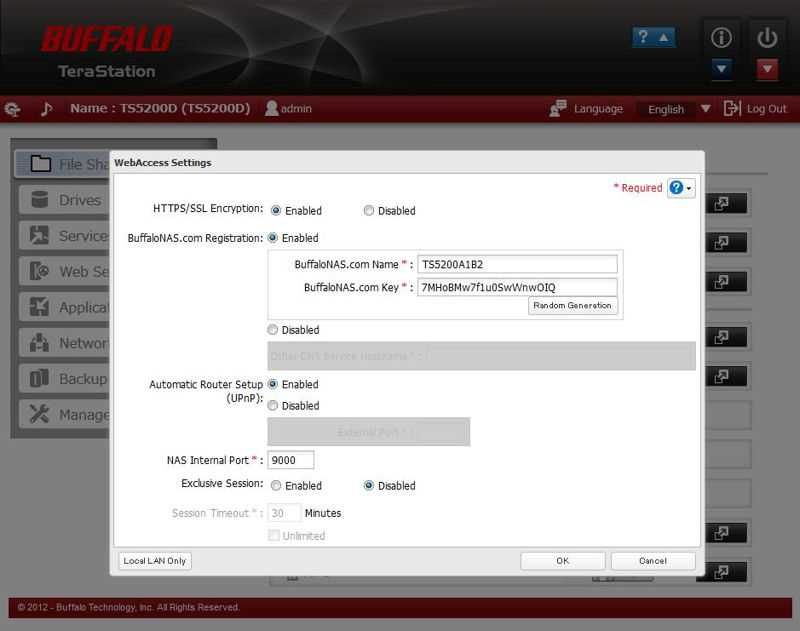
In this submenu, you set up remote access settings.
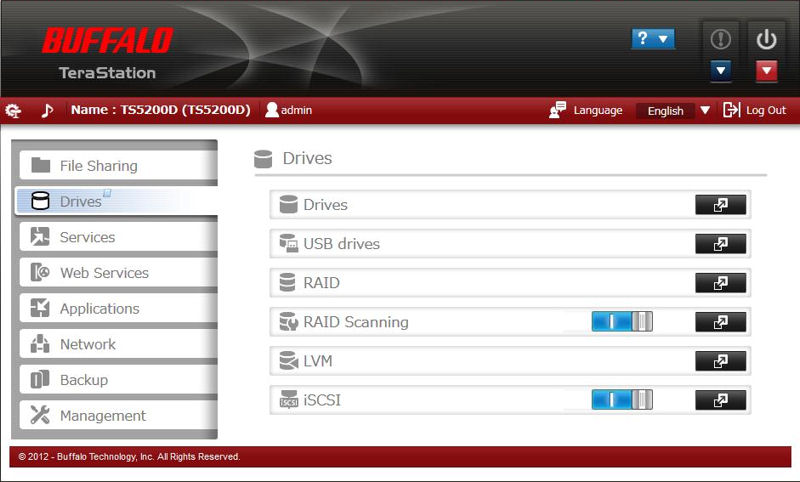
Top level Drives menu
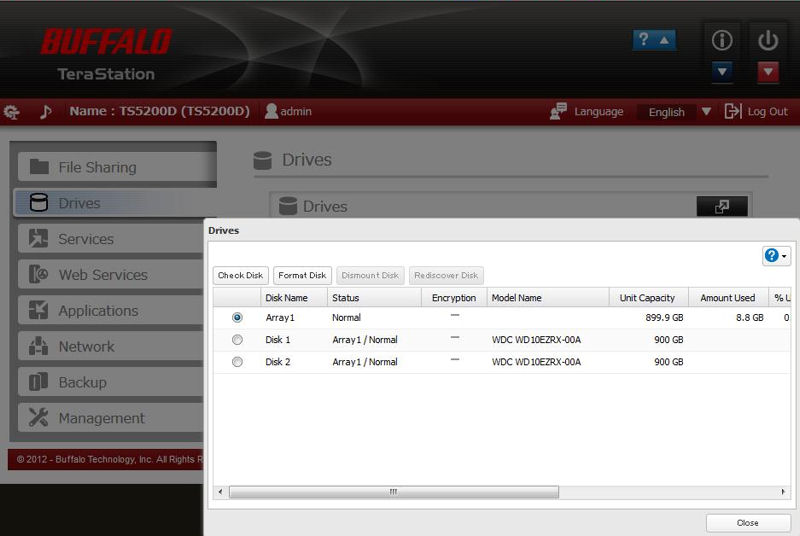
Shows current installed disks. You can also check disks or format them from this menu.
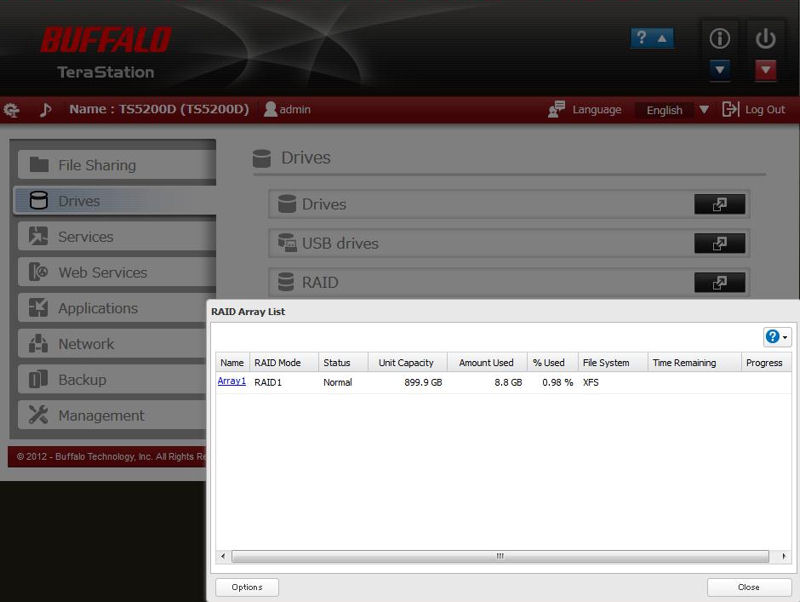
Shows the current RAID mode and status.
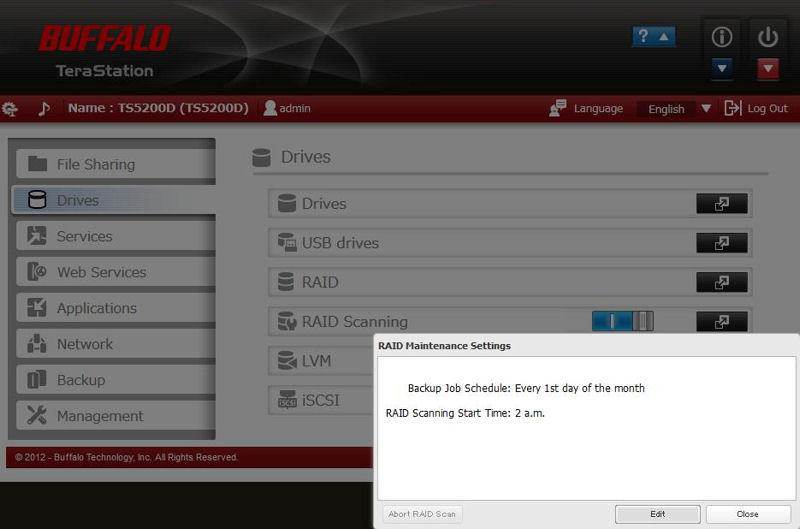
Raid Scanning regularly scans the array and attempts to correct problems.

Logical Volume Management provides a more flexible method of allocating space than conventional paritioning schemes.
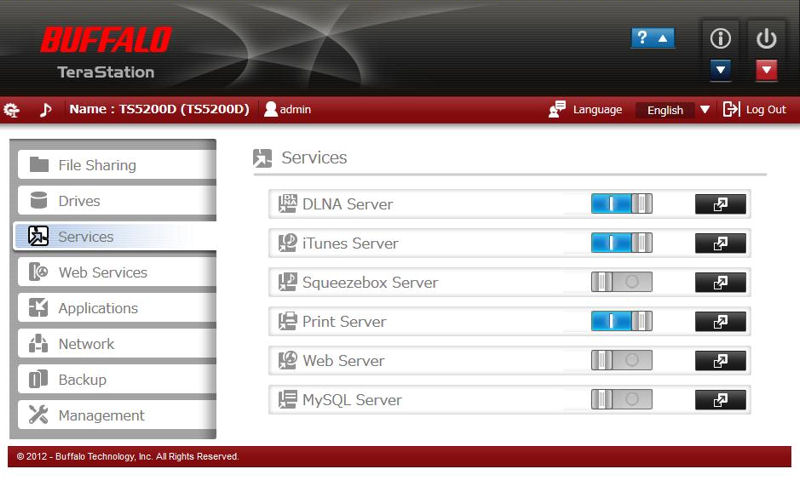
Services Top Menu – Here you can enable or disable the listed services. Each service has a configuration sub menu.
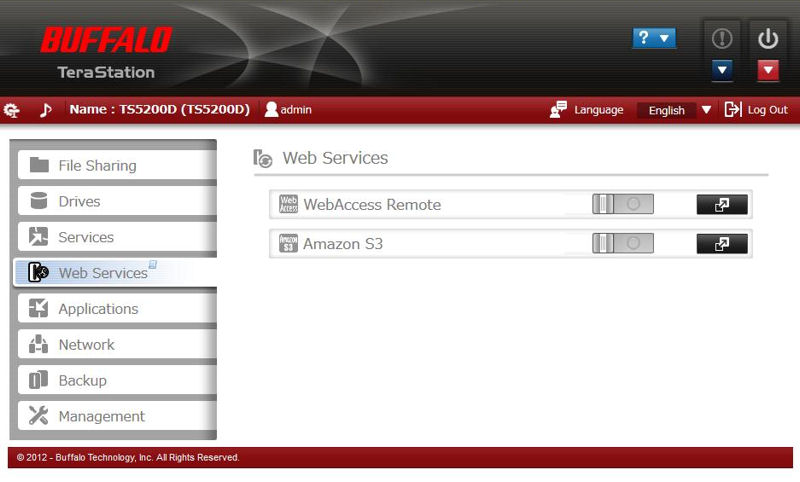
WebAccess Remote lets you open files on a remote LinkStation or TeraStation. Amazon S3 lets you backup a share to Amazon S3 storage. An Amazon account is required.

Here you can enable/disable applications that run on the TeraStation.
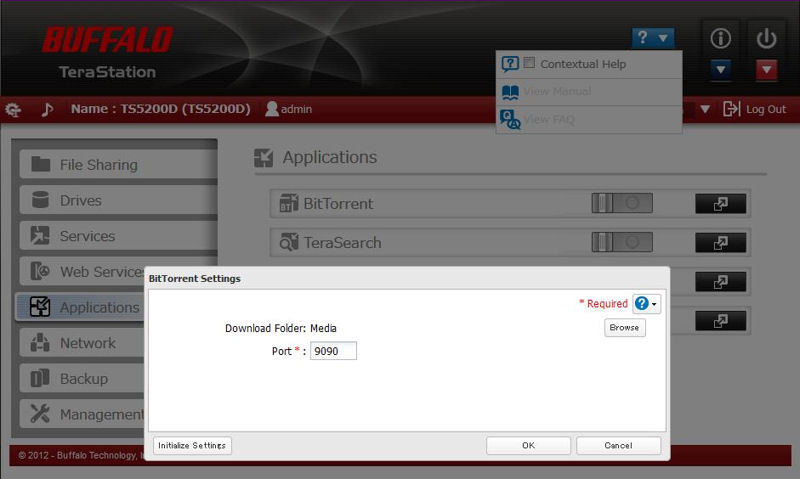
You can configure a port and specify a folder for BitTorrent downloads.
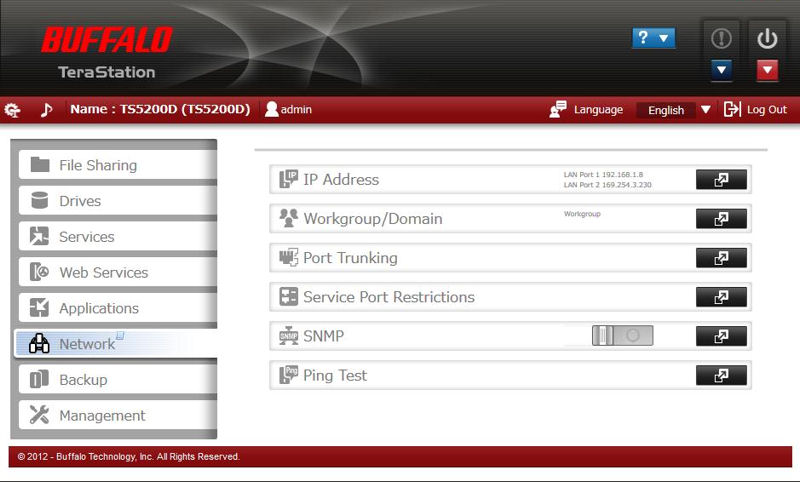
Top level Network menu. Here you can change IP addresses, specify a workgroup or join a domain, enable port trunking and enable SNMP monitoring.

For each LAN port, you can enable service restrictions.
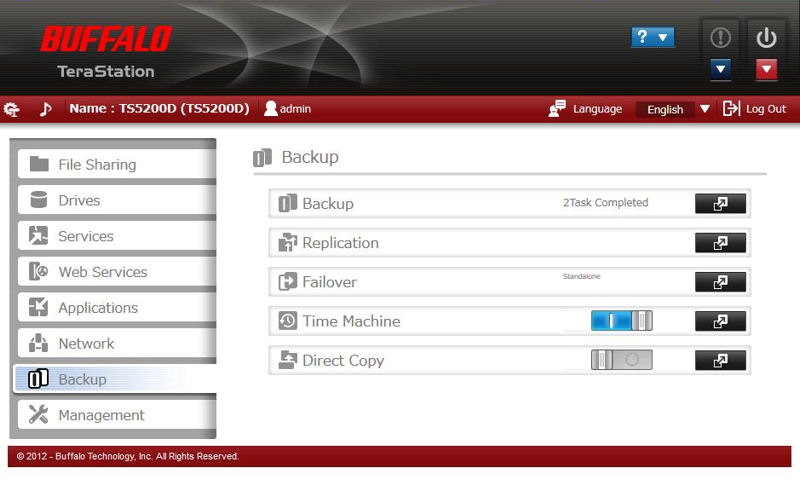
Top level Backup menu
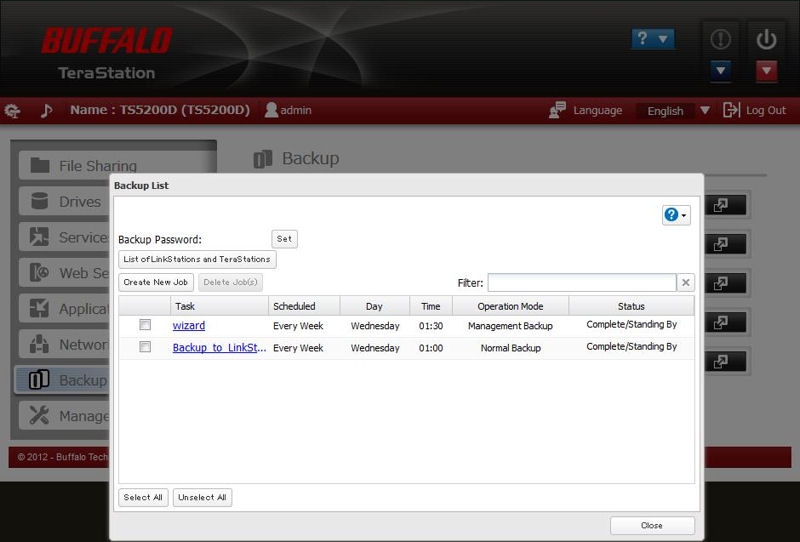
Here you can create backup jobs for each share. I created a backup one backup job to use an external USB drive, and a second job that backups to a LinkStation on my network.

You cannot activate Failover if iSCSI is enabled or if a surveillance camera is configured.
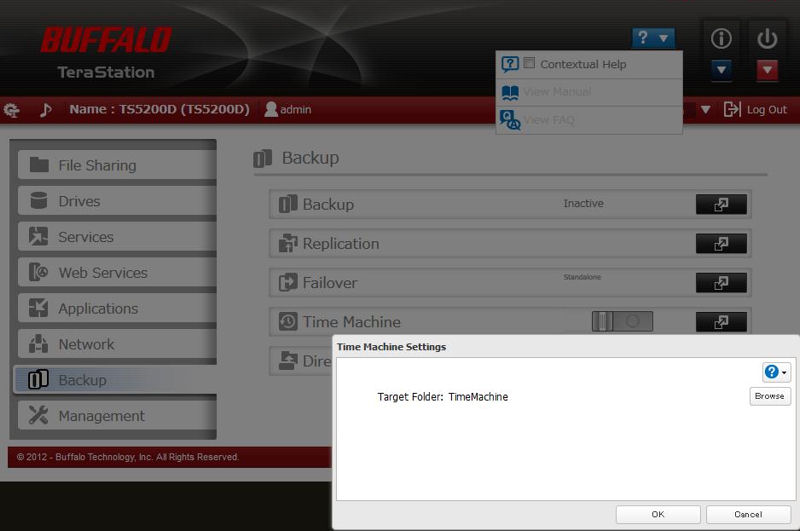
Configure a folder to be a Time Machine target.
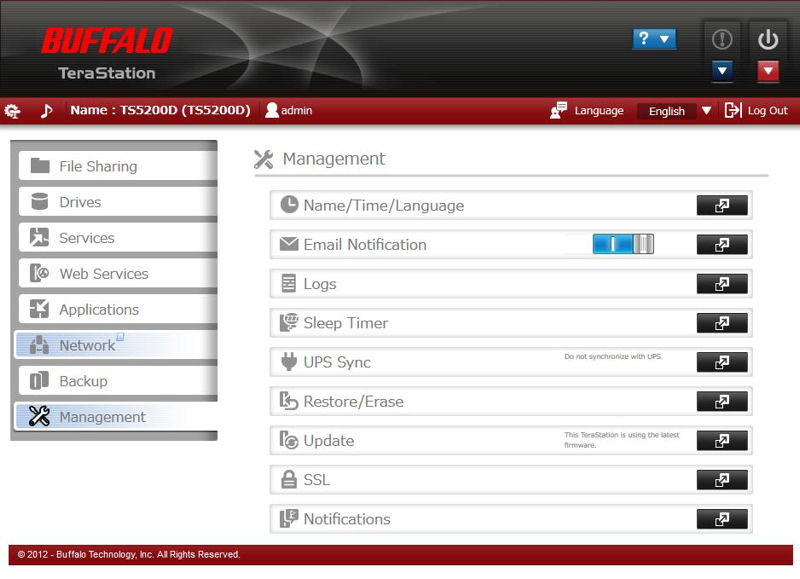
Top level Management menu
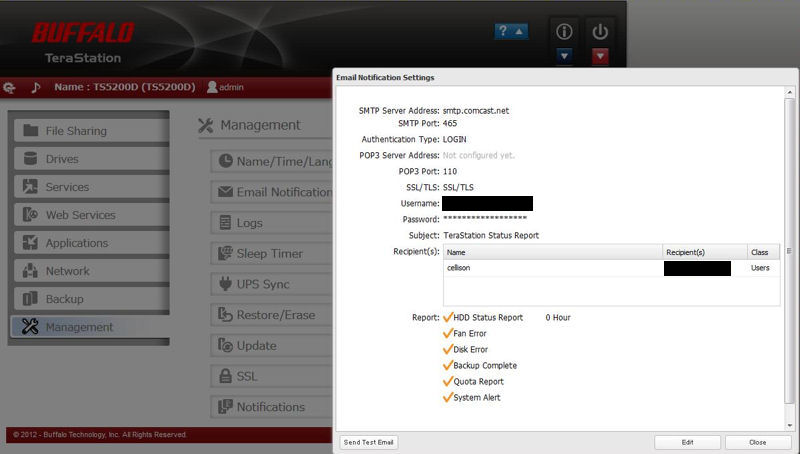
Configure email notifications and data to be reported
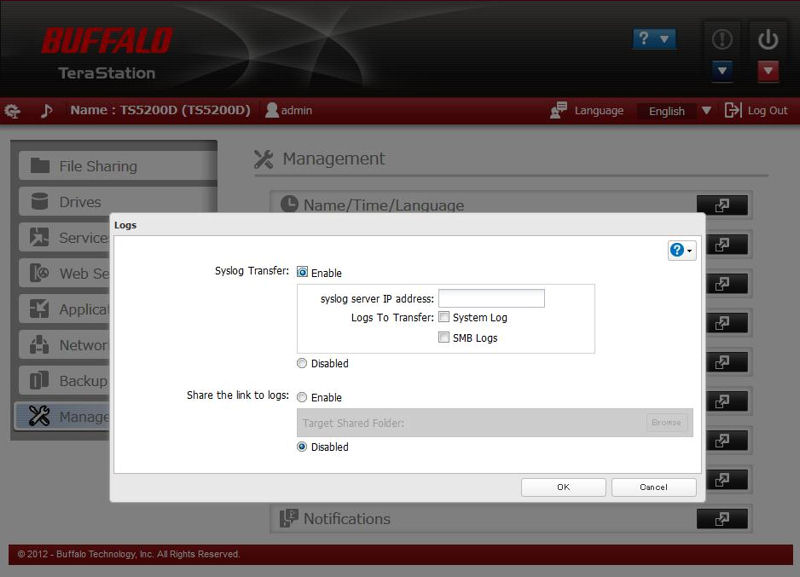
The TeraStation supports Syslog

USB backup funcions and Initialization and Format options
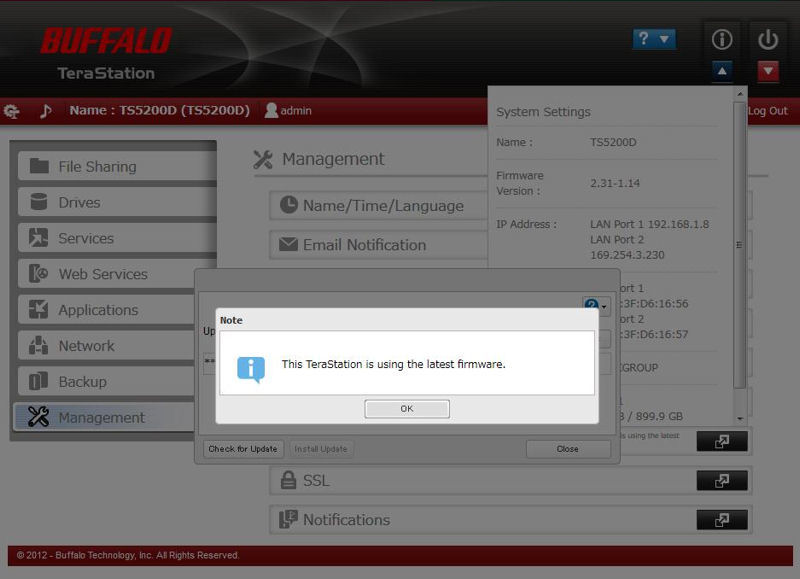
Checks to ensure that your TeraStation is running the latest firmware.
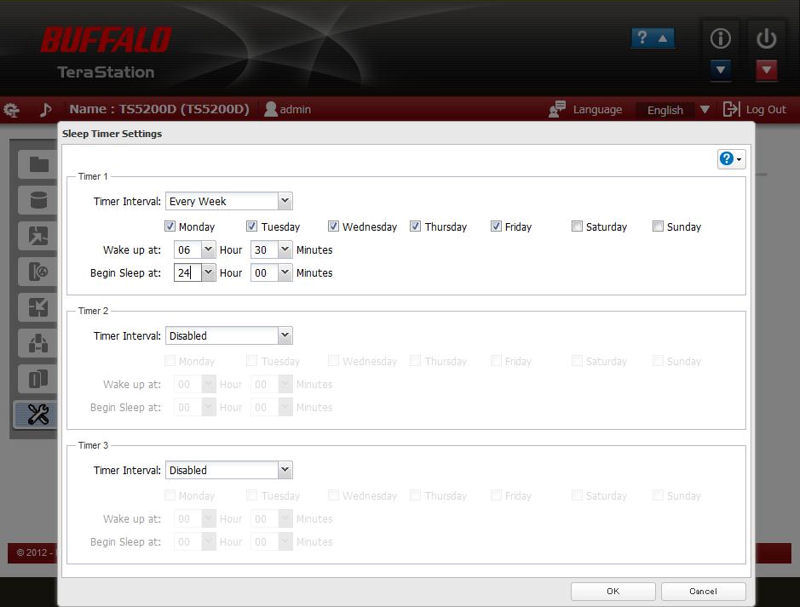
The TeraStation doesn’t support drive spin down, but you can schedule three sleep timers.
You can easliy import Secret keys or Server Certificates.
Features
From the Buffalo website, here is the list of TeraStation features. It appears that this list hasn’t been updated to include the new 5000 series features (iSCSI target support and Video Surveillance).
Network and Storage
- Dual Gigabit Ethernet LAN with aggregation, multi-homing and failover support
- Jumbo Frame support
- SMB / CIFS, NFS, AFP network file systems
- User and group level accounts
- Active Directory
- DFS
- TeraSearch file indexing and search
- RAID 0, 1, 5, 6, 10, 50, 51, 60, 61 levels (no JBOD)
- Volume per drive
- Multi-volume support
- Scheduled and on-demand backup to attached USB drive
Backup
- Direct copy from USB device to NAS
- Scheduled and on-demand network backup to other Buffalo NASes only w/ optional encryption and compression
- Real-time replication with failover
- Amazon S3 backup
- 10 licenses of NovaBACKUP Pro (Windows only)
- Apple Time Machine target support
Media
- DLNA / UPnP AV server with PS3 and Xbox 360 support
- iTunes server
- Squeezebox server
- BitTorrent downloader
Other
- Trend Micro anti virus (requires 1, 3 or 5 year license; no trial included)
- HTTP webserver with PHP and MySQL support
- Print server
- USB storage sharing
- Email alerts w/ immediate trouble notification and daily reports
- Syslog support
- UPS sync
- Sleep / wake schedules
It is good that Buffalo has expanded the TeraStation’s features with additional media and safety features. But it lacks an add-on / app system to enable easy enhancement.
Hands On
Though the user interface has changed, many of the features remain the same as on previous TeraStation products. I’ll comment briefly on the new features and a couple that deserve special mention.
Remote Access
Many NASes have a fairly simple remote access setup process. But using the advanced menu interface to set up remote access on the TeraStation 5200 wasn’t really very intuitive. Buffalo must have recognized this, as they posted a 15 minute Tech Tip Video on their home page that shows you how to setup remote access. The video, by the way, is very helpful.
The EasyAdmin interface also has a wizard to help you set up remote access. However, if you are using the advanced interface, you have to enable WebAccess for each share that you want to make available to remote users. This is done in the File Sharing, Shared Folder menu. Note that for this share, WebAccess is enabled, and user cellison has read/write rights to the folder. Of particular importance is the WebAccess Public Mode setting.

For remote access, you must enable WebAccess for a share
If you “Allow Anonymous”, anyone with the remote name of your TeraStation has full read/write access to any shares enabled for WebAccess. If you Allow All Groups and Users, all users and groups have full access to shares enabled for WebAccess, but they have to log in.
If you want to lock down access, choose “Use Inherited Folder Permissions”. With Inherited Folder Permissions, only authorized users of the TeraStation have access, and their access is restricted to whatever folder permissions they have on WebAccess-enabled shares. So, for example, with inherited folder permissions, if a user doesn’t have rights to a WebAccess enabled share, they also won’t have remote access. If their permissions are Read Only, their remote access will similarly be restricted to Read Only.
The WebAccess service, also on the File Sharing menu has to be configured and enabled. I enabled the service and allowed UPnP to configure the firewall settings on my NETGEAR WNDR3800 router and UPnP opened the ports properly. Once configured, you navigate to www. buffalonas. com and enter the name that you assigned to your TeraStation.
Log in and you’ll have access to the shares according to the security settings. You can browse your shares, stream music, view thumbnails and large sized images and even stream video. The screenshot below shows that if you right-click on a file, you can upload, download, copy, move, delete, open and share files.

Remote Access to the TeraStation through a browser is an excellent experience
Once configured, Buffalo has a decent remote access solution. But it depends on opening holes in your router’s firewall, which shouldn’t be necessary with today’s remote access technology. Requiring opened ports also means that Buffalo’s WebAccess will be a hassle to set up if your network has cascaded routers, such as when your cable / DSL modem also has a router that can’t be bridged and you have added your own router.
The odd thing is that Buffalo’s remote access uses a web portal—buffalonas. com—so that you don’t have to worry about dynamic DNS. In contrast, WD’s wd2go remote access service also uses a web portal, but doesn’t require any port opening and works through multiple NATs (routers).
Buffalo has remote access clients for other platforms, too. From the instruction manual, here’s some handy information about WebAccess on various platforms:

WebAccess client information for different platforms
I installed the iPad app and was able to successfully connect to the TeraStation. However, the iPad client warned that an encrypted SSL might not be able play streaming music and video. Indeed, I tried both, and confirmed I couldn’t stream either.
Media Services
I enabled DLNA services and created a share named Media. I then enabled DLNA for that share and copied my normal set of audio, image and video test files to the share. I tested image, music and video files on my standard DLNA test device, a WDTV Live media streamer. All media types streamed as expected.
However, I ran into one problem that I hadn’t anticipated. For photos, apparently the either DLNA server or the WebAccess service creates thumbnails of images. Those thumbnails, in addition to the full-sized images, were published. The thumbnails appeared on the media streamer with multiple file extensions. For example for a file named test. jpg, the media player displayed test, test. JPG. 4L and test. JPG. M. Unfortunately, these published thumbnails made for a bad slideshow experience, since typically, a highly pixelated full-screen thumbnail preceded the standard-full screen normal resolution image.
Here’s a list of supported media formats for the DLNA server.

Buffalo TeraStation DLNA File Support
I also enabled the iTunes server for the media share. I checked for the iTunes server using iTunes on both Windows and MacOS platforms and it appeared on neither. After I restarted the iTunes service, the TeraStation iTunes server appeared on both platforms. Music playback was as expected.
Time Machine
As with previous versions of TeraStations, the 5000 series of TeraStations can also be used as an Apple Time Machine target. I created a shared folder named “TimeMachine” and enabled the Time Machine service in the Backup menu. On my Mac, I opened Time Machine Preferences and expected to see the share listed as a potential Time Machine target. It wasn’t listed. I did an AFP mount of the TimeMachine share and then it appeared as a selectable target. The initial backup (169 GB) as well as subsequent hourly backups ran as expected.
Anti Virus
Anti Virus is a new feature for the 5000 series of TeraStations. Anti Virus is provided by Trend Micro, with licenses available for one, three and five years ($79. 99, $149. 99, $219, respectively).
By charging for AV, Buffalo is putting the TeraStation at a disadvantage compared to NETGEAR’s ReadyNASes that include it for free. At a minimum, a 30 day trial should be included to allow TeraStation owners to evaulate the AV feature before commiting to a license.
The Trend Micro NAS Security has a nice looking console that’s accessible via a web browser at port 14942 (http://ip_address:14942). After activating the product with a license, you have scan options for file types and can set scheduled scans as well as scheduled updates. The screenshot below shows that the Scan Engine, Virus Pattern and Spyware/Grayware Patterns are all up to date, and that a manual scan showed there were no infections.

Tredn Micro NAS Security console
Video Surveillance
Another new TeraStation 5000 and 7000 series feature is a built-in video surveillance server. Designed and maintained in conjunction with Soleratec, Video Surveillance lets you use the TeraStation 5000 and 7000 series NASes as part of a video surveillance system. 5000 Series TeraStations can support up to 10 cameras and 7000 series, up to 50 cameras.
Video surveillance includes an application that runs on the TeraStation and a management console that runs on a Windows PC. To get started, you need a camera that supports RTSP (real time streaming protocol). Buffalo’s website provides a link to SoleraTec where you can search for compatible RSTP cameras. You also need to download the management software from Buffalo’s web site. You’ll need the serial number of your TeraStation in order to download the software.
The TeraStation 5000 user guide provides good step-by-step instructions for setting up and registering the camera, specifying the shared folder on the TeraStation, and activating the first camera using the included free license. If you want to add additional cameras, you need to purchase camera licenses. Prices are:: 1 license pack – $57-$70; 3 license pack – $117-$150; and a 5 license pack – $232-$280.
There’s also a separate user manual for the Video Surveillance System. If you are considering using a TeraStation as part of a video surveillance solution, the two user manuals should give you a good understanding of the capabilities of the system.
I set up and tested the video surveillance system using an Axis M0154 camera Buffalo loaned me. The gallery below will give you an idea of how the surveillance system works.
Clicking the dropdown arrow next to the "!" icon reveals the device status. The icon is flashing orange since I disconnected a configured surveillance camera.
This is the landing page for the advanced interface. The first three items let you set up folders, access rights, users and groups.
Clicking on the black box next to Folder Setup opens the shared folder menu. For each share you can enable/disable services. Check marked services are enabled.
Here you can create/edit user accounts and asign them to groups. You can also assign quota alert and quota restrictions.
In this submenu, you set up remote access settings.
Top level Drives menu
Shows current installed disks. You can also check disks or format them from this menu.
Shows the current RAID mode and status.
Raid Scanning regularly scans the array and attempts to correct problems.
Logical Volume Management provides a more flexible method of allocating space than conventional paritioning schemes.
Services Top Menu – Here you can enable or disable the listed services. Each service has a configuration sub menu.
WebAccess Remote lets you open files on a remote LinkStation or TeraStation. Amazon S3 lets you backup a share to Amazon S3 storage. An Amazon account is required.
Here you can enable/disable applications that run on the TeraStation.
You can configure a port and specify a folder for BitTorrent downloads.
Top level Network menu. Here you can change IP addresses, specify a workgroup or join a domain, enable port trunking and enable SNMP monitoring.
For each LAN port, you can enable service restrictions.
Top level Backup menu
Here you can create backup jobs for each share. I created a backup one backup job to use an external USB drive, and a second job that backups to a LinkStation on my network.
You cannot activate Failover if iSCSI is enabled or if a surveillance camera is configured.
Configure a folder to be a Time Machine target.
Top level Management menu
Configure email notifications and data to be reported
The TeraStation supports Syslog
USB backup funcions and Initialization and Format options
Checks to ensure that your TeraStation is running the latest firmware.
The TeraStation doesn’t support drive spin down, but you can schedule three sleep timers.
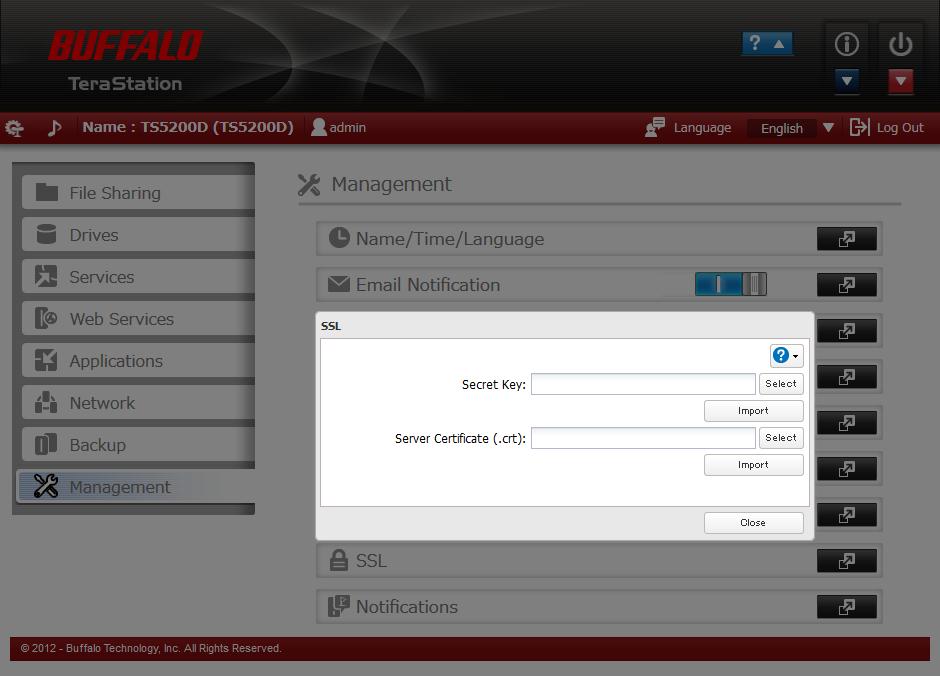
You can easliy import Secret keys or Server Certificates.
Closing Thoughts
Buffalo has significantly improved its NAS user interface with the latest version of their firmware. Though the configuration options are limited, some users may appreciate having the option of an EasyAdmin interface.
Buffalo continues their tradition of having a good remote access solution. Their free dynamic DNS (DDNS) at Buffalonas.com works well and UPnP properly opened firewall ports on a non-Buffalo router. Though the remote setup seemed a bit kludgy using the advanced interface, the video posted on YouTube makes it easy to follow. I especially liked that you have share level control of who has access and how much access they have.
Even with these improvements, however, Buffalo’s NAS OS still lags significantly behind its competition in terms of breadth of applications supported. And its lack of an add-in / app system means that its feature set will probably continue to lag.
But if you are happy with Buffalo’s TeraStation NAS feature set, its revamped NAS System puts an easier-to-use face on it.