Introduction
Update 01/19/2009: Premium features clarified
| At a Glance | |
|---|---|
| Product | NETGEAR Stora (MS2110-100NAS) |
| Summary | Consumer-oriented 2 bay NAS appliance |
| Pros | • Easy to set up • Media files playable through web browsers • Automatic RAID 1 configuration upon second drive insertion • Easy remote web access • Quiet and low power consumption |
| Cons | • Can’t use second drive to expand storage • No backup of internal storage • Subscription required to expand beyond 3 user accounts • Lacks media import application • Browser-based media players don’t play everything |
Let’s face it. When shopping for a NAS, some of us with more geekish tendencies want a product that has virtually every feature, bell and whistle available. But for many consumers just looking for a place to share files and to back up treasured digital memories, the smorgasbord of features available on products like those offered by Synology, QNAP and others can be a bit overwhelming.
NETGEAR felt this pain, too with its fully-featured ReadyNASes. Although they have a fairly understandable user interface, ReadyNASes’ array of options is just too much for general consumers to deal with. So NETGEAR decided to take a simpler approach, turning to Axentra’s HipServ 2.0 platform to create the Stora.
The Stora’s target audience is similar to that of Cisco’s Linksys Media Hub, which was introduced last year with considerable fanfare at CES. But with a current price of $350 -$400 for a single-drive 1 TB model, simplicity on the Cisco product carries a significant premium. With street pricing of around $200, and significantly better read performance, the Stora could be a better choice.
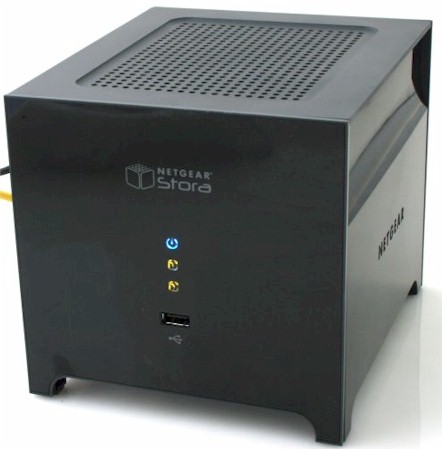
Measuring 6.90 x 5.91 x 5.74 in, the Stora is housed in a simple black plastic case wrapped around a sheet metal chassis. The front panel has a power LED that doubles as a status indicator, as well as individual LEDs for each drive. A single USB 2.0 port, which can be used to attach additional storage or a USB printer, rounds out the front panel.
The front panel slides open easily by just applying a little upward pressure on the bottom of the panel. Figure 1 shows the Stora with the front panel removed to reveal the two drive bays.
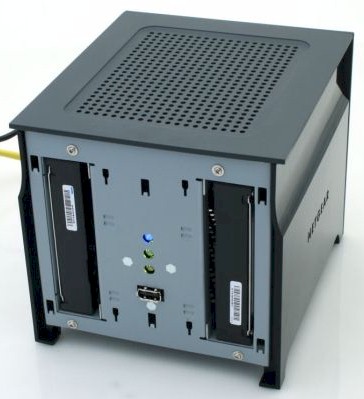
Figure 1: NETGEAR Stora with front panel removed
Unlike most NASes , the Stora has a fan that’s mounted horizontally and circulates air from the top of the case through the bottom of the case. The device is very quiet, so it would make a good companion either in an office or a living room.
On the rear panel (Figure 2), you’ll find the single Gigabit Ethernet port, power connector, power switch, recessed reset button, and two latches to eject the hot-swappable SATA drives. LEDs on the Ethernet port indicate link speed and activity. Since the Stora is intended for home use, the lack of a rear panel security slot shouldn’t be a problem.
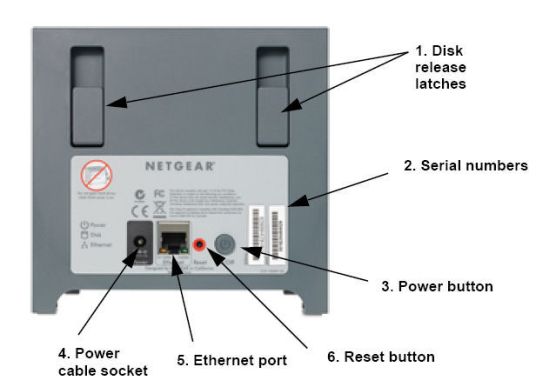
Figure 2: NETGEAR Stora rear panel
On The Inside
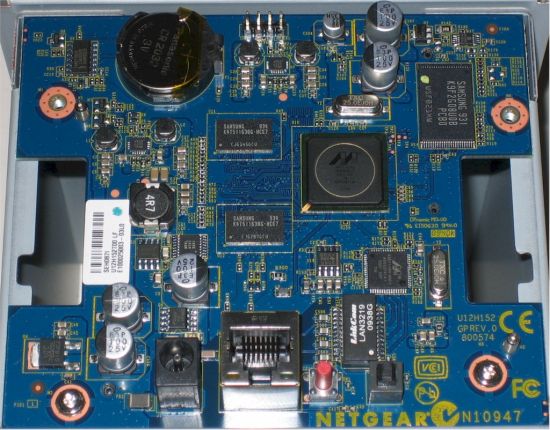
The hardware platform (Figure 3) uses the 1 GHz version of Marvell’s popular 88F6281 Kirkwood SoC, 128 MB of RAM, 256 MB of flash and a Marvell 88E1116-R for the 10/100/1000 Ethernet port (which doesn’t support jumbo frames). Drives are formatted using the XFS filesystem.
Figure 3: NETGEAR Stora board
The Stora ships with a single low power Seagate Barracuda 7200.11 1TB SATA drive. When a second 1TB drive is installed, the Stora automatically configures itself for RAID 1 (mirroring) to provide you with fault tolerance.
The device draws 11 W with a single drive and 18 W with two drives installed. Although you can’t control drive spin down time, you can schedule daily on/off times as shown in Figure 4.
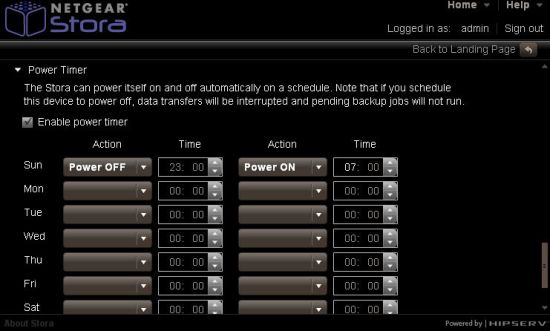
Figure 4: Stora power schedule options
Setup
As you would expect of a product targeted to consumers, setting up the Stora is fairly simple. After you connect the device to your network and boot it up, you run an installation wizard from the supplied CD. (There are Mac and PC versions of the wizard.)
During the installation process, you are asked for a name for the device, and an administrator’s password. The wizard also installs an agent that runs in your Windows system tray (Figure 5).
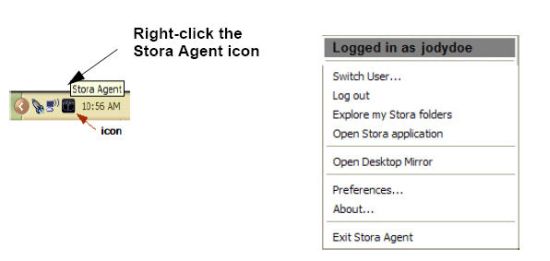
Figure 5: System tray options
You will use the system name, in conjunction with a user name and password to access the Stora using a web browser either remotely or on your local network (Figure 6).
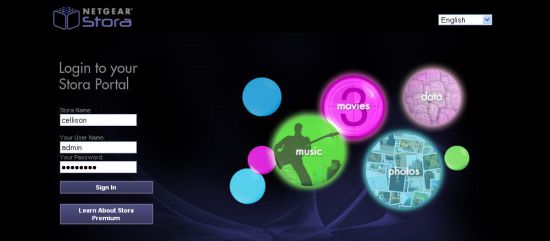
Figure 6: Stora login in page
Unlike many NASes that provide public access to all shares unless user account access restrictions are enabled, the Stora requires users to log in to obtain access. Opening the Stora applications from the system tray, or alternatively, pointing your browser to www.mystora.com lands you at the login page. Initially, you’ll have to log in as admin to create additional users. After a successful login, you’ll see the Landing Page (Figure 7).
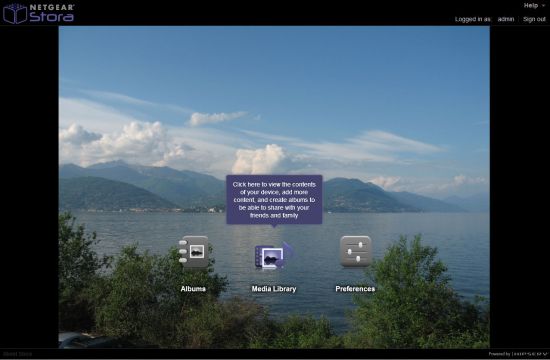
Figure 7: Stora landing page
Logged in as admin, you can click on Preferences (Figure 8) to add additional users or configure other settings. Frankly, I found the dark color scheme a little difficult to read. Under Administration, you can create additional users. For each user, you can permit admin privileges and allow access to the FamilyLibrary folders. When you create a user, private folders are automatically set up for MyDocuments, MyVideos, MyMusic and MyPhotos.
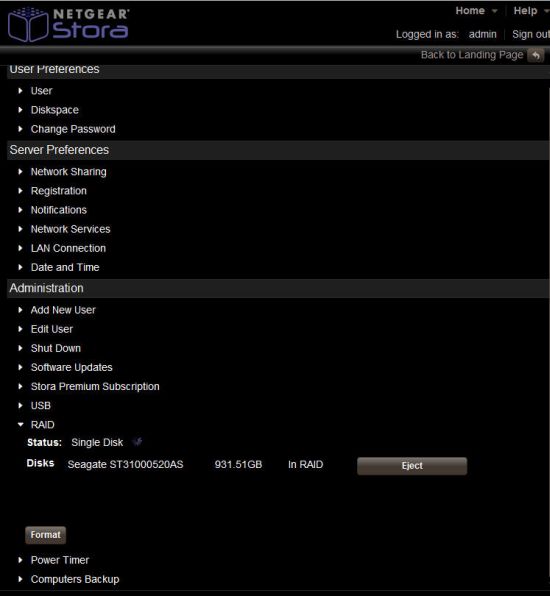
Figure 8: Stora Preferences
Most of the Preference menu selections only have one entry available when you expand them. I was disappointed that the Help menu wasn’t really very helpful. Most products, especially those aimed at consumers, have help menus that are context sensitive and provide some amount of information for the currently selected menu item. The help menu in the Stora UI contained only two entries: one for the support web page; and another that linked you to the online version of the 133 page manual.
If you use the Stora Windows Tray agent shown in Figure 5 above, drives X, Y, Z (if available) are automatically mapped to MyComputers (used for backup), FamilyLibrary, and MyLibrary as shown in Figure 9.
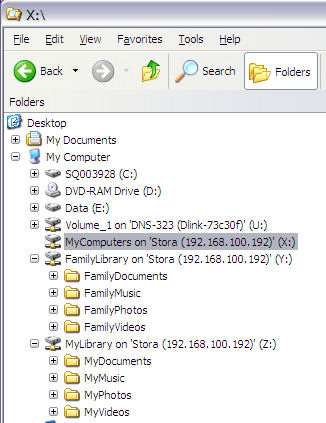
Figure 9: Using the Stora agent, drives are automatically mapped
Similarly, using the Stora agent on a Mac, you can mount the three individual volumes on your desktop. Alternatively, you can browse the network and map drives using Explorer (or Finder on the Mac). Folders under MyLibrary are your personal folders, and files contained in the FamilyLibrary folders are accessible to logged in users if granted FamilyLibrary privileges. If you are accessing your Stora remotely, you can browse the network drives through the Stora agent, but you can’t remotely map drives.
Hands On
As noted earlier, the Stora is powered by a customized version of the HipServ 2.0 media server from Axentra, which allows you to watch videos, play music and view photos using only a web browser. However, like other media servers that use web browsers to play content, the ability to enjoy your multimedia files is often limited by the codecs installed on your system or the plug-ins installed in your browser.
For example, .WMV content and.AVI files from my digicam refused to play in either Firefox or IE8. But .M4V files played without incident, as did still photo .JPG files. Slide shows played properly, but you have no control over slide duration and the only transition is a fade out / fade in. Currently, you can’t play music behind your slide show, as the web-based players handle only a single task.
You can also play your music via a browser-based player. But you may not want to, since you have very little control. Music plays in album sequence and you can’t create playlists. But you can create "albums" and drag your favorites into them.
A better choice might be to use iTunes, since the Stora has built-in DLNA and iTunes servers. I tested the iTunes server on both Mac and Windows platforms, and the server worked as expected. And, iTunes gives you a lot more control to sort on albums, artists, title, genre, etc., than the Flash-based browser player. Note that Axentra says HipServ 2.0 is "fully supported" by the PS3, which means that you shouldn’t have any problem using Stora to stream files to one.
As also noted earlier, the Stora supports remote access. When you set up the Stora and create a name for it, that name is actually used to create a sub-domain on www.mystora.com. The HipServ software handles all of the tasks associated with opening ports on your firewall via UPnP NAT traversal. But in the off chance that your router doesn’t support UPnP or ports won’t open, Stora will switch to using a NAT solution that doesn’t require ports to be opened.
Whether you’re at home or on the road, you just type http://www.mystora.com to get to the login page. Note that secure HTTPS is also supported. But the Stora doesn’t auto-forward you to a secure connection. Your browser-based experience from a remote location will be the same as if you were on your local network at home, with perhaps some lag if you have a slow or busy Internet connection.
If you click on Media Library from the landing page, you’ll land at the Library page (Figure 10).
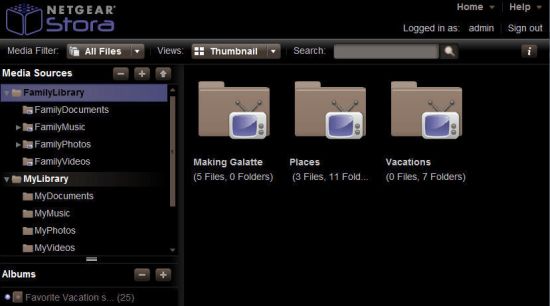
Figure 10: Media Library page for user “Admin”
Here, you have access to your private folders under MyLibrary, as well as the FamilyLibrary if you’ve been granted access. You can use the media filter to view all files, or filter by Image, music or video file types.
The Views menu gives you the option to view thumbnails, a list view, shuffle, and, if installed, view through CoolIris. Adjacent to Media Sources, the “+” and “-” icons allow you to add or delete a selected item. The up arrow allows you to upload files through a browser interface, or via a Java-based drag-n-drop applet. If your total upload exceeds 2 GB, you are instructed to use Windows Explorer or Mac OS Finder to transfer files to the Stora.
Figure 11 shows Library options. When you select a library folder and click on the right point icon, the option list appears. You can create a slideshow on the fly, download or upload, add to an existing album or view details.
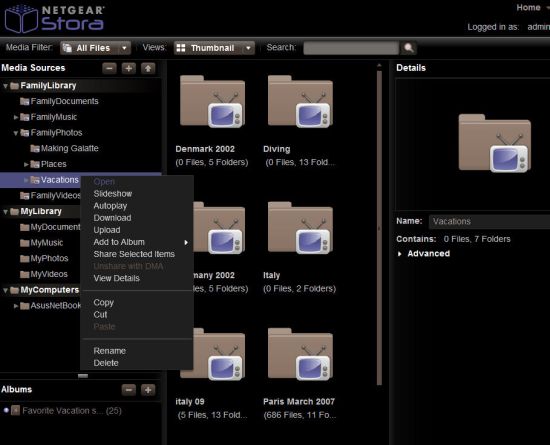
Figure 11: Library Options
By default, all items in the FamilyLibrary are shared with the built-in DLNA / iTunes server. But you can elect to unshare them. Similarly, for items in your private MyLibrary folders, you can optionally choose to share them with the FamilyLibrary. Library options also include the standard, cut, copy, paste, delete and rename functions.
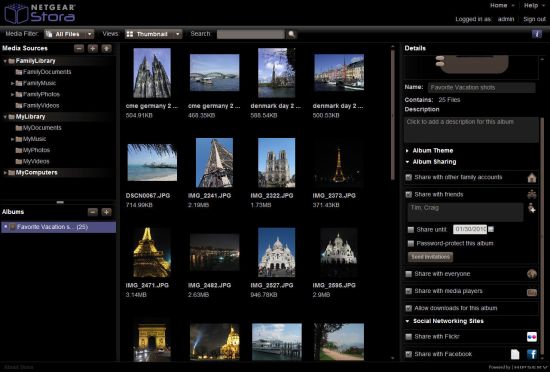
The Stora lets you create albums that can contain content from any folder on the Stora that you can access. The albums consist of pointers to files, not copies of the files. As the album creator, you can share it with users on your Stora, selected individuals on the Internet, or everyone on the Internet. If you choose to share the album with individuals, a secure link is sent to their email address. For public sharing, you get a link that you can share with everyone.
In the lower right hand corner under Social Networking are options for sharing with Flikr or Facebook. I tested uploading an album to my Facebook page and, after entering my Facebook credentials, the album was uploaded. Figure 12 shows the album sharing options.
Figure 12: Stora album sharing options
Backup
One of the main reasons to purchase a NAS is to back up data. The Stora provides a pretty good backup utility for both Mac OS and Windows, Desktop Mirror, that allows you to synchronize folders. On Windows, it synchronizes your “My Documents” folder to the Stora by default. But after finishing the setup wizard, you can choose other folders to include.
Rather than forcing the consumer to figure out full / incremental / differential backups, Desktop Mirror keeps your selected folders synchronized to folders on the Stora. Those files appear under MyComputers in the Media Library (Figure 13). I tested this utility and it worked equally well on my Mac and Windows systems.
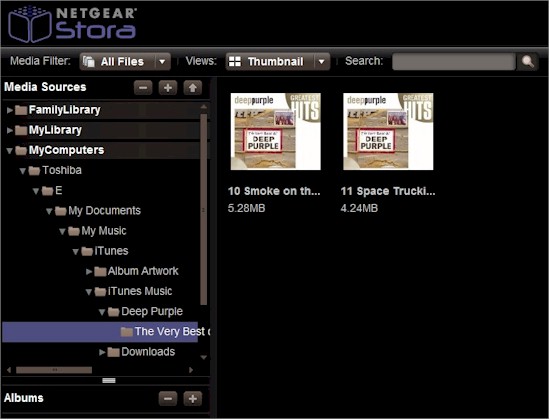
Figure 13: Time Machine setup walkthrough with Time Machine backing up to the Stora
The Stora can also double as an Apple Time Machine storage device. A separate wizard, launched from the Stora Desktop Applications folder guides you through a simple seven-step setup process (Figure 14). Once configured, my Mac (Snow Leopard) had no problems backing up to the Stora. Of course, the initial 66 GB took quite a while, even with a Gigabit Ethernet connection.
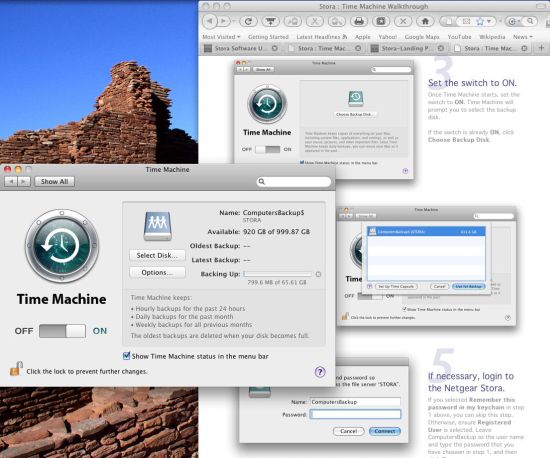
Figure 14: Time Machine setup walkthrough with Time Machine backing up to the Stora
A backup feature the Stora doesn’t provide, however, is the ability to automatically back up its files to an attached or networked drive. You can, however, attach a USB 2.0 drive formatted in FAT32 or NTFS to the front panel port and it will appear as a device under FamilyAlbums. Figure 15 shows that you can also format the drive via a built-in utility for FAT32 or NTFS.
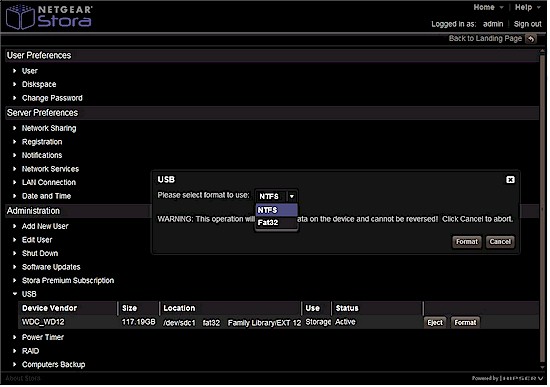
Figure 15: USB drive format options
Drive Pull Test
In addition to protecting your files, the Stora can also provide RAID 1 mirroring with the installation of a second drive. NETGEAR has stripped out all of the hassles of adding a new drive. You merely open the front panel, insert a second 3.5" SATA drive of the same capacity (1 TB), and you’re done. You don’t even have to shut down the unit, since drives are hot-swappable.
The Stora automatically recognizes the new drive and adds it into a RAID 1 volume with the first drive. The mirroring process starts immediately, but it takes a little over 5 hours to mirror the original drive. You do have full access to your Stora while the RAID 1 sync is running, however. Note that no other options are available for configuring the second drive. So you can’t use the second drive to expand the Stora’s capacity.
I simulated drive failure by pulling one of the drives while I was copying a portion of my music library to the device. The file copy continued without a problem. Later, I re-inserted the drive and it was immediately recognized as a new drive and the mirroring process started without any intervention.
I was pleased that I also received an email, shown in Figure 16, which notified me of the drive failure.
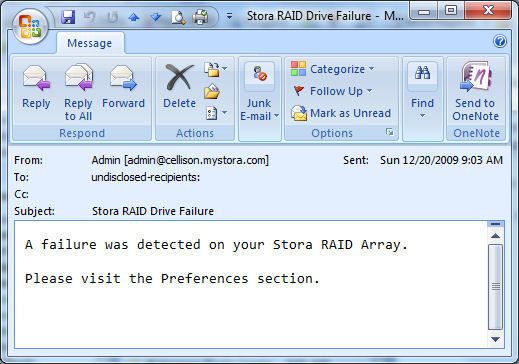
Figure 16: Email notification of RAID failure
You can track the mirroring process in the system preferences menu, shown in Figure 17. No data was lost during the drive failure or the re-mirroring.
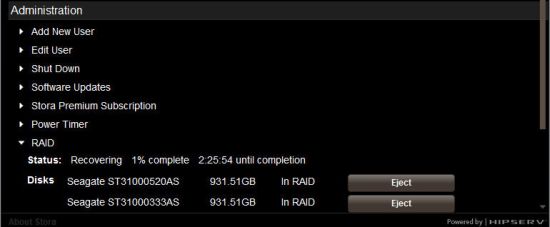
Figure 17: RAID recovery status
Performance
Testing and analysis by Tim Higgins
The Stora was tested with our standard test process. I used the latest 1.1.1:2.0.0.84:1.0.0.101.5 firmware and ran iozone and Vista file copy tests with a Gigabit LAN connection in the default single drive and RAID 1 dual drive configurations.
Write and read performance with a Gigabit LAN connection for both single drive and RAID 1 are shown in the plot below (Figure 18) Average single-drive write performance using a Gigabit Ethernet connection averaged 20.6 MB/s for file sizes between 32 MB and 4 GB, with cached behavior not included in the average calculation.
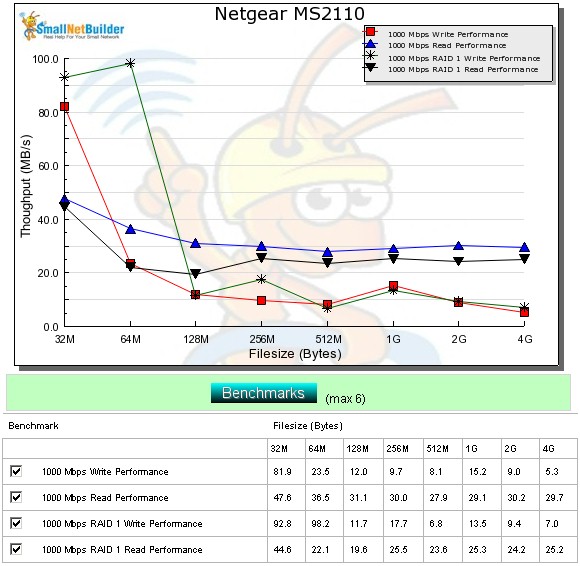
Figure 18: Stora Performance Benchmark summary
Average read performance was noticeably higher, measuring 32.7 MB/s with the same conditions. This puts the Stora in the same performance ballpark as Seagate’s BlackArmor NAS 220 and Western Digital’s My Book World Edition II (white bar).
In comparison to Cisco’s Linksys Media Hub, Stora is about the same for single drive and RAID 1 writes, but about twice as fast for reads. (~30 MB/s vs. 15 MB/s for larger file sizes).
Stora file copy performance using a Vista SP1 client under the same conditions tracked the iozone-based results pretty well with write at 23.0 MB/s, and read at 39.3 MB/s. This is about 2X the performance of the Cisco / Linksys Media Hub.
Closing Thoughts
In general, I like the NETGEAR Stora. It accomplishes its mission as an easy-to-use, consumer-oriented NAS. The underlying HipServ software is fairly institutive, though a few features caused me to check out the user guide. An obvious improvement would be to include context-sensitive help in the browser-based user interface.
The Stora does a good job of the things I consider important—backing up my data and providing fault tolerance. I like the desktop mirror for its simplicity, and with a Terabyte of storage, I might consider using the Stora for my Time Machine backups. In multiple tests of a drive failure, the Stora kept running on a single drive, and the subsequent re-mirroring process on the replaced drive worked by just re-inserting a “good” drive.
I’m not a huge fan of browser-based media players, however. There are just too many media incompatibilities because of missing plug-ins or codecs. But you can’t pin that problem on the Stora; other media servers I’ve reviewed that use flash-based browsers had the same issues. I personally prefer just to map a drive (or mount a volume on the Mac) and use a native multimedia client like iTunes or Windows Media Player. Either of these clients is far more robust that what you’ll find in a flash-based browser.
Update 01/19/2009: Premium features clarified
It’s important to note a number of the Stora features are available only via an optional $19.95 annual subscription. Without a subscription, the Stora is limited to 3 user accounts, but you get full remote access. and standard FTP access. Remotely, you’re limited to viewing shared albums. With the premium subscription, you get the following:
- Push photos to Flickr
- Online slideshows via Cooliris
- Sharing content via RSS feeds
- Unlimited user accounts
- Secure FTP
- Enhanced remote access for iPhone, Blackberry and Windows Mobile Phones
You can activate a 30 day trial through the admin preferences to see if you really want to spend the additional $20. I wish that NETGEAR had just included the premium features in the purchase price, or at least not limit the number of users. After spending $200 or so on the product, that kind of nickel-and-diming reminds me of the airlines with their baggage charges and in-flight snack sales.
But even with the subscription, if you’re looking for an easy to use, affordable NAS with decent performance, the Stora is worth a look.

