Introduction
| Anthology Solutions Yellow Machine TeraByte Storage Appliance | |
|---|---|
| Summary | RAID 5 NAS with built-in 8 port 10/100 switch and mediocre router / web proxy server |
| Update | None |
| Pros | • Supports up to RAID 5 • Automated backup capability • Compact form factor; up to 1.6 TB storage • Solid construction |
| Cons | • Lackluster performance • Buggy Proxy mode |
I’ve looked at a lot of NAS devices over the last year. Most are fine for normal home usage, but sometimes, users in a small office setting may want a little more security for their data than a typical home NAS can provide. In the same vein, these users might also want a device with more capacity than a home NAS, or one that does more than serve up data.
Anthology solutions’ Yellow Machine TeraByte Storage Appliance P400T is designed to meet the needs of such users. The Yellow Machine is a NAS with RAID capabilities that can handle up to 1.6 TB of disk storage, and includes a built-in router, an 8 port switch, and Internet proxy capabilities.
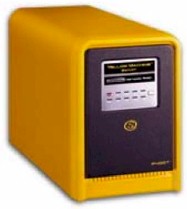
When I first started working with the Yellow Machine, its heavy, solid, construction reminded me of a mailbox, or maybe a large lunch box. Its bright yellow color may not fit all decors, but for me it was a welcome change to my shelf of silver and black network appliances. The front panel sported 10 LEDs used to signal status of its internal drives, network ports and overall health of the unit. A “mode” button is also provided, to be used to reset this device to its factory defaults. Along with a power connector, the back panel contains 8 10/100 LAN ports, a single 10/100 WAN port, and a serial port for connecting this device to a UPS.
Figure 1 shows the back of the Yellow Machine with LAN and WAN ports, plus a serial port for a UPS connection.
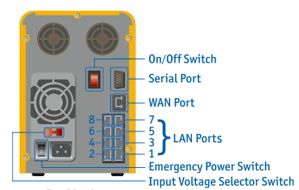
Figure 1: Yellow Machine Back Panel
I was somewhat surprised not to see any USB ports on this high-end NAS. USB ports are typically used on NAS devices to connect printers or additional storage, and provide important flexibility and expansion options. Along with the ports, the back panel has venting and a fan opening. A look at the bottom of the unit reveals a second fan.
Setting Up
When I opened up the quick install guide, I noticed that the setup of this device was unique among all NAS devices that I’ve tested. Normally these devices simply connect to the network by acquiring an IP address via DHCP when powered on. A web browser may then be used for setup. But Anthology decided to take a somewhat different approach with the Yellow Machine.
The box comes pre-configured with a fixed IP address set for the 172.16.1.255 network (a private IP address), with its web server listening for connections on port 10000. With this addressing scheme in use, whatever computer is used to configure the Yellow Machine must belong to the same subnet (network 172.16.1.X). The guide provides instructions on how to reconfigure the network settings on a Windows system, and how to connect to the Yellow Machine using a web browser for configuration. Following these instructions, I reconfigured my laptop, attached it to one of the LAN ports and powered up the Yellow Machine.
Because the Yellow Machine has two fans, I was concerned I’d be working around another noisy unit, but was pleasantly surprised. Its noise level was minimal – even less than some of the tiny consumer-level NAS devices I’ve worked with. When the unit finished booting I used my web browser to connect to the URL specified in the Quick Install Guide where I was presented with a username/login dialog.
Figure 2 shows the initial login screen during Yellow Machine setup.

Figure 2: Yellow Machine initial login screen
After logging in with a standard admin/admin user name and password, I had the choice of either setting up with a “wizard” or jumping into an advanced menu. At first, I went with the “wizard” to explore the most basic options. The first screen allowed me to set the timezone and time, but I was surprised not to find an option to identify a Network Time Protocol server to keep time synchronized. Also, the documentation indicated that the clock must be adjusted manually when transitioning to or from daylight savings time.
The next screen was a bit more interesting: it allowed the unit to be set up as a “Storage Only” device or as a “Storage and WAN” device. The Storage and Wan option is designed for use when the device is Interet-accessible. This mode perforce offers many more options for setting up the firewall, establishing port forwarding, and so forth.
Maintaining my strategy to use basic features first, I selected Storage Only and was next presented with a series of basic network configuration screens. These screens allowed me to reconfigure the device so it could operate on my normal home network. Once this was accomplished, I got the status screen shown in Figure 3 which displays the network initialization data used during Yellow Machine setup.
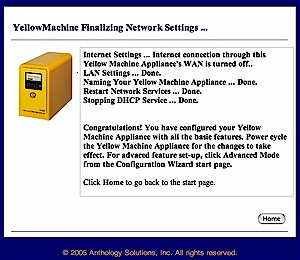
Figure 3: Yellow Machine network initialization data screen
This directed met to reboot the machine. At this point, I put my laptop back into its normal network configuration, hooked a network cable from a Yellow Machine LAN port into a switch on my network and toggled the power button. This, in turn, caused a controlled shutdown.
When I powered the Yellow Machine back up, it appeared on my network, and I was able to mount it across the network using its single, 647 Gigabyte predefined share. At this point, the device worked like any other network shared drive. I could use it from my Windows laptop, my Macintosh OSX laptop, or my Linux laptop. This was all well and good, but the interesting features of the box appear elsewhere, in its advanced options.
Advanced Options
The Yellow Machine’s advanced options are divided into sections entitled as follows: System, Network, User, Security, Storage and Backup. There are too many options under these sections to cover exhaustively, but I do cover some of the more interesting ones. Along with typical options for changing the workgroup name and changing network parameters, I found menus to specify up to three alert email addresses. These are messaged when the disk fills up, or some other kind of disk or system problem occurs.
This screen is shown in Figure 4, which permits up to three addresses to be specified to receive error, warning, or alert messages. This looks like a nice feature, one which more network devices could emulate.
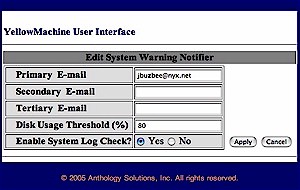
Figure 4: Designating e-mail recipients for error, warning, or alert messages
As a test, I set the default disk-full alert threshold at 1%. A few minutes later I received a warning email indicating that my disk had exceeded that threshold value. There is also a “System Log Check” option that is designed to send email based on events written to the global system log. I turned this on and received a long email with two sections : “Possible Security Violations” and “Unusual System Events”. Unfortunately, this long message (over 1,000 lines of text) consisted mostly of standard informational messages, or indications that the system might be mis-configured by Anthology.
For example, one such configuration problem indicator read:
warning: not owned by group postdrop: /var/spool/postfix/maildrop.
Interestingly enough, in one such smaller message, I noticed that one of the two accounts I had specified for alerts was rejecting this email. My ISP rejected it because it identified itself as coming from “[email protected]”, which is a non-existent machine. Thus, my ISP thought it was spam. One other interesting feature I noticed was support for the standard Unix network file system, NFS. This is a bonus for people like me who have a heterogeneous network. This feature would allow my Linux and OSX systems to use the device in a more natural way.
For user management, options were as you would expect. Menus were available to create and manage normal users, to create and manage user groups, and likewise for privileged accounts. These options appear in Figure 5, which shows the Yellow Machine’s basic User Magagement screen.
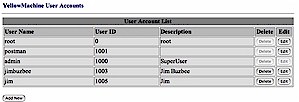
Figure 5: Basic user and group account management screen
Under the “Storage” menu I found an option for “User Storage Quota.” This is designed so administrators can assign disk space quotas to users. At first, I was a bit confused because none of my users showed up as available, nor were there any overt indications of any problems. After poking around a bit, and consulting the documentation, I learned that although there was no indication that initial set-up was needed to use this option, there were indeed a couple of steps that had to be completed before storage quotas could be assigned.
First, under the “Quick Network Storage” menu, the disk had to be “denied” to all users. Second, under the “Network Storage Configuration” sub-menu, specific users had to be granted read-write privileges. Only when these steps were completed, could user quotas then be assigned, as shown in Figure 6.
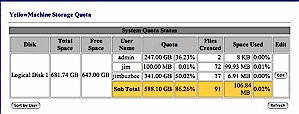
Figure 6: User quota management screen
To test this feature, I set up one of my users with a very small quota. Next, I logged into that account, then attempted to exceed the quota. As soon as I attempted to write more data to disk than my quota allowed, I received a “disk full” error message instead, as shown in Figure 7.

Figure 7: Disk quote exceeded error message
Advanced Options, Continued
Under the “Backup” tab, I found an option to backup and restore other network shares. The idea is to export disks or directories on your computers, then configure the Yellow Machine to back them up. These backup jobs could be scheduled for certain times, or performed manually. The short functionality test I ran backed up my KuroBox just fine. Figure 8 shows the Yellow Machine screen where backup options are presented.
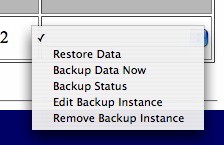
Figure 8: Yellow Machine backup options screen
Because the Yellow Machine is a RAID capable device, there is also a menu to configure or check status of its four internal drives. The device supports RAID Levels 0, 1, 1+0, and 5 (it’s configured at RAID Level 5 by default). These options are depicted in Figure 9, which shows the default setting.

Figure 9: Yellow Machine RAID options
To try out the Yellow Machine’s RAID capabilities, I conducted a small informal test. While playing a movie from a network mounted share, I removed the cover and yanked the power cable from one of its disk drives. The box kept humming along and the movie didn’t skip a beat. I expected to see a “Fault” LED turn on, but it didn’t and I could detect no difference in behavior. Several minutes later I received an email notifying me of a failure on disk2 and a check on the status sceen showed that one disk was “faulty”.
Next I rebooted the box. When it came back up, I could still see no difference in behavior, and there was still no “fault” LED. The status screen now just showed that there were only three drives present. Next I shut the box down, reconnected the drive power cable and rebooted. This time the status screen again showed a faulty drive. There didn’t appear to be any automatic recovery going on, so I went into the RAID setup screen and told it to repair the drive. This recovery was completed in a few seconds and the status screen showed everything as normal. However, even though everything was listed as normal, from the flashing LEDs and the noise of the disk drives, it was obvious that the repair was continuing on in the background.
A subsequent status email revealed more specifics. Embedded among all of the other information, the following text appeared:
 md: minimum _guaranteed_ reconstruction speed: 100 kB/sec/disc.


md: using maximum available idle IO bandwith (but not more than 100000 kB/sec) for reconstruction.
This appeared to indicate that although the repair would proceed in the background, it would not consume all available disk bandwidth. To verify this, I fired my movie up again and watched it without a glitch. My experiment demonstrates convincingly why RAID systems are important for data preservation: You can lose an entire hard drive yet still not lose any data.
I also browsed through other menus and found an interesting omission – there was no ability to create new shares! Though a single network disk share was predefined, I could find no menus or options to create another.
Firewall and Proxy modes
Up to this point, I had been exploring the device in its “Storage Only” mode. In this mode, the Yellow Machine’s WAN port is unused and its router functionality disabled. But the Yellow Machine also offers three different modes for WAN usage. The first mode, “Router” just sets the device up to route network traffic between the LAN and WAN ports. There is no firewall present. The second mode, “Firewall”, does the same as the first, but adds a firewall for incoming network traffic. When in firewall mode, all outbound traffic is allowed, and all inbound traffic is blocked by default. Menus are present to allow specified Network ports to be forwarded but there is no DMZ option to forward all ports to a certain machine.
I tried out both router and firewall modes out and they worked just fine. I turned on the DHCP server on the LAN side, and clients plugged into the LAN ports were assigned an IP address and their traffic was routed out the WAN port to the open Internet.
A third mode, “Proxy”, locks the Yellow Machine down even more. In this mode, clients on the LAN side must access the Internet through a proxy for both email and web usage. Proxy usage for other protocols such as ftp, telnet, ssh, and so forth, is missing, or at least not anywhere in the documentation that I could find. The box is also set up to record all email traffic so that an administrator can later review it.
Finally, in Proxy mode, the setup menu states that, “… webmail is disallowed, and all Internet access to adult content sites is blocked”. Being a bit skeptical of that ability, I dug into the user-manual where I found a disclaimer stating that “complete protection is not guaranteed”. To address this, a capability is provided to add specific domains to the blocked list. When the device is configured in Proxy mode, every client computer must be individually listed in a setup screen. If a client isn’t on the Yellow Machine’s allowed list, he’ll see a cryptic error like the one shown in Figure 10.
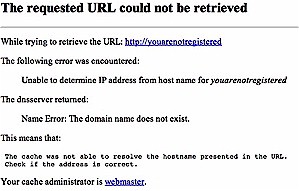
Figure 10: Blocked content cryptic error message
Because my quick tests of the router and firewall modes had worked fine, I had hoped Proxy mode would be equally easy to use. Alas, that was not to be. When I set everything up, which amounted to configuring my browsers for proxy mode, and adding my laptop to the allowed list, I would occasionally experience odd web browser behavior. Web Pages would be malformed, and usually only load partially. Small images would show up, larger ones would not. Sometimes I would get a proxy “connection refused” message as if the proxy server wasn’t working at all.
I tried various different web browsers with the same results. When I got my standard Yellow Machine system log email alert, I found errors such as child process exiting due to signal 6 - Squid Exiting due to repeated frequent errors. This told me that Squid was acting as the proxy server, and it was unhappy about something.
After double-checking my settings, I thought perhaps something might be wrong with my network setup. I was plugging the Yellow Machine into a switch that hooked into my Linksys wrt54g which was then plugged into my cable modem. Taking all of the extra pieces out of the loop, I connected the Yellow Machine directly into my cable modem and tried again. There was no change. I saw the same flaky behavior.
I tried to do my duty as a diligent reviewer and visit some adult web sites to see how well the proxy blocked them. But unfortunately, the flakey behavior of the proxy made it hard to tell if the site was really blocked, or if it was just delivering the same partial page. I can say that some sites were not completely blocked because I got a partial display. I also tried visiting using an IP address instead of a textual URL to see if I could bypass the filter this way, but once again, the unpredictable behavior of the proxy prevented me from drawing any real conclusions.
Moving on to the email proxy and recording features, I saw similar problems. I successfully sent email using the Yellow Machine as an SMTP server, but I would then get an email “alert” notifying me that mail hadn’t been sent with the following error message procmail: Lock failure on /var/mail/postman.lock. Attempting to retrieve logged emails using the postman account produced something similar: Lock error(5) on /var/mail/postman".
Clearly, something was misconfigured in proxy mode, or perhaps just not working properly. I exchanged a number of emails with engineers at Anthology describing these proxy problems. These engineers indicated that they had not seen these problems but they would look into them. At the time of this writing, I had received no resolution nor further information.
Performance
Given a relatively high-end unit such as the Yellow Machine, I had hoped to see significant performance increases over inexpensive consumer-level NAS devices. To check, I measured the read and write performance using the iozone tool as described on this page. All tests were run under Windows XP SP2 on a Dell Inspiron 1000 laptop with 384 MB of RAM installed.
NOTE! How fast a computer can read or write data to a drive depends on many factors specific to the system running the test, so this test may not represent actual performance you’d see on your own system. The maximum theoretical data transfer rate one would expect to see on a 100Mbit network is around 12,000 kBps, so any values that exceed that number appear as a result of caching behavior, not network speed.
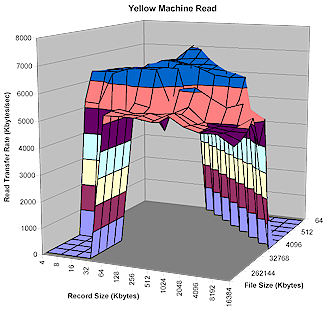
Figure 11: Yellow Machine Read Test results
(click for larger image)
Figures 11 and 12 show read and write performance for a range of file and record sizes. Peak (cached) write performance is comparable to many other drives I’ve tested, as is the peak read performance, which doesn’t have the advantage of caching.
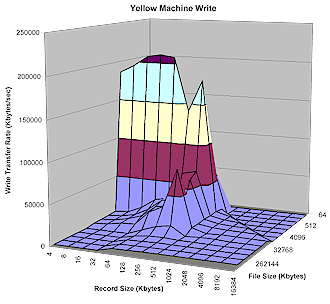
Figure 12: Yellow Machine Write Test results
(click for larger image)
To put these results into perspective, the plots shown in Figures 13 and 14 include data taken with the same iozone computer from previous reviews:
- Buffalo Technology Kuro Box
- Maxtor Simple Share
- Iomega NAS 200d StorCenter Pro
- LaCie Ethernet Disk mini
- Synology DS-101 Disk Station
The comparative plots shown in Figures 13 and 14 are taken with a 128MByte file size, which is large enough to bypass OS caching effects and show the real performance of the NAS devices.

Figure 13: Yellow Machine Comparative Read Test Results
(click for larger image)
You can see that the Yellow Machine fell near the bottom of the pack for read and about in the middle for write – a surprising result for such a costly product. In fact, the $160 Bring-Your-Own-Drive (BYOD) Kuro Box bested the $1,300 Yellow Box in both read and write performance. To be fair, some of this can be attributed to the Yellow Machine’s RAID 5 overhead while none of the compared products incorporate RAID. But again, given the product’s lofty price tag, it would be reasonable to expect better performance than products costing almost a tenth as much!

Figure 14: Yellow Machine Comparative Write Test Results
(click for larger image)
Under the Covers
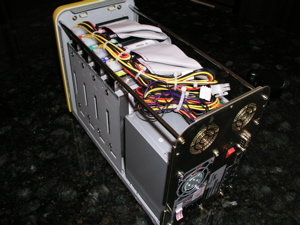
Figure 15 shows the Yellow Machine with its cover removed. At the upper rear of the photo you can see four IDE drives mounted vertically and the power supply visible inside the lower front of the box. The main board is mounted vertically on the right side and isn’t easy to get at without essentially taking apart the whole box. The general impression I got from looking inside the box was tight, solid construction.
Figure 15: Yellow Machine inside view
(click for larger image)
It’s no secret this box runs Linux, because Anthology advertises that fact plainly on its web site. One thing that surprised me a little was that the device has a telnet server running by default, and there is no web interface control to turn if off. But once you telnet in, you have complete control over the box. If your needs would be better met by an SSH server, you can install one and disable telnet, although you’ll be on your own for support.
One consolation for the security-conscious is that the telnet server is not accessible on the WAN side of the box, so it would not be exposed to the open Internet. I was also a bit surprised, and pleased, to find gcc, the standard Linux compiler available on the box. So if there is something you need that is not installed by default, and you have the Linux skills, you can build it. For example, I noticed that the box lacked a “Hello World” program, so I wrote one and was able to successfully compile and run it without difficulty.
Because I had command-line access to the box it was easy to determine some internal details. The Linux kernel version was 2.4.25 and examining the “proc” filesystem told me that the CPU was an Arm920Tid processor. Reviewing the boot messages told me that it was running at a relatively slow 200MHz and that there was only a measly 64MB of RAM installed! Poking around the Squid directories showed that the adult and webmail restriction capabilities of the box used simple keyword filtering, which seems to me like a losing battle that will inevitably cause headaches with missed web sites and false positives.
Having direct access to the box makes lots more options available to advanced users. For example, by modifying the samba configuration file, I was able to add my own network shares since there was no web interface to do it. Other modifications could be made to the firewall, DHCP server, NFS server, and so forth. Of course, Anthology would not support such customizations, but advanced users are also far less likely to need or care about such things anyway.
Closing Thoughts
The Yellow Machine’s RAID features can bring a greater degree of confidence in the safety of your data than you might find in an inexpensive consumer NAS device. In addition, the flexibility of its built-in switch and router bring extra capabilities to the table in a compact form-factor.
But the Yellow Machine misses the mark on a number of points, especially its primary value-proposition of being an all-in-one box for small-office users. If all you want is a basic NAT firewall, the Yellow Machine will probably suit you. But its use of a proxy that is limited only to email and web protection (and buggy at that) will give you fits if you want to limit what users can do on the Internet. Frankly, you’d be a lot better served buying a $40 router and just setting the Yellow Machine to Storage mode.
But even as a NAS, the Yellow Machine fails to match up to RAID competion like Buffalo’s TeraStation and Infrant’s ReadyNAS due to its missing print server, inability to connect to USB-based storage devices and missing support of user file access via FTP and HTTP.
The bottom line is that the Yellow Machine’s relatively high cost, merely modest performance, and problematic proxy behaviors should cause prospective purchasers to think twice before buying.

