Introduction
Welcome back! In Part 1, I took you through the thought process that led me to want to add cellular-based access to my home’s VoIP system. I ended up with the following project goals:
- Ensure the ability to make outgoing calls should our DSL fail
- Provide access to 911 service
- Provide access to 411 service
- Provide a low/no cost way to stay in touch when I’m travelling
- Provide a means of making oversea calls from my cell phone without paying cellular carriers oversea long distance rates
In this second and final part, I’ll focus on the little box that makes it all possible.
Portech MV-370
Normally in a product review I would not dwell upon the purchase process in any detail. However, in this case I feel it’s worth sharing the experience of buying a system directly from a manufacturer who is located in the Far East. While this might cause some concern, the experience was good and I feel I was dealt with promptly and fairly.
Having made the decision to buy a GSM gateway and researched the various products available, I decided to order the Portech MV-370. I was a little surprised to find that Portech, a Taiwanese company, doesn’t really have solid distribution system in the US.
While Portech lists a distributor on its website, that dealer’s web presence left me feeling that I should buy the unit elsewhere. Out of curiosity, I checked E-Bay and found that the device was available for purchase directly from the manufacturer. So that’s the way I went.
There are, in fact, several variants of this device, so check details and specifications before ordering! I initially purchased a tri-band variant with a 220 V power supply because the voltage on the power supply was not clearly stated in the catalog (but was detailed in the email confirmation of the order). Since that power supply was inappropriate, I contacted the manufacturer and modified the order to include a 110 V power supply. During that contact Portech also recommended the quad-band model that would cover all possible US GSM carriers and was only slightly more expensive.
Getting Service
Before the MV-370 arrived, I paid a visit to my local T-Mobile store to get a SIM card for the gateway. During that visit, I changed my calling plan from a zillion minutes/month on one line to a “family plan” with two lines sharing the pool of minutes.
T-Mobile was only too happy to do this, as I was very near the end of a two-year commitment. Since I was providing my own hardware for the second line, they required a further commitment of only one year to make the change.
The change didn’t cost me a penny, although T-Mobile may have had the impression that I was going to use my old Motorola RAZR for the second line. That may have come from the fact that I brought that phone with me to the store so they could “install” the new SIM card, although we never actually spoke about it.
Setup
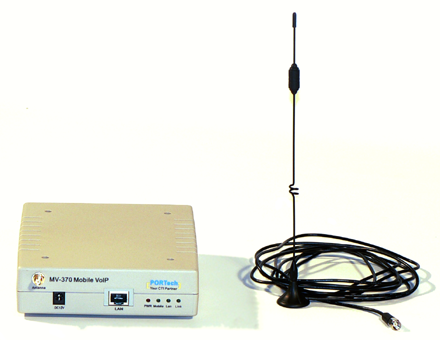
When the product arrived, I opened the box to find a small plastic device about the size of a novel. It arrived with a power supply, antenna, Ethernet cable and a printed manual.
The gateway has a removable panel on the bottom that reveals the SIM card slot. It has an SMA type connector for the antenna and the antenna itself includes a 2m attached cable.
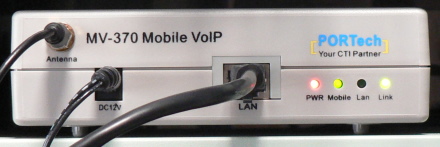
Figure 1: MV-370 close up
The device boots up with a default IP address of 192.168.0.100. But since my LAN is on a different subnet, I used a crossover cable to access the device’s internal web server and enable DHCP. Then I put it on my network and it acquired a more appropriate IP address from my router.
I later discovered that you can also define the gateway’s basic network settings via an interactive voice menu accessed by calling the gateway from a cell phone. This menu is only available in the initial 20 seconds after the device boots, while the front panel light marked “Mobile” is flashing.
Configuration #1: Use With A Hosted IP-PBX
When the gateway was initially delivered, I was a bit short on time to experiment with its configuration. The fastest way to get a little experimentation in before I left on a business trip was to link the device to a hosted IP-PBX service that I use for my day job. This initial configuration took only about half an hour.
In the admin portal for the hosted PBX, I set up a new user. This resulted in a set of login credentials that I loaded into realm 1 on the MV-370’s Service Domain settings menu. This menu supports settings for three separate SIP registrars, each referred to as a “realm.”
As a convenience, you can enable or disable each without losing the settings. The gateway places all outgoing IP calls through the first available realm. But it will answer incoming IP calls from any enabled realm.
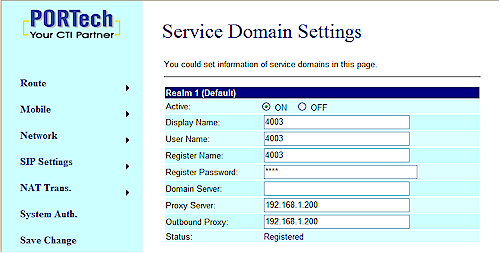
With the new credentials loaded, and after the usual reboot, the status for the server was shown as “registered” (Figure 2), which I also confirmed with the provider’s management portal (Figure 3).

Figure 2: Realm indicating registered on the gateway web interface
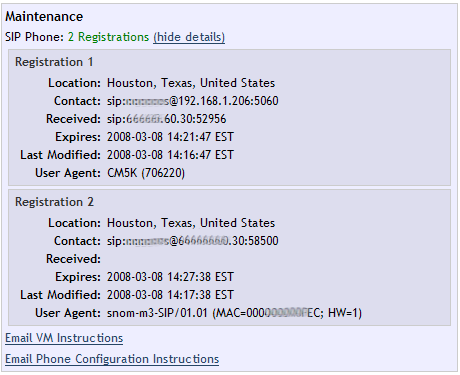
Figure 2: Successful registration on the hosted ip-pbx administrative interface
Defining Routes: Mobile To LAN
My initial use of the MV-370 was going to be in making calls to the UK from my US cell phone and leveraging the hosted PBX service. I was pleased to find that gateway provides considerable flexibility to route calls right in its own firmware. In some simple installations, its internal logic could eliminate the need for a local IP-PBX.
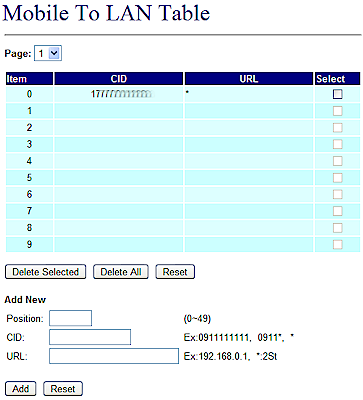
The first item on the Route menu of the GUI is the “Mobile To LAN” table (Figure 3). This sets up a list of phones that will be accepted to pass calls through the gateway from the cellular network to the IP network.
Figure 3: MV-370 Mobile-to-Lan routing table
This table supports 50 entries. Each entry can be a specific as the caller ID of a single phone, or as broad as an * indicating any incoming caller ID. By specifying a portion of a phone number, you can restrict the access to phones only from a certain area code, local exchange, etc. Since I was only concerned about my personal cell phone, I set the CID for item 0 to be my cell phone number.
Each incoming CID is mapped to a SIP URI or IP address. In this way you can hard code that any incoming call from a specific cell phone rings a specific IP phone. This creates a secure, albeit inflexible, system.
You can also specify a portion of an IP address or extension with the remainder indicated by an *. This restricts the numbers you can call based upon some prefix or range of IP addresses. Dialing an IP address into the call is done using the * in place of the decimal and # to terminate the number.
For example: 192.168.1.206 = 192*168*1*206#
One alternative to dialing by IP is to use “two-stage dialing”, which is like using a calling card. This mode is invoked by using * in place of the SIP URI or IP address. You first dial the number of the gateway from your cell phone. The gateway answers, then gives you a second ring tone. You then dial the number or extension you wish to call and the call completes.
Speed Dials
Two-stage dialing is very flexible, but adds the overhead of waiting for the second dial tone and dialing extra numbers all the time. The MV-370 also provides a list of Mobile-to-LAN Speed Dials that makes this more convenient.
The ten available speed dials map a single digit to a specific SIP URI, which worked well with the hosted PBX service. Within their system, every extension and commonly-used external numbers are exposed as SIP URIs. So it was easy to add ten extensions to the speed dial table (Figure 4). Since this reduced the amount of DTMF passed to the gateway, it also made for more reliable calling.
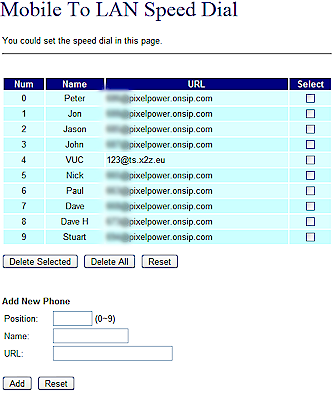
Figure 4: MV-370 Mobile-to-Lan Speed Dial table
Since I typically call only a handful of people at our head office, the speed dials became my preferred means of access. They effectively create a single digit extension for each person on the list. To reach anyone on the speed dial list, I only had to call the gateway’s cell number, pause three seconds, then dial 0-9, corresponding to the person desired.
For each person on the speed dial list, I also added a phone book entry into my cell phone. These all pointed to the same US phone number for the gateway, but with a different single digit extension after the pause.
As you can see in position #4 in Figure 4, I also set up a speed dial mapped to the SIP URI for accessing the Voice Users Conference IP conference bridge at www.talkshoe.com. In that way, I could sit in on the VUC calls from my cell, but via an IP connection. I accept that this is silly, since they also offer PSTN access. But I just did it on the principle of avoiding the PSTN where possible. Since VUC calls typically run 60-90 minutes, being able to attend using unmetered mobile-to-mobile minutes was also handy.
In Use: Cell-to-Hosted PBX
Once configured for use with OnSIP, I used the MV-370 as my principal means to call the UK from my US cell for two months. I used two-stage dialing to reach people not in the speed dial table.
The cellular signal in my office registered between 16 and 21 according to the MV-370’s Mobile Status menu, which is within acceptable limits. Once connected, the call quality was as good as a typical cell call, which makes perfect sense.
I occasionally had some trouble making connections through the gateway. In the case where I had programmed a speed dial into a cell phone memory, I found that sometimes the extra digit passed to the gateway would be ignored. When this happened, I just had to manually press the digit and the call would proceed.
I suspect that this had more to do with the default duration of DTMF tones on my Blackberry 8100 than the gateway itself. Both “in-band” and “RFC2833” types of DTMF work with OnSIP if I used the G.711 codec. Switching to the low bandwidth G.729 codec forces the use of RFC2833 type DTMF.
The gateway provides a “mobile dtmf debounce” adjustment setting (Figure 5) to overcome just such trouble. By setting this to 120 ms, passing DTMF was a little more reliable.
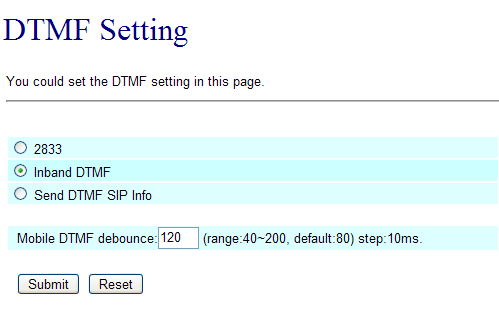
Figure 5: DTMF debounce
There was also a little extra latency to calls placed through the gateway compared to dialing the UK directly. This makes sense, since the call is passing through significantly more processing by being bridged into the IP domain.
The effect of the added latency was not so bad as to be a problem. But it might keep me from considering such a gateway as a primary trunk. At no point did anyone I called think that I was using anything more than a direct cellular call.
Configuration #2: Use With A Local Asterisk Server
When I finally had some time to experiment with the gateway, I configured it to access my local Asterisk server as the default realm with the hosted PBX as a secondary realm (Figure 6).
Figure 6: Registered with local Asterisk server
When more than one account is registered, the gateway will answer incoming calls on all accounts, but only pass outgoing calls to the default account. So my Asterisk server needed to be the default account or I would not be able to pass IP calls out to the cellular network.
Defining Routes: LAN-to-Mobile
Previously my routing had been established for calls originating on the cellular network and being passed into the IP domain. Now I needed routing for calls passing from LAN to Mobile.
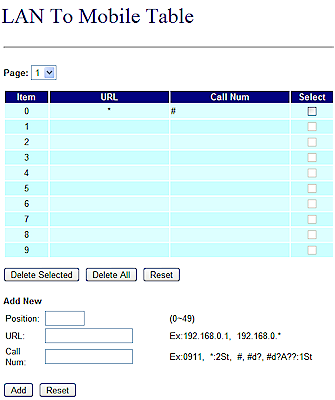
Figure 7: MV-370 LAN-To-Mobile routing table
The LAN To Mobile routing table on the gateway (Figure 7) allows you to restrict acceptance of calls by originating URL, IP address, or IP address range. It also provides a means of restricting where you might call out to, perhaps restricting access to overseas calls, for example. In my case, the routing could be wide open since I was comfortable that any call originating on my home office LAN would be legitimate.
Configuring Asterisk
The documentation includes some basic examples of the Asterisk config files. I modified these examples to suit my installation as follows. This following block of the config is a landing zone for incoming calls:
[4003]
; Portech GSM Gateway
type=friend
host=dynamic
username=4003
secret=4003
nat=no
qualify=yes
dtmfmode=inband
context= inbound-gsm
call-limit=1
insecure=very
canreinvite=no
From EXTENSIONS.CONF
[inbound-gsm]

exten => _4005,1,Answer()

exten => _4005,2,Set(TIMEOUT(digit)=3)

exten => _4005,3,Set(TIMEOUT(response)=5)

exten => _4005,4,DISA(no-password|local)
The last line calls the Asterisk DISA function that exposes other portions of the system for use by the outside caller. DISA means “Direct Inward System Access” and is the process whereby someone connecting externally is authenticated, then allowed to make use of system resources to place outgoing calls.
The DISA parameter “no-password” is considered wildly insecure, as it removes the need for any form of PIN code before allowing access to the system. “Local” is the dial plan context that is granted to the outside caller once on the system. Once I call into the gateway, Asterisk allows me to make further calls just as if I were physically in my office.
I offer this just as a conceptual example. Since the number of people that I call overseas is limited, I have simplified my DISA implementation by establishing preset Asterisk extensions that dial each party I might call. Then I use the gateway’s speed dial table to access the extensions directly with a single extra digit.
The next block of config establishes outbound dialing via the GSM gateway.
[outbound-gsm]
;
; all emergency calls routed through the GSM gateway to T-Mobile
exten => _911,1,SetCallerID("MyDesiredCallerID")
exten => _911,n,Dial(SIP/${EXTEN}@4003,60,r)
exten => _911,n,Hangup()
;
; directory assistance calls routed through the GSM gateway to T-Mobile
exten => _411,1,SetCallerID("MyDesiredCallerID")
exten => _411,n,Dial(SIP/${EXTEN}@4003,60,r)
exten => _411,n,Hangup()
;
;dial 9 for long distance via T-Mobile
exten => _91NXXNXXXXXX,1,SetCallerID("MyDesiredCallerID")
exten => _91NXXNXXXXXX,n,Dial(SIP/${EXTEN:1}@4003,60,r)
exten => _91NXXNXXXXXX,n,Hangup()
;
;dial 9713 for local calls via T-Mobile
exten => _9713NXXXXXX,1,SetCallerID("MyDesiredCallerID")
exten => _9713NXXXXXX,n,Dial(SIP/${EXTEN:1}@4003,60,r)
exten => _9713NXXXXXX,n,Hangup()
For 411 and 911 calls, we pass the call directly. For other local and long distance calls, we require that the user dial 9 to specify the GSM trunk.
Defining Routes: Mobile-to-LAN (Asterisk)
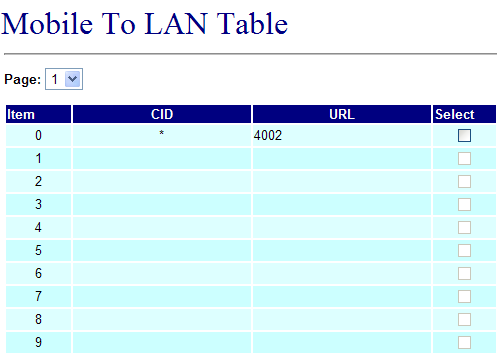
Routing cellular calls into Asterisk is unlike the configuration for the hosted PBX. It requires that the routing table in the gateway be essentially defeated. All calls should be sent directly to an Asterisk dial plan context. By setting the URL to 4002, all incoming calls ring my snom m3 cordless phones in my house and office.
Figure 8: MV-370 Mobile-to-LAN routing table setup to send calls to local extension 4002
The cellular number assigned to the gateway is not a number that I intend to publicize, so I don’t expect to receive many calls via the gateway. The exception is when I am travelling and call home. In that case, using the cellular gateway to receive the call means that I’m using free mobile-to-mobile minutes on my cellular plan.
Security
DISA is a significant security risk. Most hosted PBX providers don’t support DISA at all, since anyone breaking into the system could run up huge termination bills by calling distant lands for thousands of minutes. In our case, there are a couple of places where I can secure both the gateway and my Astlinux server:
- Restrict the incoming calls to only my cell phone. That would also limit my ability to relay an overseas call from a land-line such as a hotel room or client site.
- Enforce a PIN code in the Asterisk DISA authentication
- Restrict where the DISA user can call to only a series of predefined extensions in the Asterisk dial plan or gateway speed dial table
In practice, a single port GSM gateway on an unpublicized number has to be considered a limited liability. Any of the steps described would provide adequate security; used together, they will be more than adequate.
In Use With Asterisk
The day I first got the MV-370 working with Asterisk I must have called 411 about twenty times. I was just so pleased that it worked, and worked reliably!
I have no way of testing my access to 911 service without breaking the law. Since 411 and dialing other numbers works very well, I’m comfortable that the 911 service will also work when needed. I’ve registered my home as the default location of the new SIM card on the T-Mobile account. So 911 calls made via the gateway will be associated with our home address.
I have had problems using Asterisk and DISA to place overseas calls through my Asterisk server, however. Adding my Asterisk server into the mix has markedly increased latency in the connection, often resulting in a substandard call experience.
The gateway makes all outgoing IP calls using only the primary SIP account, which must be my Asterisk server to provide 411/911 access for my home & office phones. So I cannot have the gateway registered to OnSIP directly for the purposes of outgoing calls, as I did previously. If I had the two-channel model (MV-372), both might be possible since each channel could register with a different server.
Conclusion
The MV-370 works very well for making calls from the home & office IP phones. In fact, I’ll eventually have the dial plan cascade sequence incorporate the gateway automatically. Then if we lose access to our ITSP, outgoing calls will proceed via the gateway with no change in end-user dialing habits.
The MV-370 sees the greatest use when I call home from afar. Incoming calls placed through the gateway ring the cordless SIP DECT phones in my home, taking advantage of unlimited free mobile-to-mobile calling on my cellular plan. Calls home placed in this fashion sound just as good as calling my IP-based home line, but they’re effectively free.
I find myself drawn to slightly uncommon solutions. The cellular trunk satisfies this need and adds another dimension to our Asterisk installation. We now have reliable 411 and 911 service, without resorting to POTS lines. We also have the ability to make calls when our IP connectivity is completely down. Finally, we have a zero-cost means of staying in touch when I’m traveling, by leveraging free mobile-to-mobile minutes.
With a little more experimentation, the DISA functionality may yet be achieved. But having achieved four of our five major goals, I consider the project to be a success.
Other Related Online Resources:
Mv 370 Mobile VoIP – GSM Gateway Tutorial
Setup MV-370 GSM Gateway with Asterisk

