Introduction
| ICUBE Play@TV NMP-4000 | |
|---|---|
| Summary | Media player handling video, audio and still files in Ethernet and Ethernet+802.11b wireless versions. Requires WinXP or 2000 |
| Update | None |
| Pros | • Supports wide range of analog and video connections |
| Cons | • Optional 802.11b wireless not adequate for video streaming • Win XP and 2000 only • Requires TV for user interface |
Our computers are drowning in multimedia. MP3s, Divx videos and JPG pictures are some examples of the media files that people have stored on their PCs. Is there a way to play all those wonderful files on your TV, without lugging your computer into the living room? iCube hopes to answer that question with their Play@TV NMP-4000 network media player.
Can it play all your favorite music, videos and pictures? Is the performance fast enough? In this review, THG answers those questions and much more.
What is a network media player?
A network media player sits between your computer and your television. It translates the computer-based audio, video and picture formats into a format that the television can understand.
The included Media Organizer software must be installed on the PC(s) that contain media files. The software catalogs all the media and presents it to the player. You can think of the software as making a gigantic shared folder for the player to stream off of. Unfortunately, the Media Organizer shares the limitation of many other media players in that it requires that you use a Windows XP or 2000 system to run it on.
The player connects to your pc via either a Ethernet cable or your wireless network with a wireless PCMCIA card. If you choose the wired route, the player can either hook directly to your PC with the included cross-over cable or to your network hub/switch/router with the included straight-through cable.
Audio and video connections are made via the same types of jacks that you’ll find on your normal audio and video components. On that end, at least, hooking up a media adapter is similar to connecting up a DVD player.
Note that the Play@TV unit cannot record audio, video or still picture content. It is an output-only device.
Pros and Cons of a network media player
With a network media player, you can place your computer far away from the living room TV. This both removes the need to remodel your living room and keeps spousal complaints at bay.
Simplicity is another reason for having a network media player. Let’s face it, some people can’t use a computer. Now, Grandma can sit down and use a TV-Like remote and listen to music, watch movies and view those cute baby pictures.
Of course your computer must be on in order to feed files to the media player. Wouldn’t it be embarrassing to say, “Oh Grandma… You can’t view those pictures now. You’ll have to wait two minutes while I turn my computer on.” If you want the player to be transparent as possible, you may want to leave your computer running 24/7. Since some people already leave their computers on all the time, this may not be a problem.
Hard-drive space is cheap and inevitably will get cheaper. One viable option is to purchase a cheap computer and stuff it with inexpensive hard-drives, solely to feed the Media Player.
What can it play?
Here is a chart of the supported media formats.
| Music | Video | Photos |
| MP3 | MPEG | JPG |
| WMA | MPEG2 | BMP |
| WAV | DIVX | |
| WMV | ||
|
Table 1: Play@TV supported formats
|
||
As you can see, the iCube Play@TV supports most of the common media formats. However, it does not support the Ogg Vorbis music, QuickTime video or.PNG picture formats. A future patch may solve this problem.
What you Get
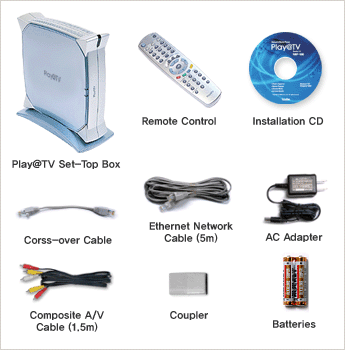
Figure 1: What you get
The Play@TV comes in two versions: regular – which offers wired connectivity only; and a “premium” version which includes a Linksys WPC11 Version 3 802.11b wireless PCMCIA card for about $20 more. iCube also lists on its website about a half dozen other cards that can be used instead of the Linksys. The same page also has a list of wireless cards that can’t be used with the Play@TV.
You’ll find the following (Figure 1) in your Play@TV box :
- A stand that enables you to mount it upright
- Composite audio/video cables (an S-Video cable isn’t included).
- A short cross-over Ethernet cable – about the same length as a US dollar bill – a much longer straight-thru Ethernet cable and handy cable coupler for connecting the two
- A two-pronged (no ground pin) switching 100V-240V power adapter
- A remote control is slightly longer than the dollar bill (Figure 2), but is thinner width-wise. Batteries are included.

Figure 2: The remote is dollar-bill sized
Ins and Outs
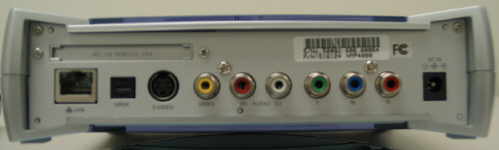
Figure 3: Connector panel
All of the cable ports are on the back of the unit (Figure 3). Going from left to right, we first see the PCMCIA slot for the wireless card. Below the slot is the Ethernet port. Next is the SPDIF optical sound out. S-Video, Composite Audio/Video (yellow,red,white) and Component Video (green,blue,red) round out the rest of the ports.
Media Organizer and Media Server
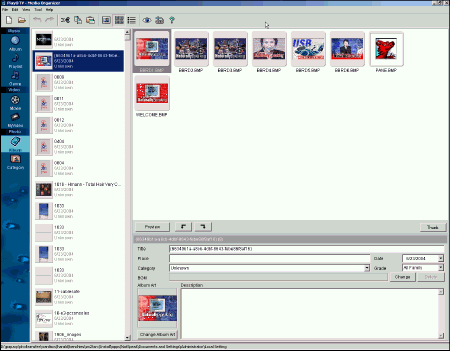
Figure 4: The Media Organizer
Before you can start viewing your media files on the TV, you will have to install and configure the Media Organizer (Figure 4) and the Media Server software on your PC. The Media Organizer, as the name implies, organizes your media files in an easily searchable database. The Media Server component actually shares the files to the NMP-4000 box.
When you start the Media Organizer for the first time, it will do a “Media Scan” which scans your hard drive for all your picture, music and video files. This can take several minutes so I suggest that you get a snack while this is going on.
The Media Organizer can rip MP3s straight from an audio CD and rip the video files from Video CDs. But video cannot be ripped directly from DVDs.

Figure 5: The Media Organizer’s built-in player
Media Organizer and Server, Continued
You can play your media within the Media Organizer (Figure 5). One very strange thing we noticed is the Play, Stop and Pause buttons are not labeled as Play, Stop and Pause. Instead they are labeled A, B and C!
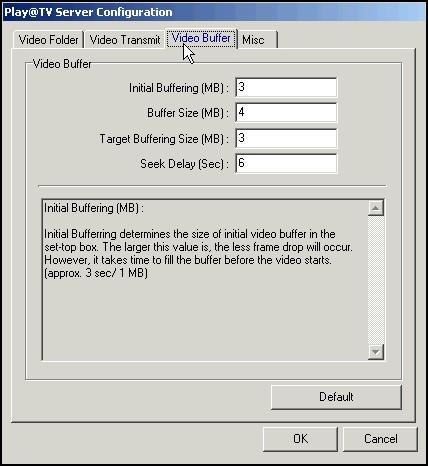
Figure 6: Video Buffer settings
The Media Server will start every time the computer starts and it will show up in the Windows taskbar. You can configure some options by right-clicking on the icon and selecting Configuration. The most important settings to configure are the Video Buffer settings (Figure 6).
These settings tell the player to buffer a certain number of MegaBytes before playing the media file. The configuration is not user friendly because the screen doesn’t initially tell you what the minimum and maximum limits are. You type in the number and then you click OK, hoping that the program takes the input (Figure 7). A slider would have worked much better.
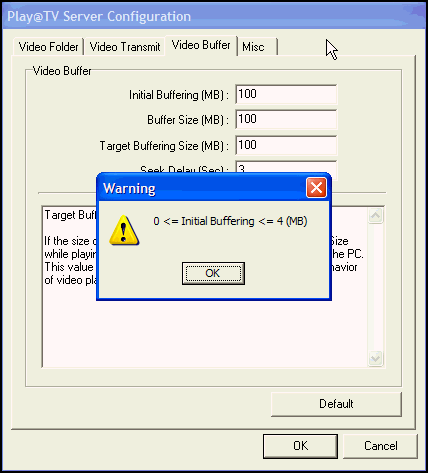
Figure 7: Out-of-range Video Buffer setting
Turning on and Configuring the Player
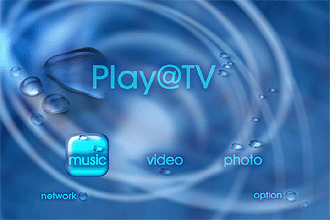
Figure 8: Opening screen
Once the Media Server is running on your PC, you can turn on the Play@TV player box. Figure 8 shows you what you should see on your TV. By default the player will look for a DHCP address, but you can configure it for a static IP if you wish. In the wireless configuration menu, the player will scan for available networks and allow you to use WEP encryption.
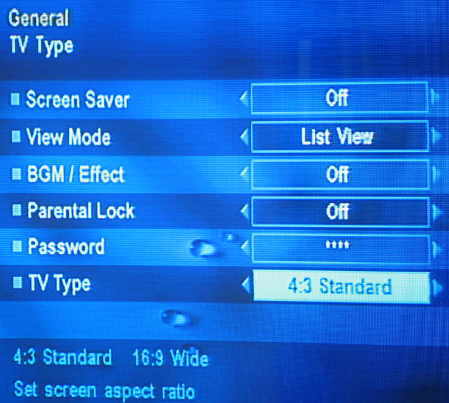
Figure 9: Options menu
You can also go into the Options menu (Figure 9) to configure other settings such as Parental Locks and whether you want the image to be 4:3 or 16:9 (for all you lucky HDTV owners). Changing the view mode will make media show up in a list or as thumbnails.
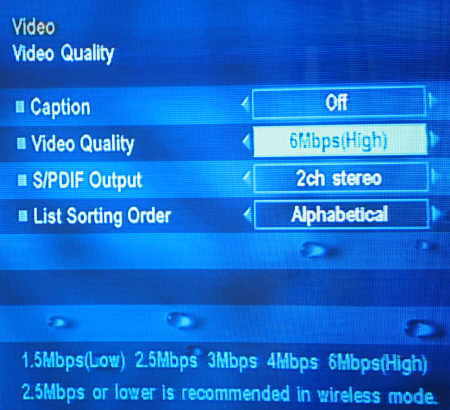
Figure 10: Setting video quality
For the incoming video, you can set the bit rate from 1.5 Mbps to 6 Mbps (Figure 10). Obviously the higher the bit rate the better the video will look. How high you can go will be determined by your network speed and the power of your computer.
File Browsing

Figure 11: Video titles
Playing your media is pretty straight forward. The remote control has buttons labeled Music, Video and Photo. You hit the appropriate button and then you are given a screen that shows the media titles (Figure 11). You use the arrow buttons on the remote control to move around and then hit the OK button to start playing.

Figure 12: Video thumbnails
Only the first frame is thumbnailed which is the problem for videos that start off with a black screen. Also, there are only eight video thumbnails per screen (Figure 12). Thankfully, there is a page up and page down button on the remote.
Playback
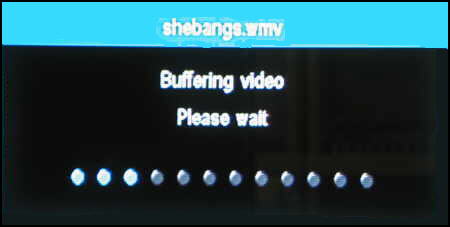
Figure 13: Waiting for the video buffer to fill
Audio and Pictures play back with no problems, but when playing back videos, there is a five to fifteen second delay as the video buffers (Figure 13). You can fast forward and backwards by pressing keys on the remote, but the video takes several seconds to resynchronize and buffer with each change. We also found that after skipping through the video, the audio would get out of synch with the video.
Playback – Continued
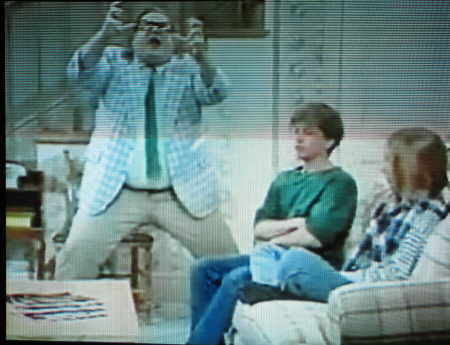
Figure 14: What it looks like on your TV
How good does the video look? The video quality is acceptable (Figure 14), but what looks good on a computer screen may not look so good on a TV screen. Or to put it another way, If the video looks bad on your computer, it will look very bad on the TV. The player also stretches the video to fit the whole TV screen, which furthers degrades the quality.
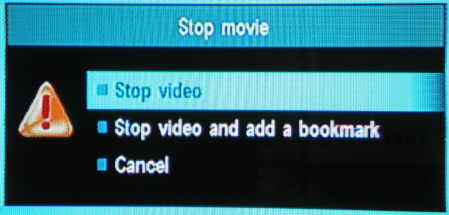
Figure 15: Setting a bookmark
One nice feature is the ability to bookmark a video (Figure 15) and come back to that exact point later. This really helps for longer videos.
The player had a little problem playing WMV files that contain still video. We played back a video of an Saturday Night Live Skit done by Robert de Niro called “Funny Terrorist Names”. While playing the video, we noticed flashing whenever a static picture was shown as part of the video. The video continues playing but the flashing can be distracting. Play@TV has been informed of this problem and they are working to solve it with a software patch.
Wireless playback was very slow, to the point of being painful. The player took upwards of a minute to initialize and buffering videos took 30-60 seconds. Often the player gave up trying to play the video and threw up an error box saying, “The network is not smooth.” We hope that a 802.11G version will speed things up.
Conclusion
Several things make the Play@TV unsuitable for the discriminating user. It doesn’t play certain media formats such as QuickTime, Ogg-Vorbis and PNG pictures. The wireless streaming works, but is very slow. And the menu system in the Media Organizer and Media Server could have been more polished, as labeling the Play, Stop and Pause buttons with A, B and C is not very intuitive.
But if you don’t plan on using the wireless interface and don’t have many files in the unsupported formats, then the Play@TV may be an adequate choice, but just barely.