| At a glance | |
|---|---|
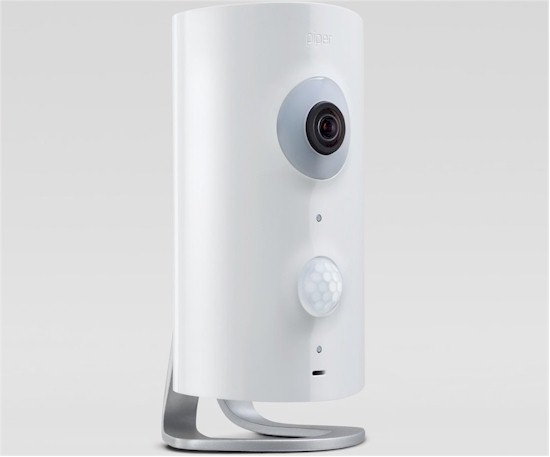
| Product | Icontrol Networks Piper nv Wi-Fi Surveillance Camera & Security System (P1.5-NA-W) [Website] |
| Summary | Cloud-based security camera system with Z-Wave controller, speaker, microphone and humidity/temp sensors |
| Pros | • Intuitive app • Free storage for 1000 video clips • Connects up to 232 Z-Wave devices • Runs on battery power in the event of power loss to the camera • Up to 5 Pipers per network |
| Cons | • Staticy audio w/ no way to adjust sensitivity • Can’t buy more storage space • Video clips limited to 35 seconds each • No way to download video |
Typical Price: $0 Buy From Amazon
Introduction
Updated 8/2/15: Video can be downloaded now
We’ve looked at a few cloud-based video surveillence products. They’ve been more similar than different in that they all have great features. Yet they all seem to be lacking some key ingredients to really complete the package and make them amazing.

That said, today we’re going to be looking at Icontrol Networks’ Piper nv. Piper nv is a second generation product, with the addition of night vision its biggest change over the original Piper Classic. However the nv also sports higher resolution video and an upgraded Z-Wave controller.
Inside the box you get the Piper nv, wall-wart USB power supply, three AA batteries and a quick setup guide. The Piper nv contains a speaker, Z-Wave controller for up to 232 devices, microphone and temperature and humidity sensors in addition to its camera. Unlike the Canary I reviewed last month, you can trigger on temperature events. Like the Canary, you can only look at data from the humidity sensor.
I collected all of the information I could about the nv from the nv’s meager tech specs into Table 1 and included Canary’s specs for comparison.
| Piper nv | Canary | |
|---|---|---|
| FCC ID | 2AA5P-P10A015 | 2ACDL-C100? |
| Resolution | 1920×1080 | 1920×1080 (videos downloaded in 1280×720) |
| Megapixel | 3.4 | ? |
| Lens | ? | ? |
| Compression | ? | ? |
| Horizontal field of view | 180° | 147° |
| Vertical field of view | ? | ? |
| Audio | Yes | Yes |
| Night vision | Yes | Yes |
| Number of IR LED’s | 12 | 12 |
| Record to SD card | No | No |
| Record to network share | No | No |
| Record to cloud | Yes | Yes |
| Wireless | 2.4 GHz 802.11b/g/n N150 class | 2.4 GHz 802.11b/g/n N150 class |
| Ethernet | No | 10/100 Mbps |
| POE | No | No |
| Pan/tilt/zoom | Yes, digital | No |
| Sensors | Motion, temp, humidity, light, sound | Motion, temp, humidity, light |
| Maximum Devices per location | 5 | 4 |
| Can integrate w/ other systems | – Can be triggered by Z-Wave sensors. – Can’t be controlled by other Z-Wave hubs. |
No |
Table 1: Spec summary and comparison
Inside
It wasn’t obvious how to take the nv apart. So not wanting to break it, I relied on the FCC ID pictures to get a look inside. The pictures aren’t clear enough for exact component identification, but you can see that the IR LEDs are on a separate board from the lens. This would let Icontrol Networks introduce a higher resolution version of the Piper Classic without night vision.

Piper boards
The slightly clearer view of the main board below reveals a TI SoC that probably does most of the heavy lifting. You can also see the Sigma Designs Z-Wave radio module at lower left and Micron RAM to the right of the TI processor. The large device on the other side of the main board shown above is flash memory.

Piper main board
Setup
Setting up the Piper nv was relatively easy, with a couple of device-specific hitches. Like most other Smart Home devices, you control the nv via an app, either Android 2.3.3 or later or iOS 7 or later. I chose to set up using my Samsung S4 running Android 5.0.1, which entailed first getting the Piper Mobile app from the Google Play Store.
The app guided me to set up a new account, then asked if I wanted to set up a Piper. That’s when things got a bit difficult. Piper broadcasts its own wireless network (Piper) that you connect your mobile device to. Then during the setup process you enter your wireless network SSID and password so Piper can be joined to it.
The snag I ran into was that my phone kept switching back to my main network before setup was complete. When I tried to switch back to the Piper network, I couldn’t, so had to start over. I went through this about half a dozen times before it finally worked. Later, I found a support article on Icontrol’s support site that recommended shutting off the phone’s “Auto Network Switch” so this doesn’t happen. But by then, I was already set up. In hindsight, I could have just temporarily deleted my home network’s Wi-Fi credentials from the phone until the Piper part of the setup was done, then restored them.
All communication between the app and Piper cloud services happens over an HTTPS connection. Icontrol says video and audio are encrypted with “high-grade SSL encryption”.
Dashboard
Once you’re set up, the Piper app’s Dashboard becomes its activity hub. The center circle icons control Piper’s Security mode, which I’ll describe in the Rules section. The icons on the left side are (top to bottom) indoor temperature, panic button and outdoor temperature. Piper doesn’t have an outdoor temperature sensor, but instead displays information based your location, which it infers from your WAN IP address.
The right side icons take you to the Settings, Events and Recordings screens. The bottom area of the screen shows the latest Events. The icons at the bottom of the screen switch among Dashboard, Vitals, Live Video, Controls and Rules screens. We’ll come back to some of these shortly.

Piper Mobile app
The items in the Settings screen on the left are self-explanatory for the most part. The right-side screenshot below is the Piper Options screen.
 & Settings Options (R) screens")
Settings (L) & Settings Options (R) screens
There are a lot of options available in the Settings screens. Note the Video Settings item, which lets you separately limit the bandwidth between the app and Piper when connected via Wi-Fi (locally) and cellular (remotely). The max setting for both is 2 Mbps. The video below is worth a watch for an in-depth run-through of all the Settings screens.
The Events screen shows anything Piper considers an alert, i.e. motion, temperature, sound, etc. Events that triggered video recordings are indicated by a Play button, which you can click to view the related video. The Recordings screen lists captured video. In both, Events that have not been viewed are red, while Events that have been viewed are grey or blue.

Piper events vs recordings
Updated 8/2/15
On July 29th, Piper released a new version of its Android and iOS apps that allows downloading event recordings, something I dinged it for in the original review. Downloading clips is essential to any home security system. Downloading recordings is easy with the new app, simply press the download button to the right of the event you want to download as shown in the image below.

New app functionality within Piper to download videos
For those who like a Panic button for their security system, tapping the moon icon at Dashboard left activates a bedside mode. This keeps your phone screen active at night, ready for you to activate that ear-bleedingly loud alarm at the push of a button.

Piper’s panic screen keeps the phone screen active
Moving down to the icons at the bottom of the Dashboard, the Vitals screen shows historical plots for indoor and outdoor temperature, indoor humidity, light and sound levels and motion.

Piper Vitals
Live Video does what it says, plus a few other features. The left-most icon at screen bottom right activates the IR LEDs for night vision. Push and holding the microphone icon and speaking will send your voice to the Piper you’re currently viewing, in case you have more than one.
Tapping the light bulb icon provides access to any linked Z-Wave switches. The right-most icon switches to Quad View, which shows four quadrants of the live video feed, with distortion from the default 180° "fisheye" view removed. Each quadrant can be zoomed and dragged to move around the view, as can the default "fisheye" view.

Live Video screen
Tapping on a recorded video icon in the Events or Recordings screen brings up the video player and timeline as shown below. You can scroll along the timeline to view other recorded videos, which are denoted by blue lines. Simply tap on a blue line to play another video.

Video playback
Recorded videos can be pinch-zoomed and panned across just like the Live Video view. You can also put recorded video into Quad View to view four quadrants at once.
Rules
Piper has four user-selectable modes, each with its own rule set. The modes are Stay, Away, Vacation and Notify Only and are easily selectable on Dashboard screen. When you change modes, Piper provides spoken notice to confirm the change. You have to manually switch among the modes. There is no geofencing option to automatically switch to Away mode when you leave home.
Piper’s base unit has rules for motion, loud sound and temperature change detection. If a Z-Wave Door / Window sensor is connected, a rules option for it will also be shown (the If Front Window opens rule shown below).

Rule options
The composite screenshot below shows Rule options for the Z-Wave Door / Window sensor and motion in the Stay mode screen. The Door / Window sensor can be mounted to windows and doors and uses a roller switch vs. magnet and sensor. All actions are also available in the other mode screens.
"Trusted Circle" contains additional contacts you define in Settings that can be notified when an Event is triggered. The "Turn Light on" option is shown only if a Z-Wave Smart Switch is connected. ("Light" was the name assigned to the switch when it was added and can be changed.)
 and motion (R)")
Rule actions for door/window (L) and motion (R)
Piper can also take action based on temperature, but not on humidity. The screenshot below shows a temperature rule with high and low limits. An alert will be triggered if the temperature moves outside the set range.

Piper temp configuration options
Z-Wave
Piper’s key differentiation vs. Canary is its ability to incorporate Z-Wave devices to extend its monitoring features. But Piper also can control Z-Wave devices independent of its security side. Icontrol Networks sent a Z-Wave Smart Switch ($44.95) and Z-Wave window/door sensor ($39.95), shown below, with the Piper nv. Icontrol also offers Smart Dimmer ($44.95), Micro Smart Switch ($44.95), and Z-Wave Range Extenders ($24.95) in its Accessory line. The device FCC IDs show they are made by Aeon Labs, a Z-Wave OEM/ODM.

Piper Z-Wave sensors sent along for review
Adding Z-Wave devices is extremely easy. Just go to the Z-Wave Accessories Settings screen, add a device and then push the button on the sensor. Once paired, configuration options for events came available, as I described earlier. The image below shows the sequence of screens for adding a Z-Wave device.

Z-Wave device add sequence
Once paired, the Door/Window sensor can be used as a security trigger Event. Output devices (switch and dimmer) can be incorporated into security Rules and also used without triggering alarms via the Controls screen. The composite below shows three methods available for switch automation: schedule; temperature and ambient light level. The schedule method offers simple on/off options; Piper doesn’t offer sunrise/sunset automation.
Temperature automation requires you select the type of appliance, either air conditioner or heater. Selecting the former activates the switch when the temperature exceeds the set point; selecting heater turns on the switch when the temperature falls below the set point.
Ambient light automation can be used only to activate the switch when the room gets "dark". There isn’t a control to let you define the "dark" setting. And keep in mind light level is measured where Piper is, not the lamp being controlled.

Controls automation screens
While it’s possible to add the same device to both automation Control and security rules, you probably won’t get the desired effect. For example, if you had a light turn on when a security event was triggered, a schedule Control won’t turn it off at the programmed time.
Icontrol says up to 232 Z-wave devices can be controlled by Piper, with this FAQ saying "any make or brand of Z-Wave accessories" will work as long as it is an on / off or dimmer switch, open / close sensor or Z-Wave range extender. Despite what this Advanced Z-Wave Network Management Word doc says (we checked with Piper Support), Piper can’t be added to another Z-Wave network.
Finally, Piper doesn’t support IFTTT.
In Use
I found Piper’s sound detection more reliable than motion detection, probably due to the use of PIR (Passive Infra Red) sensor vs. video pixel analysis like found on many video surveillance systems. Pixel analysis looks at change in the picture and determines motion, while PIR detects temperature change.
Piper’s motion settings also don’t let you set motion zones or record specific seconds before or after an event. It does, however, let you adjust sensitivity when you select the “Pet at Home” option, shown below.

Pet at home settings option
Piper has a different cloud storage model than other cloud-connected IP cams we have looked at. Most cameras have a basic free plan and an assortment of paid plans providing more storage, longer storage retention or both. Piper’s plan is completely free with no fee-based options, letting you store up to 1000 recorded event "snippets" in Piper’s cloud.
The maximum size of each "snippet" is limited to 35 seconds. This means that if you are recording a break-in or other trigger event, all you’re going to get is the first 35 seconds. Once an event is triggered you have to manually reset it before it can be triggered again. So you can’t rely on Piper to automatically retrigger and capture another 35 seconds of video.
35 seconds x 1000 equals around 10 hours of cloud storage. When the 10 hours is filled up, oldest events get deleted to free up storage. There is no way to get more storage, but you can delete snippets to free up space. Since up to 5 Pipers can be supported with one account, I could see the 1000 snippet limit hit sooner than you might think. The good news is that there is no retention time limit. Recordings stay in your cloud account until you delete them or they are deleted to make room for new ones.
The other unfortunate video "feature" is that you cannot download video or take still image snapshots from the Piper app. So if someone breaks into your home and Piper captures it on video, you can’t really give the video to the police. You can only use Android / iOS native screen captures to get a still image. This is a big negative for Piper; downloading video or snapshots should be a basic feature of any security system.
On a more positive note, Piper has battery backup (three non-Lithium AA batteries) and can record video on battery power for 4-6 hours. I tested this and it seemed to work well.
Video and Image Quality
Updated: 8/2/15
Now that the ability to download clips is available, we can show day and night motion videos for Piper. First, let’s look at Piper during the day. Note videos download from the Piper Mobile app as a 1536 x 1088 MP4 file. Here’s the day video.
Piper nv Motion Indoor Daylight
Right off the bat you’ll probably notice two things I mentioned earlier, the very staticy audio and dramatic fishbowl effect. The microphone on Piper is very sensitive and can’t be adjusted. It would be nice to see some microphone tweaking options in the Piper app.
The fishbowl effect is largely due to the huge 180° viewing angle. Notice the couch on the right side of the video? It’s actually directly beside the camera! The image quality is good, however facial recognition would be low due to backlighting. You might also notice that the Piper videos are always about 35 seconds in length, as noted in the review.
For comparison, here is Canary’s day video.
Canary Motion Indoor Daylight
Now let’s look at a night video.
Piper nv Motion Indoor Night
The night vision of Piper is pretty good. When compared to Canary’s night vision (below) you can see that Piper lights up the scene deeper. This can be seen when looking at the door on the opposite side of the room, which is more lit up with Piper. Everything does look farther away with Piper due to its larger horizontal viewing angle. Video is crisp without any visible lags or delays. In both videos you can see dust particles that are always very visible with infrared light. Overall both cameras look good, especially as I walk within 10 feet of the lens.
For comparison, here is Canary’s night video.
Canary Motion Indoor Night
Since I already have them, I’ll leave in the screenshots included before I had the video clips. In both pictures, I have markers every 5 feet and am standing at the 25 foot mark.

Piper Day Image
The day image has an obvious fishbowl effect, which is due in part to its generous 180° field of view, which is very impressive. The colors are good and the image is sharp. On the right side of the picture is a metal frame that is 4 feet below the camera directly to the side of it.

Piper Night Image
The night vision is decent, but doesn’t light up the room as Canary did, nor is it as sharp. For comparison let’s look at the last camera we reviewed, the Canary.

Canary Night Image for comparison
Bandwidth used for video was hard to measure on the Piper since I had trouble getting motion to record on demand. Live Video feeds when on a local network are via Wi-Fi directly to the mobile device and do not go over the WAN through the cloud, so I couldn’t measure bandwidth at the router when at home. However, Piper does recommend a minimum internet upload speed of 800 kbps in order for Piper to work well. As noted earlier, bandwidth limits can be set separately for Wi-Fi and cellular connections.
Closing Thoughts
Updated 8/2/15
If you’ve been trying to decide between Piper / Piper nv and Canary, my vote is for Piper, no contest. Piper simply makes a better all-in-one security system because it can use its sound, light and temperature sensors to trigger security events, while Canary triggers only on motion detection and only lets you look at its temperature and humidity sensors.
The difference between the two products is clear in Table 2, which compares only their security-related and support features.
| Piper nv | Canary | |
|---|---|---|
| Trigger on motion | Y | Y |
| Trigger on temperature | Y | N |
| Trigger on sound | Y | N |
| Trigger on window / door open | Y (requires optional Z-Wave sensor) |
N |
| Trigger on humdity change | N | N |
| Trigger on water detection | N | N |
| Two-way audio | Y | N |
| Night vision | Y | Y |
| Pan / tilt / zoom | Y (digital) | N |
| App alert | Y | Y |
| Text alert | Y | N |
| Email alert | Y | N |
| Phone alert | Y | N |
| Multiple devices | Up to 5 | Up to 4 |
| Phone support | Y (US, UK, France, Italy toll-free) |
Y (US only) |
| Email support | Y | Y |
| Chat support | Y | N |
| FAQ | Y | Y |
| Video tutorials | Y | N |
| Save video clips | Y | Y |
Table 2: Security feature comparison – Piper nv vs. Canary
For $30 more, Piper nv not only enhances home security, but also lets you try out simple home automation via its integrated Z-Wave controller. And support was responsive, both via online chat (U.S. East Coast business hours, weekends included) and email tickets.
All-in-one security systems aren’t for everyone. But if they fit your needs, I’d give Piper nv the first shot at a place in your home.
Buy Piper nv Wi-Fi Surveillance Camera & Security System from Amazon