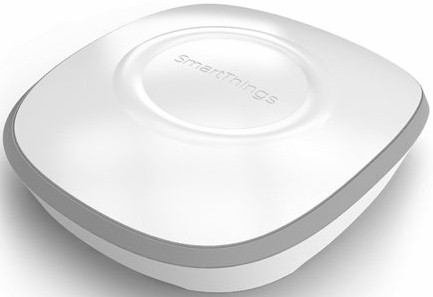
| At a glance | |
|---|---|
| Product | SmartThings Hub (STH-ETH-001) [Website] |
| Summary | Smart Home Hub supporting a wide selection of Zigbee, Z-Wave, and Wi-Fi sensors & devices. |
| Pros | • Supports many H.A. devices • Supports ZigBee, Z-Wave, Wi-Fi • Support for IFTTT (If This Then That) • Many included SmartApps for each sensor/device |
| Cons | • Lacks support for Lutron Clear Connect and Insteon products • Requires wired Ethernet connection to router • Requires Internet connection |
Typical Price: $99 Buy From Amazon
Introduction
Whether you call it Smart Home or Home Automation, an increasing number of companies want your business. But the SH/HA market remains fragmented. So decisions you make for your first purchase will, in many ways, determine what you’ll be able to do with your SH/HA in the future. The software that ties all the devices together is the most important component of a Home Automation system and support for a broad spectrum of home automation devices is key.
Like many new SH/HA companies, SmartThings started on Kickstarter in summer 2012. It made it successfully to market in 2013; so successfully that it was acquired by Samsung for $200 M in August 2014. So far, Samsung seems to be keeping to its agreement to let SmartThings operate independently.
SmartThings seems to realize the importance of system software and broad device support, emphasizing "one simple app" control in its marketing. And its Compatible Products page has an impressive number of devices, enough to require sorting by category and filtering by brands and protocols to help you find supported devices.
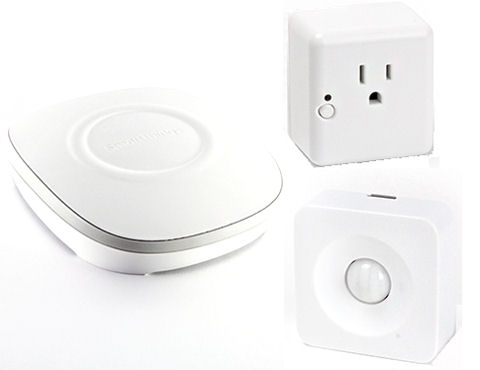
SmartThings Hub & devices
As with most Home Automation systems, the heart of the system is a Hub. The SmartThings Hub, shown above, requires a wired Ethernet connection to your home network. It communicates with sensors using built-in ZigBee and Z-Wave radios. It also can link to devices via your network’s Ethernet and Wi-Fi connections. While these methods allow connection to a significant number of sensors types and brands, other Hubs such as the Staples Connect and Wink Hub also support Bluetooth and Lutron Clear Connect.
In this review, I’ll be taking a look at the SmartThings Hub ($99.00), SmartSense Motion Detector ($49.00) and SmartPower Outlet ($55.00). SmartThings offers several money-saving starter kits that bundle a Hub with additional sensors, like the $199.00 Smart Home Starter Kit that includes a Hub, motion, Open/Closed and Presence sensors. You can purchase SmartThings products either from SmartThings directly, or Amazon’s SmartThings Store.
Inside
The inside photo of the SmartThings Hub was grabbed from the FCC ID filings. There are also a nice set of photos by Ashu Joshi in this flickr album.
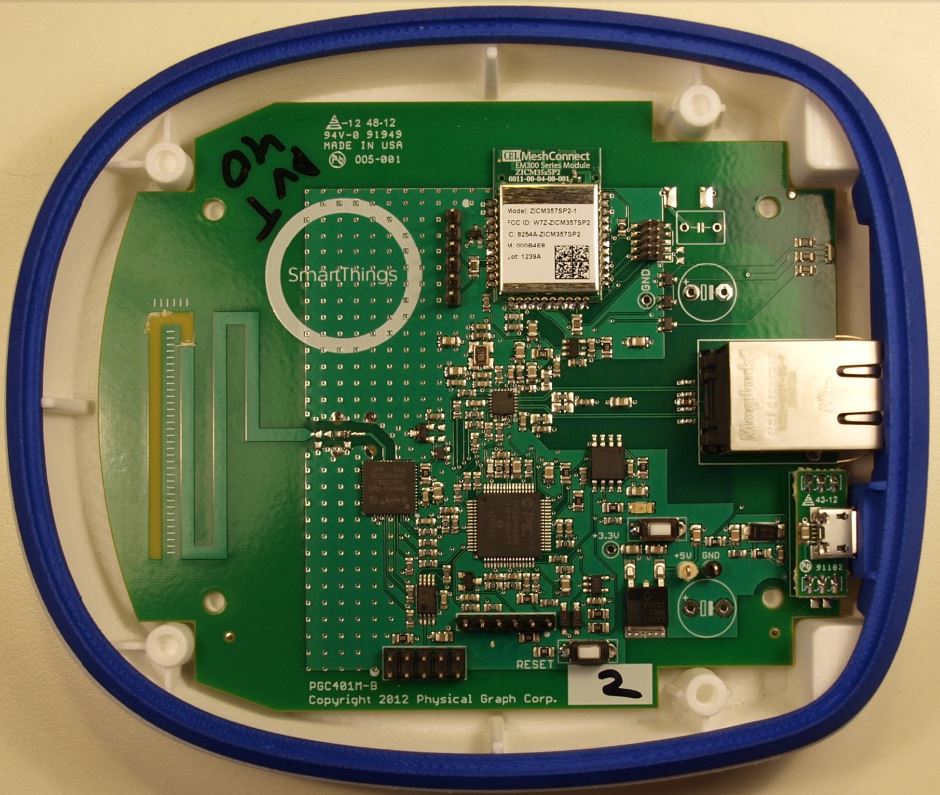
SmartThings Hub inside
As noted earlier, the Hub has ZigBee and Z-Wave radios. It relies on your router to connect to Ethernet and Wi-Fi based devices,. The California Eastern Labs (CEL) module uses a Silicon Labs EM357 transceiver chipset and has 192 KB of flash and 12 KB of RAM inside.
| SmartThings Hub | |
|---|---|
| CPU | Microchip PIC32MX695F-512H 32 Bit Microcontroller |
| Flash | 512 MB (in CPU) |
| RAM | 128 MB (in CPU) |
| ZigBee | California Eastern Labs ZICM357SP2-1 EM357 MeshConnect Mini Module |
| Z-Wave | Sigma Designs ZM4101AA-CME3 |
| Ethernet | SMSC 8720A 10/100 Ethernet PHY |
Table 1: Component summary
Setup
Like most Home Automation products, setting up the SmartThings Hub is trivial. The printed Quick Start Guide instructs you to point your browser to www.smartthings.com/start. The setup instructions are so short and simple that I’ve included a screenshot below.
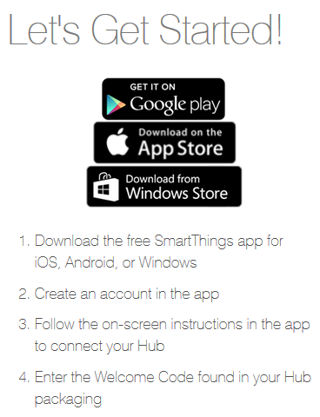
SmartThings Setup Instructions
Virtually every Home Automation system requires you to create an account to communicate with the product’s back end servers and SmartThings is no exception. The entire setup is done within the mobile application. The app guides you through connecting your Hub to your Ethernet network and connecting the Hub to power.
As part of the setup process, the app asks for permission to access location services, lets you choose a background photo for the UI and asks you to set the location of the Hub on a map. This help SmartThings determine your time zone. The setup step instructs you to enter the six character Welcome code that is on the start of the “Let’s get started” guide.
My setup experience was nearly flawless with one exception: I received an error code after entering in the Welcome code. We purchased our refurbished review sample from Amazon and the Hub had been previously registered to another account. While the device was reset to factory defaults, the device still needed to be disconnected front the previously-registered account.
SmartThings does not offer telephone support, but my email to their tech support was answered promptly. Before clearing the account, the support engineer asked me for a photo of the bottom of the unit showing the bar code and serial number. That’s a good security precaution. Shortly after I emailed the photo, I received a notification that the link to the previous account was cleared and the Hub connected to my account as expected.
Once Hub setup is complete, you are ready to start adding sensors. I wanted to try out a couple of non-SmartThing devices in addition to the two ZigBee SmartThings sensors I had (Motion and Power plug). So I factory reset a WeMo Smart LED ZigBee bulb and two GE-Link LED Z-Wave bulbs. SmartThings lists the WeMo bulb as supported by the SmartThings app, but not the GE bulb. But SmartThings’ support site said the GE-Link bulb should also work. It did, and I added two GE-Link bulbs.
As I have noted in other SH/HA reviews, I checked whether the SmartThings system could function without a working internet connection. And like all systems tested so far with the exception of Belkin’s WeMo, SmartThings stopped working when the internet connection went down. The company seems to recognize this as a weakness. According to this blog post, its V2 Hub will support "certain automations" when the internet dies.
Dashboard Tour
After completing setup, you’ll land at the Dashboard page. The screenshot below shows the dashboard after I installed five devices and created some alerts and actions. During the setup procedure, I customized the wallpaper at the top. The menu icon at the top left of the screen provides access to “Shop”, “My Account” and “Support” and lets you change modes to “Home”, “Away”, or “Night”. These modes are used when creating actions or alerts to instruct SmartThings when to execute them.
The message bubble at the right top of the screen shows you in-app notifications and alerts. Below the image there are shortcuts to the motion sensor and each of the lights and switches. “Things” is a top level menu for all installed devices. The SmartThings Internal shows the installed app for IFTTT (If This Then That). Finally at the bottom of the dashboard, there’s a large “+” icon. You’ll use this icon frequently, as it is used to add devices, create notifications, add actions, access the SmartThings Labs and access categorized SmartApps.
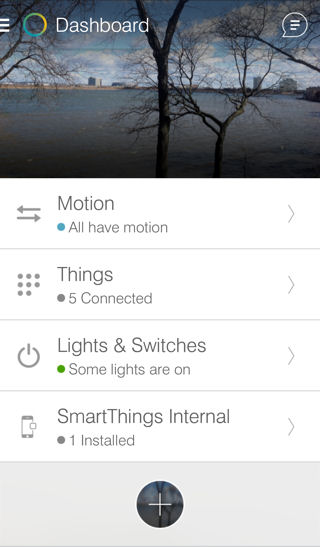
SmartThings Dashboard
The composite image below shows the Things menu (left) and the Settings menu for one of the installed light bulbs (right). You can tap on any of the devices you can control (lights, switches, etc.) and they will change state. Each device icon has a settings icon in the upper right corner. If you tap it you’ll see options for the device. In the case of the light bulb, it shows the current state (on/off) and brightness level. Tapping on the light bulb icon in this screen will also toggle it on/off. Below the light is a dimmer slider.
All devices have icons for Refresh, SmartApps, preferences (device name, dimming options, etc.) and an activity log. The one thing I don’t like about the Things menu is the lack of names. As you can see, I installed three light bulbs, but can’t really tell which light is which because the device name doesn’t appear on the top menu. You have to go into the setup menu for the device to see the device name at the top of the screen. To help differentiate the lights, I’ve used different icons for each bulb, but I still have to remember which icon corresponds to which bulb, or go into the setup menu.
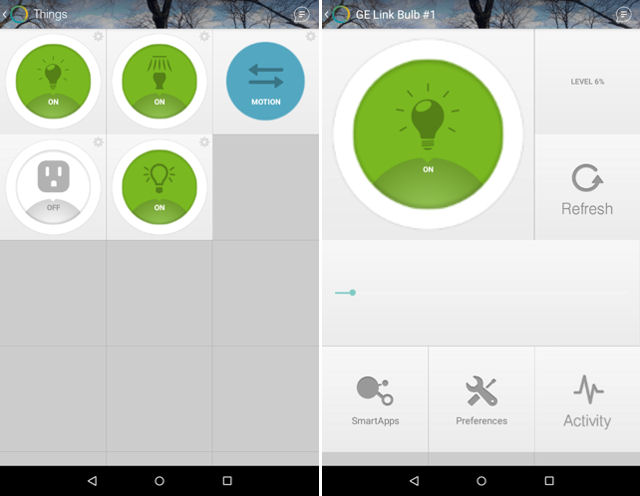
SmartThings “Things” device menu (left) and device setup menu (right)
Adding Things (devices)
After you have completed setting up the Hub, you’ll want to add devices, so click on the “+” on the bottom of the dashboard screen. The “Things” SmartSetup screen will appear as shown in the left image below. You can either just click “Connect New Devices” to have the Hub scan for anything, or you can select a category (center image) to show all of the supported devices in a category.
The right image shows the detail for the selected SmartSense Open/Closed Sensor. Your options are Connect Now, Top Alerts and Actions, Instruction Manual, Instruction manual, Installation video (if available), a link to Buy Now and finally any support articles related to the selected sensor.
After the Hub discovers the new device, you are given an option to rename it and select from a list of “Top Alerts and Actions” to install immediately. SmartThings suggests discovering the exact device from the appropriate category list if you are having trouble discovering a device using the generic Connect New Device option.
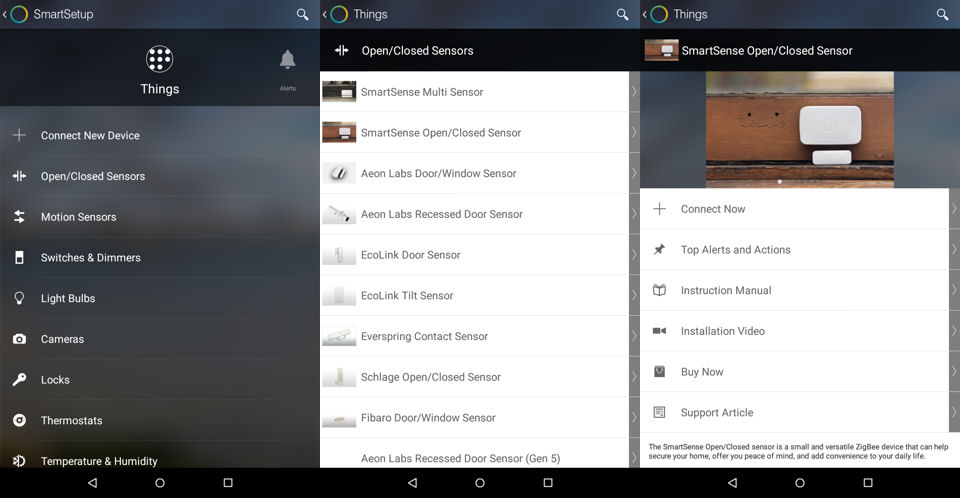
SmartThings Add Things categories (left), supported devices (center) and options for a specific device (right)
Adding Alerts and Notifications
To add Alerts and Notifications, tap the “+” icon at the bottom of the dashboard and navigate one icon to the right of the “Things” and tap on Alerts. Alerts will notify you if a certain condition is met. Alerts can be either an in-app notification, text message or both. While some products like WeMo rely on third party support from IFTTT in order to do external notification, text messaging of alerts is built into the SmartThings app. However, if you want email notification, you’ll need to use IFTTT.
In the screenshot below, I set up an alert for my front hallway. From the Alerts menu, tap Motion (left image), Select Notify me if there is motion while I’m away from home, select the installed motion sensor that you want to use (center image), then fill out the preferences page (right image). Note: Not all steps listed are included the composite screenshot below.
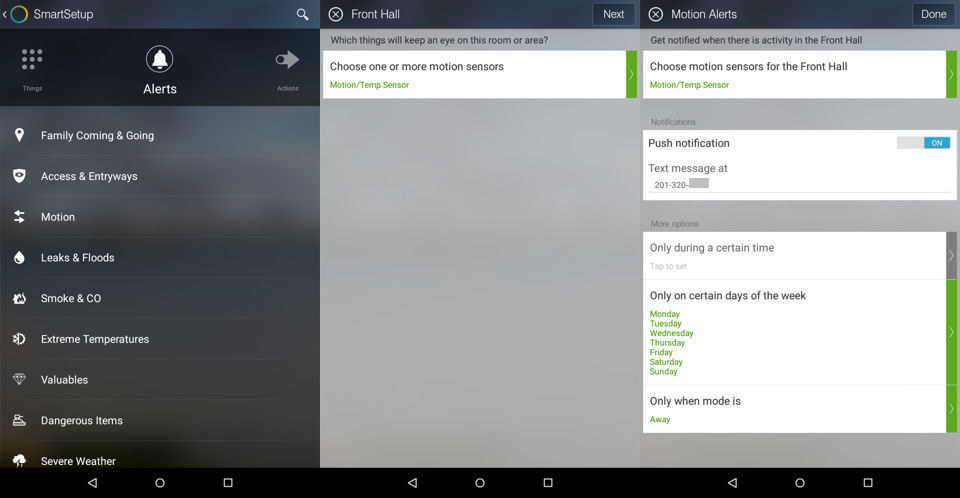
SmartThings Add Alert – Alert Categories (left), Select Sensor (center), and preferences (right)
There’s a lot going on in the right screen. You can choose push notification and/or text notification, you can set limits on when alerts are given, choose days of the week for alerts, and finally, choose which mode(s) to alert. SmartThings comes pre-configured with Home, Away and Night modes, but you can add your own modes. You can select any or all modes for alerting.
In the example above, I set the alert mode for “Away”. While testing, I set up multiple alerts for combinations of in-app notification, text notification and both and tested to ensure that proper notification was received for the specified mode, and that no notifications were received when other modes were selected. All notification and alert tests worked as expected, and there was very little lag time between the motion detection and the receipt of the notification (1-2 seconds). Motion alerts configured appeared in the SmartApps section for the Motion Sensor device setup.
Create Actions
Creating actions is very similar to creating notifications. From the dashboard screen, navigate the top menu to Actions. For the composite screenshot below, I selected Motion category (left image). Next I selected lighting to bring up some pre-configured SmartApps and selected “Turn on when there is motion” (center image). Next you choose the action device (one of the light bulbs), the motion sensor. You can set the dimmer for the light bulb from 0 to 100% in 10% increments.
Optionally, when the motion stops, you can specify how long the light remains on. Finally, you have the same time, days of week and mode options as for creating notifications. There are also SmartApps for simpler functions such as turning lights on/off at a specific time. SmartThings supports Sunrise and Sunset scheduling.
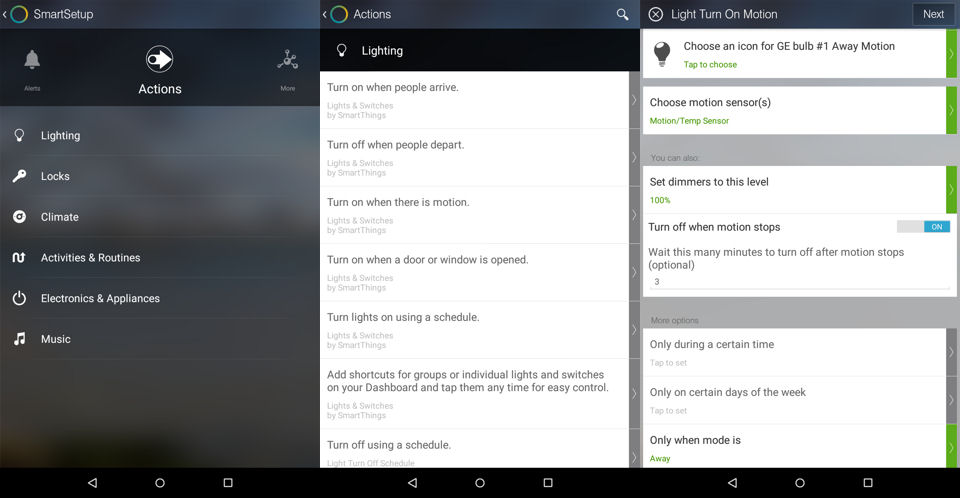
SmartThings Add Action – Choose Lighting under Motion category (left), Select SmartApp (center), Configure SmartApp options (right)
As with alerts and notifications, I created quite a few actions to test both turning lights on based on motion as well as on various schedules. All worked as expected. Some actions were created created using my iPad and others were created either on my Nexus 7 or my Android phone. All actions created on any platform were available on the other platforms.
Other Functions
To the right of the Actions menu, you’ll find the “More” menu. This menu seems to be a catch-all of the various lifestyle apps as well as the SmartThings Lab where you’ll find the latest apps from SmartThings and third party developers. The composite screenshot below shows the categories under the “More” menu (left image), a partial listing of SmartThings Labs (center image) and the Safety and Security category (right image). There are a couple of interesting apps under Smart Things Labs – Integration of the Logitech Harmony Hub with SmartThings, and the ability to trigger Logitech Harmony Activities. I’ll be covering the Logitech apps in a separate review.
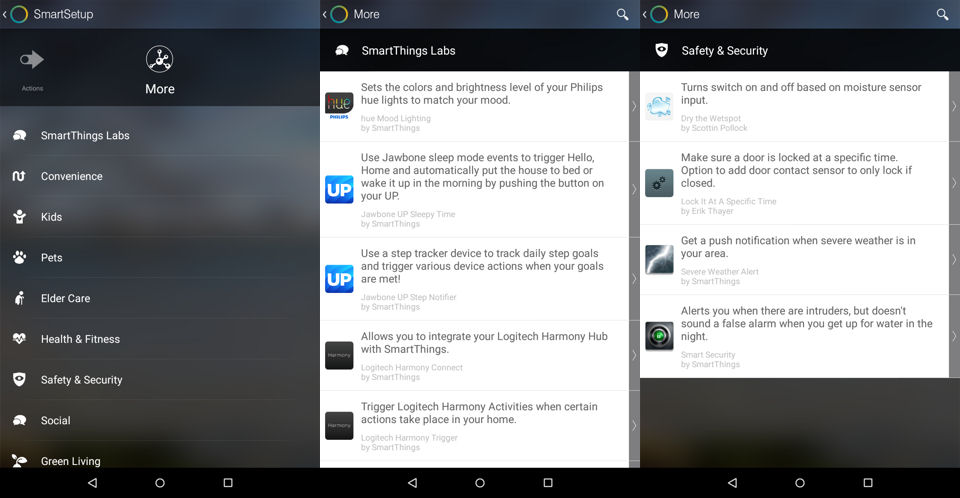
SmartThings More Menu – Category listing (left), SmartThings Labs partial listing (center) and Safety and Security apps (right)
SmartThings Sensors
As part of this review, our hardware included two SmartThings branded sensors shown in the image at the top of the review. The composite screenshot below shows the device pages from the “Things” dashboard page for the SmartThings SmartPower Outlet (left) and the SmartSense Motion sensor (right).
The SmartPower Outlet is an on/off plug that is controlled by the SmartThings app. It measures the power currently flowing through the plug, but you can’t take any action based on power consumption. The green icon reflects that state of the plug, and you can turn the plug on/off from this menu as well as from the Things menu one level up. As expected, there were no problems encountered with discovering the SmartPower Outlet.
The SmartSense Motion sensor only detects motion. Tapping the icon does do anything. If motion is detected, the icon will turn blue and show “Motion” The sensor also measures temperature. You can select which one shows up in the “Things” menu by clicking on the dot near either the motion icon or the one to the right of the temperature indicator.
As with the SmartPower Outlet, there were no problems connecting the SmartSense Motion sensor to the Hub. I just pulled the battery protection plastic tab, clicked connect now and it showed up. I did have one concern, however. The battery in the motion sensor started out at 100%. Over the course of 3 days, it dropped to 77%. However, it was in my office and was constantly detecting movement and sending data back to the SmartThings app. Today, I moved the sensor to a room with less motion and battery levels didn’t drop any further.
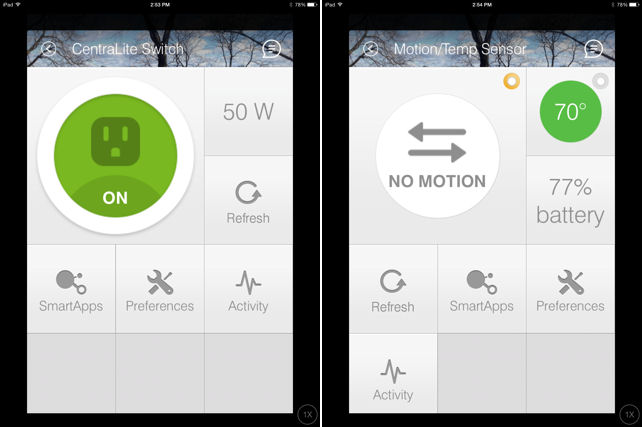
SmartThings SmartPower (left) and SmartSense Motion sensor (right)
IFTTT
SmartThings works with IFTTT. In fact, there are currently 304 active recipes available for SmartThings. Connecting your Hub to IFTTT is really easy. There aren’t any authorization codes like WeMo Link requires. When you first go to the SmartThings page, you are prompted to log into your SmartThings account. From there, you can connect your Hub to IFTTT.
I created a recipe to send me a text message when motion was detected. The recipe ran as expected. However, that recipe actually duplicates a native capability found under Alerts and Notifications. I didn’t really need IFTTT for that kind of notification. Other actions, such as logging events to a Google Doc spreadsheet or sending email notification require IFTTT.
Mobile Clients
As noted in the introduction, there are mobile clients for Android, iOS and Windows mobile devices. The iOS app is an iPhone app and is optimized for that screen format. I switched freely between my Nexus tablet, my Samsung S5 and my iPad and the applications worked the same way on all three devices. Sharp eyes may have caught that the screenshots for the SmartThings sensors were done on the iPad. All of the rest of the screenshots were done on the Nexus 7 because more information fit onto the Nexus’ screen than onto the 2X iPhone app on the iPad.
In general, I preferred the Android app because of the additional content available on the screens. The Android apps didn’t give me any problems on either my tablet or phone. On the iPad, the program hung several times and I had to force close the app. I tested each of the mobile platforms on an “off-LAN” public network. All mobile devices were able to connect seamlessly with the Hub. While you could notice some additional latency due to being routed through the Internet, the response to on/off commands were still very acceptable.
Closing Thoughts
SmartThings’ Smart Home system follows Securifi’s Almond+ as the second product I’ve reviewed that supports multiple communication protocols and can connect to a large number a various sensors from different manufacturers. I was able to include the non-SmartThings branded GE-Link and WeMo LED smart bulbs into a basic HA system that also included the SmartThings power plug and motion sensor.
However, the ZigBee-based sensors that came with the Almond+ review sample didn’t connect to the SmartThings Hub. In fairness, they were not on the list of compatible devices. Reviewing the list of compatible sensors, you can see that you can build a very robust HA system that could include security, entertainment, convenience and control features. I was disappointed, however, that the only cameras on the supported list were Dropcams.
SmartThings is attempting to be universal with mobile apps for iOS, Android and Windows Mobile. I was only able to test the apps on iOS and Android. The apps installed and ran smoothly on my iPad, Nexus 7 and Samsung S5 phone. At this point it time, I’d have to give the Android app a slight edge as the iOS app is optimized for the iPhone. On an iPad, it really doesn’t take advantage of the added screen real estate. I also had the iOS app hang several times. The menus and capabilities of the apps on the two tested platforms are very much the same, so users of both platforms have only one learning curve to climb.
The SmartThings app is robust and fairly intuitive. Initially I had a little trouble figuring out how to set things up. I feel the UI isn’t quite as easy to navigate as the WeMo app. However, as you add devices, the SmartThings app suggests some of the top notifications and actions you might use for each device. And, as you add devices, there are links to instruction manuals, installation videos (if available) and FAQs to provide you with support—a helpful touch.
The SmartThings app includes both in-app and text messing notification options. In contrast, external notification for WeMo relies on IFTTT,and the Almond+ supports neither external notifications, nor IFTTT. SmartThings has strong IFTTT support, with over 300 recipes published by IFTTT community members. But many of the recipes duplicate notifications and actions that can be done by the SmartThings app.
With only two systems under my review belt, it’s too early for me to say SmartThings has the best Home Automation system in the market. But for now, SmartThings checks most of the boxes on my must-have list: multi-vendor sensor support; robust mobile app support; remote access; and IFTTT support. Stay tuned to see how other universal Hubs stack up.
