Introduction
| At a Glance | |
|---|---|
| Product | WiLife LukWerks Digital Video Surveillance System |
| Summary | User-friendly powerline-based network camera system handling up to six cameras |
| Pros | • Easy setup • Sophisticated capabilities • Good-quality video • HomePlug networking allows flexible camera placement |
| Cons | • Windows and Internet Explorer only • Requires PC to be up and running for usage • Remote viewing requires WiLife Web site • Email alerts requires SMTP authentication |
When we had a problem with an arsonist in my neighborhood, I thought perhaps installing a visible network-security camera would at least persuade the guy to have second thoughts about targeting my house. The first network camera I tried was an inexpensive unit from Hawking Technologies. This camera, although flexible and easy to set up, suffered from numerous issues, which made it inappropriate for serious use. What I needed, along with flexibility, was reliability in a unit that would give me high-quality images.
In this review, I’ll take a look at a higher-end network-security camera setup from WiLife, Inc., which advertises ease-of-use, “view-anywhere” capabilities, and a motion-alert feature that can send you an email alert if anyone approaches the house. WiLife brands its camera system, “LukWerks,” and sells a number of different components.
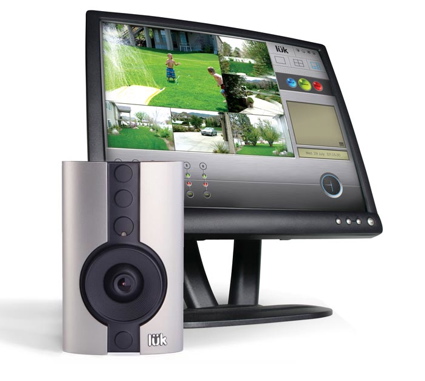
Figure 1: LukWerks Digital Video Surveillance System
For this review, I was supplied with a starter kit and one outside (outdoor) camera. Figure 2 shows the outside (outdoor) camera, and Figure 3 shows the basic starter kit.
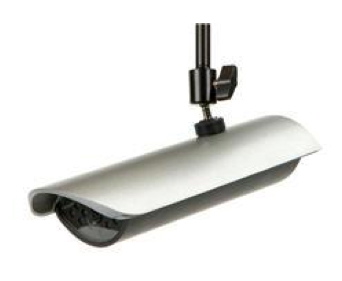
Figure 2: Outside Camera
The basic starter kit includes one inside camera, network connection hardware, and a Windows-only software package that is capable of managing six network cameras.
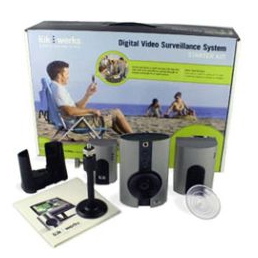
Figure 3: Starter Kit
While unpacking the starter kit, I took notice of LukWerks’s “interesting” network components. Instead of wireless networking or standard Ethernet connections, the system uses HomePlug networking, which enables you to run a network over the existing power lines in your house. For the camera setup, it means that you won’t have to worry about stringing Ethernet cables around or messing with a wireless network. Although the HomePlug standard used (1.0) is fairly low-speed, around 14 Mbps, it’s sufficient for a few security cameras.
Setup
Before hooking up any of the hardware, follow the setup instructions to install the software; it is the first step to getting your system working. Figure 4 shows the Welcome screen of Werk’s basic software installation.
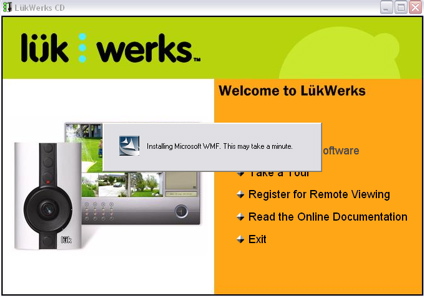
Figure 4: Software Installation
The installation process took quite a bit of time because of the number of required components that needed set up. Once the base package was installed, I was directed to hook up the camera hardware. Because it was my first experience with setting up HomePlug, it took some familiarizing since the outside camera had no separate network connector. All I had to do was plug the camera’s AC power cord into a nearby outlet and let HomePlug work its magic.
The inside camera (shown in Figure 4) seemed a bit out of the ordinary as well. It had no power cord. Instead, it uses Power Over Ethernet that is supplied via an Ethernet connection that plugs into a HomePlug adaptor (shown in Figure 5). The adaptor, in turn, plugs into an electrical outlet. Now, to position the camera, place the camera “suction-cup” on the front of the camera and attach the camera to an inside window so that the camera looks outward.
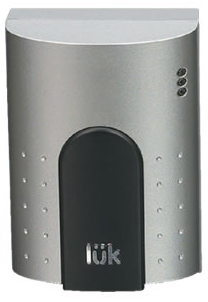
Figure 5: Homeplug Adaptor
For feeding the output of the cameras to the computer, a USB (to the HomePlug adaptor) is provided that plugs into an electrical outlet, and then to the computer via a USB 2.0 cable. Once I finished the setup and had everything plugged in, my cameras appeared in the main application. All in all, the setup was very easy. The cameras were auto-discovered and their videos appeared in the appropriate panels on the management application screen.
In Use
Figure 6 shows the basic camera-management screen. The screen shows both the inside camera, which is pointing out my front window, and the outside camera, which is sitting on my back porch.
Figure 6: Camera Application (click image to enlarge)
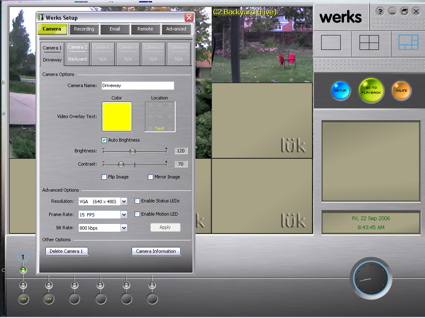
Note that the screen provides space for up to six cameras. You can arrange the screen in various ways such as sizing it so that one camera takes up the entire space or evenly dividing up the space between the cameras, and so on. Both outside and inside cameras have a maximum resolution of 640 x 480 and were advertised to deliver up to 15 fps (frames per second) of live video.
The Werks application is the heart of the surveillance system and must be running at all times in order to manage, monitor, and record. If you are not actively monitoring your cameras, the application can be hidden, so that it still runs in the background to monitor and record. Figure 7 shows the Setup Camera screen where you can define camera attributes such as label, color, and position.
Figure 7: Label Setup (click image to enlarge)
Change-detection is an important feature for these types of security monitoring cameras, since you don’t want to always watch your cameras. Most of the time, you want to be notified or alerted when something unusual occurs. The Werks application provides a fairly sophisticated change-detection capability. Figure 8 shows the Recording Setup screen where you can set up motion detection for each camera individually. From Recording Setup, you can define how much change is relevant and mask out which portions of the camera to monitor for change.
Figure 8: Change Detection Setup (click image to enlarge)
You can define up to 16 “zones” for each camera, which is useful when you want to eliminate and restrict detection in areas. For example, Figure 8 shows the picture for “C1 Driveway (Live)” with three cyan-bordered rectangular areas where I wanted to eliminate detection because I wanted to restrict the change monitoring to only my driveway. When a change is detected, the video of the event is recorded to your hard drive for later review. During the application setup, I allocated a fixed amount of disk space for video recordings. When the allocated space is exceeded, old recordings are deleted.
In Use, continued
Figure 9 shows a portion of the Playback Navigation screen. On this video review screen you can scroll back and forth in time, looking for, and viewing change events.

Figure 9: Video Review
Videos of an event can be protected from deletion or saved for permanent storage. This capability worked well and was easy to use. As far as change-detection itself, I found that it worked pretty well, with the exception that it still flagged cars driving by that were well outside of the zones I defined. Changes occurring inside my zones were consistently detected. Figure 10 shows the detection of a delivery man walking up my driveway with a package. You can see that the picture quality is pretty good.

Figure 10: Change Detection Event
This camera had a manual focus that I found a little bit difficult to get right, but once it was set up, it returned a nice picture. WiLife advertises up to 15 fps (frames per second) of live video, and my testing showed that the figure they gave was fairly accurate unless there was a lot of movement.
Figure 11 shows a screen capture taken during a rainstorm. During this period, I was lucky to get 5 fps (frames per second); the picture quality suffered as well. If our neighborhood arsonist were to strike during a rainstorm, we wouldn’t have much chance in identifying him from such a picture.
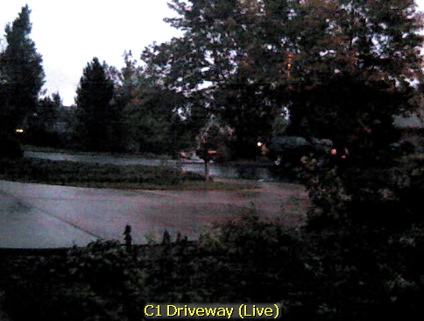
Figure 11: Rainstorm Capture
I also wanted to try the system out at night since that was the most likely time for our arsonist to visit. The camera I was testing was not designed for low-light usage, but WiLife does sell an add-on device that does IR-illumination for night usage. Since I didn’t have this add-on device to test, my nighttime picture (shown in Figure 12) came out very dark.
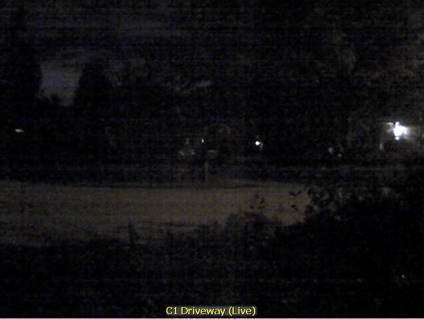
Figure 12: Nighttime Capture
Motion Alerts
Another important feature in security cameras is remote notification. It’s great to be able to use the viewer to scroll back in time looking for events, but often you’ll want to get a notification if something occurred while you’re not home. For example, you could set up an interior camera to monitor the front door so that when the door opens, you’ll get an alert.
WiLife provides a couple of different ways to deliver remote alerts. Figure 13 shows the Email Setup screen where you can define how you want to get your email alerts.
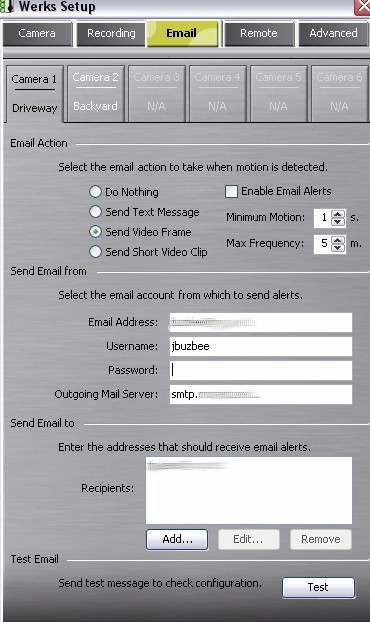
Figure 13: Email Setup
The features looked pretty complete, but when setting up this capability, I quickly ran into a limitation. The “Send Email from” section allows you to provide the outbound mail server the device can connect to and send an alert from. That’s fine, but I had to enter a username and password for my SMTP server, and the problem was that my ISP, Comcast, didn’t use usernames and passwords to verify account usage. Comcast limits the usage of its server to machines using an IP address they control.
To use the email alert feature, I had to find another SMTP server that would accept username and passwords. Luckily I had a free gmail account that included such a server, but your mileage may vary. Some ISPs, in order to reduce spam, block all outbound SMTP traffic, instead of insisting that all mail go through their own server. Hopefully WiLife will make entering a username and a password optional in future software releases.
Once I had the gmail account set up, I started getting alert emails. As you can see in Figure 13, there are three types of email alerts that can be sent. Text-only, is just that: you get a plain-text email indicating that a motion alert has been fired, which camera it was on, and what time it occurred. The “Video Frame” option gives the above information with the addition of a jpeg image of the event. The last option is to get emailed a short video clip of the motion event. The video is encoded in a Windows Media Video (WMV) format, so you’ll have to make sure the recipient of the video can handle WMV files.
You’ll also need to be careful about setting up your motion parameters. Some of the short videos I received were nearly four megabytes, so if you’re getting a lot of alerts, your mailbox could fill quickly. As well as email, you can also set up the system to send an alert to your cell phone. Figure 14 shows the setup screen where you can enter your phone number and provider.
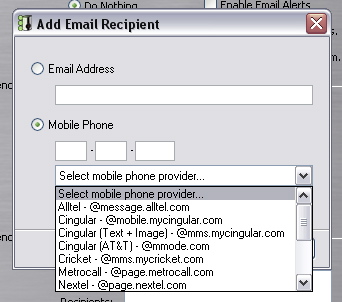
Figure 14: Cell Phone Setup
I did a quick test of this feature by forwarding alerts to my teenage daughter’s cell phone. I thought it was pretty cool, but she got annoyed quickly; so, I suggest using this carefully. In addition, some cell phone services drop picture and video attachments. So depending on your plan, you may or may not be able to receive images or video alerts via a cell phone.
Remote Capabilities
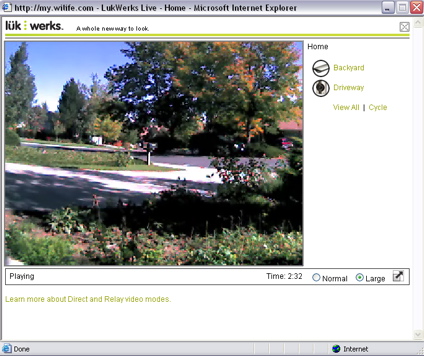
Web-based viewing is another remote capability that WiLife provides, enabling you to monitor live video from your cameras while you’re away from home. To access this capability you need to log into a free account on the WiLife Web site. My tests showed that web-based viewing worked well. Everything was set up automatically and worked without any special configuration such as port-forwarding, firewall management, and so on.
I was a bit disappointed, however, that web-based viewing was an Internet Explorer-only feature. You’re out of luck if security considerations have driven you to Firefox, or if you’re like me and use a Macintosh for day-to-day usage. Figure 15 shows my video being accessed via Internet Explorer while I was logged into the WiLife Web site.
Figure 15: Web Viewing (click image to enlarge)
It’s hard tell from this picture, but the video quality was quite a bit poorer than the local application, but this is to be expected since there’s a lot more bandwidth available on the local LAN. The web application allowed me to pick either of my cameras for viewing. I could cycle between them, or I could view them both simultaneously as shown in Figure 16.
Of course, when I was viewing both of the cameras, the picture quality suffered even more. This remote capability would be OK for general monitoring, but you wouldn’t want to use this video to try to identify a person.
Figure 16: Viewing Two Cameras Via the Web (click image to enlarge)
As far as frames per second through the web, there wasn’t anything to tell me what my rate was, but it was pretty low, maybe 5-6 fps (frames per second). Another issue is that your home computer must be up and running the management application. So, if you want to use this system for monitoring a vacation home or other remote site, you must dedicate a computer for this use and always have it running, thereby increasing the overall cost of your setup.
In contrast to this setup, the Hawking camera I reviewed previously was a stand-alone device that could support remote viewing and management without any special software or vendor accounts. An issue with the LukWerks system is that remote camera viewing is tied into your WiLife account. Decking out a full-featured surveillance system could set you back a couple of thousand dollars, but if WiLife went out of business or moved on to other pursuits, you may be stuck without a way to remotely view your expensive system.
Under the Covers and Closing Thoughts
According to WiLife’s documentation, each camera runs an embedded 400 MHz processor that internally encodes a 640 x 480 video stream to WMV, version 9, in real-time at 15 fps (frames per second). As mentioned above, these cameras sit on a HomePlug network that is only accessible from a HomePlug-connected Windows system. Checking out the settings on my Windows network, I could see that this HomePlug network was configured in a private 172.29.xx.xx range.
I couldn’t access this private network from my Linux or my OSX systems, so my poking around was limited to the tools I had on my Windows XP laptop, which were pretty minimal. I used the “netstat” tool to find the IP addresses of a camera, and “telnet” to find out that the video stream was coming from port 8080 on the camera.
To see if I could view the video using an outside application, I fired up VLC, the Swiss-army-knife of video players. Pointing VLC at port 8080 on the camera rewarded me with a live video stream. The video paused after a few seconds, but the result at least showed me that the video stream coming off the camera was pretty standard and it was possible to access the camera with alternate viewing applications.
As a home monitoring and security solution, I found the LukWerks system to be first-class. Its motion-detection and recording features were complete and easy to use. Setup for the system was a breeze. And the expandability of it all means that you’ll be able to add coverage easily as the need arises.
But of course, you’ll pay for this sophistication. The base system can cost around $230, but fully deck it out with six cameras, IR-illuminators, and other options and you’ll be paying more in the $1700 range.And with a full compliment of six cameras, the recommended PC to run it all on is a high-end 3 Ghz model. Even with the base system and depending on your usage, you may need a dedicated PC just for handing your cameras.
Another drawback of the system is the reliance on the WiLife Web site for remote viewing. There’s no guarantee that WiLife will still be around in a couple of years to support the remote-viewing capability. It would be nice to have the ability to directly contact your camera with your web browser without going through the WiLife site. Along those lines, I was also disappointed that the only way to remotely view the cameras was through Internet Explorer. That’s a showstopper for Macintosh users like myself and a drawback for fans of other browsers like Firefox.
But if the price of the system is within your budget, and you’re a Windows user who doesn’t mind using Internet Explorer, you’ll find the LukWerks surveillance system a powerful setup for keeping the bad guys at bay. And speaking of bad guys, our neighborhood arsonist is now safely behind bars, and it didn’t take a genius to track him down. The locations of the three fires pretty much formed a semicircle around his house and enabled him to watch the flames from his window. It turns out he was also the “hero” who warned the neighbors that their house was on fire. Sometimes instead of a sophisticated security system, you just need to rely on a dumb criminal and a bit of old-fashioned police work.


