Introduction
This article has been superceeded by How to Crack WEP…Reloaded.
In Part 1 of How to Crack WEP, we showed the basic approach to WEP cracking, configured a practice target WLAN and configured both sniffing and attack computers. We also introduced the Auditor Security Collection and used Kismet to find in-range wireless LANs.
In this article, we will describe how to use additional tools found on the Auditor CD to capture traffic and use it to crack a WEP key. We’ll also describe how to use deauthentication and packet replay attacks to stimulate the generation of wireless traffic that is a key element of reducing the time it takes to perform a WEP key crack.
Before we get started, however, let us make a few points that may save some readers the time and effort of trying these techniques:
-
To successfully follow this How To, you need basic familiarity with networking terminology and principles. You should know how to ping, open a Windows Command Prompt, enter command lines and know your way around the Windows networking properties screens. Basic familiarity with Linux will be helpful too.
-
These procedures assume the use of specific wireless hardware described in Part 1. They will not work with other hardware types without modification.
-
These procedures assume that the target WLAN has at least one client associated with an AP or wireless router. They will not work with an AP that has no associated clients.
-
This tutorial is based on the Auditor version released April 2005. Future versions could make this attack easier or harder. In addition, some of the commands shown are Auditor-specific scripts that don’t exist (but can easily be made) in other Linux distributions.
-
Accessing anyone else’s network other than your own without the network owner’s consent is illegal. SmallNetBuilder, Pudai, LLC and the author do not condone or approve of illegal use of this tutorial in any way
Also note that it is possible to perform WEP cracking using only one computer. But we have chosen to use two to more clearly illustrate the process and avoid some of the complications caused by using a single computer.
The four main tools used in this article are airodump, void11, aireplay and aircrack, which are included on the Auditor Security Collection CD:
- Airodump scans the wireless network for packets and captures these packets into files
- Void11 will deauthenticate computers from a wireless access point, which will force them to reassociate to the AP, creating an ARP request
- Aireplay takes this ARP request and resends it to the AP, spoofing the ARP request from the valid wireless client
- Finally, aircrack will take the capture files generated by airodump and extract the WEP key
From your scanning with Kismet as described in Part 1, you should have written down the following four pieces of information:
- MAC Address of the wireless Access Point (AP)
- MAC Address of the “Target” computer
- WEP key used
- Wi-Fi channel used
In the following procedures, we will call our laptops, Auditor-A and Auditor-B and call the target computer Target. Let’s get started.
Starting from scratch
In real-life, someone trying to break into a wireless network usually would have to obtain the information needed (MAC address of the AP and Target PC and wireless channel). Professionals who do penetration testing of networks describe this attack as a “Zero Knowledge” attack, for obvious reasons. If the attacker already has all the information needed, that’s called a “Full Knowledge” attack, which is nowhere near as challenging! We’ll assume that we know nothing and describe how to get the information we need.
Finding the MAC Address of the AP with Kismet
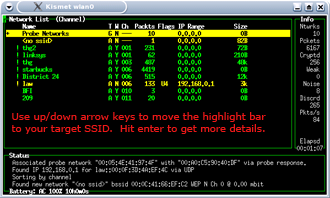
Figure 1: Navigating Kismet
(click image to enlarge)
Finding the MAC Address of the AP is extremely easy with either Kismet or Netstumbler. Start Auditor-A with its Wi-Fi card and Auditor CD inserted. Once Auditor is up, start Kismet, just like you did in Part 1, and you will see a list of APs. Type s and then c to sort the APs by channel and using the arrow keys, move the highlight bar to your target AP’s SSID. Then hit the Enter key. This will bring up a detailed screen (Figure 2) that will show the selected AP’s SSID, MAC address and channel. Voila! “Zero knowledge” has been transformed into almost all the information needed to run a WEP crack.
Figure 2: Kismet easily finds the SSID, Channel and MAC address
(click image to enlarge)
Tip: Some “security professionals” suggest cloaking your SSID / disabling SSID broadcasts. While this will defeat a Netstumbler scan, Kismet will easily detect “cloaked” SSIDs. Kismet captures more network information than Netstumbler and can find AP SSID’s by following conversations between associated clients and the AP.
Finding the MAC Address of the Client
We need one last piece of information to begin our cracking – the MAC address of a wireless client associated to the AP of our Target WLAN. Go back to Kismet and type q to quit out of the details menu. The highlight bar should still be on your AP, if it isn’t, then use the arrow keys again. Typing shift-C will bring up a list of clients. The MAC addresses are listed on the left side (Figure 3).
Figure 3: Client MAC address found by Kismet
(click image to enlarge)
If you don’t see the MAC address of the TARGET computer, check to make sure it’s on and associated with the Target AP (boot the TARGET into Windows, have it connect to the AP and start browsing the web). In about 10-30 seconds, you should see the MAC address of the TARGET computer pop up in Kismet. A prudent cracker would probably record all the client MAC addresses found so as not to be thwarted if a client isn’t present when the time comes to start the cracking process.
Packet capture with Airodump
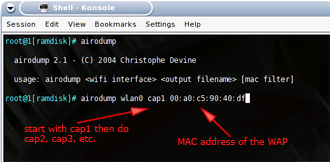
Figure 4: Airodump usage
(click image to enlarge)
As amazingly fast as aircrack is, it still needs a sufficient number of “interesting” packets to work on in order to crack a WEP key. As we noted earlier, packet capture is done by airodump, which creates a file of captured data for aircrack. Let’s see how it’s done.
You can use either computer, but we’ll stick with Auditor-A. Open the shell and type in the following commands:
Commands for setting up airodump
iwconfig wlan0 mode monitor iwconfig wlan0 channel THECHANNELNUM cd /ramdisk airodump wlan0 cap |
NOTES:
– Replace THECHANNELNUM with the channel number of your Target WLAN
– The /ramdisk directory is where the capture data will be stored
If there are many wireless access points close by, you may want to use attach the MAC address of your target AP to the end of the airodump command like so:
airodump wlan0 cap1 MACADDRESSOFAP
This will instruct airodump to write only the packets of the target AP to the capture file.
You can exit out of Airodump by typing Control-C. Typing ls -l will list the contents of the directory. Notice the size of the capture file which has the extension of .cap. If packets were successfully captured, the file size should be a few kB or so after a few seconds of capture. Note that if Airodump is stopped and restarted with the same parameters, the new capture file will appended to the previous one. You may want to make separate files by naming the first file cap1, the next, cap2 and so on.
Collecting IVs with Airodump
Figure 5: Watch the IV count go up
(click image to enlarge)
While airodump is running, you should see the MAC address of your AP listed under BSSID on the left side of the window. You should also see the Packet count and IV count (Initialization Vector) going up. This is due to normal Windows network traffic that is generated even if you aren’t surfing the web or checking your email. So you will see the IV count rise by a few IVs after a while. If you start surfing the web on the TARGET computer, you should see that each new webpage raises the IV count in airodump.
We aren’t interested in the Packet count, because doesn’t help us with WEP cracking and many of the packets will be beacons coming from the AP. (Most APs send out ten beacons a second by default and you will see that reflected in the packet count in airodump.) The IV count is the important number to watch for since you will need to capture around 50,000 to 200,000 IVs in order to crack a 64 bit WEP key and for a 128 bit key, you will need around 200,000 to 700,000 IVs!
Deauthentication via void11
You probably noticed that the IV count doesn’t rise very quickly under normal traffic conditions. In fact, it could take several hours or even days, to capture enough data from most wireless LANs for a successful WEP key crack under normal conditions. But fortunately, there are a few tools at our disposal to speed things along.
The easiest way to speed up packet generation is for the Target WLAN to be a busy one. We can simulate this by running a continuous ping or starting a large file download on the Target. Keep airodump running on Auditor-A and notice the rate that the IV count is rising. Then start your file download via bittorrent or just download an.ISO file of your favorite Linux distribution or movie trailer.
Alternatively, a continuous ping can be done in Windows by entering the following into a command window:
ping -t -l 50000 ADDRESS_OF_ANOTHER_LAN_CLIENT
where ADDRESS_OF_ANOTHER_LAN_CLIENT is replaced by the IP address of the AP, router or any other pingable client on the LAN.
Either of these methods will cause the IV count to rise a bit faster. But since they require access to the very WLAN that you are trying to obtain the WEP key for, they’re useful only to illustrate that more traffic = more IVs. What is needed is a traffic-generation method that requires only the information that we’ve obtained via Kismet.
This is where void11 comes in. Void11 is used to force a de-authentication of wireless clients from their associated AP,i.e. the clients are “kicked off” the AP. After being kicked off the wireless network, a wireless client will automatically try to reassociate with the AP. In the process of re-association, data traffic will be generated. This process is commonly referred to as a de-authentication or deauth attack. Here’s how it’s done.
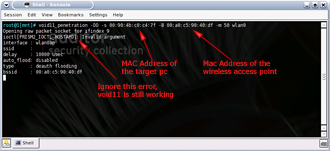
Figure 6: void11 usage
(click image to enlarge)
Start Auditor-B with its Wi-Fi card and Auditor CD inserted. Once Auditor is up, open a shell and type in the following commands:
Commands for setting up a void11 deauth attack
switch-to-hostap cardctl eject cardctl insert iwconfig wlan0 channel THECHANNELNUM iwpriv wlan0 hostapd 1 iwconfig wlan0 mode master void11_penetration -D -s MACOFSTATION -B MACOFAP wlan0 |
NOTE: Replace THECHANNELNUM with the channel number of your Target WLAN, and MACOFSTATION and MACOFAP with the MAC addresses of the Target WLAN client and AP respectively, i.e.
void11_penetration -D -s 00:90:4b:c0:c4:7f -B 00:c0:49:bf:14:29 wlan0
Tip: You may see an invalid argument error while running void11 on the Auditor Security Collection. Don’t worry about this error, as void11 is working, which we’ll verify next.
Verifying the deauth
While void11 is running on Auditor-B, let’s look at what’s happening on the Target client. Normally, anyone using a Target client will be happily be surfing websites or checking email, when suddenly the network will get very slow and eventually come to a halt. A few seconds later, the Target will be completely disconnected from the network.
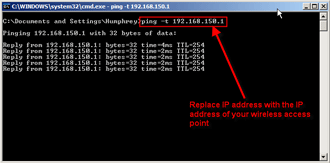
You can check this out for yourself by running a continuous ping from TARGET to the wireless access point. Figures 7 and 8 show a ping before and during a void11 deauth attack.
Figure 7: Successful pings before void11
(click image to enlarge
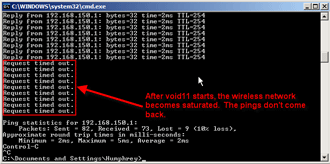
Figure 8 shows that the pings will time out while void11 is running. If you do a Control-C on Auditor-B to stop the void11 attack, the pings will come back to life after a few seconds.
Figure 8: Pings die after void11 is started
(click image to enlarge)
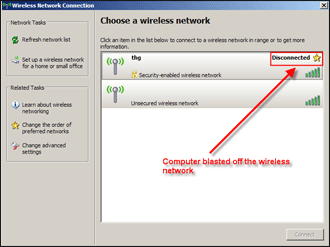
You can see if you are being deauthenticated from an AP by looking at your wireless client’s utility program, which usually indicates the connection status. Figures 9 and 10 show the wireless client utility built into Windows WP. Before the void11 attack starts, everything will seem normal, and Windows will show that you are connected to the AP (Figure 9).
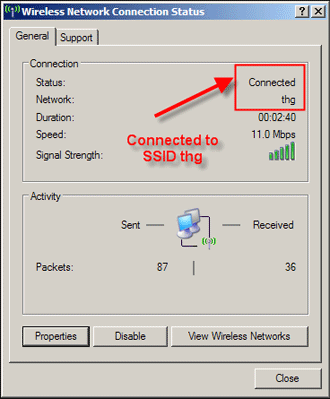
Figure 9: Now you are connected
After void11 starts, the network status will change from connected to disconnected (Figure 10). After void11 is stopped on Auditor-B, the Target will reconnect back to the AP in a few seconds or so.
Figure 10: Now you aren’t!
(click image to enlarge)
If you look back at Auditor-A – which we last left running airodump – while void11 is running, the IV count in airodump should increase to around 100-200 with a few seconds. This is due to the traffic generated by the Target client as it repeatedly tries to reassociate with its AP.
Packet replay via Aireplay
While a deauth attack generates traffic, it generally doesn’t generate enough to effectively speed up our IV gathering process. It’s also a pretty blunt instrument and severly interferes with normal WLAN operations. For more efficient traffic generation, we’ll need to employ a different technique called a replay attack.
A replay attack simply captures a valid packet generated by a Target client, then spoofs the client that it captured the packet from and replays the packet over and over again more frequently than normal. Since the traffic looks like it is coming from a valid client, it doesn’t interfere with normal network operations and goes about its IV-generating duties quietly.
So what we need is to capture a packet that is sure to be generated by the void11 deauth attack, stop the deauth attack, then start a replay attack using the captured packet. A perfect candidate for capture are Address Resolution Protocol (ARP) packets since they’re small (68 Bytes long), have a fixed and easily recongnizable format, and are part of every reassociation attempt.
Figure 11: aireplay setup
(click image to enlarge)
Let’s start with a clean slate and reboot both Auditor-A and Auditor-B. Figure 12 shows the roles that Auditor-A and Auditor-B are playing. Notice that Auditor-A is running only aireplay and is just serving to stimulate traffic (and IVs) to shorten the time it takes to crack a WEP key. Also notice that Auditor-B is used for either running the deauth attack (via void11) or capturing traffic (via airodump) and running the actual crack against the captured data via aircrack which we’ll get to shortly.
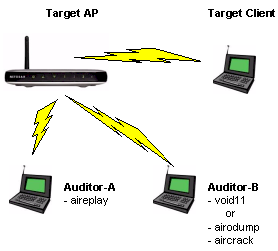
Figure 12: The full WEP-cracking monty
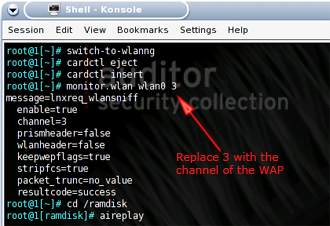
We’ll first start aireplay. Go to Auditor-A, open a shell and type in these commands:
Commands to set up aireplay to listen for an ARP packet
switch-to-wlanng cardctl eject cardctl insert monitor.wlan wlan0 THECHANNELNUM cd /ramdisk |
NOTES:
– switch-to-wlanng and monitor.wlan are custom scripts that come installed on the Auditor CD to simplify commands and reduce typing
– Replace THECHANNELNUM with the channel number of your Target WLAN
At first, nothing too exciting will happen. You should see aireplay reporting it has seen a certain number of packets, but little else since the packets haven’t matched the filter we’ve set (68 Byte packet with a destination MAC address of FF:FF:FF:FF:FF:FF).
Packet replay via Aireplay – more
Now go to the Target client computer and open its wireless utility so that you can monitor its connection status. Then go to Auditor-B and start a void11 deauth attack by following the previous instructions. Once you’ve started void11, you should see the Target client lose contact with the Target AP. You should also see see the packet rate reported by aireplay increase at a faster rate.
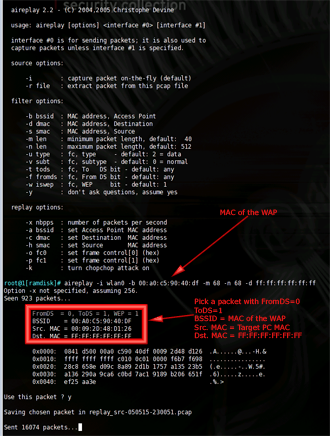
At some point, aireplay will display a captured packet and ask if you want to replay it (Figure 13).
Figure 13: aireplay bags a packet
(click image to enlarge)
You want a packet that matches the following criteria (also illustrated in Figure 13):
- FromDS – 0
- ToDS – 1
- BSSID – MAC Address of the Target AP
- Source MAC – MAC Address of the Target computer
- Destination MAC – FF:FF:FF:FF:FF:FF
Type n (for no) if the packet does not match these criteria and aireplay will resume capture. When aireplay successfully finds a packet matching the above criteria, answer y (for yes) to the replay question and aireplay will switch from capture to replay mode and start the replay attack. Immediately go back to Auditor-B and stop the void11 deauth attack.
Tips:
– The capture of a packet via a deauth attack can be the trickiest part of the WEP cracking process. While the deauth attack generates traffic, it generally doesn’t generate very much because of the time it takes for a client to realize that it has lost connection with its AP and then more time for the re-association process to complete.– Capture can be further complicated by the fact that the timing of these processes is different among client drivers (and operating systems). void11 can easily overwhelm a client with deauth packets so that it doesn’t even have time to complete a re-association and generate the packets we’ll be looking to capture.
– Sometimes you may luck out with the first packet captured. But other times you may have to wait for multiple captures.
– If aireplay doesn’t produce a captured packet within a few thousand packets, void11 could be overwhelming the AP and client and not giving them any time any time to complete a reassociation. Try stopping void11 manually (control-C) and then restarting it. You can also try adding the -d parameter to the void11 command line (the delay value is in microseconds) and experimenting with different values to allow time for a successful reassociation. Be aware that some wireless clients lock up when subjected to a deauth attack and may need to be rebooted to recover!
– You may have difficulty capturing ARP packets via a deauth attack if the Target client is idle. This is unlikely to happen with a real Target WLAN, but could be a problem with your practice Target WLAN. If aireplay is not flagging packets for you to approve, you may need to go to your Target client and run a continuous ping or start a download before you start the deauth attack.
– As a final tip, if you absolutely cannot get void11 to work, you can test if aireplay is really working by cheating a little bit. Keep aireplay running on AUDITOR-A and turn off void11 on AUDITOR-B. Go to the TARGET computer and manually disconnect from the wireless network. You can do this through either the wireless connection properties or by simply turning the computer off. Now reconnect the computer or turn the computer back on. Within thirty seconds, aireplay on AUDITOR-A should see an ARP packet sent by the TARGET computer as it reconnects to the WLAN and requests an IP address.
Packet capture and cracking
At this point Auditor-A is running a replay attack and producing plenty of IVs. Now it’s finally time to do the actual WEP cracking. Stop void11 on AUDITOR-B, if you haven’t done so already. Type in the following commands to set up airodump to capture packets for cracking.
Starting up airodump after stopping void11
switch-to-wlanng cardctl eject cardctl insert monitor.wlan wlan0 THECHANNELNUM cd /ramdisk airodump wlan0 cap1 |
NOTES:
– switch-to-wlanng and monitor.wlan are custom scripts that come installed on the Auditor CD to simplify commands and reduce typing
– Replace THECHANNELNUM with the channel number of your Target WLAN
– If there are many wireless access points in range, append the MAC address of your target AP to the end of the airodump command, i.e.
airodump wlan0 cap1 MACADDRESSOFAP
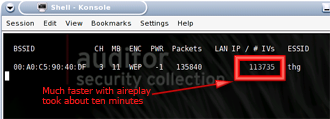
After airodump starts, you should now see the IV count rise to about 200 per second, thanks to the aireplay replay attack running on Auditor-A
Figure 14: After ten minutes of aireplay
(click image to enlarge)
With airodump writing IVs into a capture file, we can run aircrack at the same time to find the WEP key. Keep airodump running and open another shell window. Type the following commands into the new window to start aircrack:
Starting aircrack
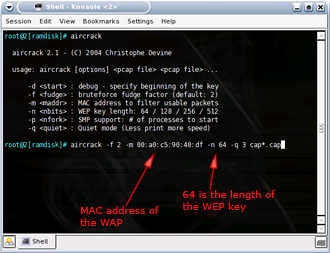
cd /ramdisk aircrack -f FUDGEFACTOR -m MACADDRESSOFAP -n WEPKEYLENGTH -q 3 cap*.cap |
NOTES:
– FUDGEFACTOR is an integer (default is 2)
– MACADDRESSOFAP is the MAC address of the Target AP
– WEPKEYLENGTH is the length of the WEP key you are trying to crack (64, 128, 256 or 512)
Figure 15 shows an example of a complete command.
Figure 15: aircrack usage
(click image to enlarge)
Aircrack will read in unique IVs from all the capture files and then perform a statistical attack on those IVs. A lower “fudge factor” (-f parameter) has less chance of succeeding, but is very fast. A high fudge factor is slower, but has a higher chance of finding the WEP key. A fudge factor of 2 is the default starting point.
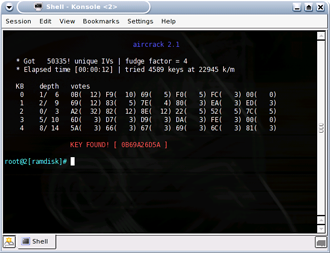
You can stop aircrack by typing control-C or just let it run to completion (it will give up after awhile if it doesn’t find the WEP key, at least for 64 bit WEP keys). If you followed our syntax above, you can simply hit the up arrow then enter. You can then restart aircrack by hitting the up arrow then enter keys, and aircrack will automatically include the updated contents of the airodump capture file. At some point, you should be rewarded with the screen shown in Figure 16.
Figure 16: Gotcha, Key Found!
(click image to enlarge)
Helpful hints
We broke a 64 bit WEP key in less than five minutes, which is the combined time for scanning with airodump and cracking with aircrack and stimulating traffic with aireplay running a simultaneous replay attack. There is a lot of luck involved and sometimes you may break the WEP encryption after gathering just 25,000 IVs, but most times it takes more than 100,000.
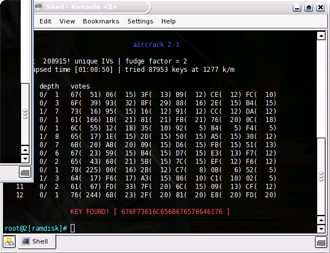
You would expect a 128 bit key to take eons longer, but this is not the case. A 128 bit key can be broken with around 150,000 to 700,000 IVs. bit capturing more IVs will definitely speed up the cracking process. When we reconfigured our target AP with a 128 bit key, we were able to recover the WEP key with 200,000 IVs, but it took the laptop we used more than an hour. Having more captured IV’s would have sped up the process dramatically.
It’s important to note that you must input the length of the WEP key that you are trying to recover into aircrack and that none of these tools provide that information. While you know this information in your practice target WLAN, you wouldn’t know it in a zero knowledge exploit. So you may need to try both 64 and 128 WEP key lengths in aircrack in order to be successful.
Figure 17: 128 bit WEP key found
(click image to enlarge)
Using a notebook with a fast processor and lots of memory for “Auditor-B” can help speed things along. You can also offload the capture files to other computers to speed up the cracking, while continuing to capture packets. We tested out this technique at the 2005 Interop Convention in Las Vegas. While one laptop was running airodump, we copied the capture files over to a very speedy server for cracking. The server (running aircrack) doesn’t need wireless access since it just crunches away on the captured files.
It goes without saying that you should use the fastest computer you can find to run aircrack. The new dual core processors from AMD and Intel may provide a speedup in WEP cracking since aircrack can spawn multiple processes with the -p option.
You may find it convenient to save your capture files to a USB flash drive to “sneakernet” them to other computers. Simply open the shell and type the following:
Saving capture files to USB flash drive
mkdir /mnt/usb mount -t vfat /dev/uba1 /mnt/usb copy /ramdisk/cap*.cap /mnt/usb umount /mnt/usb |
Note that you must perform a umount to actually write the files to the flash drive.
Conclusion
WEP was never meant to secure a network, but was designed only to provide a WLAN with the level of security and privacy comparable to that expected of a wired LAN. This is clearly indicated by its full name, “Wired Equivalent Privacy”. Recovering a WEP key is the equivalent of gaining physical access to a wired network. What happens next depends on the steps that have been taken to secure resources of the network itself.
Enterprise networks most always require a user login, i.e. authentication, before allowing access to their networks. Servers are physically secured in locked server rooms and network wiring panels secured in locked closets. Networks are frequently segmented so that users are kept from accessing shares and servers that they have no need to access.
Unfortunately, trained in bad security habits by both Microsoft and Apple, most home PC users avoid logins and password-protected network shares like the plague. And while home networks may have made Internet and printer sharing possible, the combination of networked computers and poor security practices has turned more than one home network into a unholy mess of worm-infested zombies before people even know what hit them.
WEP was shown to have failed in its function shortly after 802.11 networks came into widespread use and the industry has been playing catch-up ever since. Key rotation, stronger IVs and other proprietary schemes were tried first. But businesses quickly realized that these measures were ineffective and either closed down their wireless LANs entirely or segregated them into limited-access separate networks, required the use of VPNs or took additional security measures.
Fortunately, the wireless equipment makers quickly realized that stronger measures were needed if they were to be able to continue to sell wireless products to businesses and more security-conscious home networkers. The answer came in the late fall of 2002 in the preliminary form of Wi-Fi Protected Access or WPA and followed a year or so later by the current improved version – WPA2.
Despite the industry’s foot-dragging in getting both technologies out to its users (and providing updates for existing products), either technology – even in its simplified “Personal” (or “PSK”) form that uses password-based protection – will provide the level of security originally envisioned for WEP as long as a sufficiently random and long password is used.
In Part 3 of this series, we will demonstrate some good and not so good ways to protect your network. But in the meantime, our basic recommendation is to secure your wireless LAN by using WPA or WPA2 (with a strong password), or turn off wireless access until you can. We hope that these articles have shown that WEP is simply not an option for real “wired equivalent” security.
We would like to thank the following people and sites in helping us produce this article:
- Devine and KoRek for making the next generation of WEP cracking tools
- Brett Thorson and the staff at Interop iLabs for letting us finetune the attacks
- Max Moser for making the awesome Auditor Security Collection CD.
- The dedicated people on the Auditor and Netstumbler forums
- FBI Special Agent Geoff Bickers for breaking a 128 bit WEP key in front of 40+ computer security professionals at ISSA
Command Summary
Commands for setting up airodump
iwconfig wlan0 mode monitor iwconfig wlan0 channel THECHANNELNUM cd /ramdisk airodump wlan0 cap |
Commands for setting up a void11 deauth attack
switch-to-hostap cardctl eject cardctl insert iwconfig wlan0 channel THECHANNELNUM iwpriv wlan0 hostapd 1 iwconfig wlan0 mode master void11_penetration -D -s MACOFSTATION -B MACOFAP wlan0 |
Commands to set up aireplay to listen for an ARP packet
switch-to-wlanng cardctl eject cardctl insert monitor.wlan wlan0 THECHANNELNUM cd /ramdisk |
Starting up airodump after stopping void11
switch-to-wlanng cardctl eject cardctl insert monitor.wlan wlan0 THECHANNELNUM cd /ramdisk airodump wlan0 cap1 |
Starting aircrack
cd /ramdisk aircrack -f FUDGEFACTOR -m MACADDRESSOFAP -n WEPKEYLENGTH -q 3 cap*.cap |

