Introduction, Steps 1 – 5
![]() NOTE This procedure works with WRE54G’s with firmware earlier than the Version 3 series. See this article if your WRE54G has Version 3 or later firmware.
NOTE This procedure works with WRE54G’s with firmware earlier than the Version 3 series. See this article if your WRE54G has Version 3 or later firmware.
Linksys’ WRE54G Wireless-G Range Expander [reviewed here] is a WDS-based 802.11b / g repeater that Linksys says works only with its WAP54G access point and WRT54G and WRT54GS wireless routers. But with a little effort, you can get it to function with any 802.11b or g product that supports WDS-based bridging and/or repeating.
Note: You’ll need to make sure the product you’re going to use the WRE54G with really does support WDS, and even then it might not work. Generally, your best chance of success will be with 802.11g products that support bridging or repeating vs. older 802.11b products. See our Setting up WDS Bridging / Repeating How To for more info.
Step 1: Reset the WRE54G to factory defaults
Use the reset button in the hole on the side of the Expander. Push and hold the button until you see the Link light turn steady red. If the Link light starts flashing and/or turns blue, repeat the reset until you get a steady red Link light.
Step 2: Set your wireless client to a static IP address
The WRE54G comes set to a default IP address of 192.168.1.240. Since you’ll need to make a direct wireless connection to the WRE54G and it doesn’t have a DHCP server, you’ll need to nail down your client’s IP address info. Use an address in the 192.168.1.X range such as 192.168.1.239 with a subnet mask of 255.255.255.0. The Gateway and DNS settings won’t matter for now and you can leave them blank.
Step 3: Configure WDS bridging on the target AP
Devices joined in a WDS bridge usually require that you enter the MAC address of the device at the other end of the bridge into each device. Some devices also include an “allow any client to connect” or “allow anonymous” mode that doesn’t require entering MAC addresses, but I’ve found it more reliable to enter the MAC addresses, especially when trying to bridge products from different vendors.
You can find the WRE54G’s MAC address on its bottom-side label above the bar code labeled MAC. Enable the Bridging feature on your target AP and consult the target AP’s documentation for where (and in what format) to enter the WRE54G’s MAC address. I suggest starting by using the Point-to-Point bridging feature or its equivalent, since it’s the simplest and most likely to work.
Step 4: Find and connect to the WRE54G
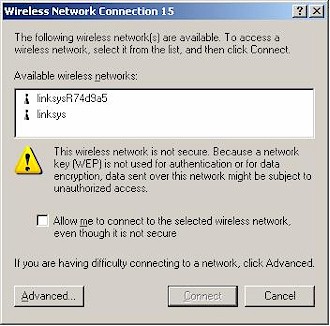
The Expander’s factory defaults set it to operate on Channel 6 with an SSID that consists of “linksys” plus the last 6 characters of its MAC address. Use your wireless client’s utility or WinXP’s Wireless Zero Configuration utility and run a site survey. Figure 1 shows the results of a survey using WinXP’s Zero Config.

Figure 1: WinXP ‘Available Wireless Networks’ with WRT54G and WRE54G
Select and connect to the ‘linksys’ network / AP that has the additional 6 characters. Wait until your client utility tells you that you have a connection before proceeding.
Step 5: Connect to the WRE54G
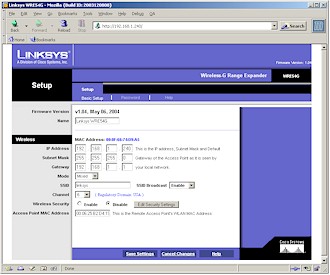
Open your web browser and point it at 192.168.1.240. You should be rewarded with a login popup and be able to log in and access the Setup screen shown in Figure 2.
Figure 2: WRE54G Setup screen
(click on the image for a full-sized view)
Steps 6 – 9
Step 6: Configure the WRE54G
Make sure that the Channel is set to the same channel as the AP or wireless router you want the Expander to connect to. Although Figure 2 shows the SSID set to “linksys” (how it will be set if you connect to any of the supported Linksys wireless products), you can leave it at the default, set it equal to the target AP’s SSID, or change it to something else.
Tip: I recommend leaving the WRE54G’s SSID set to its default or changing it to something other than your WLAN’s SSID. The SSID isn’t used by the WDS bridging function, and setting it to something different will allow you to force your wireless client to connect to the Expander instead of staying locked to your main AP, as most wireless clients prefer to do.
The only other setting you need to change is to enter the MAC address of the target AP / wireless router into the Access Point MAC address box. You’ll need to get this information from the target AP’s admin screens. It’s also usually printed on a label somewhere on the outside of the product. Make sure you enter it using colons between each pair of characters, i.e. 00:0e:ef:fd:a2:3c. When you’re done, save the settings.
Step 7: Test the connection
Go to your wireless client, rescan for wireless networks and connect the client to your WLAN’s main AP / wireless router, i.e. the “target AP”. (See how handy not having the same SSID for your Expander and main AP is?) Your client should still be set to the IP address in the 192.168.1.X range.
Open a Command (or DOS) window and ping 192.168.1.240 and if the wireless bridge is up, you’ll be rewarded with ping replies.
Step 8: Migrate the WRE54G to your LAN’s IP subnet
At this point, the WRE54G is successfully bridged to your LAN’s main AP or wireless router. If your LAN already uses the 192.168.1.X subnet, you should be able to force the wireless client to connect back to the main AP, set your wireless client back to being a DHCP client and successfully get an IP address and proper Gateway and DNS information.
If your WLAN doesn’t use the 192.168.1.X subnet, leave the wireless client set to the static IP you’ve used so far, force the wireless client to directly connect back to the WRE54G and change the WRE54G’s IP address and Gateway to match your LAN’s setup. After you’ve double-checked the entries, click the Save Settings link. Wait at least 10 seconds to make sure that the WRE54G successfully got the message, then force the wireless client to connect back to the main AP,set your wireless client back to being a DHCP client and successfully get an IP address and proper Gateway and DNS information.
In either case, once you’ve successfully leased IP address info, check that Internet and network connections work and ping the WRE54G’s IP address to make sure that the wireless bridge is up.
Step 9: Configure the WRE54G as desired
Now that the bridge is up and the WRE54G is integrated into your WLAN, you can log back into it and enable WEP or make other setting changes. If you’re enabling WEP, make sure you set up the WRE54G first, then make the the corresponding changes on your wireless client.

