Introduction
For wireless products tested after July 24, 2011, see this article.
For wireless products tested between June 19, 2008 and July 23 2011, see this article.
For wireless products tested between March 2007 and June 19, 2008, see this article.
For wireless products tested after October 1, 2003 to before November 2005, see this article.
For wireless products tested before October 1, 2003, see this article.
In late 2005, I moved into a new home and had to establish new test locations. Since this essentially wiped the slate clean in terms of being able to compare wireless test results going forward to those from my previous reviews, I also decided to establish new test methodology and add a scoring system.
My 3300 square foot two-level home is built on a hillside lot with 2×6 wood-frame exterior walls, 2×4 wood-frame sheetrock interior walls, and metal and metalized plastic ducting for the heating and air conditioning system. The Access Point (AP) or wireless router is placed on a four foot high non-metallic shelf away from metal cabinets and RF sources.
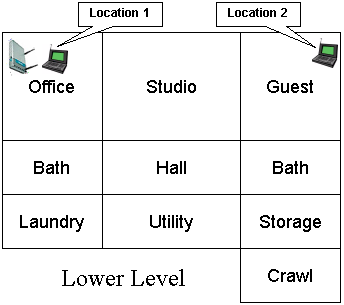
Figure 1 shows a simplified layout of the lower level and two of the five test locations.

Figure 1: Lower Level Test Locations
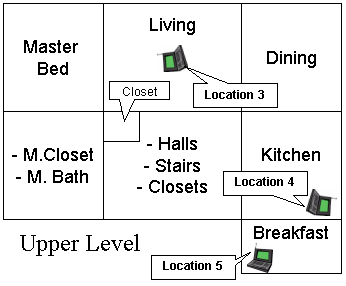
Note that the Laundry, Utility, Storage and Crawl(space) areas are below grade, but the rest of the rooms on the lower level have daylight access. Figure 2 shows the upper level layout and the other three test locations.

Figure 2: Upper Level Test Locations
The lower-level corner office is not the best location for placing a wireless router or access point for whole-house coverage, but serves the purpose well for pushing products to their limits. Note that the orientations of the icons for the AP and notebooks in Figures 1and 2 are significant. Unlike the previous test methodology that always pointed the client adapter antenna toward the AP under test, the notebook carrying the client adapter under test is now oriented as a user would naturally do in each location. Here are descriptions of the five test locations:
- Location #1: AP and wireless client in same room, approximately 6 feet apart.
- Location #2: Client in room on same level, approximately 45 feet away from AP. Two sheetrock walls between AP and Client.
- Location #3: Client in upper level, approximately 25 feet away (direct path) from AP. One wood floor, sheetrock ceiling, no walls between AP and Client.
- Location #4: Client on upper level, approximately 55 feet away (direct path) from AP. Two to three interior walls, one wood floor, one sheetrock ceiling and stainless-steel refrigerator, between AP and Client.
- Location #5: Client on upper level, approximately 65 feet away (direct path) from AP. Four to five interior walls, one wood floor, one sheetrock ceiling, between AP and Client.
While you might think that Location 5 is the most difficult, Location 4 turned out to be the toughest. I suspect this is due to the combination of antenna orientation, stainless-steel clad appliances close by, and the desktop test location being sunken about 6 inches below an adjoining quartz-composite countertop.
Test Description
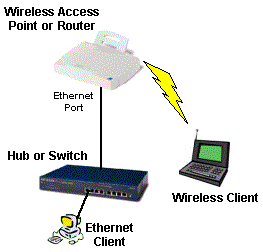
Ixia’s IxChariot network peformance evaluation program is used with the test configuration shown in Figure 3 to run tests in each of the five locations. The test notebook is usually a Dell Insprion 4100 with a 1GHz Celeron processor, 576MB of memory, and running WinXP Home SP2 with the latest updates. The Ethernet client machine is usually an HP Pavilion 716n with a 2.4GHz Pentium 4 processor, 504MB of memory, also running WinXP Home SP2 with the latest updates. The test machines have no other applications running during testing.

Figure 3: Wireless test setup
All routers / APs are generally reset to factory defaults and configured to act as access point, so the test results are in no way effected by the router portion of the products.
At each test location, the IxChariot Throughput.scr script (which is an adaptation of the Filesndl.scr long file send script) is run for 1 minute in real-time mode using TCP/IP in both uplink (client to AP) and downlink (AP to client) directions. The only modification made to the IxChariot script is typically to change the file size from its default of 100,000 Bytes to 300,000 Bytes of data for each file send for 802.11g products.
Although manufacturers continue to push throughput as the way they’d like you to compare products, the increasing use of wireless for time-sensitive applications like gaming, VoIP and audio and video streaming now means low throughput variation is becoming just as important, especially for streaming video applications. Fortunately, IxChariot provides a metric called Relative Precision that can be used to compare throughput variation. Here is an excerpt from Ixia’s Relative Precision description:
The Relative Precision is a gauge of how reliable the results are for a particular endpoint pair. Regardless of what type of script was run, you can compare relative precision values. The relative precision is obtained by calculating the 95% confidence interval of the Measured Time for each timing record, and dividing it by the average Measured Time. This number is then converted to a percentage by multiplying it by 100. The lower the Relative Precision value, the more reliable the result.
Here is a formal definition of a confidence interval, using statistical terms:
A confidence interval is an estimated range of values with a given high probability of covering the true population value. To state the definition another way, there is a 95% chance that the actual average lies between the lower and upper bound indicated by the 95% Confidence Interval.
While QoS techniques such as WMM (Wi-Fi Multimedia) and the recently-ratified 802.11e IEEE standard are intended to compensate for wide swings in wireless throughput, they can only do so much if adequate, steady bandwidth isn’t available. And if the time it took for manufacturers to incorporate WPA and WPA2 improved wireless security is any indication, it could be years before WMM and 802.11e are supported by enough vendors to be useful.
The new Wireless Quality Score (WQS) is intended to do essentially the same thing as showing IxChariot wireless throughput vs. time plots, but in a more quantifiable and easier-to-compare way. For each test location, the WQS is calculated by adding together the Average Throughput divided by the Relative Precision for each test location or:
WQS = (Loc1 AT/Loc1 RP)+(Loc2 AT/Loc2 RP)+(Loc3 AT/Loc3 RP)+(Loc3 AT/Loc3 RP)+(Loc5 AT/Loc5 RP)
where AT = Average Throughput and RP = Relative Precision. This simple score incorporates both throughput and variation in a simple way that moves the WQS up for products with higher throughput and lower variation and down for those with lower throughput and higher variation.
But since there are those for whom (high) speed is the only thing that matters, I also calculate total throughput of all locations, so that you can compare products on that basis if you prefer.
