Introduction
MU-MIMO is becoming a standard feature in both mid-range and top-end wireless routers. CES 2016 even saw MU-MIMO enabled wireless extenders introduced. So it’s time to standardize on a test method.
The method is essentially the same used in Is MU-MIMO Ready For Prime Time? The test looks for how much total throughput increases using MU-MIMO and how long the higher throughput lasts as more MU clients are added.
What you’d like to see is higher MU than SU throughput for as many STAs as possible. In the interest of having a reasonable test time (this test takes over an hour to run), we test only up to 16 STAs, because it’s our experience that the MU and SU lines usually converge before then.
Test Setup
The test hardware consists of an Ixia VeriWave WaveTest 20 three slot chassis loaded with RF46014 WaveBlade Wi-Fi, WBE1604 WaveBlade Ethernet and Management modules.
The Wi-Fi blade acts as the Wi-Fi device (STA), supporting 802.11a/b/g/n/ac. It has four RF ports, and can emulate any STA from 802.11b 1 Mbps to 4×4 802.11ac MU-MIMO 1733 Mbps. The Wi-Fi blade can create up to 500 fully independent stateful clients.
The Management blade is the controller for the two instrumentation blades, allowing the chassis to sit on a LAN and be accessed via a web interface for simple management chores. The Ethernet blade is a quad-port Gigabit wire-speed traffic generator with full packet-capture capability.
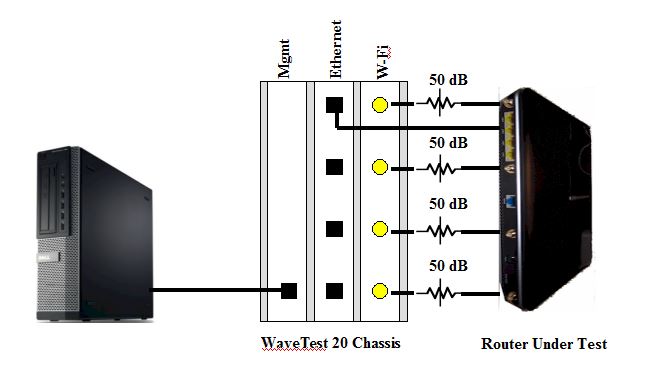
MU-MIMO Test Setup
Ixia VeriWave’s MU-MIMO testing requires direct cabling to the router under test. This is needed so the WaveBlade can precisely control beamforming to ensure test consistency. Since we have a quiet RF environment, the router under test is typically not placed in an octoBox test chamber.
The Wi-Fi blade needs an input level around -30 dBm, so 50 dB fixed attenuators are used between it and the router under test to reduce the router’s signal level. A single Gigabit Ethernet connection is made between the Ethernet blade and one of the LAN ports of the router under test. That’s a NETGEAR R7500v2 connected and ready to test in the photo below.
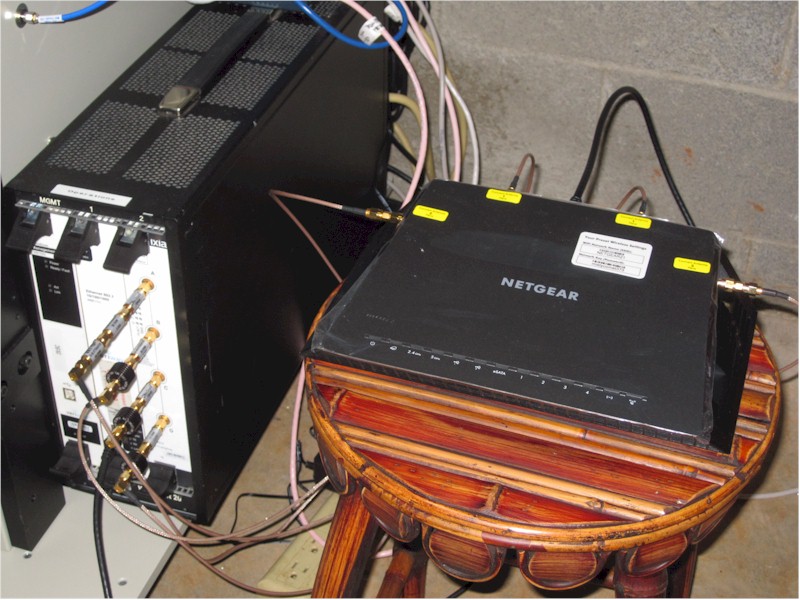
VeriWave chassis and router under test
The Test
The custom test script VeriWave developed starts with a single MU 1×1 STA, configured to connect at MCS 9 index rate, 80 MHz bandwidth and short guard interval to achieve the maximum 433 Mbps link rate. MIMO channel models (A-F) were not used; bypass mode was set.
The test connects the STA, then runs a TCP Goodput test, with MSS, Window and Frame size set so the Gigabit link is fully loaded. Each test runs for 30 seconds and throughput is recorded at the end of the test. We used a single TCP/IP session (connection) for each test.
The test then adds another MU STA, verifies connection, repeats the 30 second test and records throughput for each STA, up to a maximum of 16 STAs. The entire test sequence is then repeated with the STA mode set to SU, to see how total throughput behaves with non MU devices. Two test runs are made and the average of the two results is used.
Test results are available in the Router Charts as three benchmarks
- MU MIMO Throughput
- SU MIMO throughput
- MU, SU Throughput Difference
Interpreting Results
The default view shown is the average throughput over all 16 points measured. But you can use the selector to show any of the views shown in the screenshot below.
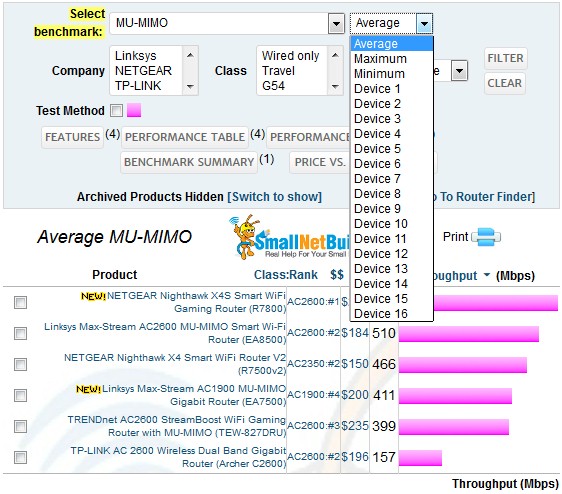
MU-MIMO Throughput bar chart view
By selecting up to four products and clicking the Performance vs. Device button, you can compare the selected benchmark plotted vs. number of devices. The plot below shows throughput with MU-MIMO devices. MU-MIMO routers with 4×4 architectures (AC2350, AC2600, AC3100 classes) should provide peak total throughput gain with three 1×1 MU devices. Only one of the plotted routers does this; the other two peak with six MU devices.
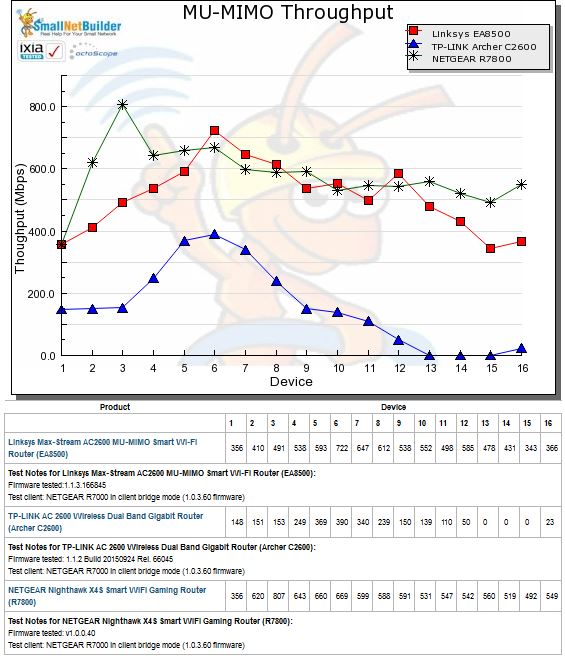
MU Throughput vs. # of devices
The next plot shows throughput with the VeriWave set to emulate SU-MIMO devices, i.e. devices that don’t support MU-MIMO. This plot should show a slight downward trend, indicating efficient distribution of bandwidth among devices, with little lost throughput. One of the products in the plot has both low SU throughput compared to the other two and a sharp decline after six devices. Single digit throughput for devices 13 – 16 should not happen.
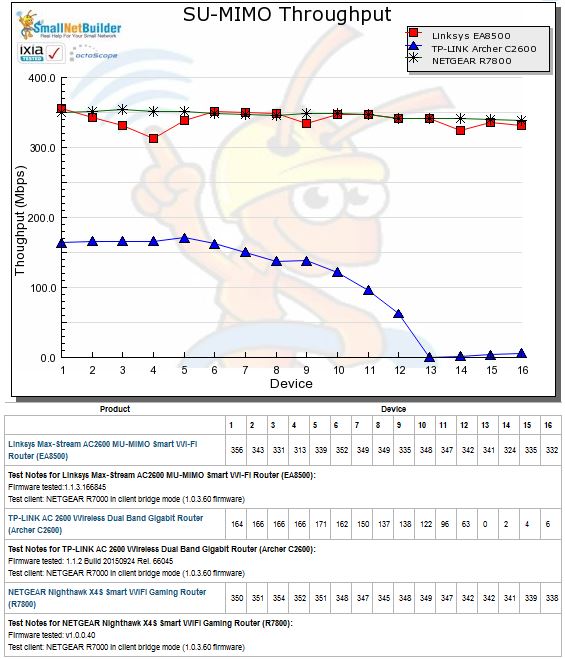
SU Throughput vs. # of devices
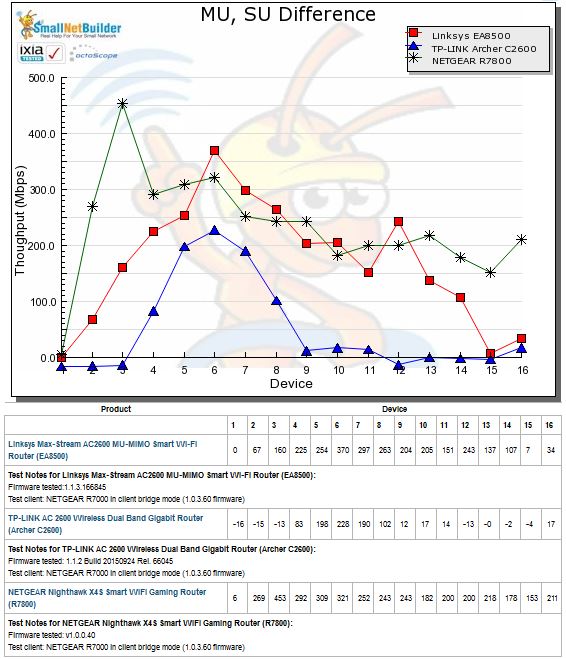
The last plot shows MU, SU Throughput Difference (simply MU throughput – SU Throughput). This plot should start at zero because there should be no throughput gain from MU-MIMO for a single device. Throughput should then peak at three devices for 4×4 architecture routers and ramp down as the number of devices increase.
MU and SU throughput will usually converge by the time 16 devices are used. One of the products shown in the plot still shows unusually high MU throughput gain over SU throughput, while the other has converged after only 9 devices.
