Introduction
The first article in this series explained the ins and outs of using WDS-based devices to extend and bridge wireless networks. This time, I’ll be looking at solutions for wireless bridging and range extension that don’t use WDS.
Please read references to access points (AP) as applying to either access points or wireless routers unless otherwise noted.
Where WDS-based repeater / bridges only work with other WDS-enabled devices, non-WDS devices work with any standard access point or wireless router. They look like a standard wireless client to APs and use the same association and authentication processes.
Because they act like standard clients, they have a key advantage over WDS-based devices in that they can use WPA/TKIP and WPA2/AES wireless security in addition to WEP. Their disadvantage is that because they act like clients, they need to use the SSID of the AP they are associated with. So you can’t use the trick of configuring the repeater with a different SSID so that you can direct your client to associate with it.
When shopping for repeaters, it’s hard to know what you’re buying simply by reading product descriptions, because manufacturers don’t have a common vocabulary to describe these devices. Non-WDS based devices are sometimes called wireless range expanders or range extenders. You’ll also find wireless bridges, some of which use WDS and others that don’t. But "bridges" are generally used to wirelessly connect wired network segments or single devices with Ethernet ports.
Some devices don’t refer to bridging or repeating in their product name. The popular NETGEAR WNDR3700 RangeMax Dual Band Wireless-N Gigabit Router [reviewed], for example, makes no mention of bridging, repeating or even WDS support, even though it has it. Other routers supporting WDS, usually don’t mention it either.
How To Tell
The surest way to know whether your prospective purchase supports WDS or not is to download the user manual and look at the wireless settings.
We’ll use the EnGenius ESR9850 [reviewed] as an example product, because it supports both WDS and non-WDS repeating. Figure 1 shows its wireless settings when in AP Router Mode and with WDS enabled. The indicators of WDS support here are the WDS mode setting and the MAC address entry boxes.
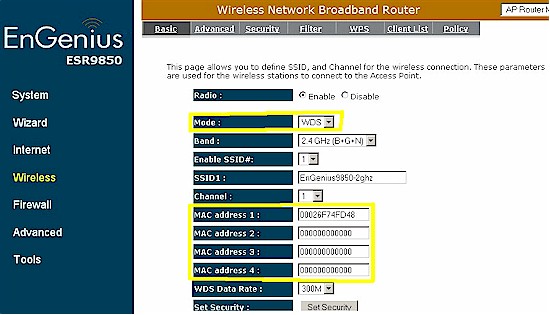
Figure 1: ESR9850 wireless settings for WDS mode
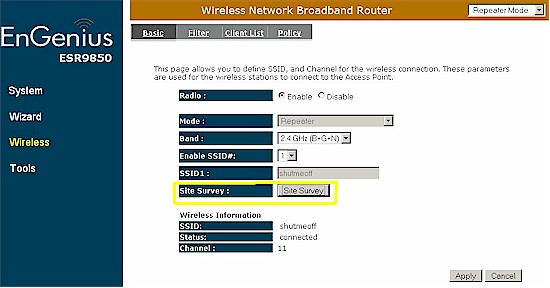
When you set the router to Repeater Mode using the drop-down at the top left of the admin screen, the Wireless settings screen looks much different. Figure 2 highlights the key indicator of a non-WDS repeater, the Site Survey button.
Figure 2: ESR9850 repeater mode wireless settings
Clicking Site Survey brings up the screen shown in Figure 3, which lets you choose a wireless network to join.

Figure 3: ESR9850 site survey screen
That’s about all there is to configuring a non-WDS device; no looking up MAC addresses or having to enter them on multiple devices.
To save you some time, I’ve put some current devices that support wireless range extension and bridging into Table 1. The EnGenius devices are the most flexible, because they support both WDS and non-WDS connection, bridging and repeating.
| Check Price | Device | Standards | Dual-band | Modes |
|---|---|---|---|---|
 |
Buffalo WLI-TX4-AG300N Nfiniti Wireless-N Dual Band Ethernet Converter | A,B,G,N | Yes | Non-WDS, Bridge only |
 |
D-Link DAP-1360 Wireless N Range Extender | B,G,N | No | Non-WDS, AP |
 |
D-Link DAP-1522 Xtreme N Duo Wireless Bridge / Access Point | A,B,G,N | Yes | Non-WDS, Bridge only, AP |
 |
Cisco Linksys WET610N Wireless-N Ethernet Bridge | A,B,G,N | Yes | Non-WDS, Bridge only |
 |
EnGenius EAP9550 Wireless N 300Mbps Access Point/Repeater | B,G,N | No | Non-WDS,WDS,AP |
 |
EnGenius ESR9850 300Mbps Wireless N Router with Gigabit Switch | B,G,N | No | Non-WDS,WDS,AP, Router |
 |
Hawking HW2R1 Hi-Gain Wireless-N Dual Radio Smart Repeater | B,G,N | Yes | Non-WDS |
 |
NETGEAR WNDR3700 RangeMax Dual Band Wireless-N Gigabit Router | A,B,G,N | Yes | WDS, Router |
 |
TRENDnet TEW-638APB 300 Mbps Wireless N Access Point | B,G,N | No | WDS, AP |
Table 1: Wireless Range Extenders and Bridges
Bridge only means that the product will not allow wireless clients to connect to it. So it can’t be used to extend wireless range (unless you plug an access point into it).
I didn’t include older G-only products in the list above because manufacturers are retiring them in favor of N-based products. If you’re going to be using WDS, bridging or repeating, you definitely should be using 802.11n products. G-based repeating will provide only single digit Mbps throughput.
Make sure any product you buy has an Ethernet port. This lets you connect via a wired connection for setup and configuration and also gives you the option of using the device as a bridge to connect devices with Ethernet ports. Life is too short to be trying to set up a repeater over a wireless connection.
I don’t recommend using the Linksys WRE54G Wireless-G Range Expander, which hasn’t yet faded into the sunset. It not only lacks an Ethernet port, but also can be used only with WDS-enabled routers.
Setting Up
Compared to all the hoops you need to jump through to set up a WDS connection, using a non-WDS bridge / repeater is a breeze. The hardest part is connecting to it for initial configuration. Some devices will be set to automatically grab an address from a DHCP server, while others may come set to a static IP address. Still others may include a utility program or setup wizard that will find the device and initially configure it.
Make sure you read the setup guide that comes with your product so that you don’t waste time. I recommend connecting the device via Ethernet to your LAN. This will ensure a reliable connection from the computer you’re using to set it up and has the benefit of confirming a working wireless connection by the same flash-all-your-LAN-switch-lights method we saw when setting up a WDS connection.
After you’re connected to the repeater / bridge, all you need to do is find the Site Survey (or similarly-named) function that shows you in-range networks, choose a network and connect. That’s all there is to it. If you’ve done the job right, all your router’s LAN port activity lights should start flashing wildly due to the network storm caused by two connections to the device (wired and wireless).
As noted, earlier, since channel and SSID must match for a client – AP connection, you can’t set the bridge / repeater’s SSID to anything other than the SSID of the network you’re connecting to. But if the bridge / repeater has multi-SSID capability (also known as "guest network"), you can enable a second SSID and set it differently.
If you can’t set up a separate SSID, then I recommend that you force your client to disconnect and reconnect to the network when moving to a location where you want to be connected to your repeater. But even then, there is no guarantee.
The only easy way to know if traffic is flowing through your repeater is to look at its wireless activity light while you are watching a streamed video or copying a large file. It’s important to have continuous wireless activity running for this check, since the wireless activity light may flash occasionally, even when the repeater is idle.
If you’re lucky, your repeater will have some sort of bandwidth monitor or other indication showing what’s connected to it. But don’t hold your breath. Checking the wireless activity light is the most reliable way.
Performance
The biggest mistake most people make when setting up wireless range extenders or repeaters is putting them too far away from their main AP, at the fringe of the wireless coverage area. Doing this gives the repeater very low bandwidth to start with, which it then reduces by ~ 50% when its single radio receives, then retransmits data. Let’s look at an actual example.
Figure 4 shows the wireless test layout here at Chez SNB. The diagram is the same one from How We Test Wireless Products – Six Location Open Air Method, which describes our standard test methods, but with a few changes.
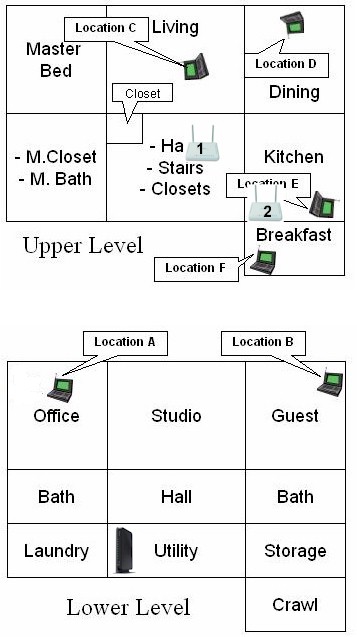
Figure 4: Wireless repeating test layout
On the Lower Level, the wireless router is shown in the Utility room, instead of its usual spot in the Office. This central location is really where the NETGEAR WNDR3700 that I’m currently using as my home router sits.
On the Upper level, you can see two little EnGenius ESR9850s, labeled 1 and 2. These represent two spots where I parked the ESR9850, running in repeater mode.
For all tests, I put my test notebook, which uses an Intel Wi-Fi Link 5300 adapter, at Location F.
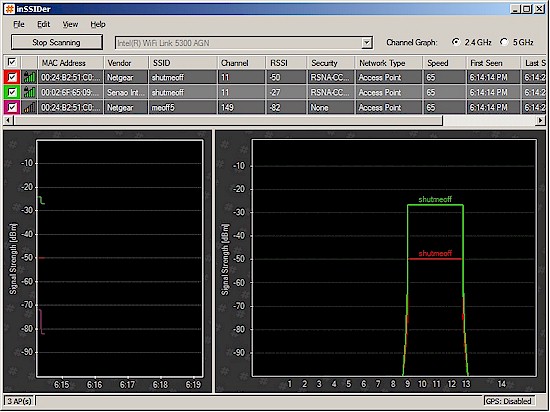
For the first test, I put the ESR9850 in Location 2, on a counter in the kitchen about 6 feet from the notebook, with no walls in between. I then fired up inSSIDer to take the snapshot of signal strength shown in Figure 5. The Vendor shown for the EnGenius in the table at the top of the screenshot is Senao, EnGenius’ parent company.
Figure 5: Main AP and repeater signal strength – repeater in Location 2
inSSIDer shows that the signal from the EnGenius is 23 dB higher than that from the NETGEAR, which is about 200X.
I then used TotuSoft’s LAN Speed Test to run a quick measure of wireless speed from the test notebook to my primary desktop, connected via Gigabit Ethernet. Figure 6 shows the test notebook was able to write a 5 MB test file of random data at 12.7 Mbps and read at 5 Mbps when connected directly through the WNDR3700. I insured that the notebook connected only to the WNDR3700 by unplugging the ESR9850.
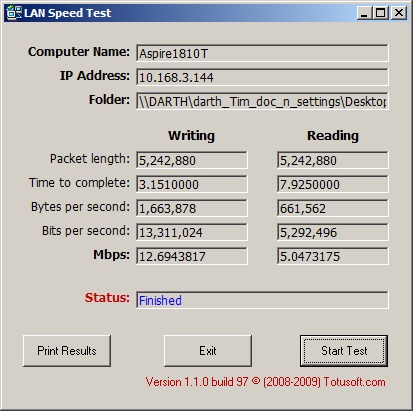
Figure 6: Wireless throughput – client direct to WNDR3700
I then forced the client to disconnect from the WNDR3700, powered up the ESR9850, reconnected the client, then reran the test. Figure 7 shows essentially no change in write speed, while read more than doubles to 12.9 Mbps.
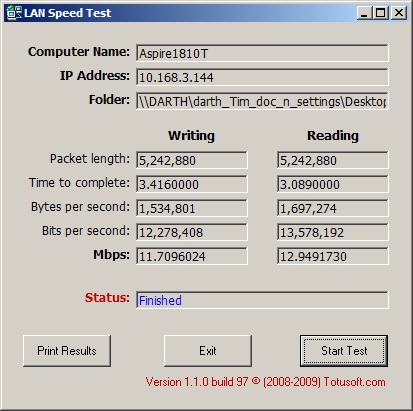
Figure 7: Wireless throughput – client through ESR9850 in Location 2
Performance – more
For the second test, I moved the ESR9850 to Location 1. This spot isn’t that far away from Location 2, but it removes a wall from between the WNDR3700 and ESR9850 and puts it instead between the ESR9850 and test client.
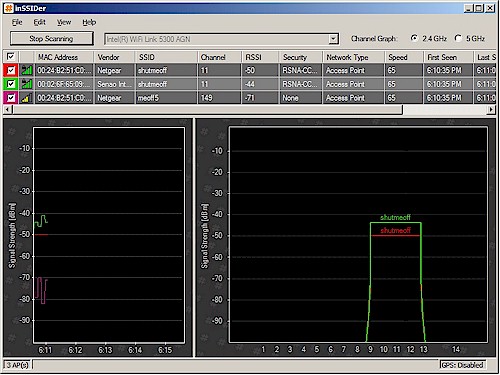
Figure 8 shows that just that one change has a significant effect on signal strength, with the signal from the WNDR3700 now 6 dB (4X) stronger than the one from the ESR9850.
Figure 8: Main AP and repeater signal strength – repeater in Location 1
Figure 9 shows that even though the client is working with a weaker signal from the repeater, its performance is significantly improved, with both write and read speeds of almost 22 Mbps.
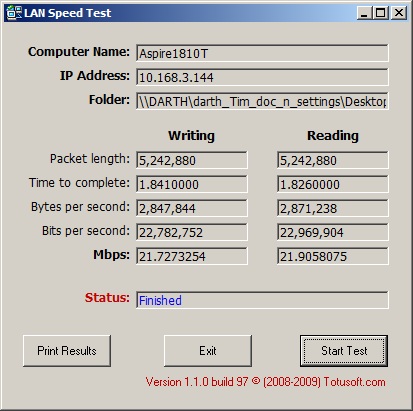
Figure 9: Wireless throughput – client through ESR9850 in Location 1
This improvement is due to the stronger signal between the WNDR3700 and ESR9850, which leads to higher bandwidth between them. And with higher bandwidth coming in, the ESR9850 can provide higher bandwidth out.
Closing Thoughts
Wireless bridging and repeating remains a confusing aspect of wireless networking. Although devices are easier to configure and interoperability has improved among WDS devices, the topic is still full of unclear terminology, with the same terms used to describe things that are very different under the hood. And, if that isn’t enough, remember that there is no Wi-Fi interoperability certification for bridging / repeating devices.
In spite of these drawbacks, WDS, bridging and repeating are useful tools to have in your networking bag of tricks. I hope this short series has helped you to better understand and use them.

