Introduction
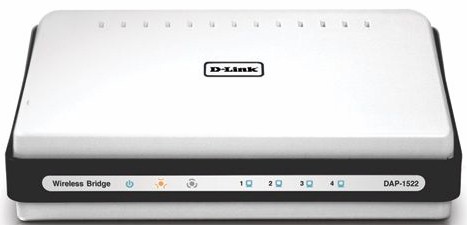
| At a Glance | |
|---|---|
| Product | D-Link Xtreme N Duo Wireless Bridge / Access Point (DAP-1522) |
| Summary | Dual-band draft 2.0 802.11n AP/Bridge based on Ralink silicon |
| Pros | • Dual-band • 4 port gigabit switch w/ jumbo frame support • Can be used as AP or bridge • Lowest price for dual-band draft 11n |
| Cons | • Single radio, so no simultaneous dual-band. • Sub-par 2.4 GHz band performance • 40% WEP and WPA/TKIP throughput reduction • Very low throughput with 802.11g clients |
D-Link seems to have caught dual-band draft 802.11n fans’ interest with the announcement of the DAP-1522. It is the successor to D-Link’s DAP-1555, which was one of the first draft 11n AP / bridges to hit the streets.
A key point of interest is that the DAP-1522 is currently the only dual-band draft 11n AP option that’s street-priced under 100 bucks. The sweetener to the deal is that you also get a three port gigabit Ethernet switch that supports jumbo frames! (The 1522 has a four port switch, but you need one port to uplink it to an existing router or switch.)
The only other $100 draft 11n option for opening up access to the 5 GHz band is Netgear’s WNHDE111 [reviewed]. But that product covers the 5 GHz band only and has only two 10/100 Ethernet ports.
Figures 1 and 2 show the controls, lights and ports on the front and rear panels of the 1522.
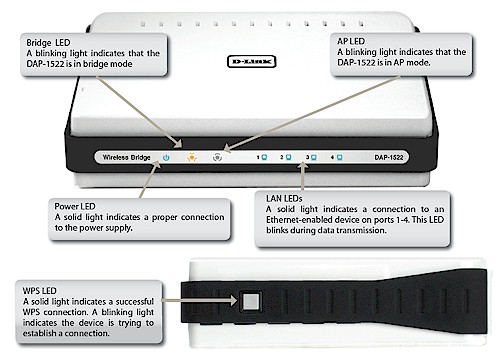
Figure 1: Front panel
I don’t get the logic behind the separate "Bridge" and "AP" lights, since the product can be in only one mode at a time. It’s kind of annoying that the lights have a constant one second blink rate. But what’s more aggravating is that D-Link should have had the Bridge mode light indicate a successful link to an AP—particularly because it’s not staightforward to log in and check.
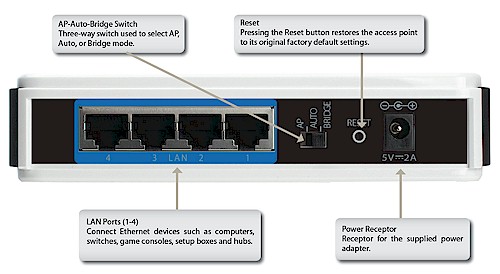
Figure 2: Rear panel
Internal Details
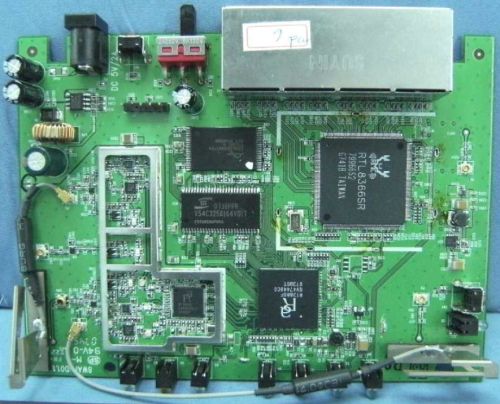
Figure 3 shows the FCC ID photo of the 1522, which shows that D-Link has turned to Ralink to drive the cost down from its Atheros-based DAP-1555. The SoC processor (RT2880F) includes the draft 11n MAC / Baseband processing and a dual-band draft 802.11n 2T3R (2 transmit, 3 receive channels) transceiver (RT2850L) completes the radio.
Figure 3: DAP-1522 board
Although D-Link doesn’t spec it, my tests showed that jumbo frame support is enabled for the Realtek RTL8366 four-port gigabit switch. I tested only 4K, but the Realtek’s spec says that it supports 9K jumbo frames at wire speed.
More details, including a comparison to the DAP-1555, can be found in this article.
Setup
Maybe I wasn’t patient enough, but I didn’t find the 1522 to be as plug-and-go as the Netgear WNHDE111. First, the product comes set to the Bridge mode, not Auto, by default. So those of you (like me) in the "I-don’t-need-no-steenking-manual!" club will wait in vain for the units to connect if you buy a pair to use as AP and Bridge.
Second, the Quick Install Guide that comes with the product doesn’t really have a recommended procedure, just an explanation of the switch positions. And there’s no setup wizard on the CD either.
D-Link sent a pair of 1522’s, so I set the Auto / AP / Bridge Mode switch to Auto on both, connected one to my LAN’s switch and the other to the Ethernet port on one of my notebooks and waited. And waited.
From the UPnP notification that popped up on my PC, it appeared that the unit connected to my LAN detected the DHCP server and switched to AP mode. But the 1522 connected to my notebook didn’t automatically connect, since the Ethernet icon in the System Tray continued to show a no-connection state.
I tried this a couple of times, first resetting both units to factory defaults and then plugging in the LAN-connected unit, waiting about 10 seconds and plugging in the notebook-connected unit. But no connection was to be had.
But when I set the LAN-connected unit to AP mode and the notebook-connected 1522 to Bridge, the pair connected right up. So my recommendation is to skip the Auto position on the switch and use the AP or Bridge positions as your application dictates.
I also tested the Wi-Fi Protected Setup (WPS) feature by pushing the buttons located on the side of each unit. Although setup appeared to take the full 2 minutes, the WPS session completed successfully, resulting in an auto WPA mode configuration, which I think meant that the link was secured via WPA2 / AES.
Configuration
The slideshow will walk you through most of the 1522’s configuration screens, so I’ll just hit a few key points here. Getting to the admin interface when the product is in AP mode is easy, since it defaults to grabbing IP settings via DHCP and sends out a UPnP advertisement.
But getting to the Bridge mode admin can be a pain. Since the mode defaults to a 192.168.0.50 fixed IP, you’ll need to change a wired machine that’s plugged into the Bridge mode 1522’s switch to an unused IP in the same range if your LAN is using another subnet before you can login.
Once in, you can then either set it to DHCP and then hunt for the IP, or a fixed IP outside the range of your LAN’s DHCP server (to avoid an IP address conflict).
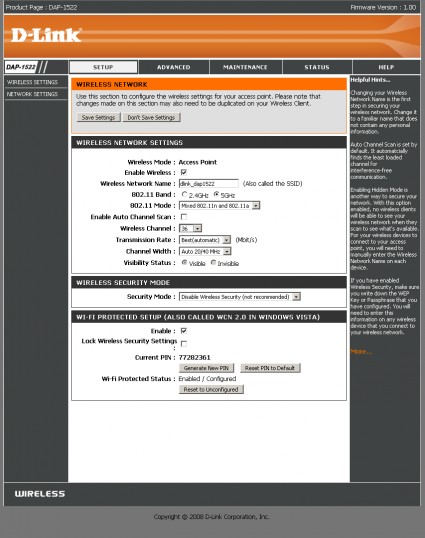
Figure 4 shows AP mode Wireless Settings, which I’ve configured for 5 GHz band operation (I also changed the SSID). The 1522 actually defaults to 2.4 GHz, auto channel selection and 20 MHz bandwidth mode. When set to 5 GHz, supported channels are 36, 40, 44, 48, 149, 153, 157, 161 and 165. Note that the Transmission Rate setting doesn’t actually work. The only selection available is the Best(automatic) shown.
WEP, WPA and WPA2 wireless security is supported in both modes, with both Personal and Enterprise modes supported for WPA / WPA2.
Figure 4: Manual Setup – AP
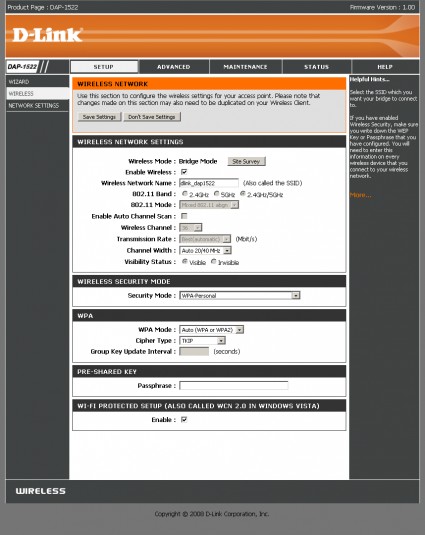
When in Bridge mode, the screen changes slightly, with many settings greyed out to reflect the "slave" nature of the mode. Note the auto 2.4/5GHz band option and Site Survey button. The latter pops up a window that shows in-range networks info including SSID, BSSID (MAC address), Channel, Security mode, signal level (in %) and Type (Ad-Hoc or Infrastructure).
Figure 5: Manual Setup – Bridge
The WLAN Partition settings will also come in handy for controlling wireless access. You can block wireless client-to-client connection and also connection between wireless and wired LAN clients. Both are unblocked by default so that everyone can connect.
The Status Page in AP mode has screens for Device Info, Wireless clients, Logs and Statistics. My main complaint is that neither the Status nor Wireless pages indicate the Bandwidth mode. And although the band and mode aren’t also explicitly indicated, you can at least infer the band from the Channel indication.
![]() See the slideshow for an admin interface tour
See the slideshow for an admin interface tour
Walkaround Performance – 2.4 GHz
I started to test the 1522 as a pair using my five location walk-around test by connecting one of the pair set to Bridge mode to my notebook, but remembered that it doesn’t have a gigabit Ethernet interface. So I installed a Netgear GA511 Gigabit Ethernet Cardbus card to solve that problem, then plugged in the 1522. The other 1522 was set to AP mode and connected to my LAN’s Netgear GS108 gigabit switch. All testing was done on Channel 1 with no encryption.
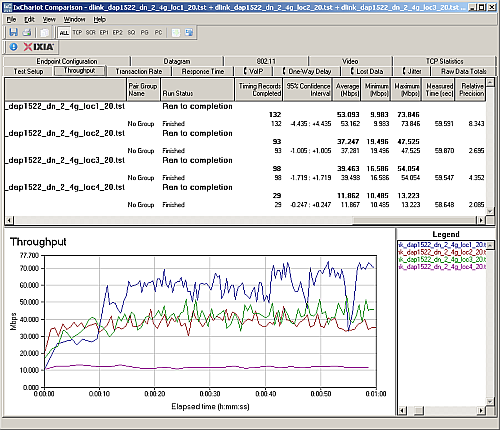
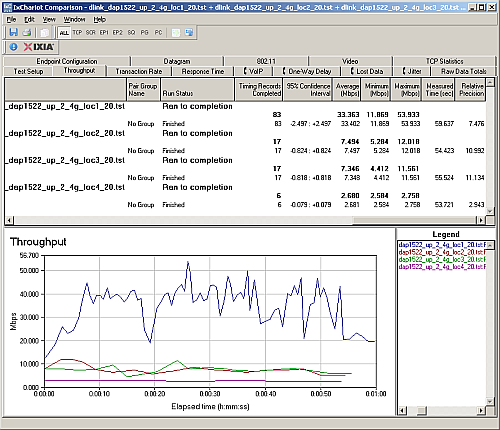
I then left the AP mode 1522 in the lab and walked the Bridge mode 1522 and notebook around. Figures 6 and 7 show down and uplink throughput for locations 1-4 (the pair were unable to connect in Location 5) in the 2.4 GHz, 20 MHz bandwidth mode that the 1522 defaults to out of the box.
As is typical of many draft 11n products, up and downlink throughput are not equal. Figures 6 and 7 show best cases of 53.1 Mbps downlink and 33.4 Mbps uplink in Location 1. You can also see that throughput is not steady and really falls off quickly with distance for uplink.
Figure 6: Walkaround wireless throughput – 2.4 GHz down, 20 MHz mode
Since the 1522 does not provide a readout of link rate, I couldn’t confirm my suspicion that excessive link rate adjustment is the culprit for the throughput variation. I have no explanation for the significantly lower uplink performance, particularly because there is the same 2T2R (2 transmit, 2 receive channels) radio at both ends of the link.
Figure 7: Walkaround wireless throughput – 2.4 GHz up, 20 MHz mode
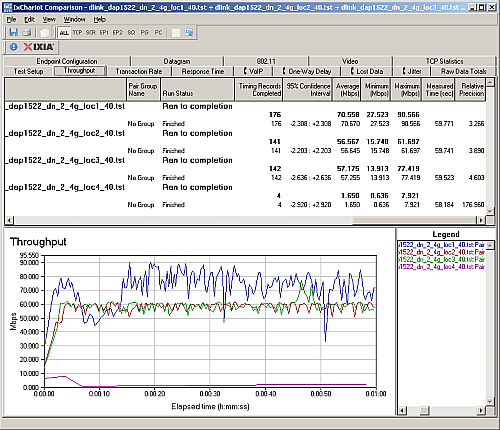
Things significantly improved for uplink when I switched to the Auto 20/40 MHz mode, which I verified using 40 MHz channel width during the tests by using a Cognio (now Cisco) Spectrum Expert spectrum analyzer. Downlink speed (Figure 8) improved to 70.6 Mbps and smoothed out at Locations 2 and 3.
Note that the Location 4 connection became very erratic, which accounts for the very low 1.6 Mbps throughput. That average number is a bit misleading, since it appears that the connection was just about dead 6 seconds into the 1 minute run.
Figure 8: Walkaround wireless throughput – 2.4 GHz down, 40 MHz mode
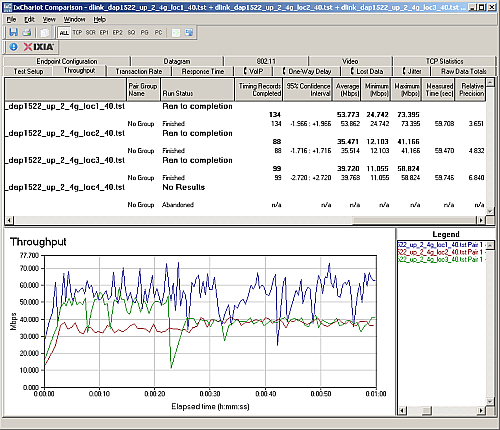
Uplink throughput also improved to 53.8 Mbps. But, again, there was a price to pay at Location 4. This time, I couldn’t even maintain a connection, which accounts for the "No Results" reading in Figure 9.
Figure 9: Walkaround wireless throughput – 2.4 GHz up, 40 MHz mode
Walkaround Performance – 5 GHz
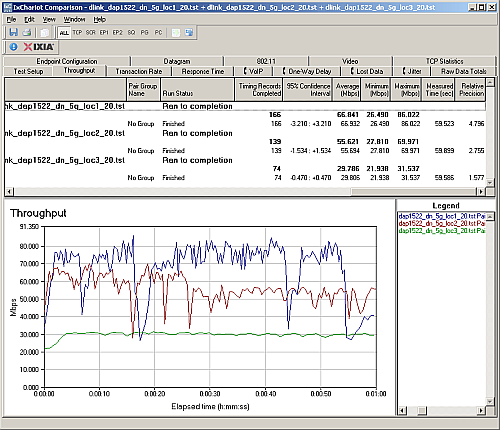
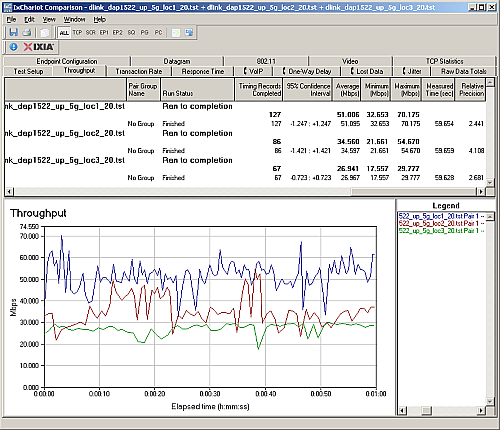
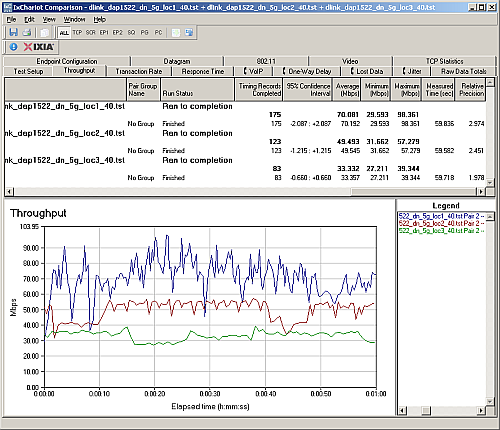
Tests using the 5 GHz band (channel 36) also showed high throughput variation and the same pattern of better downlink than uplink speed found with 2.4 GHz. Figures 10 and 11 show best cases of 66.8 Mbps downlink and 51 Mbps uplink in Location 1. Like the Netgear WNHDE111, I couldn’t get a connection at Locations 4 and 5.
Figure 10: Walkaround wireless throughput – 5 GHz down, 20 MHz mode
It looks, however, like throughput falloff running 5 GHz uplink isn’t as bad as it was at 2.4 GHz, with speeds in the mid 20’s to mid 30’s vs. 7 Mbps.
Figure 11: Walkaround wireless throughput – 5 GHz up, 20 MHz mode
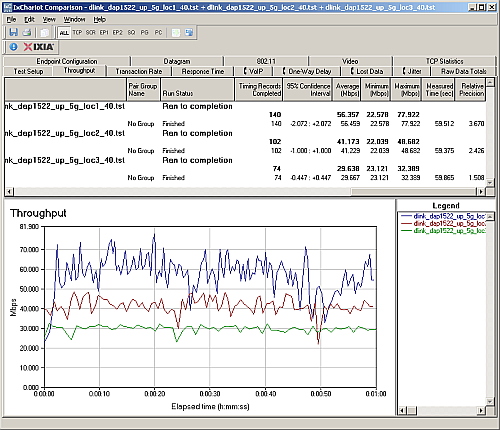
There was not a big speed boost for either up or downlink when I switched to the Auto 20/40 MHz mode. Downlink speed (Figure 12) edged up to 70.1 Mbps and uplink to 56.4 Mbps.
Figure 12: Walkaround wireless throughput – 5 GHz down, 40 MHz mode
Figure 13: Walkaround wireless throughput – 5 GHz up, 40 MHz mode
Throughput vs. Path Loss
Of course, after I had gone through all the walk-around tests, it occured to me that I could get around the Azimuth ACE MIMO test software’s limitation of not being able to handle a client that’s an Ethernet bridge. All I had to do was use the 1522 as an AP and throw a dual-band client into my notebook. So I also ran a full set of throughput vs. path loss tests using the Azimuth system to get a more detailed look at how the 1522 performed over its entire dynamic range.
I started out by using the Netgear WNDR3100 RangeMax Dual Band Wireless-N USB 2.0 Adapter, which uses an Atheros Xspan chipset. But very low (8 – 9 Mbps) uplink throughput with the router set to its default 2.4 GHz, 20 MHz bandwidth caused me to swap in a Linksys WPC600N Ultra RangePlus Dual-Band Wireless-N Notebook Adapter (Cardbus format), which uses a Broadcom Intensifi draft 11n chipset. The WPC600N not only solved the uplink problem, but had higher downlink throughput, too!
Figure 14 shows throughput vs. path loss performance for all 2.4 GHz modes and directions. Uplink performance appears to be better than I achieved in the walk-around tests with the pair of 1522s. This could be due to the three antenna configuration in the WPC600N card.
It’s a bit hard to tell in this composite plot, but the 40 MHz mode tests stop 3 dB sooner than the 20 MHz.
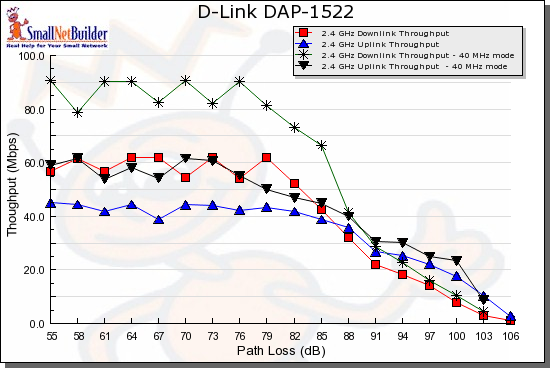
Figure 14: 2.4 GHz Throughput vs. Path Loss mode comparison
You can’t directly compare 2.4 and 5 GHz results from the Azimuth system because it doesn’t correct for the higher attenuation of 5 GHz signals. But it’s plain to see that 5 GHz range is significantly less than the 2.4 GHz mode and falls off faster. But that’s the story for pretty much all 5 GHz draft 11n products I’ve tested. So we have to compare the 1522 to its competition.
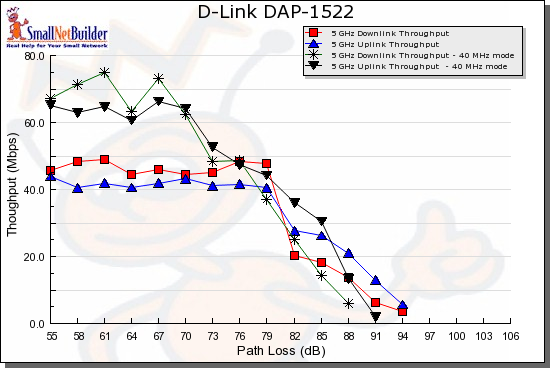
Figure 15: 5 GHz Throughput vs. Path Loss mode comparison
Figure 16 compares the 1522 with the D-Link DGL-4500 [reviewed] and the current dual-band darling, the Linksys WRT600N [reviewed]. Keep in mind that the 1522 may be at some disadvantage in this comparison because it is not being used with a "matching" adapter.
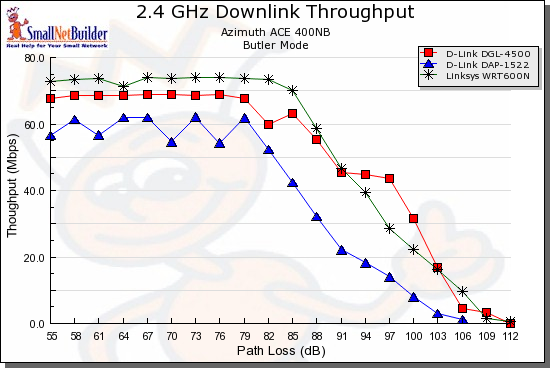
Figure 16: Competitive comparison – 2.4 GHz 20 MHz mode, downlink
Figure 17 shows the uplink comparison, with all products maintaining their relative positions. In the interest of space, I’m not going to take up space here with the 40 MHz mode plots. Here is 40 MHz down and 40 MHz up.
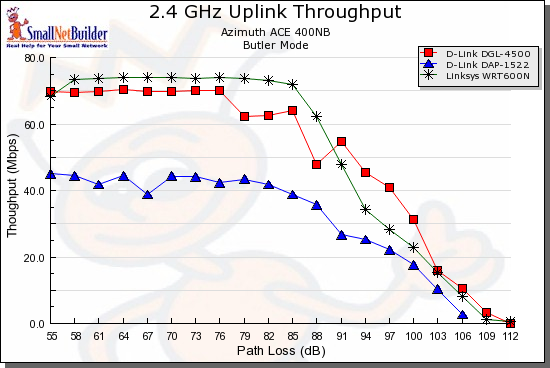
Figure 17: Competitive comparison – 2.4 GHz 20 MHz mode, uplink
The 5 GHz plots are even more interesting because, as luck would have it, the client used with each product is the Linksys WPC600N! For downlink (Figure 18), the Linksys WRT600N is the clear winner and the DAP-1522 bests the DGL-4500 only at the stronger signal levels (lower path loss).
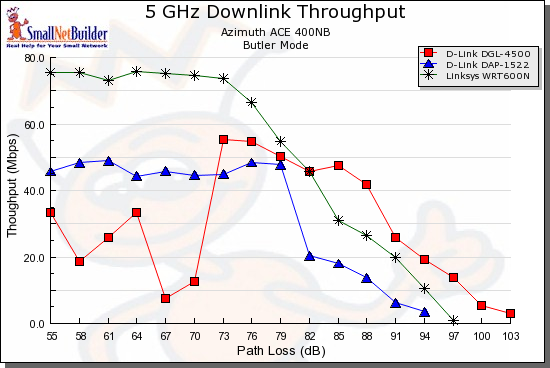
Figure 18: Competitive comparison – 2.4 GHz 20 MHz mode, downlink
For uplink (Figure 19) the DAP-1522 again ranks at the bottom. Here are the 40 MHz down and 40 MHz up plots for 5 GHz in which the 1522 beats the DGL-4500 only at stronger signal levels for downlink.
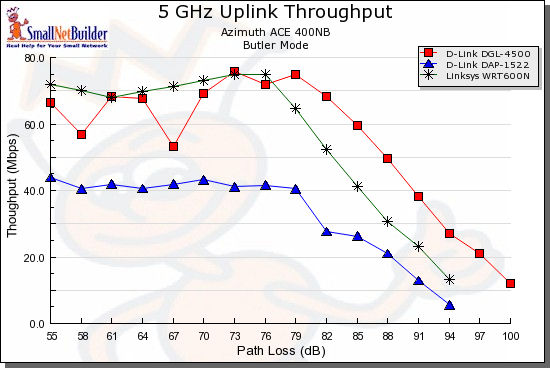
Figure 19: Competitive comparison – 2.4 GHz 20 MHz mode, uplink
I think the main factor that accounts for the 1522’s low comparative ranking is D-Link’s choice to go with a two-antenna 2T2R design to hit the $100 price point. The other two products are three antenna 3T3R / 2T3R designs, which will have a throughput advantage.
Legacy Mode Performance
I ran a quick check to see how the 1522 behaved with "legacy" clients. I used the Intel 2915abg internal mini-PCI adapter in my notebook and tested with the 1522 set to 2.4 GHz and 5 GHz 20 MHz bandwidth modes. The notebook was about 10 feet away from the 1522 in the same room and no other networks were in operation.
Figure 20 shows that the 1522 provided just shy of 19 Mbps, which is a bit below the mid-20 Mbps performance that I would have expected.
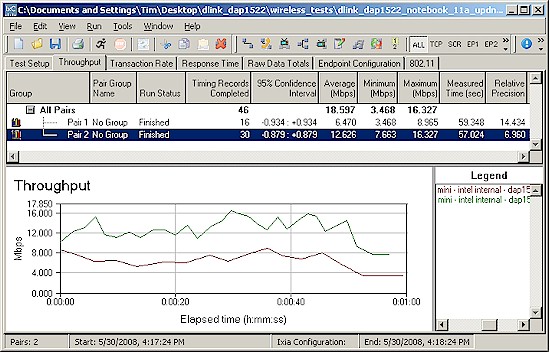
Figure 20: 11a client performance
But when I switched the 1522 to 2.4 GHz mode and reran the tests, I got the surprise shown in Figure 21! 7.5 Mbps is very poor performance; about a third of what I should have gotten. I also tried a second notebook with an internal adapter based on Atheros’ AR5001X+ chipset and got total throughput of 12.5 Mbps (9.5 Up, 3 Down).
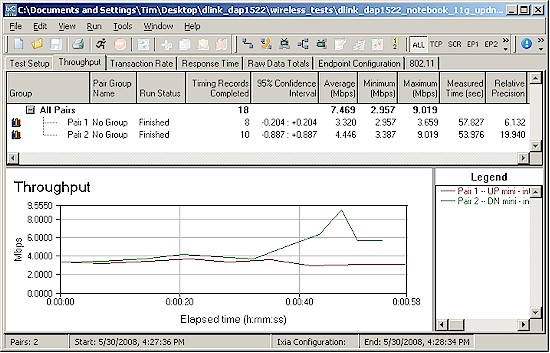
Figure 21: 11g client performance
This, plus the uplink results and other things I saw during my 2.4 GHz band tests tells me that D-Link and Ralink have some performance tuning work to do in that band.
Security Mode Performance
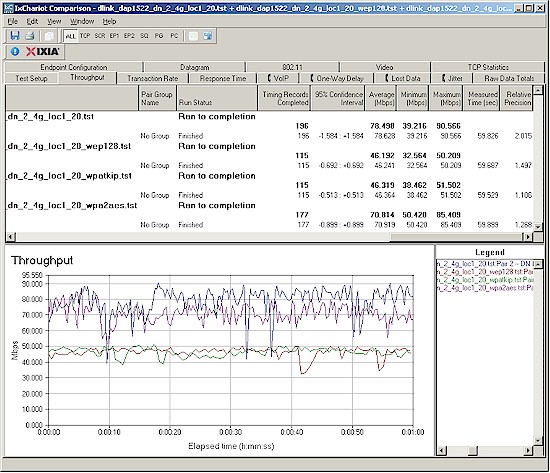
Since I previously found two Ralink based draft 11n routers that did not exhibit the severe throughput penalty in WEP and WPA/TKIP modes (the Belkin N Wireless Router and Edimax BR6504n), I almost skipped testing the 1522. Figure 22 shows that it’s a good thing that I didn’t!
Figure 22: Wireless security mode performance comparison
For some reason, it looks like the security mode throughput optimization Ralink provides in the other products is not present in the 1522. So use WPA2 AES when enabling security or suffer the (throughput) consequences!
Closing Thoughts
The good news is that the DAP-1522 can add dual-band draft 11n to your existing router for about $100. The bad news is that its 2.4 GHz operation draft 11n performance seems unstable and it may really stink at supporting legacy 11b/g clients. And while its 5 GHz performance seems like it has had more attention than the 2.4 GHz, the 2T2R radio won’t deliver as high a throughput as you’ll get with more expensive three-antenna 5GHz products.
Still, there aren’t many other ways that you can get access to the relatively clear 5 GHz Wi-Fi airwaves for as little money. While performance won’t compare to the more expensive options, you won’t feel as bad replacing it when better options come along. Just set it to the 5GHz band and keep using your current router’s 11b/g radio.

