Introduction

| At a Glance | |
|---|---|
| Product | Buffalo Technology LinkStation Pro (LS-250GL) |
| Summary | Fastest yet single drive SATA-based NAS with gigabit Ethernet |
| Pros | • Really takes advantage of its gigabit Ethernet port • Jumbo Frame support • FTP server • Supports Active Directory and external user authentication |
| Cons | • No print, Web or UPnP serving options • No sleep or idle spindown |
Buffalo Technology has been in the consumer NAS game since pretty much the beginning so its flagship LinkStation has been getting a bit long in the tooth. The company tried a tweak last year in the form of the Gigabit LinkStation, but the minor performance boost provided by the gigabit port has been outpaced by newer products.
Enter the LinkStation Pro with both a handsome new black enclosure (the better to blend in with media room gear) and completely new hardware platform. Although some of the functionality of the Link Station has been lost in the transition, the Pro really delivers on performance, as we’ll see later.
While the Pro has a new squared-off black plastic enclosure, the port complement is the same as the original LinkStation and “Giga” versions. The only change is that both USB 2.0 ports have been moved to the back panel. The Pro has its power supply built in, which is easier to deal with than the largish brick-plus-power cord arrangement sported by some of its competition. There is a single 2 inch fan, which to my ear was barely audible, even during the heavy load of testing.
The only controls are a Power / Shutdown switch on the front and reset-to-factory-defaults switch on the rear and the front panel indicators are Power, Link/Act, Info and Error. The difference between the Info and Error indicators is that the Info light blinks when you have a message waiting in the client utility and the Error light flashes an error sequence when the Pro has a problem.
Construction Details
The Pro is much easier to get apart than the original LinkStation – a few screws and some careful jiggling to unlatch the internal plastic case snaps was all it took. Figure 1 shows all the innards and Figure 2 the board. The 250 GB Western Digital WD2500JS-00NCB1 Caviar SE drive (8MB cache, 7200 RPM, 300 MB/s SATA) is mounted to a metal panel that normally bolts over the motherboard, but has enough slack so that it can be easily swung aside as shown in the photo.

Figure 1: LinkStation Pro inside view (click image to enlarge)
Figure 2 shows a close-up of the Pro’s board, which is based around a Marvell “Orion” 88F5182 Media Vault Processor, with the single gigabit Ethernet port provided by a Marvell 88E1111. 128 MB of RAM comes from two Elpida EDE5116AF DDR2 SDRAM chips and 256 kB of Flash from a chip on the circuit side of the board.

Figure 2: LinkStation Pro board (click image to enlarge)
Buffalo told me that the Pro runs on MontaVista Linux, the same as the earlier LinkStations. The Pro’s download page didn’t have the link to Buffalo’s GPL download page when I checked it, but they assured me that it would be added soon. In the meantime, use this link.
Note that even though the Pro is easy to open, swapping your own drive in will take a bit of doing. Like Buffalo’s other diskful products, the Pro won’t automatically initialize a blank drive. Due to UL regulations regarding the power supply, Buffalo can’t even officially condone opening the case. But if you download the firmware update utility and as long as the drive inside the Pro has no partitions, the utility will partition the drive with the SWAP, OS, and Data partitions and you should be on your way. Of course, doing this will void your warranty.
Set Up and Features
The Pro is a diskful NAS with 300, 400, 500 and 750 GB flavors available in addition to the 250 GB model that Buffalo sent for review. I received an early review unit, which had a hand-made CD containing the PDF documentation, Link Navigator setup program and Memeo backup software with a single-client license.
The Pro comes set as a DHCP client, so it automatically grabs an IP address from your LAN’s DHCP server. You can find out what that address is by either doing a broadcast ping (to the “255” address in your LAN subnet), to which the Pro will reply, or inserting the CD into your computer and using the Link Navigator program (Figure 3) which auto-launches.
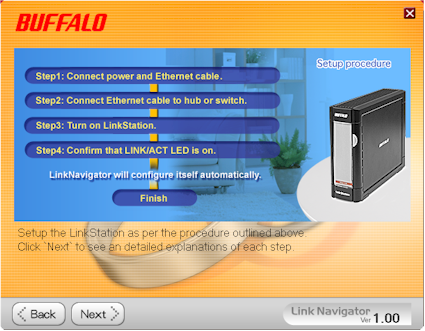
Figure 3: Link Navigator screenshot
Kudos to Buffalo for the Link Navigator, which is much more polished both functionally and visually than the company’s usual utilities. The program guides you through the physical set up and displays the IP address for the drive. It also allows you to install a more complete Link Navigator utility and the bundled single-client Memeo backup software.
I liked that the program runs from CD and finds your Pro without having to install to your computer, because all the Pro’s real configuration is done via its web interface. But I didn’t like that you can’t get a “Setup Complete” message until you install the Link Navigator software. But since this step comes after the CD-based version runs and finds your Pro, you can just quit the Link Navigator without having to do the install.
Figure 4 shows the main setup screen for the Pro once I had completed the initial setup and logged in.

Figure 4: Web interface Home screen
Buffalo has also revamped the LinkStation web interface for the Pro and cleaned it up both visually and functionally. Most of the options will be familar to anyone who has set up a NAS before, so I’ll move quickly through them. By the way, if you don’t want to be bothered with futzing around with any settings, you’ll be happy to know what the Pro comes with “share” and “info” shares already set up, which have read / write access for anyone.
The Basic Page holds controls to set host name, date / time, NTP server and interface language. Network lets you disable the DHCP client function (on by default) and set IP address, subnet mask, default gateway and primary and secondary DNS servers. This is also where you set the Ethernet frame size for 1,518 (default normal frame size), 4,102, 7,422 or 9,694 “Jumbo” byte frames.
Figure 5 shows the Workgroup / Domain sub-screen that controls where the Pro gets its workgroup / domain and authentication orders from. Note the support for Active Directory and using a Windows Domain Controller for user authentication.

Figure 5: Network Workgroup / Domain screen
Feature Tour, Continued
The Disk Management menus show capacity information for the main drive (which is XFS formatted by default) and two drives attached to the USB ports. This menu also holds Disk Check and Format options, with the latter including ext3 and FAT32 options that can be used only to format external USB-connected drives.
Shared Folders is where the controls for setting up new shares are. Figure 6 shows the options, which include designating the share for Mac OS share, FTP or LinkStation-to-LinkStation backup duties. Note also the ability to set access privileges at both the User and Group level. A Service Setup sub-menu holds the enables for FTP and AFP support.

Figure 6: Add Shared Folder screen (click image to enlarge)
Groups and Users are defined in the Group and User Management screens, which are very straightforward. Note that quotas cannot be set at any level – share, group or user.
The Disk Backup menu is used to set up the built-in backup utility that can copy selected Pro folders (or the entire drive) to either another networked LinkStation, TeraStation or an external USB drive.

Figure 7: Disk Backup screen (click image to enlarge)
Moving on to the Maintenance menu reveals controls for emailed alerts (Figure 8), UPS settings, Alert sounds, LED brightness (Status LED Setup), Shutdown and Initialization. By the way, I liked that the Pro chirps a little greeting when powered up, ready for use and to confirm the press-and-hold-the-power-button for shutdown.
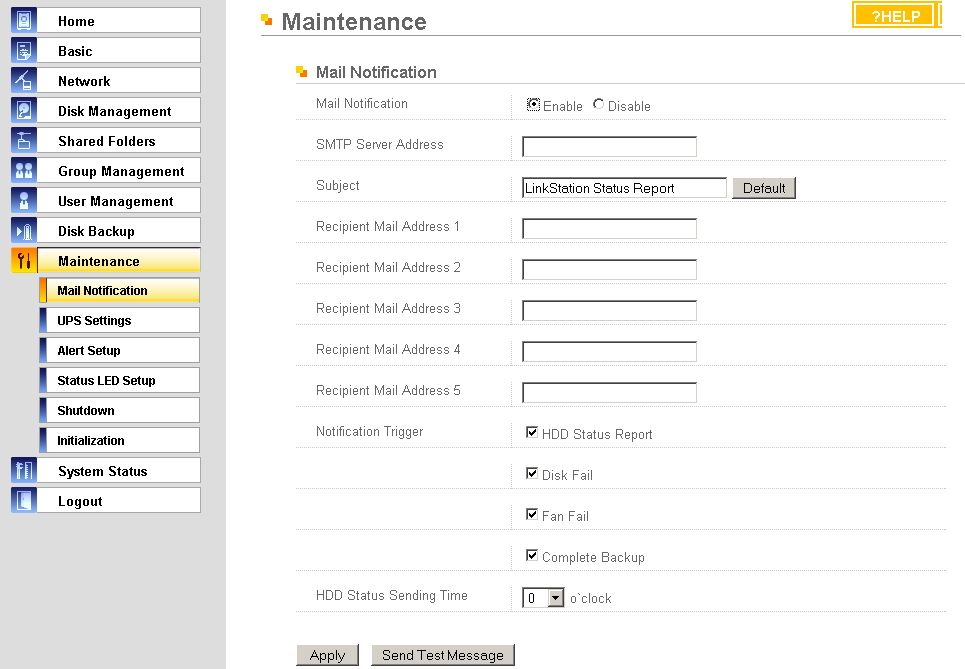
Figure 8: Mail Notification screen (click image to enlarge)
Finally, the System Status menu just provides more information on general System Information, attached USB devices, the HDD and Network settings, including received and transmitted packet count.
On the downside, features you won’t find in the Pro’s menus are controls for:
- HTTP or any form of media serving
- The print server found on the other LinkStations
- Admin interface idle timeout
- Timed sleep and wake up
- Idle time drive spindown or NAS sleep
- Logging
Performance
To see how well the Pro performed, I made a few Iozone runs using 100 Mbps and 1,000 Mbps connections. The 1,000 Mbps tests were run once with 4 K jumbo frames enabled, and one with jumbo frames disabled. (For the complete story on how we test NAS products and on the new test result format, go here.)
Figures 9 through 12 show the results, along with those from a selection of comparable products including Buffalo’s Gigabit LinkStation. The results don’t require much explanation since the Pro clearly outperforms all the products included for comparison in all modes and speeds.
You can also see some of the Pro’s results against a wider range of NASes over on our NAS Charts. It is at the top of the gigabit performance charts and is bested only by the Iomega StorCenter Pro NAS 200d with a 100 Mbps network connection.

Figure 9: LinkStation Pro 100 Mbps write comparison (click image to enlarge)

Figure : LinkStation Pro 100 Mbps read comparison (click image to enlarge)

Figure : LinkStation Pro 1 Gbps write comparison (click image to enlarge)

Figure : LinkStation Pro 1 Gbps read comparison (click image to enlarge)
Conclusion
Buffalo’s NAS product line now includes four LinkStation models, the original LinkStation, the gigabit LinkStation, LinkStation Home Server and now the LinkStation Pro. I found lowest web prices of $170, $197, $318 and $232 respectively, but the Home Server price is for a 300 GB model (there is no 250 GB).
But even though you’ll pay a little under 20% more for a Pro, the choice over a Gig LinkStation is a no-brainer if your primary selection criteria is performance.
It’s unfortunate that the Pro doesn’t have a superset of its predecessor’s abilities, which forces consumers to choose between the Pro’s significant performance improvement and the print and media serving capabilities of Buffalo’s previous-generation offerings. But from what I hear from Buffalo, a print server in the Pro is not in the cards, although firmware updates are planned for the Pro that expand upon its features aimed at the Pro(fessional) buyer. And as for media serving capabilities, the existence of the “Home Server” offerings in Buffalo’s line-up provide a hint of the direction they are taking.
At any rate, if you’re looking for a reasonably-priced single-drive NAS that can really put a gigabit LAN connection to use, you should definitely consider the Buffalo LinkStation Pro. This is one hot NAS!