Introduction
Updated 9/12/13: Improved configuration security
In my review of Ubiquiti’s EdgeRouter Lite (ERL), I promised some help with getting the router from its out-of-box raw state that doesn’t function as a basic NAT router into something that actually works as a NAT router!
The SOHO Edgemax Example in the Edgemax Wiki is a good resource in that it tells you what the configuration changes are. But when I tried to follow it, I screeched to an early halt because the first thing it has you do is change your LAN connection to from the default port 0 (eth0) to port 1 (eth1). If you are not careful how you do this, you end up disconnected from the router admin and need to reset to start all over again.
So, instead of making you stumble through your first configuration, I’ve prepared two configuration files, described below, for your uploading pleasure. Either one will get you connected to the internet. Choose the one that is the closest to what you want.
Updated 9/12/13: Improved configuration security
NOTE! Ubiquiti let us know that the local firewall rules (WAN_LOCAL) were missing state rules that could leave them exposed to router attacks. The download files have been updated as follows:
Changed this:
name WAN_LOCAL {
default-action drop
description "packets from Internet to the router"
enable-default-log
rule 1 {
action accept
description "allow established session to the router"
log disable
protocol all
}
rule 2 {
action drop
description "drop invalid state"
log enable
protocol all
} }
to this:
name WAN_LOCAL {
default-action drop
description "packets from Internet to the router"
enable-default-log
rule 1 {
action accept
description "allow established session to the router"
log disable
protocol all
state {
established enable
invalid disable
new disable
related enable
}
}
rule 2 {
action drop
description "drop invalid state"
log enable
protocol all
state {
established disable
invalid enable
new disable
related disable
}
} }
This post in the Ubiquiti Forums also has some basic SOHO configurations with PPPoE client and PPTP remote-access server for the three port EdgeRouter Lite and a basic SOHO configuration for the newer five port EdgeRouter-POE.
ubnt_erl_bridge_config.tar.gz [Download link]
This is a basic router configuration with one WAN and two LAN ports with DHCP connection type for WAN and DHCP server for the LAN. Specifically:
- Configures port 0 as WAN, expecting a simple DHCP connection
- Configures the ERL’s admin address as 192.168.1.1
- Bridges ports 1 and 2, essentially forming a two-port switch for LAN connection
- Configures a DHCP LAN server, serving addresses from 192.168.1.100 to 192.168.1.200
- Configures a simple NAT router to shart the internet with all LAN clients
- Configures a firewall rules blocking all inbound WAN-to-LAN traffic to LAN clients and to router itself
ubnt_erl_2lan_w_dhcp.tar.gz [Download link]
This configuration supports two subnets on the LAN side, with different IP ranges for each. Both subnets have internet connection, but do not allow connection between them.
- Configures port 0 as WAN, expecting a simple DHCP connection
- Configures the ERL’s admin address as 192.168.1.1 on port 1 and 192.168.2.1 on port 2
- Configures a 192.168.1.0 subnet with DHCP LAN server, serving addresses from 192.168.1.100 to 192.168.1.200 on port 1
- Configures a second 192.168.2.0 subnet with DHCP LAN server, serving addresses from 192.168.2.100 to 192.168.2.200 on port 2
- Configures a simple NAT router allowing internet connection to both subnets
- Configures a firewall rules blocking all inbound WAN-to-LAN traffic to both LAN subnets and to router itself
Both configurations use the default ubnt / ubnt login.
Installing the Configuration Files
To install either configuration, follow these steps:
1) Reset the ERL to defaults, following these instructions from the Quick Start Guide (QSG). If the ERL is factory-fresh, you can skip this step.
To reset to factory defaults, disconnect the Power Adapter from the Power port. Press and hold the Reset button while connecting the Power Adapter to the Power port. Keep holding the button until the right LED on port 2 starts flashing and then stops after a few seconds.
Make sure you press the reset button until the port 2 light stops flashing and goes out.
2) Download the desired configuration file to the computer you will use to configure the ERL.
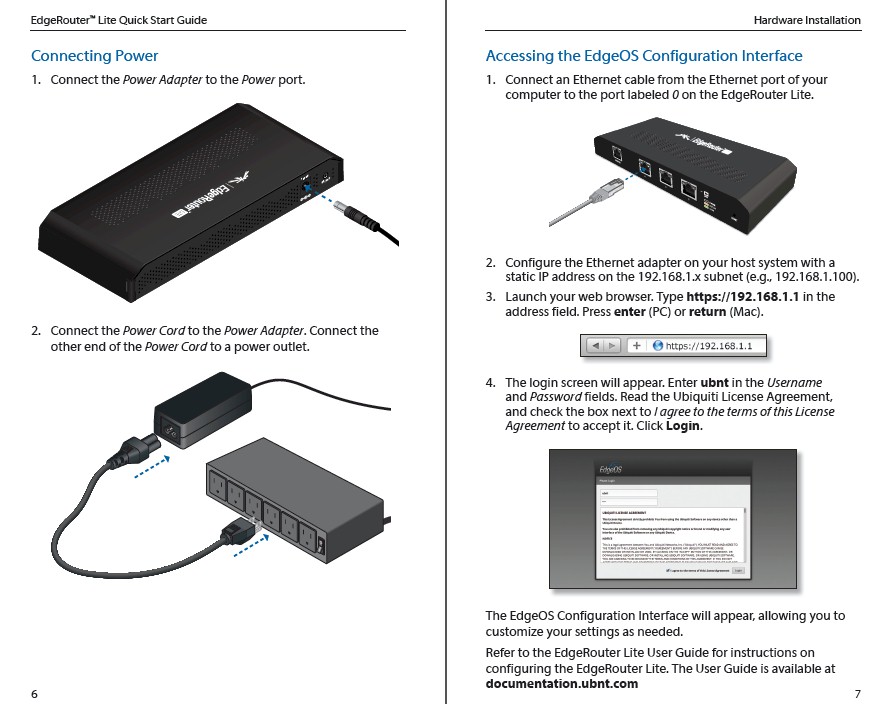
3) Connect a computer to the ERL, following the instructions from the QSG below.

Connecting to the ERL
You can ignore any invalid security certificate warnings from your browser. Just accept the certificates.
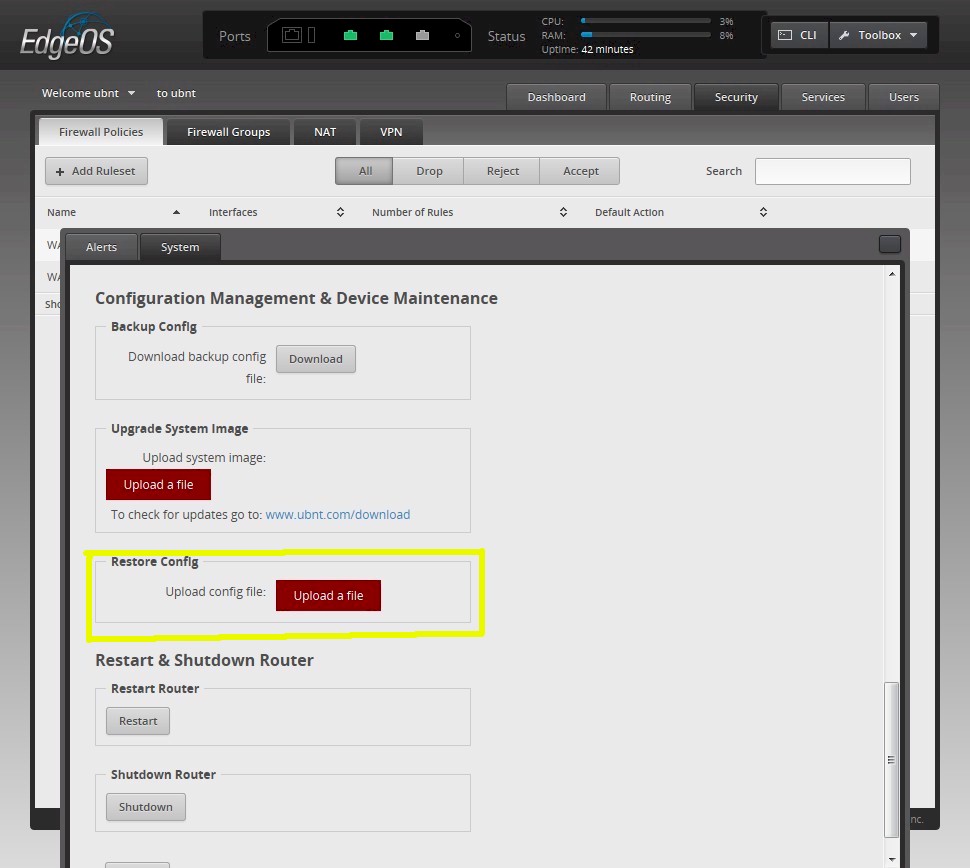
4) Click the System tab at the bottom of the Admin screen and scroll down to the bottom until you see the Restore Config button as shown below. Do not use the Upgrade System Image button. That is used to upgrade router firmware. Click the Restore Config Upload a File button and select the file.
NOTE! You do not get a confirmation prompt and file upload is pretty much instantaneous. So be sure you select the correct file!

Connecting to the ERL
5) Respond to the prompt to reboot the router to apply the configuration. When the reboot starts, move your computer from port 0 to port 1. This is because both configurations change the LAN connection from port 0 to port 1. Connect your modem or internet connection device to port 0. Wait about a minute for the router to reboot.
6) If you leave the browser alone, you should get a prompt that your session has expired and you need to log in again. This means the router has properly rebooted and the configuration has taken. If you don’t get this prompt after a minute or so, you can try entering 192.168.1.1 into your browser again to access the ERL admin.
7) Remove the static IP settings from your computer and set it to obtain its IP address automatically, i.e. be a DHCP client. Force a DHCP release/renew on your computer or do a connection repair or whatever you need to do to get your client to perform a DHCP request. Check that the IP address is in the proper range and that the Gateway and DNS both point to 192.168.1.1.
8) If the client IP address information checks out as described in #7, then you should be good to go. Point your browser at your favorite site and enjoy!
Tips For Rolling Your Own Config
Once you have one of these basic configurations in place, you can experiment with changing them. But there are a few things to keep in mind.
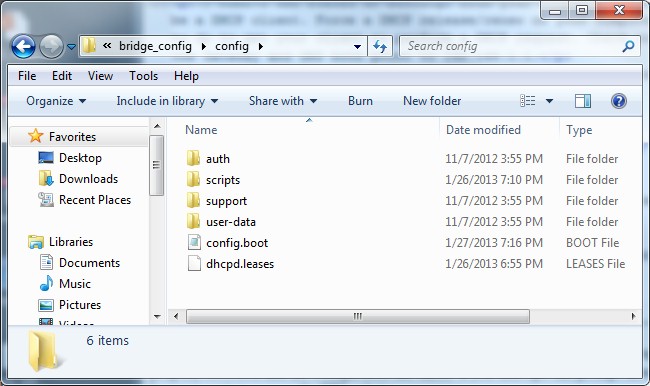
- The tar.gz file generated via the System > Backup Config button backs up the ERL’s entire config folder, whose contents are shown below. I learned this the hard way, with the help of mrjester in the EdgeMax Forum.
The config.boot file is the only thing you need to edit if you want to modify a configuration offline. But you must then tar and gzip the entire config folder contents before you can use the Restore Config button. If you try to just restore the config.boot file using that button, you will get an error. I used 7-zip to tar, then gzip the tar file before upload.

Config folder contents
- You can find example config.boot files in the EdgeMax Forum. But you must put them into a properly constructed tar.gz backup file as described above to upload them via the Restore Config button. If you want to upload just the config.boot file itself, see the next tip.
- You can transfer files to the ERL using WinSCP and other SSH based programs. But note that most files are owned by root, so you can’t just overwrite them. You will have to rename the config.boot file first, then upload your modified version and then reboot the ERL to have the new configuration used.
- The Port Forward example is a good starting point if you want to learn to forward ports. Note that you need to set both NAT and firewall rules for each port you want to open.
- You have access to most common Linux commands when logged into the CLI window or connected via Telnet or SSH. So you can modify the config.boot file directly if you like to live dangerously. But make a copy first!
- Some of the CLI commands can be found in the Wiki, but there isn’t a complete list or a downloadable reference available from Ubiquiti. Since EdgeOS hasn’t diverged much from Vyatta at this point, the Vyatta Quick Start and Basic CLI references might be helpful in getting up the learning curve.
- Ask questions over in the EdgeMax Forum. My questions about the config file were answered within 30 minutes or so…on a Sunday!
If you find errors or problems using either the config files or these instructions, post in the SNB Forums or send an email.
