Introduction
Update 8/9/2007: This product has been discontinued. But a similar product is available directly from JumpNode Systems.
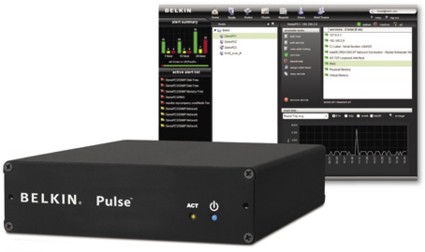
| At a Glance | |
|---|---|
| Product | Belkin Pulse (F1DU110 1 year, 10 device subscription) |
| Summary | Simple, yet robust SNMP-based network monitoring system |
| Pros | • Plug and Play Installation • Auto Device Discovery • Externally Available Web Dashboard • Remote access to LAN devices |
| Cons | • Analog Modem requires dial-up account • Needs separate cable for static IP config |
The Belkin Pulse is a simple but highly functional and powerful network alarming tool capable of monitoring 10–50 devices. It has the capability to alarm IP-enabled devices with a wide variety of technologies—including IP, HTTP, and SNMP—yet it is simple enough to deploy on even the most basic network.
The technology behind the Belkin Pulse is from a company called Jumpnode. The core of this product is what Jumpnode refers to as their appliance-enabled software (AeS) service platform. The Pulse, leveraging the Jumpnode technology, is an all-in-one network monitoring solution, combining a simplified device with powerful software and an external service to produce a very robust package.
In this review, we’ve installed and configured the Pulse to monitor numerous different components to get a feel for how it works. We’ll run through many of the configuration options and hit on the highlights of its functionality to give you an idea of how it could benefit your network management.
Before we get into the Pulse, let’s cover some concepts. Monitoring a network can be very basic: from simply pinging various devices, to running detailed scans, polling, and scripts to verify functionality and monitor service levels.
Why do you want or need to monitor your network? If you’re not alarming and monitoring your network today, you’ve likely received various panicked phone calls or urgent visits to your desk telling you email is down, the web site is down—or, my favorite: the Internet is down!
This is a basic reactive network alarming method: letting end users detect and tell you about problems. This strategy often leads to tense and stressful situations that can be minimized or even eliminated with the right tools.
Alarms and failures are never good, but receiving proactive notification from an intelligent network device can position network administrators to quickly understand the issue and focus on resolution. A good network alarming system can monitor the key functions of your network and provide reports and quick communication in the event that a device stops responding or begins performing poorly.
Network alarming systems are often referred to as network management systems, or NMS. An NMS is a critical tool used in both large and small networks. They are used in large Network Operation Centers (NOCs) to monitor and manage large multi-site networks. Many network management systems provide graphical displays and reports on the status of a network, as well as numerous options on notifications—including audible and visual alarming, emails and messaging, communication, or even automated actions in response to defined conditions.
There is a standard protocol commonly used in network monitoring, called SNMP. SNMP, or Simple Network Management Protocol, is an IETF (www.ietf.org) standard for network management and monitoring supported by most advanced network enabled devices. SNMP commonly uses UDP ports 161–162 for its data path. It is not unusual to find SNMP support even on smaller home devices today.
SNMP has three versions. The original is version 1, with versions 2–3 providing greater functionality over the previous. The key is to configure both the device and NMS to use the same version.
An NMS can communicate with one device at version 1, and other devices at other versions, depending on what they support. The Pulse supports SNMP version 1 and 2c, with SNMP version 2c the most commonly used variant of version 2. For more details, check out this good overview of SNMP.
Devices being managed and monitored may have built-in SNMP support, or be running an SNMP agent. With this support or agent, SNMP-enabled devices can reply to a management system’s information requests (GET), and/or proactively send information to the monitoring system (TRAP). SNMP GETs and TRAPs can provide very detailed information about a managed device’s status and performance.
Setup
The Pulse is pretty simple looking—a black box about 7” deep, 5.5” wide, and 1.5” high (Figure 1). There are two indicator lights on the front, one for network activity, the other for power. This is consistent with the Pulse’s focus. The idea of the Pulse is to run out of sight and out of mind; you only notice it when there is an issue on your network that you need to know about.
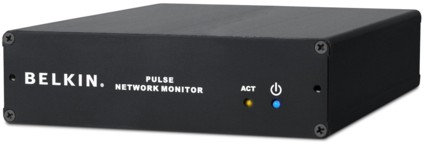
Figure 1: The Belkin Pulse
The Pulse comes with a phone cable, Ethernet patch cable, Ethernet crossover cable, USB/Ethernet adapter, power cable, and some very minimal instructions. After testing the Pulse for the past couple weeks, I can honestly report it is pretty intuitive.
You start by simply connecting the Ethernet cable to a port on your network, plugging in the phone line (an optional step), and plugging in power. The Pulse is designed to pull an IP address via DHCP, so IP configuration is not required.
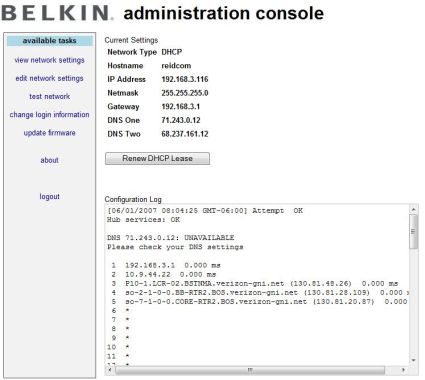
If you want to assign a static IP address, you can do so later via the very functional web-based Dashboard, or you can use the included USB adapter with the crossover cable to access a basic Administration Console Utility (Figure 2).
Figure 2: The Pulse’s Administration Console
To access this utility, you connect the USB Ethernet adapter to the Pulse, and connect the included red cross-over Ethernet cable from the adapter to your PC. The Pulse provides an IP address to your NIC, and then allows you to log in via a browser to the configuration page at http://192.168.100.1.
I found it interesting that you can’t log into the Pulse via the dynamically acquired IP address assigned to its Ethernet port. However, this wasn’t an issue in testing, as using DHCP worked fine, and once the device is accessible via the Dashboard, you can change the network settings there.
Also in the Admin Console is the firmware update utility. Clicking on Update To The Latest Firmware triggers the Pulse to check for an updated file. The firmware that came with the device, 1.5.5, was the current firmware.
Once all plugged in and connected, the included instruction sheet directs you to register the device at Belkin’s website to activate it. As a side note, it would be helpful if the instruction sheet told you to write down the serial number, as it is located on the back of the Pulse and is easier to read before installing the device.
To activate the Pulse, you enter a registration code, set up a user name and password, enter the serial number, and select a time zone. Our test box came with a 1-year subscription to monitor 10 devices, making it a nice “NOC-in-a-box” solution for our small LAN. Belkin also offers a three-year subscription option, as well as the ability to support 10, 20, or 50 network devices.
Configuration
Once you’ve completed installation and product activation, you can let loose the device to find your network and start configuring monitoring services. We installed the Pulse on a small LAN consisting of a Windows XP Pro machine acting as an FTP server, a Linux machine running Fedora Core 6 acting as an IP PBX, a NAS (Buffalo LinkStation), a VoIP ATA (Grandstream HandyTone 286), a wired router (Linksys RV042), a wireless router (Dlink DGL-4300), and a network printer (HP 7310). Holding this LAN together are a couple of 5-port unmanaged 10/100 Ethernet switches.
One of the strengths of the Pulse is its plug and play functionality. The Pulse provides an automatic way to detect the devices on the network and speed up the process of configuring alarming and monitoring.
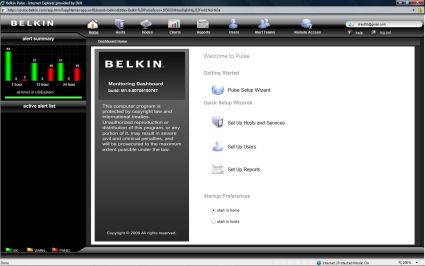
The Pulse Setup Wizard (Figure 3) will walk you through the steps to find and scan the devices on your network, customize notification profiles such as email addresses or pager numbers, and to set up reporting.
Figure 3: The Setup Wizard
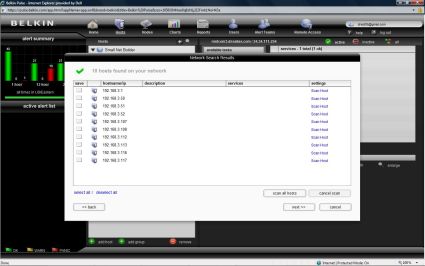
The Wizard gave me the option of letting the Pulse find my hosts automatically, or entering them manually. I chose the automatic method (Figure 4). This method provided two additional choices: to resolve host names and/or to scan for SNMP-enabled devices, with a warning that each of these additional scans may add time.
I selected the SNMP choice, and entered my network’s “community string” I had preset in my devices. The community string is like a password for SNMP communication. All you do is set your NMS and each device to use a common string of characters.
It took less than one minute to return the below screen (Figure 4), displaying the IP addresses of all the devices on my network, impressive!
Figure 4: The results of the network scan
From there, I selected the option to scan all hosts. This took a bit longer, but there is a nice display showing a rotating icon next to each device as it is being scanned. Once scanned, the Pulse produces a check mark next to each device, indicating it has discovered services it can monitor and has classified the device.
For a larger NMS, this is a function referred to as auto-discovery. This is useful, especially in deployments where there are dozens, hundreds, even thousands of devices. Auto-discovery may not get all the details perfect, but it saves time getting them entered so you can edit them.
These scans took about four minutes, and then gave me the option to edit each individual device, or choose Next. I chose Next, which took me to another screen where I selected Finish.
This created a list of the components on my network, each with about 1–10 different monitoring services per device. This is where you customize what you want to monitor and alarm.
One of the biggest issues I’ve seen in Network Operations Centers is activating too many alarms on too many devices. This condition ends up providing excessive information, which leads to overwhelming the limited resources available to respond, and masking critical conditions with a lot of “noise.”
I decided to go through each device and optimize its alarming for what was truly necessary. For purposes of testing, though, I probably activated too many services in order to do a good evaluation. For a longer-term deployment, I’d probably pare down the monitored services even further.
Starting at the top is the device at 192.168.3.1, which happens to be my main router, a Linksys RV042. This device is connected to my ISP (Verizon FiOS), acts as a firewall, and provides DHCP services for my LAN. The RV042 has a web utility for configuration, and also supports SNMP.
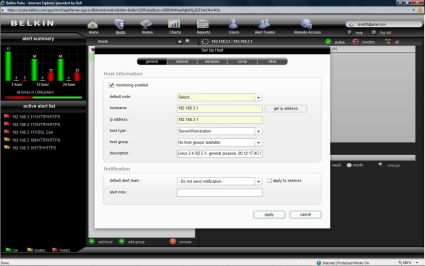
The Pulse detected the RV042 as a Linux 2.4 Server/Workstation, indicating the OS on the router is likely Linux. The Pulse auto-configured itself to monitor the RV042 via a ping to its internal IP (192.168.3.1), its web configuration page (http://192.168.3.1), and RIS Data (inter-communication). The first two were useful, the third not so much, so this is where it is important to customize the Pulse configuration (Figure 5).
Figure 5: Configuring a host device
Configuration – more
I proceeded to change the host type to Router and clicked apply. This reduced the available configurations for this device to General, Internet, SNMP, and Other, eliminating the Windows monitoring option.
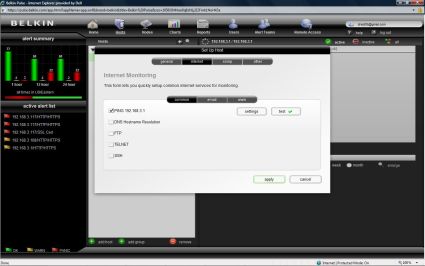
In the Internet option, there are three areas to configure: Common, Email, and WWW. Under Common, I could select whether I wanted to ping my device, perform DNS host name resolution, check FTP, Telnet, or SSH. I stayed with ping.
A useful feature is the buttons to the right that allow for further Settings and Test (Figure 6). The Settings button lets you choose how many pings to send, defaulting to 10. I left that alone, but ran the ping test to verify the Pulse could successfully reach 192.168.3.1. I liked the check mark returned on the Pulse Dashboard display, confirming success.
Figure 6: The ping configuration option
With this piece verified, I went to the Email tab. This is where you can configure monitoring of IMAP, POP, and SMTP. Since my router wasn’t doing any of these things, I left them blank.
The next tab is WWW, which is for monitoring web servers. This is useful on a simple router, as it can be used to verify that the device’s CPU is functioning. I’ve seen devices reply to a ping, yet be in a hung state and not respond to input, so logging in to a device can be a useful means of checking status.
This showed the value of customizing the configuration. Had I left this alarm on, I would have received notifications of problems, as the web page for my router requires authentication. The Pulse allows you to configure the user name and password of your device, which will enable the Pulse to log on and check it is functioning.
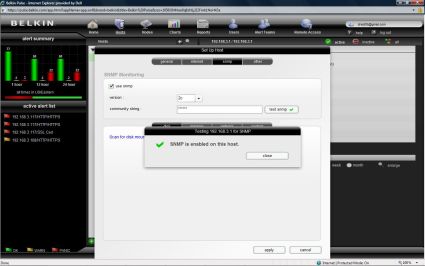
After clicking Apply, I was ready to move to the SNMP customization options (Figure 7). Running an SNMP test returned verification that SNMP was working between the Pulse and my router. Within this configuration screen are options for monitoring disk, memory, network, and custom. Of primary concern on this router is its connection to the Internet, so I left the disk and memory scans alone.
Figure 7: Configuring SNMP
Running the scan tool under the network SNMP page showed many things that could be monitored, including the internal and external IP addresses, as well as the two WAN interfaces (ixp0 and ixp1), a loop back interface (lo), and a point-to-point protocol interface (ppp1).
I was already pinging the internal interface, so additionally monitoring the internal interface via SNMP would be redundant. Monitoring the external IP address would create unnecessary alarms, as I have a dynamic WAN IP, so I’d get meaningless alarms when my IP address changes. However, polling the WAN interface connected to my ISP will enable monitoring connectivity to the Internet.
With the internal IP address being pinged, the web page of the router being regularly checked, and the external interface being monitored via SNMP, I deleted the RIS Data monitoring, leaving me with the three functions on my main router alarmed.
Next up is the Windows machine. The amount of services the Pulse can monitor on a Windows server is impressive. Belkin has a small application (agent) you can download from their website that will enable detailed communication between Windows and the Pulse. The software agent is available via a link found in the Windows configuration section of the Host Setup section of the Pulse Dashboard.
Leveraging this software and the Pulse configurations, I was able to alarm this Windows machine’s IP address, FTP service, Web server, CPU, memory, uptime, and Remote Desktop access. In addition, Directory Services, NetBIOS, HTTP and SMB were all auto enabled. I deleted the monitoring of the Directory Services, NetBIOS and SMB, but tested and left all the others.
The end result for my Windows box is that the Pulse is monitoring FTP and Web Services, pinging it, checking CPU, memory, and uptime, and watching Remote access. Further, within each service, a network administrator can set up different notifications to keep on top of the system.
For my Linux box, I asked Belkin if they had a Linux version that would provide monitoring as detailed as their Windows application. As the folks at Belkin explained, most Linux admins use SNMP, so there is nothing additional to install other than ensuring that SNMP is properly configured on your server.
I went through and optimized the alarming and monitoring for the remaining devices on my LAN (NAS, Printer, ATA, Wi-Fi Router), choosing and testing options appropriate to each device, and using the included test functionality to ensure they were properly configured.
For each device, I typically had the Pulse ping its IP address and check its Web utility. If SNMP was available, I selected monitoring of the services I thought would be useful and informative.
In Use
With the Pulse installed and my network configured, there were a couple of things I wanted to test. First, I wanted to verify notification in the event of a problem, both via email and to my cell phone. Second, I wanted to test the analog modem functionality, as this can be necessary for sending alarms when network connectivity is down.
To test notification, I used my Windows server as the guinea pig. For notification to work, each device in the Pulse Dashboard has to be enabled for notification, and you need to configure users and Alert groups. In my test, this was relatively simple, configuring myself as the sole user in a single Alert group. Obviously, additional employees can be added as necessary.
I have a Verizon cell phone, which can receive text messages via an email address of (myphonenumber)@vtext.com. I used this email address as the notification for my user account in the Pulse Dashboard. There is an option for short or long format messaging, depending on whether the message is going to an email inbox or cell phone.
I did a simple graceful shut down of my Windows PC and noted the time it was down. I pinged it to verify it was gone from the network. Within about one minute, alarms started appearing on the Pulse Dashboard, indicating a failure of the IP address of the Windows PC.
In a few more minutes, I started receiving text messages to my cell phone telling me there was a problem. The text of the message for failed pings was as follows:
From [email protected]
PANIC 0h 16m dur
Packet Loss=100.0
192.168.3.51 ping
Additional messages were similar, reporting failure of the CPU scan, memory scan, and so on. Also, the FTP and Web monitoring services indicated “No route to host.”
Test one passed! The Pulse detected the Windows PC was down and sent notifications reporting the conditions.
Turning the PC back on and starting all necessary services on the PC cleared the alarms on the Pulse Dashboard automatically. Further, I received messages to my cell phone that all previous conditions were now OK. For example, the OK message for ping showed Packet Loss=0%.
Kudos to Belkin on enabling both outage notifications and corresponding alarm clear notifications. It is fairly common for alarms to clear themselves, so it is welcome news to receive a message showing a device restored and the condition cleared.
I repeated the above test; this time configuring the Pulse to send notification to my email address; below is the text of one of the messages.
Alert for Small Net Builder from TestNetwork
Name: FTP
06/01/2007 21:28 – PANIC – 192.168.3.51 (192.168.3.51), No route to host
06/01/2007 21:28 – CREATED
Elapsed time: 0h and 0m.
General Host Alert Notes
Windows Server Error!
Notice in the above message the line that says “Windows Server Error!” This is a custom message I entered in the Pulse configuration, which is useful information telling me which of my devices is in alarm. Each device can have a custom message configuration, which will help the network administrator receiving the messages better understand the condition.
To test the analog modem, you need a dial-up account. My network is pretty small, and long ago I canceled my dial-up service in favor of broadband. It’s a good idea for a business network to maintain a backup dial-up account, and this is an example where it is valuable. I used a temporary dial-up service so the Pulse could dial out.
For the analog modem test, I disconnected the WAN cable to the main router to simulate a failure of the Internet service.
I was pleased and impressed to quickly receive messages to my cell phone indicating that the WAN interface on my main router was down. Internet access is a key element of most networks, and can be one of the more common sources of failure. The Pulse’s included modem and ability to use an alternative dial-up service to notify of network failure enables a network administrator to quickly contact their ISP and report a problem.

Figure 8: An alert message warning of a connection failure
From the above message (Figure 8), you can see that the Pulse is indicating “Connection to 192.168.3.1 timed-out.” This is a little misleading, as 192.168.3.1 is the internal IP address of the router, which did not fail. 192.168.3.1 is also the name for the device in the Pulse configuration, which explains the message. Most important is the “Name: ixp0” section at the top of the message. This tells me the alarm is on the WAN interface on my router.
Test two passed! The Pulse detected my Internet connection was down and was able to notify me through a secondary connection.
A nice option on the Pulse is the ability to add multiple users to your notification, enabling paging on some alarms and general emails on others, as well as the ability to send messages to multiple recipients.
In Use – more
The Pulse also has some valuable functionality for providing Charts on device performance, Reports on overall network performance, and a neat feature to enable Remote Access to internal devices.
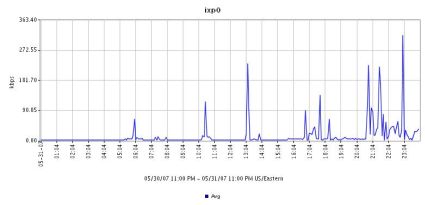
For example, below is a chart on average network utilization on my WAN link over a 24-hour period (Figure 9). This data was generated using the SNMP monitoring functionality on the main router. I configured the Pulse to send this report to my email address.
You can see from this report that the peak bandwidth utilization is between 272 and 363 Kbps. With a 5 Mbps connection, there is obviously a lot of bandwidth remaining. For a business wondering whether to upgrade to a faster connection, this is a useful measurement tool to determine if the upgrade is truly warranted.
Figure 9: An SNMP monitoring chart of average network utilization
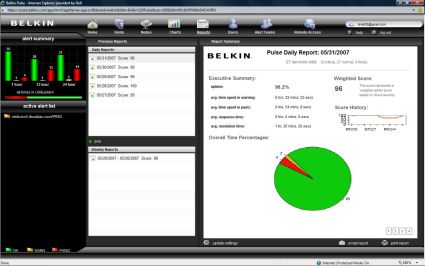
The Pulse can also be configured to provide a summary report on overall network performance on various intervals. Below is a screen shot of the Pulse Dashboard showing a 24-hour report on overall network performance (Figure 10).
In this report, the Pulse provides total times of device warning and panic conditions, as well as response and resolution times. Also of interest, the Pulse assesses a composite score of 0–100 for your network for the reported period. This is a handy relative measurement on overall network performance, and useful for communicating network status to non-technical personnel. This report can be viewed via the Dashboard, as well as received via email.
Figure 10: The daily report on overall network performance
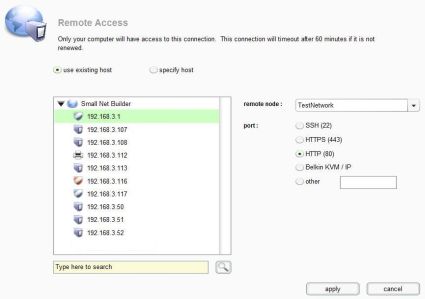
A surprising feature of the Pulse is Remote Access. Through the Dashboard, you can configure Remote Access to devices on your LAN. This is a handy tool that could be very timely while off site and receiving alarms or notifications on your network.
For example, using this functionality, you can access the web configuration page of your router, even if you haven’t enabled WAN access. This is accomplished through the Pulse’s secure connection to the Belkin web service.
As you can see below, remote connections can be configured for SSH, HTTPS, HTTP, KVM IP, or Other (Figure 11). Upon selecting the type and clicking apply, you are presented with a URL mapping your internal network device to a public web site. For security purposes, the connection automatically times out after 60 minutes or can be manually canceled at any time.
Figure 11: Remote access configuration for network devices
Conclusion

Figure 12: The NOC at Harvard
Source: aldebaran.tekinteractive.net/cis202ivy/case_studies/01evens/noc_images/harvard_noc.jpg
With its web based Dashboard utility, the Pulse is surprisingly powerful and functional. The Pulse communicates over 168-bit encryption to a centralized service, enabling a network manager or administrator to access a very informative network Dashboard from anywhere they have an Internet connection. The Pulse even enables remote access to network devices behind a firewall, if you choose to set it up.
Moreover, the Pulse provides a nice level of redundancy, enabling alarming of your network even if the network itself goes down! The built-in analog modem provided excellent network alarming capability, successfully notifying of a loss of broadband connectivity.
In my opinion, it would be helpful for Belkin to offer a dial-up option to the subscription for those who use broadband exclusively and don’t maintain dial-up service for redundancy.
The Pulse is priced from $1,499 for a 1-year, 10 server subscription to $5,999 for a 3-year, 50 server subscription. This works out to about $150 per year, per server at the entry level, to about $40 per year, per server for the 3-year, 50 server product.
As mentioned at the beginning of this review, the Pulse is based on technology developed by Jumpnode. Jumpnode sells its product through resellers and OEMs, not direct, hence the Belkin Pulse. Belkin informed me that once the Pulse is launched, Jumpnode will no longer offer their end-user product in order to focus on custom solutions.
Jumpnode does provide a price list on their website, displaying the costs to resellers and OEMs. For example, Jumpnode lists the 1 year 10 server product at $999. But if you look closely at the Jumpnode pricing, Remote Access functionality is an add on. With Remote Access included, the subscription pricing for the Jumpnode and Belkin Pulse are nearly the same.
There are various software solutions for small network monitoring, such as DLink’s DView product, as well as various freeware, such as Servers Alive. The advantage of the Pulse is that it is a stand-alone device that communicates to an external service, providing a measure of reliability that an internally-running tool would be hard-pressed to match.
Loss of functionality on the network can result in a loss of productivity, sales, and revenue, and can affect many aspects of a business. Having a reliable network alarming system can provide advance warning of possible problems, as well as timely notification of various conditions, enabling proactive outage prevention and quicker resolution to outage conditions.
Alarming a network is a Return on Investment (ROI) decision. The higher the cost per hour of downtime, the shorter the ROI of an NMS. If several hours of downtime cost thousands of dollars to your business, an NMS in conjunction with good network management can pay for itself very quickly.
There are many technologies and methods for monitoring a network. Belkin’s Pulse is an easy “NOC-in-a-box” solution to network monitoring, providing the small network manager with capabilities typical in much larger networks. The Pulse makes it easy to get an alarming solution up and running quickly, and it provides a high degree of functionality.
Don’t judge a book by its cover, as they say. The Pulse may look simple, but it really has a lot under the hood!

