Introduction
Updated 8/11/2008: Link to wireless card article
Part 1 of this series provided an explanation of WLAN basics and described common wireless problem symptoms and their probable causes. And Part 2 showed you how to perform a site survey to get information about your wireless environment. In this installment, I’ll show you how to increase the effective coverage of your wireless network. Note that I didn’t say "range", and it’s important to understand the difference.
NOTE: Please read references to access points (AP) or wireless routers as applicable to both kinds of products unless otherwise noted.
When manufacturers spec range, they mean how far a wireless router and card will stay connected—regardless of speed in an open-field (no obstacles), interference-free, outdoor environment. While this may make for enticing advertising copy, it bears little relation to what you’ll experience in your home or office.
The effective coverage of a wireless network is a combination of enough throughput for the desired applications at the desired locations. In other words, effective coverage is a combination of throughput, distance and application.
For example, if you are primarily using your wireless network to connect a notebook for email, chat and casual web-browsing, a connection speed of around 1 Mbps or even less will probably be just fine. Those applications don’t require much bandwidth and chances are your "broadband" connection might be running only around 1.5 Mbps anyway for download and a quarter of that for upload.
If, on the other hand, you want to connect three or four computers running a combination of gaming, heavy downloading and YouTube viewing, you could easily multiply the effective bandwidth needed by 5. Add in local backup of large media files and multiple local video streams and you could easily exceed the available bandwidth in some locations.
NOTE: For more on the effect of bandwidth on video streaming, see Video Streaming Need To Know: Part 2
As I’ve said many times before, the best solution is the one that meets your needs. So it’s important to understand what those needs are before you devise a solution.
Radio Basics…Again
We covered RF basics back in Part 1. But it’s helpful to again picture your wireless router as a tiny, faint light bulb and your home’s walls and ceilings not as solid objects, but more like translucent panels with varying opacity, to get into the right frame of mind. The more panels between the bulb and your eye, the tougher it will be to see the light. The number and location of other “light” sources – 2.4GHz cordless phones, microwave ovens, etc. – will make it difficult, or even impossible to see the flashlight bulb instead of the interfering sources.
It’s also helpful to visualize how the radio signal radiates from your access point or wireless router’s antenna(s).
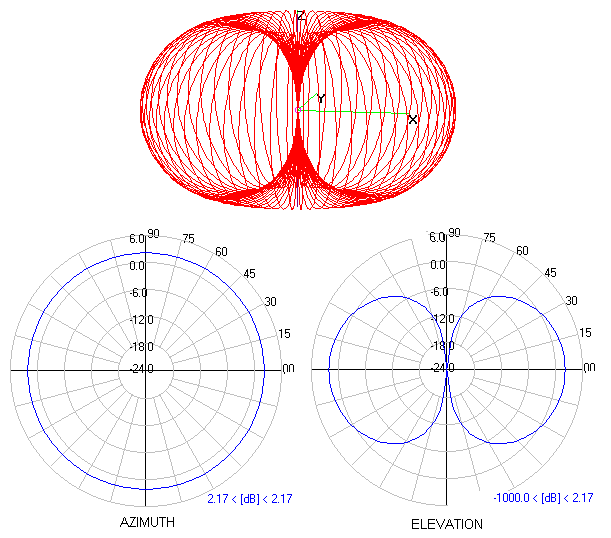
Figure 1: Simple dipole antenna radiation pattern
(click on image for a larger view)
From Antennas Enhance WLAN Security by Trevor Marshall
Used by permission
Figure 1 shows the radiation pattern for the dipole antenna that comes with most access points and wireless routers. The red “donut” at the top is a 3D representation of the energy radiating from the antenna, which you should picture as sticking up through the “donut”‘s hole.
The circular plot at the lower left is an Azimuth plot which shows the energy pattern from a top (or bottom) view, while the right-hand plot is an Elevation (side) view. You should look for Azimuth and Elevation plots for any antenna that you are considering buying, since they give you essential information for determining whether an antenna will work in your intended application.
You can see that a dipole is an omni-directional antenna, since its energy pattern is equally strong over all 360 degrees around it. Note also that the pattern is not a perfect sphere, but is flattened slightly on the bottom and top. If the radiation pattern were a perfect sphere, i.e. spread out equally in all directions, the antenna would be a perfect isotropic radiator.
But since every antenna type concentrates radiated (or received) energy in some way, that concentration increases the radiated signal output or sensitivity to received signals. The energy concentration is referred to as gain, and is expressed in units of dBi (decibels relative to isotropic radiator). Given that the dipole is the simplest antenna type, it also has the lowest gain – about 2.15dBi (usually rounded up to 2.2dBi).
I’ll have more on antennas later, but with these basics under our belt, let’s move on to some wireless improvement!
Location, location, location
The least-expensive thing you can do to make things better in WLAN-land is locate your Access Point or wireless Router as close as possible to the area where you need the best wireless connection. This may be easier said than done, however, especially if you’re tied to a specific spot because of where your cable or DSL modem line enters your home or office.
Of the two, a DSL-based connection is probably easier to move, since you may already have other phone jacks that are tied to the same phone line. But even if you have a cable-modem connection, you might consider using powerline networking technology to help relocate your AP.
The current generation of powerline products based on HomePlug AV or DS2’s "200 Mbps" can provide an average throughput of around 50 Mbps. While this is half of what you would get from 100 Mbps Ethernet, it can be perfectly fine for making the connection between a broadband modem and wireless router.
All you need to do is buy a pair of adapters such as the Zyxel PLA-400 [reviewed], Linksys PLE200, or Netgear HDX101, plug them into the wall and plug Ethernet cables from the modem and router into the adapters. At around $70 each, this solution can be a bit expensive. But it’s a lot easier than snaking CAT 5e cable through walls!
Once you’ve picked your location, the following rules of thumb will help with the final AP placement:
1) Higher is better than lower
2) On top (of a cabinet, bookshelf, desk hutch) is better than inside
3) Away from large metal objects (filing cabinets, steel shelving, etc.) is better than near
If you follow the simple practice of trying to “see” (remember the light bulb and translucent-walls analogy) your access point from wherever you want to use a wireless client, you may quickly find some obvious problems. You might also find some not-so-obvious ones too, like the aquarium that one home networker realized was killing his WLAN connection (water weakens high-frequency radio waves).
Watch out, too, for utility rooms and attic spaces that might be lined with foil-backed insulation or metal firewalls or doors. Trying to figure out why you can’t get a good signal out on your deck? Aluminium siding or window-screens could be the culprit!
The same goes for the locations where you use your wireless clients. You’ve probably noticed that you get a better signal when you orient your notebook computer in a certain direction, or move to another part of a room. I’ll talk more about client-based solutions later, but don’t overlook moving some furniture around or even moving your favorite chair, if that’s where you’ll be doing most of your wireless computing.
Since you now know how to perform a site survey, make sure to use that tool to confirm that your AP’s new location actually is better. You might find that you’ve solved one coverage problem, only to create another!
Once you’ve exhausted the no-cost option of just moving things around, the next steps involve spending money. The trick here is to spend wisely and get the maximum bang for your buck.
AP Solutions
The first thing to consider is whether you should improve the access point or client end of the connection. The natural inclination is to focus on the AP, especially when your wireless network includes more than one client. There are basically three ways to go:
1) Boosting Transmit Power
2) Upgrading Antennas
3) Buying new gear
Boosting transmit power is the least preferable way to go, because this "fix" is only one-way. Since wireless LANs require two-way communication between AP and client, you may not see any performance improvement by making the signal stronger at only one end of the connection. The other negative of this approach—higher visibility of your WLAN—is described in the sidebar below.
|
If you still want to try boosting power, the easiest approach is to load your wireless router with an alternative firmware such as DD-WRT, OpenWrt or others. If you do this, read the documentation carefully and make sure that your router is supported before you try to flash it, or you may "brick" it.
Antenna Upgrading
If you’re going to try the centralized approach, a good choice is to use a higher-gain antenna— if your AP’s antennas are attached via connectors. If your antennas are hard-wired, you’ll either need to choose another method, buy a new AP, or try using the information in the sidebar below to add parabolic reflectors to your existing antennas.
|
If you decide to go this way, see the Upgrading your Antenna section.
Trading Up
First of all, if you still are running an 802.11b wireless network, you should definitely consider replacing all of your wireless gear with at least 802.11g products. Even the least-expensive 802.11g current-generation chipsets have improved receive sensitivity that can definitely help improve wireless coverage. And you’ll also get support for WPA2; the most current wireless security protocol.
But if you already are running an 802.11g WLAN, what other options do you have? Ever since Texas Instruments turned its PBCC (Packet Binary Convolutional Coding) modulation technique that failed to be included in 802.11g into "enhanced" 802.11b, manufacturers have been making proprietary tweaks to wireless standards in order to increase wireless LAN throughput and range.
I looked at a few of these techniques back in this 2004 article, and concluded that both Atheros’ Super-G and Airgo’s True MIMO actually did help. Super G is still around in many products, and is generally indicated by the use of "108 Mbps" either in the product name or noted somewhere in the product spec.
But I found Airgo’s MIMO, in the form of Belkin’s Pre-N router and card to be the more impressive technology. Although Airgo’s technology was taken off the market by Qualcomm’s purchase of the company, MIMO lives on in the form of 802.11n.
So what kind of improvement can you expect from a move to Super G or draft 11n? Figures 2 and 3 show composite throughput vs. path loss plots generated using our Wireless Performance Charts for downlink and uplink for three D-Link products.
NOTE: See this article for an explanation of how Path Loss relates to distance.
Both the entry-level WBR-2310 (which began life as the DI-604) and DGL-4300 are based on Super-G. But the 2310 defaults to disabling the "Turbo" (channel-bonded) mode that provides most of Super-G’s throughput enhancement, while the 4300 defaults to Turbo enabled. The DIR-655 is a 802.11n Draft 2.0 certified router using Atheros XSPAN silicon.
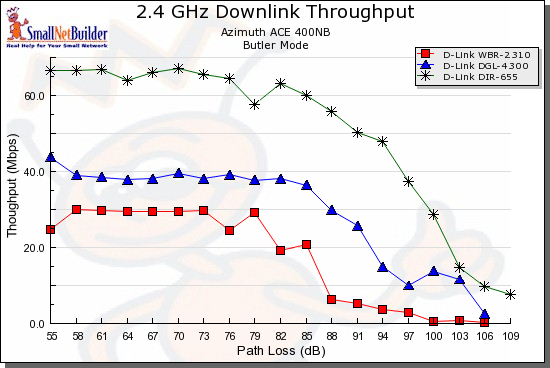
Figure 2: 11g, Super G, Draft 11n comparison – downlink
The higher throughput that both Super G Turbo and draft 11n MIMO provide over standard 802.11g is obvious. But the range story is a bit different. All of the test runs were made until the router and card disconnected, which you can see is within one 3 dB test step, which is not that big a difference.
Even more interesting is the uplink plot, which shows Super-G Turbo’s throughput falling below that of standard 11g. Also note the difference in the X axis scale, which is 3 dB smaller for uplink.
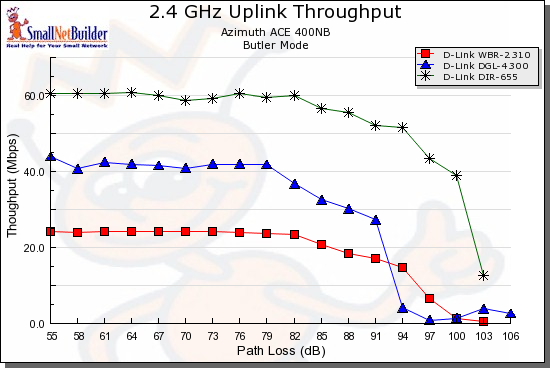
Figure 3: 11g, Super G, Draft 11n comparison – uplink
Broadcom’s Afterburner throughput enhancement is a bit of a different story. Figure 4 shows a downlink comparison between the Linksys WRT54G V5 and WRT54GS V7, i.e. without and with Afterburner.
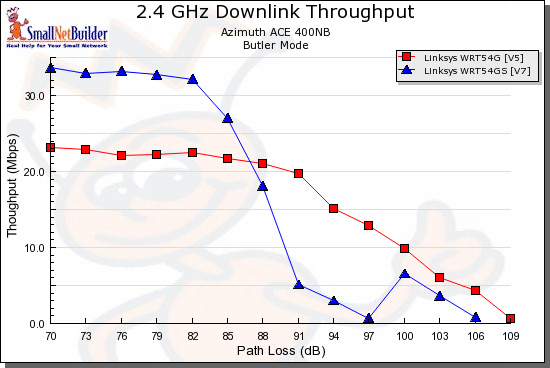
Figure 4: 11g, Afterburner comparison – downlink
You can see that in both directions, the throughput enhancement doesn’t last long and then falls back to lower throughput than you get with the standard Broadcom 11g chipset! Also note that, once again, there is only 3 dB of difference in Path Loss performance.
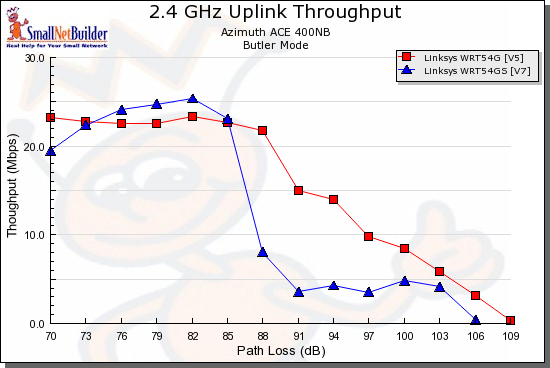
Figure 5: 11g, Afterburner comparison – uplink
The main take-away from this is that newer technologies may provide more of an improvement in speed than range. So if you were getting no connection with your current gear, that still might be the case after you upgrade. But if you were getting an intermittent and/or slow connection with your old stuff, newer gear might move you from an annoying wireless experience to one that’s (relatively) trouble free.
Conclusion
Updated 8/11/2008
That wraps it up for this time. In the next installment, I’ll look at upgrading AP antennas. In the meantime, if you’re wondering whether changing your wireless client adapter can improve performance, take a look at this article.
