Introduction
Probably the most frequently asked question about wireless LANs is how to improve their performance. Although the focus is usually on improving range, what people many times want is to get a better (or any!) wireless connection from a specific location in their home or small office.
There are actually a lot more options than you might think for attacking this problem, and this NTK will attempt to leave no stone unturned in the quest for a more satisfying wireless experience. What it won’t cover, however, are techniques for wireless bridging, i.e. connecting multiple wired lans via wireless links. That info is presented in my Wireless Bridging NTK. I’ll also be primarily focusing on indoor/short-range WLANs and leave the subject of long-range wireless LANs for another article.
NOTE: Please read references to access points (AP) or wireless routers as applicable to both kinds of products unless otherwise noted.
Radio Basics
Before launching into improvement techniques, let’s first spend a little time building a “mental model” to use in visualizing how wireless LAN signals travel through your home or office.
The simplest model is that of light – a naked flashlight bulb operating off one battery to be more exact! The analogy works well in an “open field” environment where there is a clear line of sight between the bulb (your Access Point or wireless Router) and your eye (your wireless-equipped laptop), but requires a little bit of tweaking for an indoor environment.
However, if you picture your home’s walls and ceilings not as solid objects, but more like translucent panels with varying opacity, the resulting imagery is accurate enough for our purposes. The more panels between the bulb and your eye, the tougher it will be to see the light. The number and location of other “light” sources – 2.4GHz cordless phones, microwave ovens, etc. – will make it difficult, or even impossible to see the flashlight bulb instead of the interfering sources.
It’s also helpful to visualize how the radio signal radiates from your access point or wireless router’s antenna(s).
Figure 1: Simple dipole antenna radiation pattern
(click on image for a larger view)
From Antennas Enhance WLAN Security by Trevor Marshall
Used by permission
Figure 1 shows the radiation pattern for the dipole-type antenna that comes with most access points and wireless routers. The red “donut” at the top is a 3D representation of the energy radiating from the antenna, which you should picture as sticking up through the “donut”‘s hole. The circular plot at the lower left is an Azimuth plot which shows the energy pattern from a top (or bottom) view, while the right-hand plot is an Elevation (side) view. You should look for Azimuth and Elevation plots for any antenna that you are considering buying, since they give you essential information for determining whether an antenna will work in your intended application.
You can see that a dipole is an omni-directional antenna, since its energy pattern is equally strong over all 360 degrees around it. Note also that the pattern is not a perfect sphere, but is flattened slightly on the bottom and top. If the radiation pattern were a perfect sphere, i.e. spread out equally in all directions, the antenna would be a perfect isotropic radiator.
But since every antenna type concentrates radiated (or received) energy in some way, that concentration increases the radiated signal output or sensitivity to received signals. The energy concentration is referred to as gain, and is expressed in units of dBi (decibels relative to isotropic radiator). Given that the dipole is the simplest antenna type, it also has the lowest gain – about 2.15dBi (usually rounded up to 2.2dBi).
I’ll have more on antennas later, but with these basics under our belt, let’s move on to some wireless improvement!
Location, location, location
The least-expensive thing you can do to make things better in WLAN-land is locate your Access Point or wireless Router as close as possible to the area where you need the best wireless connection. This may be easier said than done, however, especially if you’re tied to a specific spot because of where your cable or DSL modem line enters your home or office. Of the two, a DSL-based connection is probably easier to move, since you may already have other phone jacks that are tied to the same phone line.
Once you’ve picked your location, the following rules of thumb will help with the final AP placement:
1) Higher is better than lower
2) On top (of a cabinet, bookshelf, desk hutch) is better than inside
3) Away from large metal objects (filing cabinets, steel shelving, etc.) is better than near
If you follow the simple practice of trying to “see” (remember the light bulb and translucent-walls analogy) your access point from wherever you want to use a wireless client, you may quickly find some obvious problems. You might also find some not-so-obvious ones too, like the aquarium that one home networker realized was killing his WLAN connection (water weakens high-frequency radio waves). Watch out, too, for utility rooms and attic spaces that might be lined with foil-backed insulation or metal firewalls or doors. Trying to figure out why you can’t get a good signal out on your deck? Aluminium siding or window-screens could be the culprit!
The same goes for the locations where you use your wireless clients. You’ve probably noticed that you get a better signal when you orient your notebook computer in a certain direction, or move to another part of a room. I’ll talk more about client-based solutions shortly, but don’t overlook moving some furniture around or even moving your favorite chair, if that’s where you’ll be doing most of your wireless computing.
Get out your wallet
Once you’ve exhausted the no-cost option of just moving things around, the next steps involve spending additional money. The trick here is to spend wisely and get the maximum bang for your buck. This section will help you define the problem you’re trying to solve, which should help guide your hard-earned money in the right direction.
AP or Client?
The first thing to consider is whether you should improve the access point or client end of the connection. The natural inclination is to focus on the AP, especially when your WLAN includes more than one client. But if you have only one, or maybe two wireless clients to deal with, don’t rule out the client-based solutions in the next section. You may be surprised how much higher-gain antennas can cost for your AP, vs. how little new wireless client cards are going for!
And even in the cases where the cost of changing your wireless card or improving your access point are about equal, an upgrade of your client card to a current-generation model, may have other benefits such as multi-band access, or improved WEP-enabled speed.
The Centralized Approach
Most people, however,like to focus on beefing up their AP via either a different antenna or signal booster. Some gear-heads also play with boosting the transmit power on Atmel-based APs like the pre-v2.2 Linksys WAP11, SMC2655W, or Netgear ME102. Boosting the transmit power only is the least preferable way to go, because the “hacks” are generally not for beginners, but more importantly are only a one-way solution. Since wireless LANs require two-way communication between AP and client, you may not see the performance improvement you expect by making the signal stronger at only one end of the connection.
The advantage of the centralized approach is that – done correctly – it can benefit most, if not all of your WLAN’s clients. This is a definite plus if you have a lot of clients to feed. The disadvantage is that it may improve your WLAN’s range enough to make it more widely visible to clients that you don’t want on your network.
|
Antenna Upgrading
If you’re going to try an AP-boosting approach, your main choice is to use a higher-gain antenna, if your AP’s antennas are attached via connectors. Not all 802.11b AP’s have upgradeable antennas and if yours doesn’t, you’ll either need to choose another method or buy a new AP. If you decide to go this way, see the Upgrading your Antenna section.
NOTE: In general, you won’t find single or dual-band 802.11a APs or wireless routers with removable antennas. This is due to tighter FCC rules for some of 11a’s operating frequencies.
Signal Boosting
Another alternative for beefing up your AP that might take a little extra work is to use a signal booster. Although commonly used by Wireless ISPs for outdoor “backhaul” type links, Linksys recently brought signal boosting into the consumer market with its WSB24. Although FCC certified (and Linksys-supported) for use only with Linksys’ popular WAP11 AP and BEFW11S4 wireless router, it can be used with any 2.4GHz AP if you’re willing to provide your own cables. See the review for more info if you want to go this way.
There are two other approaches – wireless repeating and adding Access Points – but I’ll save them for last. Instead, let’s move on and take a closer look at how to improve the client side of things…
Client-side Helpers – Portables
In my tests of many 802.11b PC Card wireless client adapters, I’ve found little to differentiate the performance of one from another – aside from WEP-enabled throughput loss in older designs.
The reason for this is simple: the antenna in most 802.11b PC cards is awful! I’ll describe just how awful later, but for now, I’ll just say that investigating the following alternatives might be a quick way to enhance your wireless laptop’s performance:
- Go dual band Although it may seem a contradiction to what I just said, I have found a clearly better 802.11b PC card client in the form of any Atheros-based dual-band CardBus card. Maybe you don’t need the 802.11a aspect of the card, but pop one of these babies into your laptop and you should see a significant difference in 802.11b performance vs. range due to its superior radio and antenna design.
Note that the improvement holds for both the older dual (a/b) and newer tri (a/b/g) mode cards. Check out my reviews of the NETGEAR WAB501 dual-mode, or WAG511 tri-mode cards for more details and performance data. Other models that should offer equivalent performance are the Linksys WPC51AB and ORiNOCO Silver and Gold Dual-Band cards.
- XWing marks the spot
 Asante’s AL1511 AeroLAN XWing Wireless PC Card uses an effective antenna design that’s so simple you wonder why someone else didn’t come up with it sooner. My testing found significant, measurable improvement with the antennas in their unfolded vertical position.
 -
Switch to USB
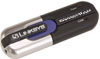
Huh? Why would you want to switch to an adapter type that has such a bad reputation for slow performance and has to dangle on the end of a cable? Once again, the difference is in the antenna. The newer class of small USB adapters such as the Linksys WUSB12 can plug directly into your notebook’s USB port and also sports a flip-up antenna.I’ve even seen larger adapters like NETGEAR’s MA101 or Velcroed to the back of a notebook’s screen, again to take advantage of the adapter’s superior antenna.
-
Go built-in
Although not the cheapest way to fix a flaky laptop connection, switching to a notebook that has integrated wireless capability should help boost your performance. The reason, again, is better antennas – usually built into the laptop’s screen with vertical orientation, too.
- Yes they do exist!
Although hard to find, there are PC card adapters that directly accept connection of higher-gain antennas. The ORiNOCO Gold card sports a proprietary miniature connector in addition to its built-in stripline antenna. While convenient because it can also operate with its built-in stripline antenna, there aren’t any little antennas available that just snap onto the card.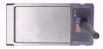 Zoom’s ZoomAir Model 4103 is a little easier to deal with, given its robust RP-SMA connector which accepts a little dipole “whip” antenna that comes with the card.
But since all wireless clients don’t have to move around, I’ll next look at some alternatives for desktop machines.
Client-side Helpers – Desktops
When improving the wireless connection to a desktop client there are a few more tricks that can be pulled out of the bag. The main thing to avoid, however, is desktop adapters that consist of a laptop-type PC card inserted into a PCI (or ISA) adapter. These will put your antenna in the absolute worst location, i.e. near the floor and behind a metal object (your PC). Depending on your room and desk’s location, the antenna may also be facing an outside wall and away from your AP.
It’s a must that any desktop adapter have an antenna at the end of a sufficiently long cable that it allows the antenna to be placed so that it can be clearly viewed from all points in your room. The antenna cable should preferably be attached to the adapter via a connector, which allows you to substitute a different antenna should you need to.
The other main approach to WLAN desktop connectivity is via a USB adapter. You may give up a little bit in maximum throughput because of the USB interface, but you’ll gain the flexibility of being able to locate the adapter (and its built-in antenna) where needed to get an unobstructed “view”. For this application, a cabled USB adapter is preferred over the newer miniature types that can plug directly into a USB port.
Less likely to be used due to their higher cost, are the newer Wireless Ethernet bridge products such as Linksys’ WET11. These require that your computer already have an Ethernet port, but don’t require the installation of a driver to get up and running. There’s no real signal-enhancing advantage that these products provide, however. Same goes for using a Linksys WAP11 or other AP that supports AP Client mode, i.e. the ability to connect to an Access Point or wireless router.
All this talk about antenna placement reminds me that I need to tell you how to select and install them. So next section, please…
Upgrading Antennas – Factors to Consider
Although it’s tempting to think that throwing amplifiers at the problem of weak signals will be a quick and “best” fix, experience has shown that using higher-gain antennas is often simpler and more cost-effective in improving problem WLAN connections. Consider the following points:
-
Amplifiers boost both signal and noise. Although this isn’t really a problem in the transmit direction, amplified noise can swamp out a weak wireless client signal.
-
WLANs are two way systems. It does little good to have an Access Point with a strong transmitted signal if wireless clients don’t have equivalent range.
-
For best results, amplifiers must be located as close as possible to the AP’s antenna to avoid losing the amplifier’s gain through loss in a long cable. This requirement can complicate an amplifier’s installation beyond the point where many home networkers will want to deal with it.
So let’s say that you’re convinced that using a higher-gain antenna is the way to go. Where do you start? First, your AP’s antennas need to be attached via connectors. Although you’ll find exceptions, consumer WLAN gear seems to have zeroed in on the two connector types shown below.
 |
 |
|
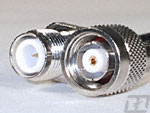
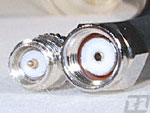
RP-TNC
|
RP-SMA
|
|
Figure 2: Popular WLAN Antenna Connectors
(Photos courtesy of HyperLink Technologies) |
|
Linksys uses the slightly larger RP-TNC connector across their wireless line, and the smaller RP-SMA is widely used by other manufacturers of consumer wireless gear. By the way, the “RP” in each connector-type’s name stands for “Reverse Polarity”. These are special versions of each connector type that have the gender of their center contact reversed from that of the non “RP” version. This is done to satisfy Part 15.203 of the FCC regulations which says in part:
An intentional radiator shall be designed to ensure that no antenna other than that furnished by the responsible party shall be used with the device. The use of a permanently attached antenna or of an antenna that uses a unique coupling to the intentional radiator shall be considered sufficient to comply with the provisions of this section. The manufacturer may design the unit so that a broken antenna can be replaced by the user, but the use of a standard antenna jack or electrical connector is prohibited.
Translation: “We don’t want folks changing antennas on their own and possibly violating FCC specs, so manufacturers can’t use ‘standard’ connectors”. Something obviously got lost in the translation, however, since “RP” based antennas and cables are now widely available, and it’s unlikely that the FCC is going to come knocking at your door to shut down your wireless LAN!
TIP: The entire FCC Part 15 Rules are located here.
Now that you have your old antenna removed and know its connector type, how do you select a new one? There are four main factors to consider:
-
Operating Frequency
Because of the way that radio waves work, antennas must be designed to work over specific frequency ranges. Generally, the higher the operating frequency, the narrower the frequency range of an antenna.
For 802.11b, you need an antenna designed for 2.4GHz operation. This antenna won’t, however, work for 802.11a purposes, even if you did manage to get it attached (remember that 802.11a gear doesn’t usually allow you to change the antenna).
-
Gain
As I showed earlier, the simple dipole that comes with your AP has a gain of about 2.2dBi. And no, the two antennas on your AP don’t provide a total 4.4dBi of gain, but are there to support antenna diversity, which can improve your WLAN’s performance through a different technique.
This is the main thing you’re trying to improve by changing antennas and you’ll probably spend the most time agonizing over this spec.
-
Radiation Pattern
This factor is as important as Gain in determining whether a specific antenna is right for you. It determines the directivity or coverage area of the antenna, and if chosen incorrectly can make your wireless connection worse!
-
Packaging/Mounting
It used to be that the antenna type determined the physical form-factor of an antenna. However, you can now get both omni and directional antennas in different physical forms. Especially handy for overcoming a spouse’s objections to your wireless improvement plans.
Upgrading Antennas – Making the Choice
The art of antenna selection can get fairly involved when you’re trying to get a long-range outdoor link to work. But for indoor or short-range (house to workshop, across a street, etc.) use, selection is fairly easy if you keep two rules of thumb in mind:
Rule of Thumb #1: It takes a 6-dB (dBi) increase in gain to double the range over what you get with a simple dipole antenna. Doubling would be a best case because your WLAN includes obstructions and other effects that reduce the actual range-boosting effect.
Rule of Thumb #2: The higher an antenna’s gain, the higher its directivity or area of coverage will be. This effect is similar to what happens with binoculars or telescopes. The higher the binoculars’ power, the narrower its field of view will be.
With these rules in mind, let’s look at the types of antennas made for indoor use and their merits for specific applications…
|
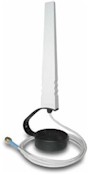
TRENDnet TEW-IA04O 4dBi Omni Antenna(Photo courtesy of TRENDware) |
Type: Dipole Gain: 4 dBi Pattern: Omni |
This is a typical omni-directional desk-mount type antenna, with slight gain over a normal 2.2dBi dipole The primary reason you’d use this would be for flexibility in locating the antenna separate from the AP itself, with minor performance improvement from the 4dBi gain. |
|
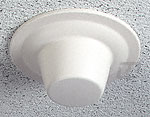
HyperGain HG2404CU 3.5dBi Ceiling Mount Antenna
|
Type: Dipole Gain: 3.5dBi Pattern: 90° vertical , 360° horizontal beamwidth |
This antenna’s radiation pattern extends in all directions around it, but in a 90° “cone” below it. Good for keeping signals for escaping to upper floors, or above a roof. With no significant gain advantage over a dipole, its primary use is for aesthetics and controlling signal leakage. |
|
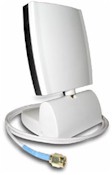
TRENDnet TEW-IA06D 6dBi Directional Antenna
|
Type: Directional “panel” / “patch” Gain: 6dBi Pattern: 80° beamwidth, horizontal and vertical |
The 6dBi gain should provide noticeable performance improvement. This antenna’s directional characteristics will also help keep the signal inside the area in front of the antenna. The 80° horizontal and vertical beamwidth would provide good coverage for remote rooms, but may miss areas in the same or adjacent rooms. |
|
HyperGain Range Extender 8 dBi “Range Doubler” Omni Antenna
|
Type: Dipole Gain: 8 dBi Pattern: Omni |
Appropriately named, this omnidirectional antenna’s 8dBi gain meets our first rule of thumb for range-doubling. But its 16 in size might not be to everyone’s taste, and remember that you’ll need two of these bad boys if your AP has dual antennas! |
|
|
Type: Directional “panel” / “patch” Gain: 8dBi Pattern: As shown |
Although it has the same 8dBi gain as the omnidirectional model above, this “patch” style has a smaller 4.5 x 4.5 in size. The trade-off is its directional pattern which has relatively wide horizontal coverage for indoor use, but perhaps too narrow a vertical pattern for multi-floor coverage. This type of antenna is about as powerful as you’d want to go for general indoor coverage. |
|
|
Type: Directional “panel” / “patch” Gain: 14dBi Pattern: As shown |
The 14dBi patch is more for outdoor use in point-to-point applications, or to reach a remote omni-directional station. Although the high gain is tempting, its beamwidth is too narrow for general indoor coverage. |

To sum up, you’ll need a minimum gain of 5dBi and no more than 8dBi to see a noticeable performance improvement. The choice of omnidirectional or “patch” types depends on antenna placement relative to the coverage area and any signal containment requirements. Now that wasn’t so hard was it?
Before we leave the subject of antennas, let me show you why laptop wireless cards have such poor performance. As most any laptop user knows, their WLAN adapter card is highly directional, but Figure 3 shows just how much!

Figure 3: PC card antenna gain plot
(click on image for a larger view)
From Antennas Enhance WLAN Security by Trevor Marshall
Used by permission
This plot shows the relative sensitivity of a typical 802.11b PC card adapter, with the key points being:
- this is definitely not omni-directional performance
- the adapter would perform better if the laptop’s body were vertically oriented!
The reason for the second point is simple. Notebooks orient a WLAN adapter card’s antenna in a horizontal plane, while most access points’ antennas are vertically oriented. This simple fact itself accounts for the significant performance improvement from built-in WLAN notebook adapters because of their better orientation (usually vertical when the laptop screen is raised) and design (from not having to be squeezed into a 1 x 1.5 in space in the adapter itself).
Now that you’re an expert on antennas, let’s explore an wireless performance improvement alternative that has become available to consumers within the past year or so.
Wireless Repeating
A newer alternative for WLAN performance improvement – at least for those who don’t have “enterprise-grade” budgets – is wireless repeating. This method has actually been around almost since access points themselves, but was available only in commercial-grade APs – with commercial-grade (>$300) pricing!
That all changed in the Fall of 2002 when D-Link introduced a free firmware upgrade to their DWL-900AP+ access point that brought the cost of 802.11b wireless repeating down to about $100! [See Wireless Repeating with the D-Link DWL-900AP+ NTK for more info.] D-Link has pursued this product category the most aggressively, introducing the lower-cost (about $70) DWL-800AP+ that omits some of the 900AP+’ s access point modes.
A wireless repeater is basically an AP with a special mode that re-transmits data received from other wireless stations over the same wireless channel. This means that all you need is a repeater and a power outlet to extend the range of a wireless LAN! Figure 4 illustrates the use of a repeater.
Figure 4: WLAN with wireless repeater
This magic comes at a price, however. When running in repeater mode, the AP’s Ethernet port no longer passes LAN traffic, and becomes instead the only way to access the admin interface of the repeater. So you really don’t want to locate repeaters in hard-to-reach places, because rebooting them when they inevitably lock up will be a major pain.
You also lose about half the normal throughput for each repeater, making a 5Mbps link into one running at about 2.5Mbps. This probably isn’t as big a deal as it might sound if you mainly use your wireless LAN for email and web browsing with one or two clients. But if you have a very fast Internet connection or do a lot of file transfer / downloading, you probably won’t be satisfied with a wireless repeater’s performance.
Although some products allow repeaters to associate with each other – forwarding wireless data through multiple repeaters for longer range extension – others limit the repeat to one “hop” or repeater unit. Even in the latter case, however, you can have multiple repeaters associated with a single AP, which at least will let you extend your WLAN’s range in a ring around the AP.
Adding Access Points: Non-Ethernet
The last, at perhaps most dreaded step from both a cost and complexity view, is going to a multiple AP setup. Not long ago, a multiple-AP setup meant running CAT5 Ethernet cable and AC power to each location where an AP was to be located. Because of the expense (and permanence) involved in running that cabling, advance planning in the form of a site survey had to first be done. Given the work involved, most home networkers unhappily put up with their WLAN’s performance idiosyncracies, or gave up in frustration and returned their wireless gear altogether.
But this option really isn’t as hard to implement as it used to be due to the emergence of Ethernet alternatives that use other wires already running through your home’s walls, i.e. phone and power.
HomePNA (HPNA) equipment uses your telephone wiring to carry digital data at a maximum raw bit rate of 10Mbps, which typically yields a useable data rate of about 5Mbps. HPNA doesn’t interfere with the phone line’s normal use for voice, data, FAX, or even DSL, and doesn’t even require the phone line to actually be in service.
HomePlug products operate in a similar way to HPNA, but use AC power wiring instead of phone lines. HomePlug has a 14Mbps max raw data rate, but delivers useable bandwidth similar to HPNA’s.
Both technologies are used in a similar way to get a wired connection to a remote access point. Figure 5 shows an example setup.
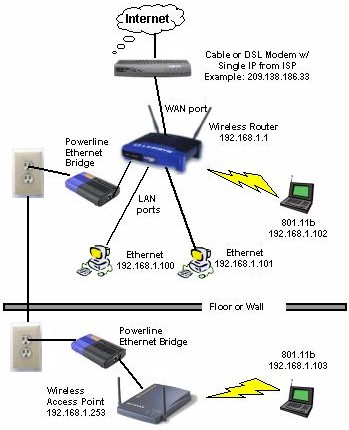
Figure 5: Adding an AP using Powerline networking
The diagram shows the basic idea when using alternative networking methods, using a powerline-based example. A HomePlug to Ethernet Bridge connects your Ethernet LAN to the power line on one end, and a second Bridge is used to connect the remote AP. More APs can be added by duplicating the remote HomePlug Bridge / AP pairs.
An HPNA-based setup would look essentially the same, with HPNA to Ethernet Bridges (and connection to a common phone line!) substituted for the HomePlug Bridges and their AC connections.
There are many variations on this basic setup. You can use a separate router and AP, or even a wireless router with built-in HomePlug bridge such as SpeedStream’s 2524 Powerline Wireless DSL/Cable Router. Speedstream also has its 2521 Powerline 802.11b Wireless Access Point, which combines an 802.11b AP and HomePlug-to-Ethernet bridge in a “wall-wart” sized package!
I prefer HomePlug based setups to those based on HPNA, mainly because they’re more flexible – you can usually find a power outlet in every room, but not a phone jack. I also really like the mini-AP mentioned above because it’s just so darned easy to move around! Who needs to spend a lot of time planning where to put additional APs when all you need to do is unplug it from one outlet and move it to another?
The downside of both HPNA and Powerline approaches, however, is that they won’t work for everyone. Both phone and especially power wiring is not exactly the best electrical medium for high-speed data signals (I think it borders on magic that this stuff even works at all!). Folks with older homes especially may find that their HPNA or HomePlug based networks run too slowly to be of practical use, if they even run at all! Range can be limited too, sometimes preventing their use for LAN extension to a backyard office or free-standing garage.
Adding Access Points: Ethernet-based
Which brings us back to the good old standby – Ethernet. CAT5 cabling may be a pain (and expensive) to run, but it’s a low-tech, sure-fire way to have the fastest and most reliable network. It has the added bonus of eliminating the power outlet requirement if you use remote APs with Power Over Ethernet (POE) capability. POE puts DC power on the unused wires in a CAT5 cable, making it do double duty as both a data and power cable. Although most consumer-grade equipment doesn’t include the POE feature, it’s not that hard to roll-your-own POE solution.
Before I head for the Wrap Up, I’ll pass along a few more tips to keep in mind when adding Access Points:
-
Mix it Up!
You don’t have to use the same make and model as your main unit when adding APs to your WLAN. Using the same product is more a matter of convenience, since you won’t have to learn the admin interface for multiple products. - Using Wireless Routers
Wireless Routers can be put into service as expansion Access Points, but require a little reconfiguration to work in this mode.
|
Putting it all together
If you’ve made it this far, you may be more confused than when you started, given all the options available. So let’s see if I can boil it all down to a few basic points:
Understand the problem
Now that you know how radio waves travel, look for obvious problems from metal, interference sources, and high water-content items. Eliminate the problems you find if you can, and move stuff around if you can’t. Relocation is the cheapest tool you have in improving wireless LAN performance.
Less may be more
If relocation doesn’t get you what you need, resist the urge to throw the kitchen sink at the problem. You’ll have better results if you use only as much improvement as you need, and your wallet will stay fatter, too!
Keep it simple
Higher-gain omnidirectional antennas are probably the simplest, most cost-effective improvement you can make, especially when used at the Access Point. If your AP has two antennas, make sure you upgrade both with the same make and model. If that doesn’t get you what you need, try upgrading clients that are still giving you trouble.
Don’t fear expansion APs
With the alternative methods of HPNA and HomePlug available, adding on access points doesn’t necessarily mean fishing cables through walls. Sometimes just one additional, properly placed access point is all that’s needed to fix what ails you, and the cost can end up being lower than you think.
So don’t just complain about your wireless LAN’s problems… now you can do something about them!