| At a glance | |
|---|---|
| Product | NETGEAR Nighthawk X6 Tri-Band WiFi Router (R8000) [Website] |
| Summary | First three-stream AC3200 router based on Broadcom XStream technology with two 5 GHz radios |
| Pros | • The second 5 GHz radio can improve total throughput • OpenVPN server • USB 3.0 storage activity does not affect either wireless radio |
| Cons | • Expensive • Total throughput improvement from second radio depends on client mix • 5GHz radio assignment is simplistic • Heavy wireless traffic reduces storage throughput |
Typical Price: $280 Buy From Amazon
Introduction
Updated 10/20/15: Component information added
So much for summer being a slow time for product introductions. Router manufacturers seem to feel that it is the ideal time to foist new products upon buyers. Last year it was AC1900 routers. This year it is two new router classes: AC3200 based on Broadcom’s XStream "tri-band" architecture; and AC2350 (or AC2300), or the first true 4×4 router based on Quantenna’s QSR1000 "wave 2" 802.11ac device.
The difference between these two approaches was described in MU-MIMO vs. XStream: The Coming Battle For Wi-Fi Airtime. So if you have no idea what the heck I’m talking about, please first go read that piece.
First out of the chute for AC3200 is NETGEAR’s Nighthawk X6 that is the focus of this review. AC2350 is represented by ASUS’ RT-AC87U, which is sitting in the "to be tested" pile waiting for a bit more stable firmware.
My R8000 coverage will be in two parts. This first installment will cover wired routing and storage performance and take its "Smart Connect" feature (NETGEAR’s term for its implementation of Broadcom’s XStream technology) for a stroll. The second part will cover wireless performance using a new wireless test process that I am putting the finishing touches on. The new process uses larger Octobox chambers, a new AC1900 class test client and even a turntable to rotate the router under test so that I don’t have to eyeball multiple test runs any more to choose the "best" one.
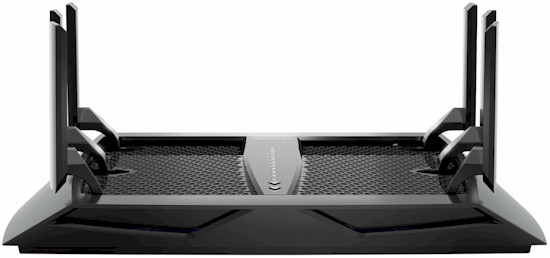
The R8000 wins the contest for largest router yet. The photo below compares it to the original R7000 Nighthawk. The two are about the same width, but you can clearly see the X6 is deeper. The top cover is mostly a grid of small open triangles to provide plenty of ventilation. There is no fan in this puppy, so you better not stack anything on top of it.

R7000 and R8000 head to head
The bottom of the router has the same triangle pattern, but without the openings. The real vent slots are at the top of the photo and run the width of the router. Note the two mounting slots at the bottom of the photo. This puts the back panel connectors toward the floor if you choose to wall-mount it. NETGEAR chose not to go with the centrally located bi-directional slots the R7000 has.

R8000 bottom
All indicators are in a nicely-styled strip on the router top as shown below along with the larger WPS and Wi-Fi On/Off lighted buttons at the bottom. The default color is a soft white vs. the eye-killing blue that tends to not have high WAF. For an additional WAF boost, there is a physical LED On/Off switch on the back panel, that shuts off everything except the Power light.

R8000 front panel
All switches except the two mentioned above are on the rear panel along with all connectors. There is nothing on the side panels and only attractively designed ventilation slots on the front panel. All Ethernet ports are Gigabit, of course, and you one each USB 2.0 and 3.0 ports.

NETGEAR R8000 rear panel callouts
Setup
It’s been awhile since I described the setup process for NETGEAR’s Genie-based routers. But things—at least from a user’s perspective—haven’t changed since we looked at the WNDR3800. You just plug everything in, power up the router and point your browser at http://www.routerlogin.net and you’re redirected to the web interface on the router. You don’t have to type in an IP address such as 192.168.1.1, though that’s the default address for the router.
If you have only wireless devices, you can connect via WPS or use the wireless password printed on the serial number label that contains everything else you need to know to first access the R8000.

NETGEAR R8000 rear panel callouts
In running through the setup, I was first presented with a screen that said that another router was detected and asked if I wanted to set the X6 up as an access point, which I declined. I appreciate the thought, since many ISP modems now actually include routers that in some cases can’t be bridged. But I can see where unknowledgeable users could be confused by this.
The setup is nicely covered in the printed installation guide that comes in the box. The User Manual has also been posted.
Inside
I am not going to open up the R8000 until testing has been completed. But I pretty much know what’s inside from the briefing I got during a recent visit to Broadcom. The block diagram below is from MU-MIMO vs. XStream: The Coming Battle For Wi-Fi Airtime, which has the details of the multi-processor architecture shown.

Broadcom XStream Architecture
Since there are only six antennas, three are dual-band and three are 5 GHz only for the second 5 GHz radio. NETGEAR told me the R8000 is using the new FCC rules for 5G Band-I. So Tx power has been maximized "as much as possible within FCC limits" (30 dBm total).
Updated 10/20/15
Since the FCC short-term confidentiality period passed I was able to pull some photos from the FCC file.

R8000 board top
More photos in the gallery, with commentary.
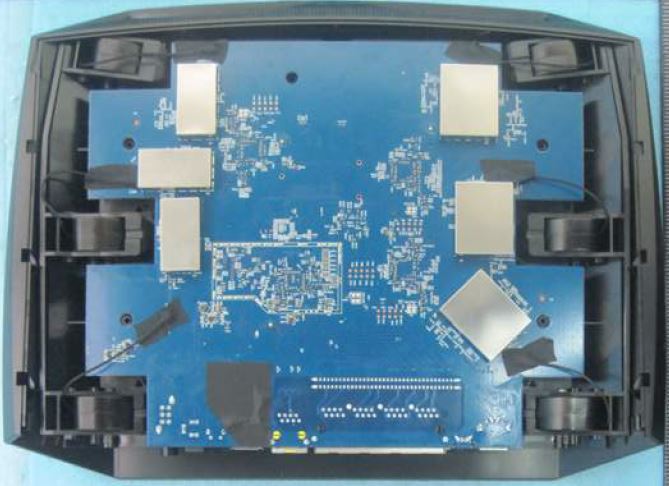
View inside with bottom cover removed
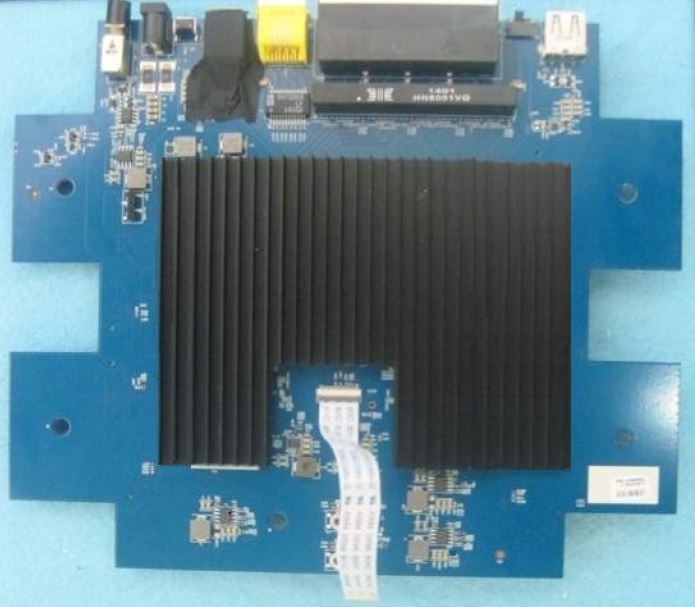
Board top with heatsink in place
Board top with heatsink and RF can tops removed. The 2.4 and 5 GHz -1 radios feed the antennas on the right of the router (facing front). 5 GHz – 2 radio gets the left three antennas all to itself.
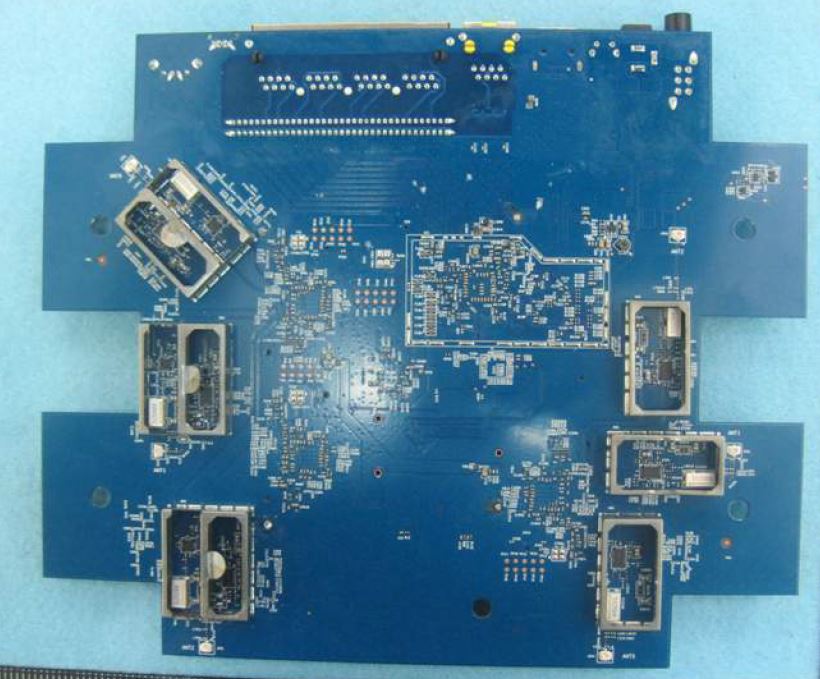
Board bottom with RF can tops removed.
The photos were good enough to identify some components I only guessed at before. So I updated Table 1.
| NETGEAR R8000 | NETGEAR R7000 | Linksys WRT1900AC | ASUS RT-AC68U | |
|---|---|---|---|---|
| CPU | Broadcom BCM4709A | Broadcom BCM4709A | Marvell MV78230 Armada XP @ 1.2 GHz (ARMv7) | Broadcom BCM4708A |
| Switch | in BCM4709A | in BCM4709A | Marvell 88E6172 | in BCM4708A |
| RAM | 256 MB | 256 MB | 256 MB | 256 MB |
| Flash | 128 MB | 128 MB | 128 MB | 128 MB |
| 2.4 GHz Radio | – Broadcom BCM43602 – Skyworks SKY85309-11 2 GHz Front end (x3) |
– Broadcom BCM4360 – Skyworks SE2623L 2.4 GHz Power Amp (x3) |
Marvell 88W8864 – Skyworks SE2623L 2.4 GHz Power Amp (x4) |
– Broadcom BCM4360 – Unidentified 2.4 GHz Power Amp marked 397 649e 230(x3) |
| 5 GHz radio 1 | – Broadcom BCM43602 – Skyworks SKY85712-11 5 GHz Front end (x3) |
– Broadcom BCM4360 – Skyworks SE5003L1 5 GHz Power Amp (x3) |
Marvell 88W8864 – Skyworks SKY85402 5 GHz Power Amp (x4) |
– Broadcom BCM4360 – SiGE 5023L 5 GHz Power Amp (x3) |
| 5 GHz radio 2 | – Broadcom BCM43602 – Skyworks SKY85710-11 5 GHz Front end (x3) |
N/A | N/A | N/A |
| PCIe | PLX Technology PEX8603 3-lane, 3-port PCIe switch | N/A | N/A | N/A |
Table 1: Component summary
Features
The R8000’s feature set is the same Genie-based feature set NETGEAR has supported for some time. The detailed feature coverage in the WNDR3800 review still pretty much applies across NETGEAR’s current routers. Here is the Home page "dashboard".

R8000 Home Page
Here’s a rundown of the R8000 / Genie feature set:
Routing / Firewall
- Static and Dynamic IP, PPPoE and PPTP, L2TP and Bridge WAN connections (IPv4)
- IPv6 WAN : 6to4 tunnel, Passthrough, Fixed, DHCP, PPPoE, Auto Detect, Auto Config
- MTU Adjust on all connection types
- Secure / Open NAS select
- Application Layer Gateway (ALG) enable/disable for SIP
- IGMP Proxy (default disabled)
- WAN Port ping response control (default disable)
- Port Scan / DoS Protection (default enabled)
- WAN MAC address clone
- WAN IP release / renew
- DHCP Server with MAC reservation
- NAT enable / disable
- RIP 1, 2B, 2M in and out
- Static Routes
- Single & port range forwarding with separate source and destination ports
- Triggered port range forwarding.
- DMZ Host
- UPnP enable/disable with portmap table
- DDNS support for Dyndns (www.dyndns.org), NETGEAR, NO-IP.com
- OpenVPN support
Administration
- Attached devices (wired, 2.4 GHz, 5 GHz Radio 1, 5 GHz Radio 2)
- Internet Traffic Meter with volume and connection time controls, counter reset and limit warning
- Router reboot
- Configuration backup / restore
- Previous firmware restore
- LED control (in addition to hardware on/off switch)
- Emailed block site access alert and scheduled logs
- Browser logging with clear and email controls
QoS
- WMM enable/disable only
Access / Parental Control
- OpenDNS Live Parental controls
- MAC based access control
- Schedulable domain / keyword blocking
- Service blocking for single and port range to single or IP range
USB features
- ReadyShare Vault SMB storage sharing
- Network USB Print server
- Media server with iTunes and TiVo support
- FTP server
- Share access control by user
- HTTPs remote storage access
- Approved device list
Missing
- HTTPS management
- IPv6 firewall controls
- Manual or automatic QoS or bandwidth control
Navigation is reasonably quick, but reboots for some adjustment saves can take awhile. I wish NETGEAR would let you control the login timeout, although for most users this probably isn’t a big deal.
A major addition to the feature list is OpenVPN support. Since ASUS offered it on their top-of-line routers, router geeks have been demanding it from other vendors. The lack of OpenVPN has been a sticking point for some folks eyeing the Linksys WRT1900AC. But it looks like NETGEAR has taken that objection off the table for the R8000.
On the downside, it’s surprising that NETGEAR has not included some sort of bandwidth control / traffic shaping / QoS features. The lone controls found on the QoS Setup page are only WMM disables, which you should leave alone since they are needed to achieve any of the high 802.11n or ac link rates.
Features – Wireless
People tend to like expensive top-of-line routers to have plenty of knobs to twiddle, especially when it comes to wireless settings. So at $300 and with two 5 GHz radios that are supposed to "intelligently choose the best 5 GHz band for your dual-band device", you might expect simple and advanced settings screens.

Smart Connect concept
Nope. The only Smart Connect control you get is an on/off switch. Check the box and the only thing you can adjust on the 5GHz-2 radio is the primary channel. Everything else is copied from the 5GHz-1 radio settings.

Basic Wireless Settings for Smart Connect
Advanced Wireless settings are limited to what you see below. The 2.4 GHz settings are not shown but are the same as the 5 GHz. The lone advanced control is the implicit Beamforming enable. Standard 802.11ac "explicit" beamforming is enabled by default and can’t be disabled. As with the R7000, there is no transmit power adjust and no controls to limit link rates or set specific b, g or n operating modes or compatibility features. And while the latest R7000 firmware added an Airtime Fairness control, the R8000 doesn’t have that either.

5 GHz Advanced Wireless settings
The bigger omission, however, is the lack of any wireless bridging features; no WDS and no client bridge like the R7000 has. So if you were thinking of trying to bond the two 5 GHz radios into a single wireless bridge, forget it.
Another important 5 GHz "feature" is that each radio is limited to a subset of channels. 5GHz-1 supports only channels 36, 40, 44 and 48 and 5GHz-2 supports only channels 149, 153, 157 and 161. This is due to the filtering and other design tweaks required to keep the two radios from overloading each other.
On the plus side, both "Home" and "Enterprise" (RADIUS) wireless security is supported.
Storage Performance
Broadcom said it has paid a lot of attention to storage performance in the XStream architecture. With wireless duties handed off to dedicated processors (and RAM) in each wireless radio, all the main BCM4709 processor has to do for wireless is shuttle Ethernet packets to and from the radios. This should leave it plenty of processing power for storage and internet sharing.
I used the standard Startech USB 3.0 eSATA to SATA Hard Drive Docking Station [SATDOCKU3SEF] with a WD Velociraptor WD3000HLFS 300 GB drive to test file copy performance. I formatted the drive with FAT32 and NTFS and tested both USB 2.0 and 3.0 performance.
Table 2 summarizes USB 2.0 performance and includes competitive top-of-line routers and NETGEAR’s R7000. Results show with-the-pack performance, which is not surprising given that the speeds indicate limiting by the USB 2.0 bus itself. The FAT32 outlier results isn’t a fluke. I reran the test and got virtually the same result.
| NETGEAR R8000 | NETGEAR R7000 | Linksys WRT1900AC | ASUS RT-AC68U | |
|---|---|---|---|---|
| Processor | Broadcom BCM4709A | Broadcom BCM4709A | Marvell MV78230 | Broadcom BCM4708A |
| FAT32 Write (MBytes/s) | 18.5 | 24.8 | 28.7 | 11.8 |
| FAT32 Read (MBytes/s) | 28.9 | 27.8 | 31.0 | 24.0 |
| NTFS Write (MBytes/s) | 27.2 | 27.9 | 30.1 | 23.7 |
| NTFS Read (MBytes/s) | 29.0 | 27.9 | 30.8 | 24.2 |
Table 2: File copy throughput – USB 2.0 (MBytes/sec)
Switching to USB 3.0 results, it looks like most of the claimed performance boost is on reads vs. writes by about a 2-to-1 margin. So Linksys’ WRT1900AC remains the storage performance leader for now.
| NETGEAR R8000 | NETGEAR R7000 | Linksys WRT1900AC | ASUS RT-AC68U | |
|---|---|---|---|---|
| Processor | Broadcom BCM4709A | Broadcom BCM4709A | Marvell MV78230 | Broadcom BCM4708A |
| FAT32 Write (MBytes/s) | 31.9 | 33.4 | 61.1 | 11.7* |
| FAT32 Read (MBytes/s) | 73.9 | 57.4 | 76.5 | 21.6* |
| NTFS Write (MBytes/s) | 39.3 | 36.8 | 66.7 | 23.6* |
| NTFS Read (MBytes/s) | 73.5 | 57.7 | 75.1 | 24.3* |
Table 3: File copy throughput – USB 3.0 (MBytes/sec)
* = "Reducing USB 3.0 interference" setting enabled
Routing Performance
Routing throughput was measured using our standard router test process with the router using 1.0.0.90 firmware. Table 4 summarizes the results and once again includes the Linksys WRT1900AC, NETGEAR R7000 and ASUS RT-AC68U for comparison.
All these routers have plenty of routing throughput and you would be hard pressed to find a difference among them in real-world use.![]()
| Test Description | NETGEAR R8000 | NETGEAR R7000 | Linksys WRT1900AC | ASUS RT-AC68U |
|---|---|---|---|---|
| WAN – LAN | 806.4 Mbps | 931.4 Mbps | 631 Mbps | 754.5 Mbps |
| LAN – WAN | 782.1 Mbps | 941.7 Mbps | 926 Mbps | 824.6 Mbps |
| Total Simultaneous | 1391.8 Mbps | 1378.3 Mbps | 975 Mbps | 1226.8 Mbps |
| Maximum Simultaneous Connections | 34, 083 | 38,793 | 30,557 | 33, 263 |
| Firmware Version | 1.0.0.90 | 1.0.1.22_1.0.15 | V1.1.7.160177 | 3.0.0.4.374_205 |
Table 4: Routing throughput
The IxChariot unidirectional composite plot for the R8000 shows a cyclical variation between low 700s Mbps and peak speeds near 950 Mbps for downlink. Uplink also peaked up to the same 950 Mbps region, but only with brief spikes.

NETGEAR R8000 routing throughput unidirectional summary
The R8000 simultaneous up/downlink benchmark plot shows some battling at the beginning, that is probably due to IxChariot’s Nagle’s algorithm implementation. Once that settles down, throughput is smoothly shared with higher uplink vs. downlink throughput.

NETGEAR R8000 routing throughput bidirectional summary
Smart Connect
I mentioned earlier that I’m still finalizing the new SmallNetBuilder Wireless Testbed, so won’t be presenting complete wireless performance data in this part of the review. Instead, I chose to explore NETGEAR’s SmartConnect feature.
To recap, SmartConnect is NETGEAR’s implementation of Broadcom’s XStream architecture. SmartConnect uses two 5 GHz radios and assigns client to each one when they connect. The assignment is static until the connection between router and client is broken.
Dynamic client assigment is part of the XStream architecture, but vendors can choose which XStream features they use. NETGEAR told me they disabled dynamic client assignment because some devices "do not make a graceful switch".
Note that SmartConnect does not support 2.4 / 5 GHz band steering. Clients are only steered between the two 5 GHz radios.
I assembled the following devices to use for the test:
- Moto X smartphone (1×1 AC)
- NETGEAR R7000 in client bridge mode (3×3 AC)
- Laptop with NETGEAR A6200 USB adapter (2×2 AC)
- iPad 2nd gen (1×1 N)
- iPod Touch 5th gen (1×1 N)
The R8000 was located in the wireless testbed upper test chamber with the door open. The bridge mode R7000 was in the lower chamber with the door closed. This allowed me to use the testbed programmable attenuators to control the signal and therefore the link rate of the R7000. So that it didn’t totally dominate the other AC devices, I programmed 20 dB of attenuation for the testing. All the other devices were located within 6 feet of the R8000, outside the test chamber, and all received a nice, strong signal.
I started by disabling SmartConnect and directed devices to connect to the upper band radio. The Attached Devices screen below confirms that everything except the laptop with A6200 adapter was connected. I used that in a second set of tests.

Device connection – SmartConnect Off
I then set up an IxChariot script that simultaneously ran a stream to each client. The composite plot below shows a just under 63 Mbps of total throughput delivered to all devices. Not very impressive and somewhat surprising given previous experiments with multiple AC clients. Note the highest-class client, the 3×3 R7000 ended up with the lowest throughput in the group–only 13 Mbps.

Throughput – SmartConnect Off
Smart Connect – more
I next forced all clients off, clicked the SmartConnect box and let clients reconnect. The Attached Devices screen shows both AC clients (the R7000 and Moto X smartphone) connected to the low-band radio and the 1×1 N clients (iPod Touch and iPad) connected to the high-band radio. This represents a proper separation of "slower" and "faster" clients. But the assignment is opposite the description in product promotional material and data sheet, which identifies the low band radio for "dual-band WiFi devices" and the high band for "newer dual band AC WiFi devices".

Device connection – SmartConnect On
With the devices connected as above, I ran the same IxChariot script with the results shown below. Both AC devices do much better this time and the slower N devices do about the same. But total throughput this time is 258 Mbps, a 4X increase.

Throughput – SmartConnect On
Given the very unequal throughput distribution between the 3×3 and 1×1 AC devices, I decided to add a 2×2 AC device into the mix and repeat the experiment. I used the NETGEAR A6200 adapter in my trusty Lenovo x220i notebook with its internal wireless disabled. I also used only the iPad as the "slow" device.
The Attached Devices screen below shows all three devices connected to the high band radio with SmartConnect disabled. Note the 192.168.1.101 entry you see in some screens is the R7000 bridge IP, not the 192.168.1.102 Ethernet-connected client that the IxChariot test uses. In other words, consider the 192.168.1.101 and 102 devices as one wireless device.

Device connection second mix – SmartConnect Off
This produced total throughput of 83 Mbps shown below. Not much better than the first result.

Throughput second mix – SmartConnect Off
Enabling Smart Connect and reconnecting devices once again shows all AC devices on the low-band radio and the lone iPad on the high.

Device connection second mix – SmartConnect On
Total throughput this time is slightly lower (247 Mbps vs. 258), with the 3×3 device once again getting the bulk of the bandwidth. The 2×2 A6200 adapter (Pair 6 in the plot) gets only 29 Mbps, less then 10% of the total.

Throughput second mix – SmartConnect On
I also tried to see if I could get SmartConnect to assign the R7000 bridge to the "slow" device group by raising attenuation to the point where it had a very low link rate. But no matter what I did, SmartConnect figured out that it was a "fast" AC device and connected it with the other AC devices.
Closing Thoughts
$300 is a lot to spend on a router, so they better be worth it. The R8000’s value proposition is that its two 5 GHz radios will provide better total throughput utilization by separating "slow" and "fast" devices. It’s not promising improved range. It’s not promising higher (single device) speeds. But it is promising to fix a problem many of us have and don’t realize it–that our slower wireless devices are making our faster ones look like they are broken.
My simple experiments show that the R8000 can deliver significantly higher wireless throughput with a mix of 5 GHz devices by assigning them to different radios. But the experiments also show that bandwidth sharing among devices connected to each radio may not be very equal. Perhaps it was the mix of devices I used. But between the 3×3 and 2×2 NETGEAR devices I used, the 3×3 got around 74% of total throughput and the 2×2 got only 11%.
Given the capabilities I saw in Broadcom demos, NETGEAR appears to have dialed XStream’s capabilities down to a very simple level. Radio assignment appears to be based strictly on supported link rates, not the actual link rate in use. And NETGEAR has said it disabled dynamic radio assignment, citing problems it found with some devices not liking being steered. This bears another look, which I will do in Part 2, along with OpenVPN performance and full wireless testing.
In the meantime, don’t be so quick to jump on this or the other "vacation special" that ASUS is trying to get you to buy. They are expensive, the firmware is not stable (especially so right now for the ASUS RT-AC87) and the technology has not been significantly shaken out to ensure trouble-free use. Let someone else take the pain for now.