| At a glance | |
|---|---|
| Product | Edimax 2 x 2 AC Dual-Band Ceiling-Mount PoE Access Point (CAP1200) [Website] |
| Summary | Business class indoor ceiling mount AC1200 class AP supporting fast roaming and built-in RADIUS server |
| Pros | • Built-in RADIUS server • Good AP placement tool • Traffic shaping for Guest networks • Well-behaved roaming |
| Cons | • Web admin takes awhile to save changes • Terrible 2.4 GHz performance (Revision 10 retest) |
Typical Price: $90 Buy From Amazon
| At a glance | |
|---|---|
| Product | Edimax 3 x 3 AC Dual-Band Wall-Mount PoE Access Point (WAP1750) [Website] |
| Summary | Business class indoor AC1750 class AP supporting fast roaming and built-in RADIUS server |
| Pros | • Built-in RADIUS server • Good AP placement tool • Traffic shaping for Guest networks |
| Cons | • Web admin takes awhile to save changes |
Typical Price: $0 Buy From Amazon
Introduction
Updated 12/4/17 – CAP1200 retested
Edimax introduced its Pro Series access points at CES 2015 and they recently started shipping. We haven’t tested a lot of AC access points and people seem to be looking for them. So we decided to bring two of them in.
I’ll be looking at the CAP1200 and flagship WAP1750 Pro series business-class access points. I’m going to cover both as standalone access points, as well as using one in controller mode with Edimax’s Network Management System (NMS).
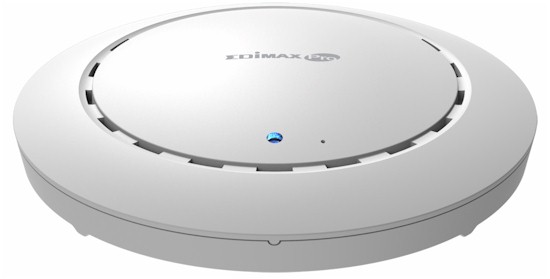
The CAP1200 is an AC1200 class 2×2 802.11ac access point in a circular "smoke detector" format, measuring just under 7" (17.6 cm) in diameter and 1.25 in. tall (3.2 cm) at its highest point. It can be wall or ceiling mounted with the included hardware and powered via 802.3af PoE or the included AC adapter. Edimax rates the CAP1200 as capable of supporting up to 50 concurrent clients per radio.
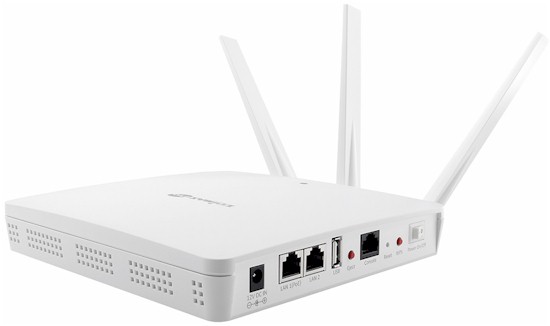
The WAP1750 is an AC1750 class AP with a 7" x 7" (18.3 x 18.3 cm) footprint and about 1.5"(3.6 cm) tall. It can also be wall or ceiling mounted with included hardware and powered via 802.3at PoE or with an included AC adapter. Edimax rates the WAP1750 also as capable of supporting up to 50 concurrent clients per radio.
The WAP1750 has two 10/100/1000 Ethernet ports. Port 1 will be connected to the main wired network and can receive power via 802.3at PoE. Port 2 is an 802.3af PoE port that can power other PoE devices such as access points or IP cameras when the WAP1750 is powered using the included 12V / 4A power adapter. I grabbed the WAP1750’s callout diagram from its User Manual. Edimax hasn’t posted the CAP1200’s manual yet.

Edimax WAP1750 callouts
Inside
Edimax turned to Qualcomm Atheros (QCA) and Mediatek to power the WAP and CAP. The CAP1200 mainboard is shown below, built around a MediaTek MT7620 802.11n 2T/2R SoC as the main processor and 2.4 GHz radio. The 5 GHz radio is a QCA9882 2×2 802.11ac/a/b/g/n radio.

CAP1200 mainboard
The WAP1750 has a larger mainboard, shown below, with a Qualcomm Atheros QCA9558 802.11n 3x3SoC as the main processor and 2.4 GHz radio and QCA9880 3×3 ac 5 GHz radio.

WAP1750 mainboard
The key components for both APs are summarized in Table 1.
| WAP1750 | CAP1200 | |
|---|---|---|
| CPU | QCA9558 dual-band, 3-stream 802.11n SoC | MediaTek MT7620 802.11n 2T/2R SoC |
| Ethernet | AR8035 + AR8033 Gigabit Ethernet PHYs | AR8035 Gigabit Ethernet PHY |
| RAM | 128 MB | 64 MB |
| Flash | 16 MB | 16 MB |
| 2.4 GHz Radio | – In QCA9558 – SiGE SE2565T 2.4 GHz power amp (x3) |
– In MediaTek MT7620 – SiGE SE2565T 2.4 GHz power amp (x2) |
| 5 GHz radio | – QCA9880 3×3 802.11ac radio – Skyworks 5003L1 5 GHz power amp (x3) |
– QCA9882 2×2 802.11ac/a/b/g/n radio – Skyworks SE5003L1 5 GHz power amp (x2) |
Table 1: Component summary
Features
Below is a bullet point list of features and specifications of the CAP1200 and WAP1750 taken from Edimax’s product website. The first section lists features common to both devices, with device specific features listed after.
|
CAP1200+WAP1750
|
CAP1200
WAP1750
|
In Use
Configuring the CAP and WAP in default AP mode is straightforward. You can configure it with a direct Ethernet-connected PC, or just plug it into your network. The AP will pull an IP address from your router’s DHCP server and you can browse to its IP and log in.
Once connected and logged in, you are presented menu options to view Information and configure Network Settings, Wireless Settings, Management Settings, and Advanced Settings.
I used the Network Settings menu to give the WAP1750 a static IP so I could consistently find it on my network, then used the Wireless Settings menu to assign an SSID and key to the 2.4 and 5 GHz radios. Within minutes, I had Windows and MacOS laptops, plus a couple ofiPhones connected to the CAP1200’s Wi-Fi network.
Immediately apparent when configuring individual Edimax APs is a bit of configuration lag. Each time you apply a new config, it takes up to 60 seconds for it to apply, with a wait message displayed such as the one below.

Config Delay
For example, it took approximately 60 seconds to apply a network IP address change, 10 seconds to apply a management password change, 15 seconds to apply an SSID change and 40 seconds to apply a change to Wi-Fi security.
This gets old quickly. A better solution would be to save changes quickly on each page and be given the option with each save to apply them (and take the longer reboot hit) once.
Both the CAP1200 and WAP1750 support PoE. I successfully connected the WAP1750 to a ZyXEL Power over Ethernet switch, so I didn’t have to use the included AC adapter for power.
The menus and options on the CAP1200 and WAP1750 are the same. The Edimax APs offer a wide array of options to configure the radio and SSIDs. Configuration options are summarized below.
Information
- System Info, Wireless Client Info
- Wireless Monitor
- Site Survey (detects 2.4GHz and 5.0GHz Wi-Fi SSIDs and displays channel and signal strength)
Network Settings
- LAN IP, LAN Port
- VLAN
- For the wired port, can set which VLANs are tagged and untagged
- For the Wi-Fi SSIDs, can assign each to a unique VLAN
Wireless Settings (2.4GHz and 5.0GHz)
- Basic = Define SSID, channel, channel bandwidth, BSS rate set
- Advanced = Set Contention Slot, Preamble Type, Guard Interval, 802.11 protection, DTIM Period, RTS Threshold, Fragment Threshold, Multicast Rate, Tx Power, Beacon Interval, Station Idle Timeout
- Security = Set SSID, Broadcast Enable, Wireless Client Isolation, Load Balancing, Authentication Method, WPA Type, Encryption Type, Key Renewal Interval, PSK Type, PSK, Additional Authentication
- WDS = Set WDS On/Off, WDS Peers 1-4, WDS VLAN, WDS Encryption
- Schedule = Set by day and by start/stop time
- WPS
- On/Off, PIN, Push-button, WPS by PIN, Status
- RADIUS
- Settings = For 2.4 and 5.0 GHz Primary and Secondary, set Type, Server, Port, Secret Key, Timeout, Account, Acct Port
- Internal Server = On/Off, EAP Internal Auth, EAP Cert Upload, EAP Secret Key, Session timeout, Term Action
- Accounts = Add/Delete users
- MAC Filter
- Add/Delete MAC addresses
- WMM
- AP and Station settings for traffic prioritization (Back Ground, Best Effort, Video, Voice)
Management
- Admin, Date and Time, Syslog, Ping Test, I’m Here, Operations Mode
Advanced
- LED, Update firmware, Save/Restore, Factory Default, Reboot
As you can see from the menu options, the Edimax Pro APs are highly configurable. Wireless security via WEP, WPA and WPA2 both home (PSK) and enterprise (RADIUS) are all supported, along with AES and TKIP encryption. Edimax PRO APs have built-in RADIUS servers or can connect to an external RADIUS server for 802.1X authentication. Up to 16 SSIDs can be configured per radio on each AP and each can be mapped to a unique 802.1q VLAN.
The Wireless Monitor is a useful utility for detecting surrounding Wi-Fi signals. Scanning for surrounding Wi-Fi signals allows you to manually select the least occupied channels to optimize your network. Clicking Scan in the Wireless Monitor menu presents a list of all detected SSIDs in both bands or each one individually. The below screenshot shows a Wi-Fi scan run from the WAP1750.
The Wireless Monitor looks for SSIDs and signal levels and doesn’t measure channel utilization. I ran a continuous ping test with a laptop connected and ran a scan. I observed 1-2 dropped pings while the scan was running. So there could be a brief STA interruption/disconnection while the scan is running.

Wi-Fi SSID Scan Tool
A feature I hadn’t seen on an Access Point before is the “I’m Here” menu option. This lets you trigger an Edimax access point to beep for 1-300 seconds. In a larger deployment with Access Points above false ceilings or otherwise out of sight, this buzzer feature is a nice way to physically locate the device. (It is also an amusing tool for surprising an unsuspecting pet or human!)

AP Locator Tool
Network Management Suite
PRO APs support Edimax’ Network Management Suite (NMS) to manage up to 8 Edimax Pro Access Points. NMS runs on an Edimax AP configured in Controller mode. Both the CAP1200 and WAP1750 support Controller mode.
NMS provides a single point for configuring Access Points and monitoring your network. The AP running in Controller mode can also serve as the RADIUS server for 802.1X authentication, be used to update firmware on the APs and used to tune and manage Wi-Fi channels and signal strength in a wireless network.
Interestingly, an AP running in Controller mode can also serve as an AP. But when you try to enable the AP, you are presented with a warning saying “To turn on the radio will influence NMS performance. Do you want to enable this?” I chose to leave the radio in the CAP1200 disabled when using it as a controller.
Setting the CAP1200 to Controller mode enables the Edimax NMS. Once in Controller mode, you’ll see the NMS menus instead of the standalone AP menus.
To control other Edimax APs, the Controller needs to find them. The easiest method to make them discoverable by the Controller is to reset them to defaults. My previously configured WAP1750 was not initially detected by the NMS, so I set it to default, along with a second WAP1750, and both were quickly detected by the Controller.
The NMS menus include the same options available in AP mode as shown previously, plus a few more. I’ve listed the NMS specific configuration options below.
- Dashboard
- Provides an overview of Managed APs, Managed AP Groups, and Active Clients
- Zone Plan
- Provides a graphical view of physical layouts with AP locations and signal coverage
- NMS Monitor
- Options to edit AP and AP Groups.
- Options to edit WLAN and WLAN Groups.
- Search tool for active Wi-Fi clients
- Search/Scan tool for Rogue networks.
- Event logs and graphs.
- NMS Settings
- Edit Access Points
- Edit WLANs
- Edit RADIUS
- Edit Access Control
- Guest Network Configuration
- Zone Edit
- AP Firmware Upgrade
- Advanced = Set system security and Date/Time
With both WAP1750s at factory defaults, the three-step NMS Wizard made it easy to discover the APs and set up a basic Wi-Fi network. The NMS Wizard automatically creates an AP group and WLAN group to get you started. Configuration delay, discussed in the previous section, seems to be shorter in Controller mode.
The Edimax NMS presents a useful dashboard, shown below, displaying system information, device counts, managed APs and AP Groups, and Active Client information.

NMS Dashboard
Group configuration options are a handy efficiency in the Edimax NMS. An AP group can be created specifying network VLAN and radio configuration options. A WLAN group can be created with multiple SSIDs. Network, radio, and Wi-Fi settings can then be applied to multiple APs by assigning a WLAN group to an AP group, and then assigning APs to your AP group.
The Edimax NMS has a nice feature for uploading maps or floor plans and then placing access points in their actual physical location on the map. If you know the exact length of a section of the map or floor plan, you can drag a line on the map and enter its length. This allows Edimax to automatically set the appropriate scale.
I uploaded a JPG floor plan of my test area, set the scale, and placed the two access points in their physical locations on the plan as shown below. The concentric circles indicate signal strength, so you can see overlap between the two APs at the center of my home.

AP Floor Plan Tool
Fast Roaming
A feature on the Edimax APs is “fast roaming.” As Edimax describes it, fast roaming allows client devices to roam “smoothly between APs without lag or interruption, ensuring top performance for video and voice streaming applications”.
To test fast roaming, I ran a simple test by putting the two WAP1750s as far from each other as I could, as shown previously in my floor plan. I used a Windows 8 laptop with an 802.11n Wi-Fi adapter as my roaming device.
On my laptop, I ran inSSIDer, a Wi-Fi signal strength application, along with a continuous ping to Google’s DNS server (ping 8.8.8.8 -t). inSSIDer shows real time Wi-Fi signal strength, the MACs of the surrounding Access Points, and identifies the AP I’m connected to. The continuous ping reflects network connectivity. The screenshot below shows inSSIDer on the left and the continuous ping on the right. The SSID I’m using is MDC11.

Fast Handoff Testing
For my test, I stood next to one access point, made sure I was connected to it, then walked toward the other access point. As I got closer to the other access point, the signal strength increased for the access point I was approaching and decreased for the access point I was originally connected to.
Eventually, my laptop “roamed” from one access point to the other. I walked back and forth between access points multiple times with the ping test running, and only once observed a single dropped ping as my laptop roamed from one access point to the other.
Any test of Wi-Fi roaming is going to vary based on building structures such as walls and doors and other obstacles in the area. It is also going to vary based on the Wi-Fi client device. Thus, this test can’t indicate how all clients will behave, but it is a real world test. My conclusion from the test is my laptop was able to roam relatively smoothly, although the one dropped ping could have resulted in a brief degradation of a video or voice application.
Guest Network
The NMS also provides a Guest Network option. This option allows you to create a separate wireless network for external users and apply controls to keep them out of the internal network. As shown below, control options for Guest Networks include VLANs, Wireless Client Isolation, Load Balancing, Traffic Shaping, and IP Filtering.

Guest Network Options
Performance
Testing and analysis by Tim Higgins
The CAP1200 and WAP1750 were tested using the V8 Wireless test process. All wireless testing was done using latest available 1.1.0 firmware on the CAP and 1.1.7 on the WAP. Each access point was first reset to factory defaults and Channel 6 and 20 MHz bandwidth mode set for 2.4 GHz and Channel 153 and 80 MHz bandwidth mode for 5 GHz. All testing was done using WPA2 / AES secured connections.
The photo below shows the CAP1200 in the test chamber. Test runs were done with the AP sitting directly on the chamber turntable and with it raised approximately 3 inches as shown in the photo. Downlink throughput was slightly higher with the AP raised, that position was used for testing. The AP was centered X and Y on the turntable, which centered it on the test chamber antenna array.

CAP1200 in Test Chamber
The WAP1750 body was positioned horizontally on the turntable with the three antennas centered X and Y. This ensured the AP antennas would not be above the chamber antennas.
The Benchmark Summaries below shows the average of throughput measurements made in all test locations for the CAP1200…

CAP1200 Benchmark Summary
…and WAP1750.

WAP1750 Benchmark Summary
The CAP1200 is the first AC1200 access point tested with the current Version 8 test process, so we have no APs to compare with and the Wireless Ranker is no help. The Charts also fail us since they don’t allow comparing routers and access points. So you’ll have to do a little interpolation between two charts.
The CAP1200 will be on the left; the ASUS RT-AC56U and Linksys EA6350 AC1200 routers on the right. I didn’t include the TP-LINK Archer C5 top-ranked AC1200 router because it’s really an AC1750 router, at least in 2.4 GHz. Be sure to keep an eye on the Y axis; it autoscales and most times changes between the two plots.
For 2.4 GHz downlink, the CAP1200 is between the ASUS and Linksys with low attenuation values (high signal levels). Throughput starts to fall off at 24 dB; about the same time as the Linksys, but earlier than ASUS. The ASUS is the winner for range, staying connected all the way out the 63 dB test limit.

CAP1200 throughput vs. attenuation – 2.4 GHz downlink
The 2.4 GHz uplink plots are easier to compare since the scales are the same. The CAP1200’s profile looks more like the Linksys, except it stays connected 3dB longer.

CAP1200 throughput vs. attenuation – 2.4 GHz uplink
5 GHz downlink has the Edimax behaving more like the Linksys at the start of the run. But while the ASUS doesn’t achieve the high starting throughput of the other two products, it stays connected the longest, indicating superior range.

CAP1200 throughput vs. attenuation – 5 GHz downlink
5 GHz uplink tells a similar story; higher starting throughput than the ASUS, but earlier disconnect.

CAP1200 throughput vs. attenuation – 5 GHz uplink
Performance – WAP1750
Evaluating the WAP1750’s performance is easier, albeit limited since we have only the Linksys LAPC1750PRO to compare. 2.4 GHz downlink shows the two products pretty close, although the Edimax runs above the Linksys for the middle attenuation values.

WAP1750 throughput vs. attenuation – 2.4 GHz downlink
In the 2.4 GHz uplink plot, the Edimax clearly outdoes the Linksys over much of the test range.

WAP1750 throughput vs. attenuation – 2.4 GHz uplink
5 GHz downlink finds the Edimax with both higher throughput at all attenuation values and significantly better range, disconnecting after 39 dB vs. the Linksys’ 27 dB.

WAP1750 throughput vs. attenuation – 5 GHz downlink
Finally, 5 GHz uplink shows the Edimax doesn’t achieve the same peak throughput as the LAPC1750PRO, but it again provides significantly better range.

WAP1750 throughput vs. attenuation – 5 GHz downlink
Closing Thoughts
I’ve reviewed Wi-Fi solutions from ZyXEL and Ubiquiti, and the Edimax solution has similarities to both. Like the ZyXEL solution, Edimax allows you to convert one of the APs to an AP controller. And like the Ubiquiti UniFi solution, Edimax provides a nice mapping tool for displaying exact physical locations of the access points.
In Table 2, I’ve listed current prices for the Edimax, ZyXEL, and Ubiquiti access points.
| Access Point | Class | Price |
|---|---|---|
| Edimax CAP1200 | AC1200 | $150 |
| Edimax WAP1750 | AC1750 | $280 |
| ZyXEL NWA3560n | N600 | $298 |
| Ubiquiti UniFi AP AC | AC1750 | $271 |
Table 2: AP price comparison
The CAP1200 is much less expensive than the ZyXEL and Ubiquiti APs, while the WAP1750 is about the same price as the other two. Keep in mind the ZyXEL is N600 class (simultaneous dual-band N 2×2), while the CAP1200 is the more up-to-date AC1200 (simultaneous dual-band AC 2×2).
Using the Edimax CAP1200 as a controller for an Edimax Pro-based small network would be much less expensive than using a ZyXEL NWA3560n. And although Ubiquiti’s free UniFi controller software is tough to beat in price and has powerful features, the UAP-AC is Ubiquiti’s only AC AP.
Overall, the Edimax Pro Wi-Fi system is quite simple to use and was stable during my testing. All my Wi-Fi devices quickly connected and stayed connected to the CAP1200 and WAP1750.
I also like Edimax’s NMS solution, it is quite easy to set up. The only time I consulted the manual was to double check details. I never needed the manual to figure out a configuration or option.
To sum up, the Edimax Pro Wi-Fi access points are a user-friendly system suitable for small-to-medium sized business grade Wi-Fi networks.
Buy 2 x 2 AC Dual-Band Ceiling-Mount PoE Access Point from Amazon
Buy 3 x 3 AC Dual-Band Wall-Mount PoE Access Point from Amazon