| At a glance | |
|---|---|
| Product | Securifi Long Range Touchscreen Wireless AC Router / Range Extender + Home Automation Hub (Almond +) [Website] |
| Summary | Touch screen configurable AC1750 class router with dual USB 3.0 ports, Gigabit Ethernet ports and built-in Z-Wave and ZigBee radios for Home automation |
| Pros | • Zigbee & Z-Wave radios for H.A. • Setup can be done via color LCD screen • Open-WRT based |
| Cons | • Not Wi-Fi certified • No User Manual • Awkward connector position • Open-WRT based |
Typical Price: $80 Buy From Amazon
Introduction
Updated 4/30/15: Component details corrected
A little over two years ago, I reviewed Securifi’s Almond – a simple, but relatively expensive N300 router that featured a unique touchscreen that allowed you to set up most, but not all of the router’s features. Fast forward two years, and Securifi has two new products: The Almond-2015 and the Almond+ I’ll be reviewing today.
The chart below, taken from the Securifi website, summarizes the three products. Compared to the original product, the Almond+ features four Gigabit Ethernet ports, a larger 3.5″ LCD touchscreen, two USB 3.0 ports and built-in ZigBee and Z-Wave radios that support an entire range of home automation products. As an AC1750 class router, it supports simultaneous dual band operation and has 3X3 radios on each band. The other two products are single band N300 (2X2) class products.

Securifi Almond product comparison
The Almond+ has two unique selling propositions that differentiate it from other AC1750 class routers. First, like the original Almond, it has a color touchscreen. The touchscreen on the Almond+ is a 3.5″ 480 X 320 pixel screen vs. the 2.8″ 320 X 240 pixel screen found on the other two models. This allows for eight “metro” or “modern” styled icons on the screen of the Almond+, compared to 6 on the other two models.
Using the touchscreen, you can completely configure the basic setup as well as most of the router’s features. Likewise, the browser-based interface, which many customers will never use, also lets you configure the router. Interestingly, there are some features that can be configured only in the web UI and some features that are only configurable using the touchscreen interface. The Almond+ has additional advanced features available by using an OpenWRT interface found on the Advanced page of the web UI.
Second, the Almond+ has built-in ZigBee and Z-Wave wireless interfaces that support a large number of Home Automation devices such as door locks, security sensors, thermostats, smart LED bulbs and power sockets. In order to support those devices, Securifi has built its own back-end services as well as Android and iOS apps. These Home Automation features are covered in this review.
Product Tour
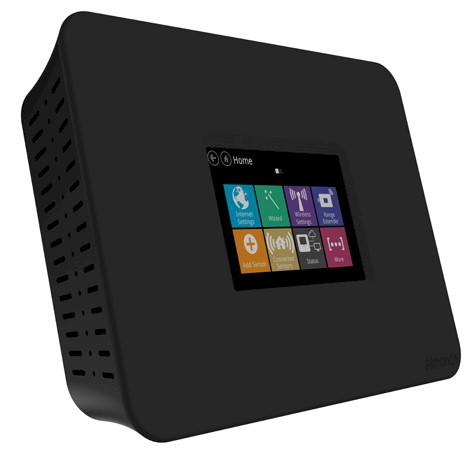
Securifi took a slightly different design direction with the Almond+. First, the black plastic molded case on the Almond+ has a nice matte finish, which helps hide fingerprints. The original Almond had a glossy finish which seemed to attract fingerprints. Second, while the original Almond was intended primarily as a desktop router and sits vertically, the Almond+ tilts back at an angle and is supported by a plastic kickstand that snaps on with two tabs. I found that the angle made it easier to use the touchscreen – similar to the experience you have with a tablet.
Securifi includes a stylus tucked into a slot in the router top that comes in handy to operate the touchscreen. Also included is a plastic back plate for wall mounting that snaps into the same holes the kickstand uses.

Securifi Almond+ rear panel showing the support bracket
On the rear of the Almond+, you’ll find four Gigabit Ethernet LAN ports (black) and one WAN port (gray). Each port has a single green LED to indicate link status and activity. The network ports, like the two USB 3.0 ports and the power jack, are mounted so that cables plug in vertically from the bottom of the router. It’s a bit difficult to connect Ethernet cables to several of the ports with the support bracket attached. You really need to remove the kickstand to insert or disconnect cables, and even then, it’s awkward.

Securifi Almond+ Ethernet ports and power jack
Like the original Almond router, there isn’t a user’s manual for the Almond+. I contacted Securifi tech support with several product questions and they were very helpful. They pointed me to the Securifi Wiki, where you’ll find pages dedicated to the Almond+, including an expanded Quick start guide, a number of “How tos”, USB Printer Support and SSH Access.
In looking through the Wiki pages, I found the hardware reset button, shown below. Initially, I had thought that the button might have been for WPS, but the Almond+ doesn’t currently support WPS. That may be added in a future firmware release and could appear as a touchscreen button.

Securifi Almond+ reset button is located beneath the third rear air vent on the top left of the case
On the Inside
Updated 4/30/15: Component details corrected
The Almond+ is based on a Cortina Systems CS7542 dual core Cortex-A9 SOC running at 750 MHz. It has a built-in Wi-Fi processing engine, so the main CPU is freed for other tasks. The Gigabit Ethernet switch is built into the SoC a QCA8337. There’s 512 MB of Samsung DDR3 RAM and 512 MB of Spansion Flash. The 2.4 GHz radio is an Atheros AR9580 and the 5 GHz radio is a QCA9880-BR4A 3X3 802.11AC radio. The power amplifiers for both 2.4 GHz and 5 GHz are unidentified from RFAxis.
The FCC ID internal photos show a clean, but chock-full design. The first photo shows the placement of the three dual-band Wi-Fi antennas as well as the locations of Z-Wave and ZigBee antennas.

Securifi Almond+ interior showing antenna placement
The next photo shows the top of the main PCB with heat sinks and RF shields removed. The LCD panel plugs into the connector on the photo’s right side.

Securifi Almond+ PCB Top
The last image shows the bottom of the main PCB with a substantial heatsink and cooling pipe. The pipe connects to a heatsink on the other side of the board that you can see in the first photo. It has a blue insulator/spacer attached to it. I did observe that the top of the case near the air vents was fairly warm to the touch.

Securifi Almond+ PCB Bottom
Key components are summarized in Table 1.
| Securifi Almond+ | |
|---|---|
| CPU | Cortina Systems CS7542 @750 MHz |
| Switch | QCA8337 |
| RAM | 512 MB |
| Flash | 512 MB |
| 2.4 GHz Radio | – Atheros AR9580 – RFAxis 2.4 GHz power amp (x3) |
| 5 GHz radio | – QCA9880-BR4A 3×3 802.11ac radio – RFAxis 5 GHz power amp (x3) |
| Zigbee radio | Silicon Labs EM357 |
| Z-wave radio | Sigma Designs 3-series module |
Table 1: Component summary
Setup
As with the original Almond, the touchscreen really simplifies setup. In fact, the product packaging claims that you can set up the router in 3 minutes without using a PC. And you can. The setup process is very similar to the original Almond. However, you have several additional optional steps to create an Almond+ account for remote access for your sensors and to set up sensors themselves. The quick Start Guide still describes the same four router setup steps found in the original Almond.
- Unplug/reset your cable/DSL modem and remove the Ethernet cable attached to your computer or existing router;
- Wait one minute and plug in the modem;
- Wait one minute and plug in the Almond; and
- Follow the instructions on the Almond’s touchscreen.
The on-screen instructions are clear and succinct. They guide you through language selection, finding the stylus, selecting the mode of operation (router or range extender) and connecting your WAN Ethernet cable. When the wizard completes, it shows you have an Internet connection and summarizes your wireless network settings. The Almond+ automatically configures your wireless network with wireless security enabled as well as an admin password. You can find login information under the Status, Web Admin option. You can find the wireless network names and passwords under the Wireless settings icon on the touchscreen.
If you intend to use the Almond+ as a range extender, setup is even easier. All you have to do is plug in the router. If the Almond+ doesn’t find an Ethernet connection on the WAN port, it will default to range extender mode.
Features
The Almond+ lacks many of the features found on high end routers. Most likely Securifi traded features for ease of use. Some missing features include lack of support for port range forwarding or port triggering, Wi-Fi Protected Setup (WPS), content filtering and a UPnP port map to show open ports. There are also no configuration settings to control VPN passthrough (PPTP, IPSec or L2TP). Most routers support that and enable VPN passthrough by default, but with the Almond+, you really don’t know. There currently isn’t a feature list available, so I’ve compiled my own.
Internet
- Static IP
- DHCP
- PPPoE
- PPTP
- VPN – (PPTP and IPSec)
Network
- Default setting is 10.10.10.254 with a subnet mask of 255.255.255.0
- DHCP server Enable/disable
- Configurable lease time (default – 24 Hours)
- Static DHCP Leases (DHCP Reservation)
- Active lease table of clients showing remaining lease time.
- Network interface (LAN and WAN) traffic stats – OpenWRT only
- DDNS (9 providers) – OpenWRT only
- QoS – OpenWRT only
- IGMP Proxy – OpenWRT only
Wireless (separate settings for each band)
- Disable Wireless network
- Enable Wireless Client Isolation
- Set Maximum number of stations
- Set Country
- Channel mode
- Mode (channel width)
- Channel (auto or select channel)
- B/G Protection mode (2.4 GHz only)
- Wireless Security – No Encryption, WEP Open, WEP shared Key, WPA-PSK, WPS2-PSK, WPA-PSK/WPA2-PSK Mixed mode (No enterprise)
- MAC Filter – Disable, Only ALLOW MAC addresses on line, DENY MAC addresses on list.
- Repeater mode
- AP mode
- Guest Network – 1 per band with separately configurable SSIDs
- Hide SSIDs – only configurable on touchscreen
Routing/Firewall/Forwarding
- Port forwarding (no pre-configured services)
- Static IPv4 Routing table
- DMZ
- Web Access (Port 80 only – no https access) – only configurable on touchscreen
- SSH access (Port 22) – only configurable on touchscreen
- FTP access (Port 21)
- WAN Ping response – only configurable on touchscreen
Sharing
- USB Printer sharing – Configured through OpenWRT
- USB storage sharing via FTP/SAMBA
- DLNA Server – enable/disable
Admin/System
- Admin password change
- Screen Lock Pin
- Screen timeout (5 min default)
- Enable Screen lock
- Paste public SSH keys
- Backup/restore settings
- Update firmware
- Check for updates – touchscreen only
- System Mount points
- System Log (not e-mailable)
- Kernel Log (not e-mailable)
- Syslog configuration, Log output level and Cron Log Level – OpenWRT only
- Set Time/time zone – OpenWRT only
- Configure NTP servers – OpenWRT only
- Application-level Gateway enable/disable (FTP, IPSec, H323, RSTP, SIP) – OpenWRT only
- Enhanced status pages – OpenWRT only
Hands On
There are two ways to manage the Almond+: Via the touchscreen; and via the web browser interface. Not all features are available in either interface. As noted, from the Web UI, there is also access to OpenWRT, which has its own interface. But there aren’t many additional features provided by the OpenWRT admin.
In the next two sections, I’ll take a look at both the touchscreen UI as well as the web UI.
Touch Screen Interface
The Almond+ has more screen real estate than the other models, so it can fit eight icons per page rather than six. But since I reviewed the original Almond, there have been a lot of changes to the touchscreen menu. Table 1 below shows the top level touchscreen icons for the Almond+ and original Almond.
| Almond+ | Almond | |
|---|---|---|
| Internet Settings | X | X |
| Wizard | X | X |
| Wireless | X | X |
| Range Extender | X | X |
| Add Sensor | X | |
| Connected Sensors | X | |
| Status | X | X |
| Settings | X | |
| Almond Account | X | |
| Help | X | X |
| AP Mode | X | |
| Diagnostics | X | |
| Time (Beta) | X | X |
| Weather (Beta) | X | X |
| Shutdown | X | X |
| Security | X | |
| Add Device | X | |
| Screen Settings | X | |
| Web Administer | X | |
| Software Update | X | |
| Connection | X | |
| System Log | X | |
| Statistics | X | |
| Support | X | |
| Help | X | |
| Filter | X | |
| Users | X | |
| DMZ | X |
Table 1: Touch screen icons for the Almond+ and Almond
Note: The data in Table 1 for the Almond was based on firmware as of the review date. Securifi may have re-arranged the top level icons in the Almond via firmware updates since the original review.
Many of items found on top level icons in the Almond are now found in submenus on the Almond+. Some features such as System Log, Statistics, Filter, Users, and DMZ are no longer in the touchscreen UI, but are available through the Web UI. This results in an easier to use and simpler touchscreen interface on the Almond+. And of course, since the Almond+ supports Home Automation devices through its Z-Wave and ZigBee interfaces, there are some new icons on the touchscreen as well as in the web UI to support them.

Securifi Almond+ Touch screen Home Pages 1 & 2
I’ll briefly describe each of the functions:
Page 1
Internet settings – choose from DHCP, DSL Dial up or Manual (static) IP
Wizard – launches the setup wizard.
Wireless – Change SSID, WPA PSK, operating channel, enable/disable guest network, change guest network name and password.
Range Extender – starts wizard to configure the Almond as a repeater/bridge. This is not found in the Web UI.
Add Sensor – starts the connection wizard for home automation devices
Connected Sensors – shows connected home automation
Status – This top level menu now leads to four sub menus shown in the composite image below
Page 2
Settings – This has sub menus for software update, screen settings (Pin, lock enable and timeout) Web access, and Security (for entering the screen PIN when locked.)
Almond Account – Shows shows currently linked Almond Account
Help – This shows you a summary of your wireless settings for each band as well as a Windows and Apple icon. Clicking on that icon walks you through connecting wirelessly on your desktop. The submenu also includes support phone numbers, the ability to send logs for diagnostics and an About screen showing model, device name, MAC address and software version.
AP Mode – Here, you can convert your router to AP mode. In previous versions, you had to do this from the Web UI.
Diagnostics – This checks your Internet connection, your cloud account and connection, your and re-synchronizes the router’s clock with an NTP server.
Time – This feature has been in "Beta" for more than two years. Shows current time, day of week and date. You can also force an NTP update.
Weather – shows current location and temperature with high and low prediction for the day. You can’t change the location from your current location. Also this is still in "Beta".

Securifi Almond+ Touch Status screens
Web UI
You log into the Web UI using the Web Administrator IP address and credentials (root / jiffs). Very little has changed on the landing page from the one found on the Almond two years ago. It has the same Windows “Modern” look with large square or rectangular icons. The only changes between the Almond+ and the original Almond are that an Software icon has been moved to replace the Add Device icon, and a new Access Point icon has replaced the Add Device icon on the old user interface. Some of the submenus, accessed by double clicking on the icons (or tapping on the icon on a touchscreen), have additional functionality.

Almond’s web UI has a Windows 8 Metro look
Internet – you can configure connection options of PPPoE, L2TP and PPTP; Additional features of the Web UI include the ability add a Host name, use DNS servers advertised by peer and use Bootp broadcast flag. The MAC clone feature in the previous model has been removed.
Wireless – This submenu – similar for both the 2.4 GHz and 5 GHz bands, lets you configure Mode (channel width) Channel, Country, enable/disable the radio, enable Wireless client isolation, configure security, MAC Filtering, enable/configure the Guest Network and change to repeater mode. You can’t choose to hide the SSID – this is in the touchscreen interface only.
Network – You can specify DHCP starting and ending address as well as the DHCP lease time. unlike the previous version, you can’t specify the primary and secondary DNS servers. You can configure statically assigned IP addresses based on MAC addresses. The network submenu also shows active DHCP leases.
Management – Here you can change the admin password, set the Screen Lock PIN, Screen Timeout and Enable the Screen lock feature. You can also paste public SSH keys on this form.
Access Point – Change the router mode to access point mode.
Status – There’s no submenu.
Software – you can use this page to update the Almond’s firmware. Unlike the touchscreen UI, It doesn’t check for new firmware. This menu also lets you back up and restore your current configuration files.
There are two new tabs on the Almond+ web UI for Home Automation features. While I have installed two ZigBee devices and have performed some basic tests, I won’t be discussing Home Automation in depth in this review. It will be covered in an upcoming review.
- Sensors shows your currently installed sensors and provides you status and rudimentary control (On/Off)
- Rules lets you create rules to control your installed devices.
Like the Advance settings (sic) in the Almond, the Advanced settings menus on the Almond+ are displayed in gray and white. This menu represents the largest change in the product. Removed from the Advanced UI on the Almond+ are the following features. I’ve copied the feature description from the previous review so you can see details on what’s been removed.
Removed features:
Firewall – this isn’t in the touchscreen UI. This menu has the following functions: Remote management; Ping from WAN; Block port scan; Block SYN Flood, SPI firewall. All are disabled by default.
Filtering – this isn’t in the touchscreen UI. This allows you to create up to 32 MAC/IP/Port filtering rules
Content Filtering – You have a bit more granular control of filtering than in the touchscreen UI. You can filter Java, ActiveX and Proxy. You can also filter web sites by URL and keyword.
Console – you have very basic command line access. The following commands are available:
break cd chdir continue eval exec exit export false hash help local pwd read readonly return set shift source times trap true type ulimit umask unset wait

Securifi Almond+ web UI Advanced Settings
Retained Features:
Forwarding – this isn’t in the touchscreen UI. Here, you can forward ports or ranges of ports from the WAN to hosts on your local network. You can choose TCP, UDP or both protocols for forwarding. There are no pre-defined services such as HTTP (port 80). You can have up to 32 rules.
DMZ – You can enable/disable the DMZ and specify a LAN IP address for forwarding.
Routing – this isn’t in the web UI. You can view the exiting routing table and add routing rules.
System Log – This has been removed from the touchscreen UI. In the web UI, it provides you a system log, but you can’t email or alert using the log.
Support – the touchscreen UI also has a US phone number for support – the web UI only has the email address.
New Features:
DLNA Server – If you have attached storage, you can enable the DLNA server (disabled by default). It is a very basic server. It scans all directories, and you can’t password protect the library. There’s also no button to force a re-scan/re-build of the library. I tested the server and I was able to play music, view sideshows and play videos on my iPad using a DLNA client.
FTP/SAMBA – you can enable each of these services separately. As with the DLNA server, this is a very basic set of services. There’s only a single user name/password, and there are no configuration options for FTP (anonymous, passive mode, logging, default directory, etc.) For FTP, root access is denied and session open/close events are logged into the system log. Downloads are not. For Samba, I was unable to map a drive using the user name/password on the FTP/SAMBA configuration page either on a Windows XP or a Windows 7 computer.
VPN Server – The Almond+ supports either a PPTP server or an IPSec server. You can add additional clients and specify their assigned IP addresses.
Diagnostics – provides access to web-based ping, tracert and nslookup
Mount Points – You can view and create mount points
OpenWRT – When selecting the OpenWRT interface, you actually open up a separate web interface on port 90 with a completely different look and feel. Using the OpenWRT interface does open up some configuration options not available either in the touchscreen or the standard Securifi Web UI. It also duplicates many of the options included in the Securifi Web UI. Some of these additional features include:
Status: detailed status screens for Firewall, Routes, System Log, Kernel Log, Processes and Realtime Graphs
System: Controlling Startup daemons, adding/configuring NTP servers (all default NTP servers are Taiwan-based)
Services: Configure UPnP, configure the Torrent server (disabled by default), configure print server, configure VPN server (also in Web UI), and enable/configure Dynamic DNS (9 providers configured)
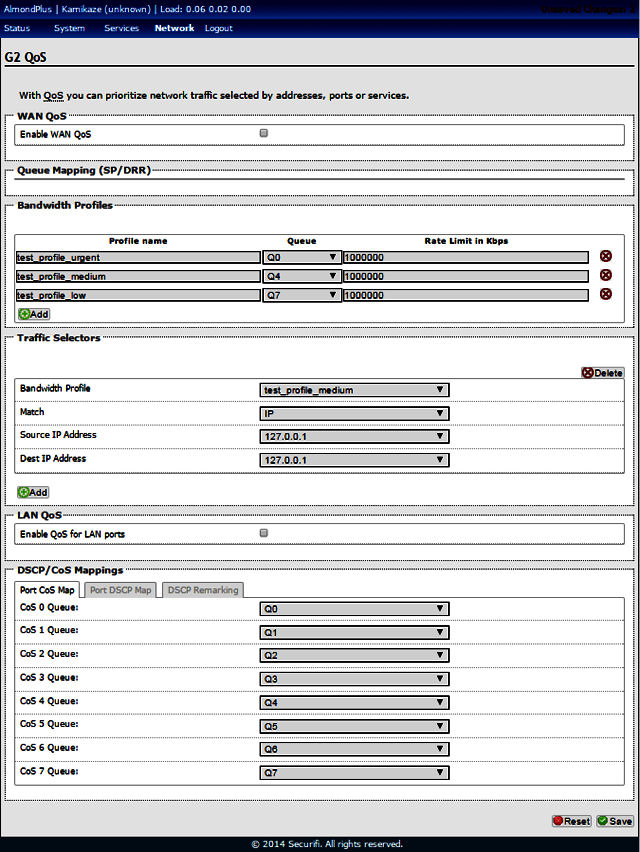
Network: Enable G2 QoS, Firewall (Syn-Flood protection), Configure IGMP Proxy
To give you a feel for the OpenWRT interface, the image below shows the landing page status screen. I’ve also included a gallery below that shows many of the additional features mentioned above.

Securifi Almond+ OpenWRT Status Page
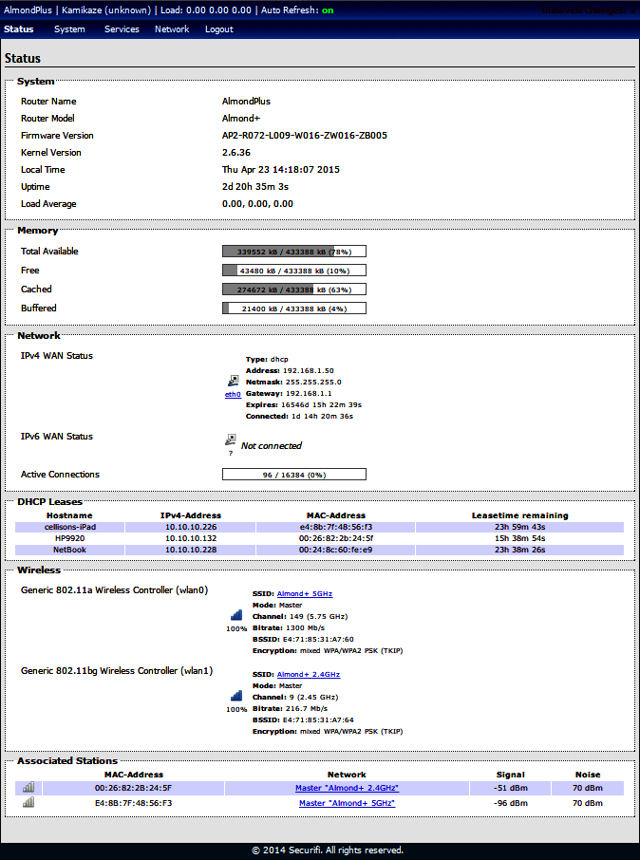
Overview Status landing page for OpenWRT
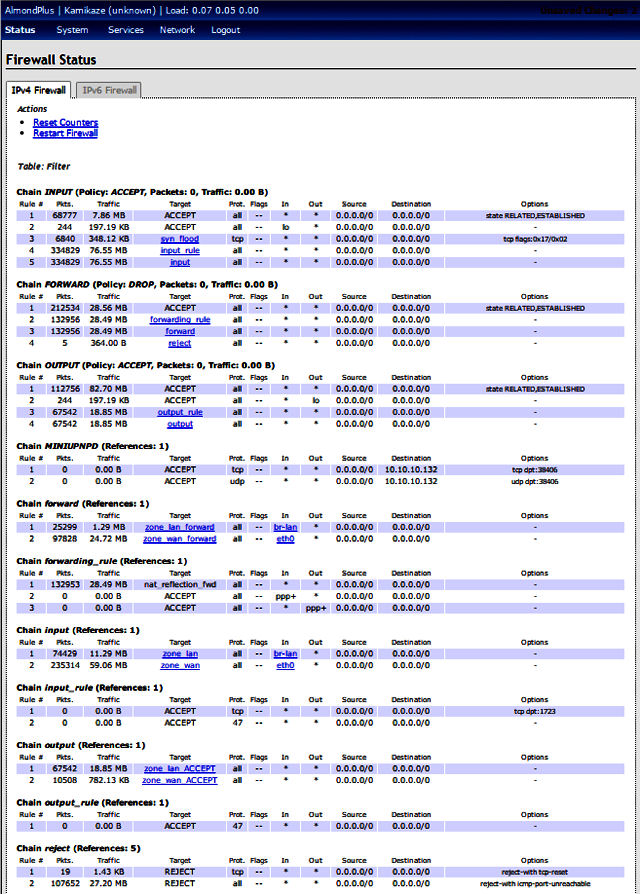
Shows firewall statistics
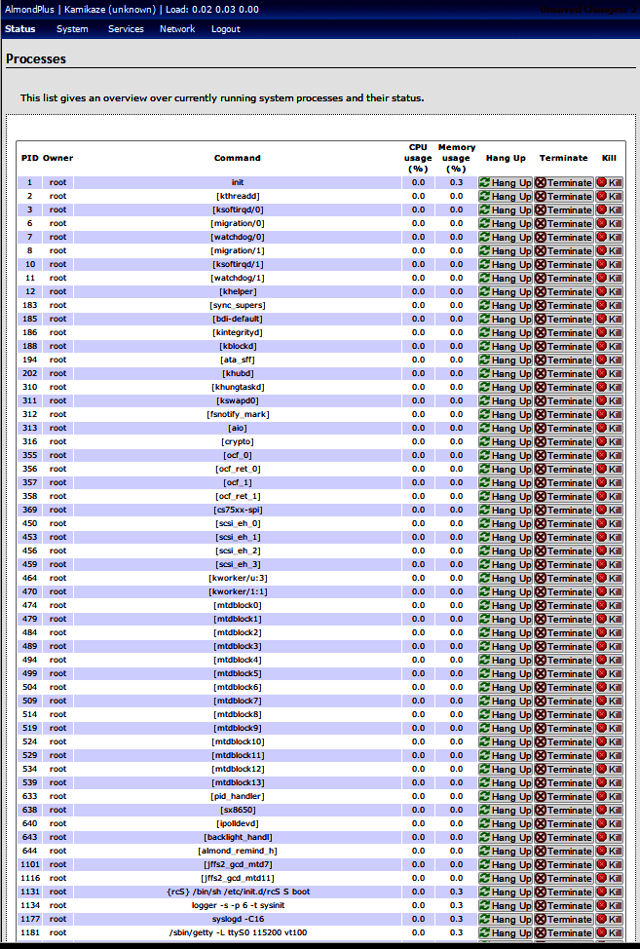
Shows currently running processes with CPU and memory utilization and options to hang up, terminate or kill individual processes.
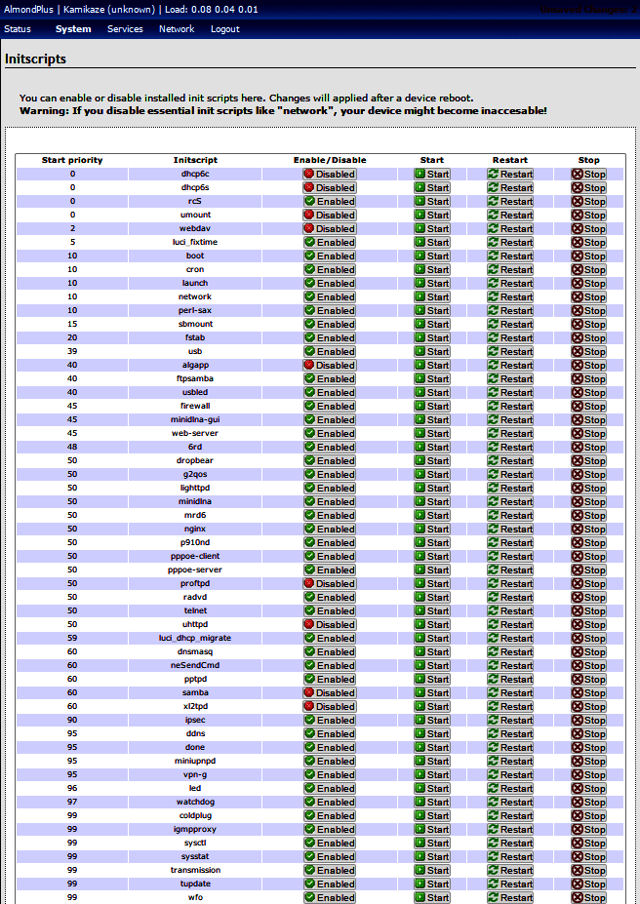
Shows enabled/disabled scripts with options to start, restart or stop individual processes
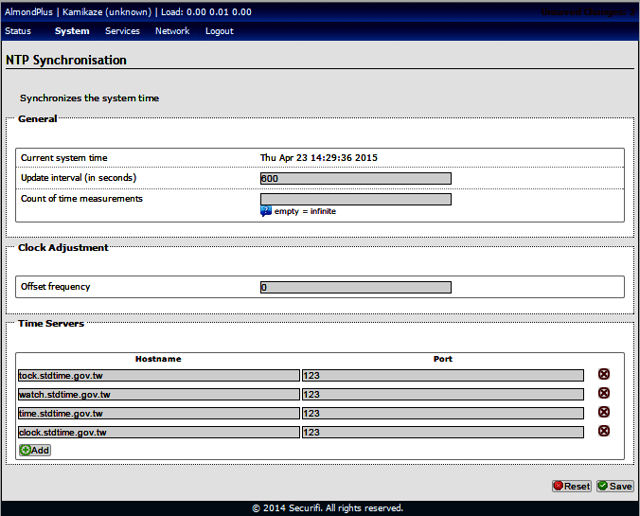
You can update NTP settings and add servers. Note: 600 seconds seems pretty aggressive for updating time.
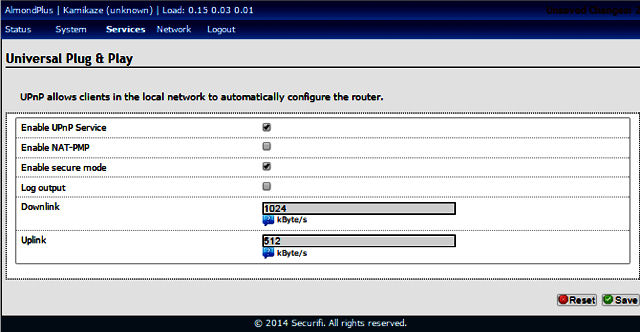
Enable/configure UPnP options

Enable/configure Torrent server
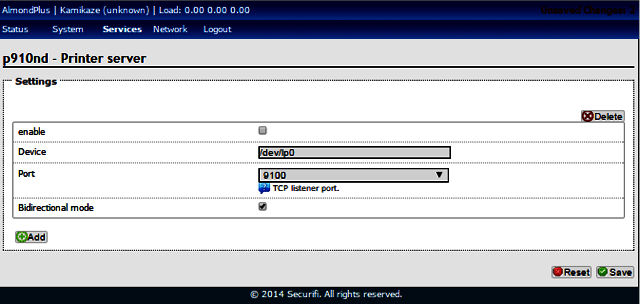
Enable/configure Printer server
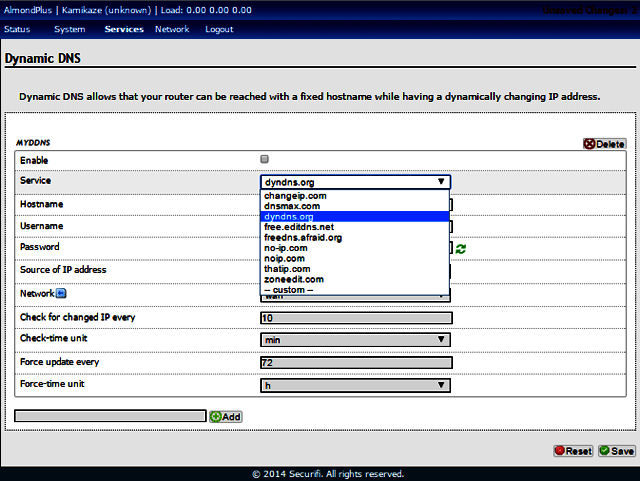
9 supported DDNS providers. This page gives you granular control over DDNS settings.
Some help information would be handy to help configure this feature. To most users, it would not be immediately obvious how to use this feature.
Range Extender
In addition to being a traditional router, the Almond offers a Range Extender mode. In this mode, the Almond connects wirelessly to another wireless router/AP and then repeats it, extending your wireless network. You select the Range Extender from the first home screen on the touchscreen UI. In fact, you have to use the touchscreen UI to change to the range extender mode – it doesn’t appear in the web UI.
If any Ethernet cables are plugged in, you are prompted to remove them. The Almond then searches for nearby wireless networks and displays a list showing the wireless networks with strongest signals at the top of the list. Each available network’s signal strength is shown with one, two or three bars. You select the network that you want to extend. Next, you enter the password (WPA-PSK) for the selected network. The Almond+ then prompts you for the SSID to be used by the range extender. The default is the host name of your Host network with _almond appended. (eg, mynetwork_almond)
Alternatively you can choose to use the same SSID as the host network, or create a completely different name. The original Almond didn’t give you the option to set the SSID of the extended network during the setup process. After choosing a name for your extended network, the Almond+ then saves the settings, connects to the selected network and obtains an IP address. After connecting, a status screen appears that shows that the device has Internet connectivity. The credentials to log into the Almond+ will be using the IP address received from the “home” network’s router.
In my test, I selected my wireless network named Strohmeyer that’s located in my office as the wireless network to extend. When the Range Extender setup completed, the status screen showed that the SSID of the Almond+ was Strohmeyer_almond. The wireless password was the same one used for the host wireless network, Strohmeyer. The main status screen also reflected that the Almond was in Range Extension mode, had Internet connectivity, and displayed Strohmeyer_almond and the password. I attached to the extended network with my iPad and received an address from the Host network. Likewise, I connected a notebook using an Ethernet cable to one of the LAN ports on the Almond+ and also received an IP address from the Host network. You couldn’t have asked for an easier setup.
Note: When I reverted back to router mode, the wireless networks retained the names from the Range Extension mode – Strohmeyer_almond and Strohmeyer_almond5G.
AP Mode
The Almond+ has retained the AP mode found in the original Almond. You can change from router mode to AP mode from either the Web UI or from the touchscreen. I changed into AP mode, and after rebooting, the Almond+ was, indeed in AP mode advertising the same Almond+ SSIDs (on both bands) that were used when it was a router. I checked the Web Admin address on the touchscreen and found that the Almond+ had received an IP address on my “Home” network. Using the address on the status screen (on my network’s subnet), I was able to log into the Almond’s web UI. I connected my iPad to one of the wireless networks on the Almond+ (in AP mode) and it received an IP address from my “home” network indicating that the AP mode was working properly. I also connected my notebook to one of the LAN ports on the Almond+ and confirmed that the LAN ports were bridged in the AP mode.
Storage Performance
We tested storage performance using our router storage test process. Table 2 below summarizes storage performance for other selected AC1750 class routers that have USB 3.0 ports. The Almond+ had the best performance for FAT32 Writes, but the slowest performance for FAT32 Reads. Similarly, the Almond+ was the fastest for NTFS Writes, but places third behind the NETGEAR r6300 V2 and the TP-LINK Archer C8 for NTFS Reads.
| Securifi Almond+ | TP-LINK Archer C8 | NETGEAR R6300 v2 | Buffalo WZR-1750DHP | D-Link DIR-868L | TRENDnet TEW-812DRUv2 | |
|---|---|---|---|---|---|---|
| FAT32 Write | 28.4 | 21.4 | 15.6 | 21.0 | 16.0 | 8.1 |
| FAT32 Read | 16.6 | 34.5 | 26.1 | 38.0 | 27.0 | 17.2 |
| NTFS Write | 31.5 | 12.8 | 23.3 | – | 11.5 | 4.8 |
| NTFS Read | 16.1 | 19.0 | 26.1 | – | 13.8 | 12.1 |
Table 2: Storage Performance for AC1750 class routers with USB 3.0 ports (MB/s)
Routing Performance
We tested routing performance using our current Router test process using AP2-R072-L009-W016-ZW016-ZB005 firmware. Table 3 summarizes the results for the Almond+ and selected A1750 class routers. The Almond+ outperformed our currently top-ranked AC1750 router, the TP-Link Archer C8 in all categories and had the highest simultaneous throughput of any product in the table.
| Test Description | Securifi Almond+ | TP-LINK Archer C8 | Archer C7 V2 | ASUS RT-AC66U | D-Link DIR-868L |
|---|---|---|---|---|---|
| WAN – LAN | 806.3 | 776.6 | 821.1 | 836 | 924.2 |
| LAN – WAN | 820.8 | 770.7 | 809.4 | 839.2 | 887.9 |
| Total Simultaneous | 1558.6 | 1079.6 | 1434.7 | 819.5 | 1005.4 |
| Maximum Simultaneous Connections | 16384 | 7821 | 31,666 | 30,069 | 33,894 |
| Firmware Version | AP2-R072-L009-W016-ZW016-ZB005 | 3.16.27 Build 20140903 Rel. 75232 | 3.13.34 Build 131217 Rel 60903n | 3.0.0.4.376.1123 | 1.08B07 |
Table 3: Routing Performance for selected AC1750 class routers
The IxChariot plot for the individual upstream and downstream routing tests shows consistent throughput in both directions with upstream having a slight performance edge and less variation.

Securifi Almond+ individual upstream and down stream shows balanced performance
The plot for the simultaneous upstream and downstream routing tests shows downstream having a slight performance edge and less variance as compared to upstream.

Securifi Almond+ Simultaneous throughput shows balanced performance
Wireless Performance
The Almond+ is not Wi-Fi Certified and does not support Wi-Fi Protected Setup (WPS). It was tested using our Version 8 Wireless test process using AP2-R072-L009-W016-ZW016-ZB005 firmware. The router was first reset to factory defaults and Channel 6 was set for 2.4 GHz and Channel 153 for 5 GHz. 20 MHz B/W mode was set for 2.4 GHz and 5 GHz was set in 80 MHz bandwidth mode.
The Benchmark Summary below shows the average of throughput measurements made in all test locations. For comparison, I included the top ranking TP-Link Archer C8 and the #2 ranking router, the ASUS RT-AC66U which is tied with the Almond+.

Benchmark Summary for Securifi Almond+, TP-LINK Archer C8 and ASUS RT-AC66U
The composite image below shows the Throughput vs. Attenuation plots for 2.4 GHz uplink and 2.4 GHz downlink profiles for the same three routers compared in the benchmark summary above.
Looking first at the 2.4 GHz uplink chart, all three routers start the test with approximately the same throughput. However, the Almond+ drops off quite sharply starting at about 12 dB of attenuation and then provides consistent, but lower performance than the other two out to about 42 dB of attenuation where its plot is above and to the right of the other two. The Almond+ finishes with better performance at the last four tests with the most attenuation.
The 2.4 GHz downlink chart is significantly different. The Almond+ starts the test with 29 Mbps less throughput than the Archer C8. As with the uplink chart, it stayed below and to the left of the other two routers until about 36 dB of attenuation. And like the uplink tests, the Almond+ finished the last five tests with higher throughput than the other two routers.
The bottom line is that in 2.4 GHz, the Almond+ won’t necessarily provide the highest throughput, but it could provide better effective range.
 Throughput vs. Attenuation")
2.4 GHz Uplink and Downlink Throughput vs. Attenuation
The composite image below shows the Throughput vs. Attenuation plots for 5 GHz uplink and 5 GHz downlink profiles.
For the 5 GHz uplink profile, all three routers showed consistent throughput and tracked each other throughout the range. The Almond+ started out slightly lower than the other two. The ASUS RT-AC66U was sandwiched between the plots of the Almond+ on the low end and the Archer C8.
For the 5 GHz downlink profile, it was pretty much the same story as for the 5GHz uplink profile. The Archer C8 was above and to the right of the other two routers, indicating it is capable of providing slightly higher throughput than the other two products under all signal level conditions.
For both uplink and downlink tests, the Archer C8 held onto its connection with 3dB more of attenuation than the other two, indicating slightly better range.

5 GHz Uplink and Downlink Throughput vs. Attenuation
Ranking
Using the Router Ranker, I filtered for test method Revision 8 and AC1750 class routers. The image below shows that the TP-LINK still retains bragging rights as the top ranked AC1750 router with a total router score of 2.0. The Securifi Almond+ tied with the ASUS RT-AC66U for second place with a total score of 3.3. From a performance standpoint, the AC1750 class is interesting. Out of eight routers, we have three ties for Total Router rankings. Yet within each of the three ties, there’s a significant difference in price.

Product Rank for AC1750 class routers using Revision 8 testing
The composite image below shows the individual category rankings for the three routers previously compared in the Benchmark Summary and Throughput vs. Attenuation plots above. The scores for the Almond+ were helped by the high simultaneous throughput performance in the Routing Throughput category as well as top rankings for 2.4 GHz Uplink and Downlink range. As expected from reviewing the Throughput vs. Attenuation plots, category scores for Average and Maximum Wireless Throughput were below the other two routers.

Category Performance Ranking for Securifi Almond+, TP-LINK Archer C8 and ASUS RT-AC66U
Closing Thoughts
Manufacturers of products that are essentially commodities are constantly trying to figure a way to differentiate themselves. If you can create what marketing folks call a “USP” (Unique Selling Proposition), you might be able to charge a higher price and generate better gross margins. Obviously, performance is one way to separate one product from the herd of similar products.
In the case of the Almond+, Securifi has created not one but two “USPs”. First they have the only AC1750 class router that’s easily configurable from a color touchscreen. Second, by including both ZigBee and Z-Wave radios in the Almond+, they are hoping to tap into the emerging Home Automation (HA) market by making the Almond+ an “all-in-one” hub for your home.
But both of these differentiating features require additional hardware, which adds material cost that is reflected by the price of the Almond+. Priced at $199, it is the highest priced AC1750 class router that we’ve recently reviewed. In fact, at the time of writing this review, the top ranked AC1750 class router, the TP-LINK Archer C8 was only $117.
So, is the Almond+ worth the premium? If you’re not deploying home automation devices around your home, the answer is probably not. You can get a better performing AC1750 router for far less. However, despite the lack of some of the features found in high-end routers, I can certainly understand the allure of the simple, easy-to-use touchscreen interface with wizards that walk you through everything. As with the original Almond, changing from router mode to either AP or Range Extender mode from the touchscreen is quick and easy.
If you are planning to deploy home automation, the answer isn’t so easy. While there are both ZigBee and Z-Wave interfaces built into the Almond+ that can connect and control devices, all devices are controlled by mobile apps (Android and iOS) created by Almond linked to Securifi’s bank-end servers. This means that to use the Almond+ for HA, you tie yourself to Securifi’s Home Automation ecosystem. So how well that HA ecosystem works becomes very important.
For example, I was able to connect a GE-Link Smart LED to the Almond+, so had to use the Almond app to control it instead of the GE Link hub and app. To me, the GE app was a better than the Almond app.
Adding to confusion in the HA market is the appearance of universal HA hubs. Staples is currently marketing a line of Staples Connect products, all interconnected by the Staples Connect hub ($79.99), made by D-Link, with multiple wireless interfaces. Those devices are controlled by a Staples Connect app. Similarly, there are systems from Belkin (WeMo), Insteon, Quirky/Wink and others, all of which have their own hubs, apps and devices. While many of these devices may well connect to the Almond+, its success in the HA market will more likely revolve around its app features and back-end services.
Still, there is a value to the HA interfaces built into the Almond+. I’ve only started to test those features, but so far, it has been able to connect to the GE-Link bulb and control it as well as the Securifi “Peanut Plug”, a power plug that you can control with your Android/iOS device (or web browser) using your Almond user account. The Peanut Plug, a $40-$50 value, is included with the Almond+. Add that to the value of ZigBee and Z-Wave interfaces, and you’ve probably more than justified the premium price of the Almond+, if you plan to use the Almond app for all of your home automation.

Securifi Peanut Smart Plug
As of today, I wouldn’t base a purchasing decision on a router solely based on the inclusion of ZigBee and Z-Wave radios. The HA market is changing rapidly as CE manufacturers search for the next big thing to boost flagging sales. Google and Apple are both targeting this market, which means things will surely get more interesting as these elephants take to the Home Automation dance floor.
Buy Long Range Touchscreen Wireless AC Router / Range Extender + Home Automation Hub from Amazon