Introduction
| At a Glance | |
|---|---|
| Product | Synology Disk Station Expansion Unit (DX510) |
| Summary | Five bay expansion chassis for Synology DS710+ and DS1010+ NASes |
| Pros |
• Little to no performance degradation • Synchronized power off and drive sleep • Hot swappable drives |
| Cons | • Expensive for what you get • Doesn’t power up with main chassis • Only one volume can be configured |
It’s taken a lot longer than I had figured, but Synology finally sent its DX510 Disk Station Expansion Unit in for a look. The DX510 is the expansion chassis designed to mate with Synology’s five-bay DS1010+ [reviewed] and two-bay DS710+ [reviewed] NASes.
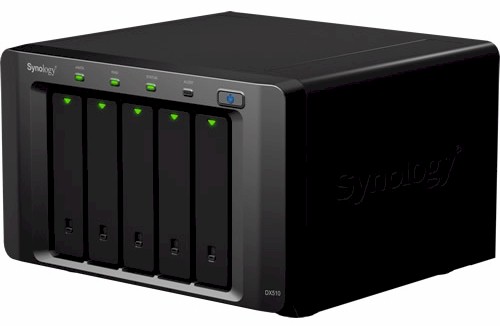
The DX510 is simple in design, consisting of a five-bay chassis that you could easily mistake for the DS1010+ that has two cooling fans, an internal power supply and controller board. The rear of the chassis (Figure 1) has only a power receptacle and single eSATA port.
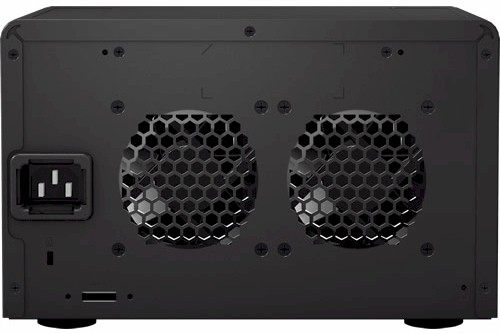
Figure 1: Synology DX510 back panel
Inside
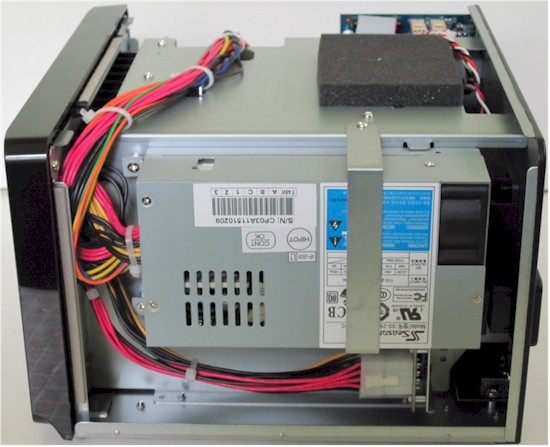
Figure 2 shows the right side of the DX510 with the cover removed, which provides a clear view of the power supply.
Figure 2: Synology DX510 inside right
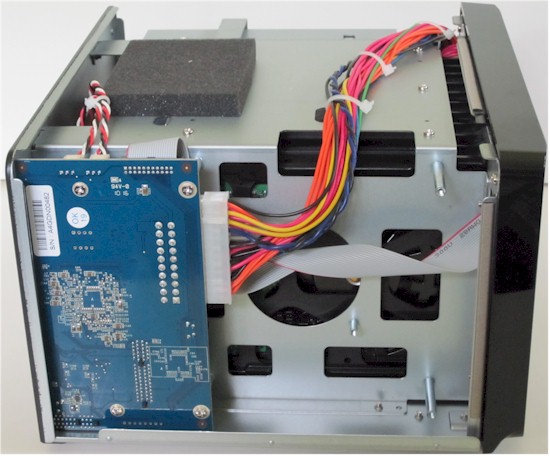
Swinging around to the other side (Figure 3), we can see the little controller board.
Figure 3: Synology DX510 inside left
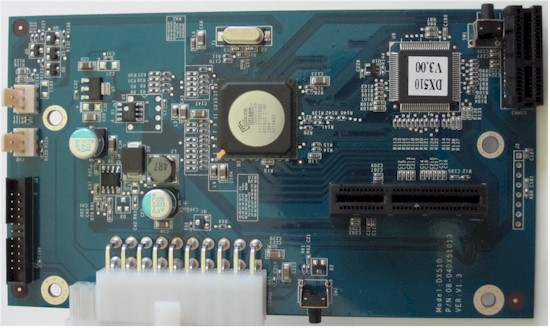
Figure 4 is a shot of the board, which holds some power supply circuitry, connectors for the backplane and eSATA connector, flash memory and the key player, a Silicon Image SiI3726 – 5 Drive SATA300 SATALink SATA II Port Multiplier.
Figure 4: Synology DX510 Controller board
The SiI3726’s block diagram (Figure 5) shows it supports host and device link rates of 1.5 Gbps and 3 Gbps with auto-negotiation for each drive.
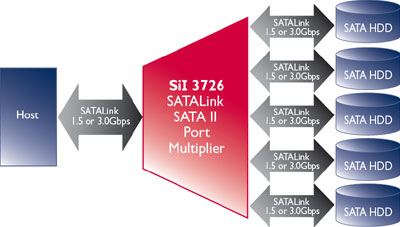
Figure 5: SiI3726 block diagram
In Use
Installation is very easy, consisting of plugging in an AC line cord and connecting a supplied eSATA cable between the DX510 and DS710+ or DS1010+. Although the printed User’s Guide says that the DX510 will be turned on or off automatically by its companion Disk Station, I found only the auto power-off works.
You’ll need to manually hit the front panel power button on the DX510 and let the drives spin up before turning on the companion NAS. This is especially important if you configure a volume consisting of drives both in the main NAS and in the DX510.
You get a warning that you’ll lose such a volume if the DX510 is powered off or disconnected, which I confirmed by getting a corrupt volume when checking to see if the DX510 powered on automatically when I turned on the DS1010+ it was connected to.
The DX510 has no administration interface per se, but is configured via its companion NAS. Figure 6 shows how the DX510 shows up in the eSATA menu
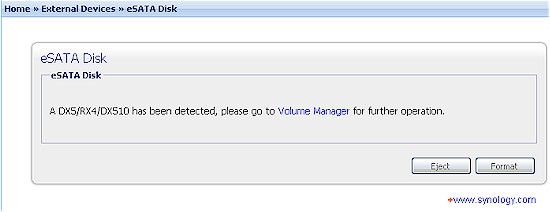
Figure 6: DX510 eSATA connection detected
The DX510’s drives automatically appear in the Volume Manager. Figure 7 shows a RAID 1 volume consisting of one internal drive and one drive in the DX510 (Expansion Unit).
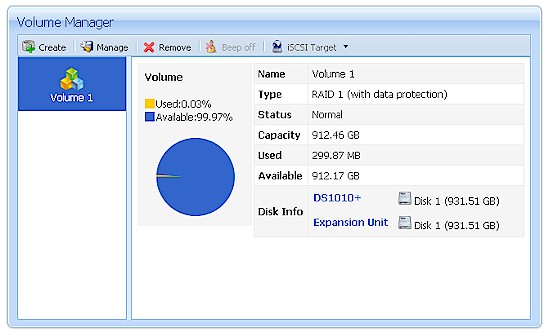
Figure 7: Combination DS1010+ – DX510 volume
There is not a lot of online documentation available for the DX510. I couldn’t find a PDF version of the printed User’s Guide that came with the product. And a search of Synology’s Wiki yielded only one hit about Notifications, a few FAQ hits and no "How To" Guides.
Since the info in Figure 8 is available only in the User’s Guide, I thought it was important to pass it on.
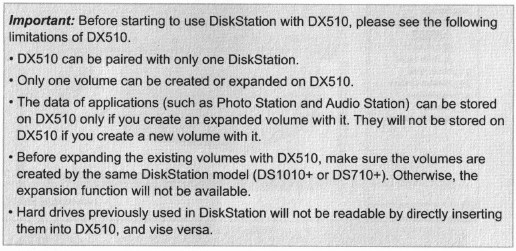
Figure 8: DX510 important info
Performance
The main reason I wanted to test the DX510 was to see if the single eSATA connection and use of SATA port multiplier would have any significant impact on performance. I ran tests with the DX510 connected to a DS1010+ and also a DS710+.
Both NASes were first upgraded to DSM 2.3-1161 and Samsung HE103UJ SpinPoint F1 1 TB drives were used in both main NASes and DX510. Test runs were made using our standard NAS test process with the following volume configurations:
- DS1010+: Five internal drives in RAID 5
- DS1010+ / DX510: Five drives in DX510 in RAID 5
- DS1010+ / DX510: One drive in DS1010+ and four in DX510 in RAID 5
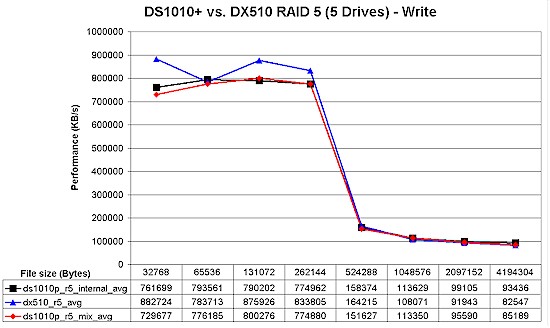
Figure 9 shows a comparison of the iozone-based tests for the RAID 5 volumes. There is some larger difference in cached behavior, with the DX510-based volume showing speeds higher than the other configurations. But for when cached behavior drops out at file sizes of 1 GB and higher, the internal volume has the highest performance, followed by the volume spread across the two boxes and finally the DX510-based volume.
Figure 9: DS1010+ / DX510 RAID 5 write performance comparison
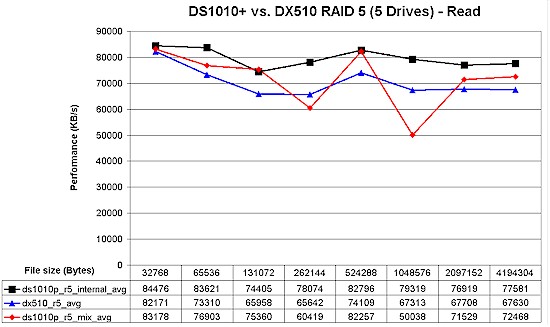
Read results seem to show a similar pattern. But the high variation in the mixed volume run make it more difficult to really call the results.
Figure 10: DS1010+ / DX510 RAID 5 read performance comparison
Switching over to using the DS710+, I ran only two tests, skipping the "mixed" volume.
- DS710+: Two internal drives in RAID 1
- DS710+ / DX510: Two drives in DX510 in RAID 1
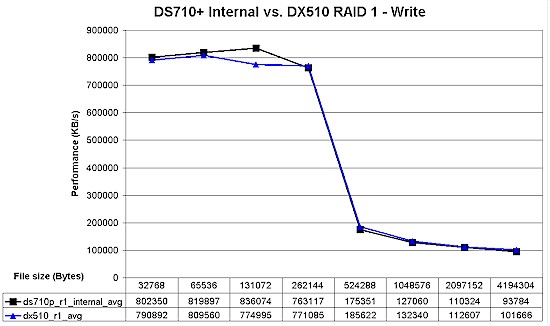
In Figure 11, write cache is still in effect at 1 GB file size. But it seems like the RAID 1 volume in the DX510 has the edge over the internal DS710+ volume.
Figure 11: DS710+ / DX510 RAID 5 write performance comparison
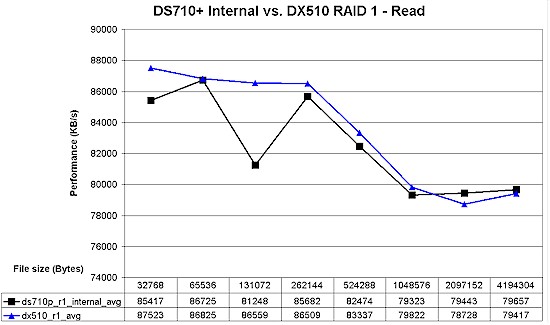
Read results in Figure 12 show a similar pattern, but the difference is too close to say that there really is a difference (note the expanded scale in Figure 12).
Figure 12: DS710+ / DX510 RAID 5 read performance comparison
For a simpler performance comparison, I gathered the Vista SP1 filecopy test results into Table 1 for the RAID 5 tests and Table 2 for the RAID 1 tests. Each value shown is the average of three filecopy runs and I’ve calculated the percentage change for the other volume configurations using the internal drive volume as the reference.
This time, both the all-DX510 and mixed volumes show a write performance degradation between 8 and 10%. Read results are a mixed bag, though, with the all-DX510 volume showing no change and the mixed volume change cut in half to 4%.
| DS1010+ RAID5 | DS1010+ RAID5 in DX510 | DS1010+ / DX510 RAID5 1/4 | |
|---|---|---|---|
| Write (MB/s) |
85.7 | 77.6 | 79.0 |
| % Change | -9.4% | -7.7% | |
| Read (MB/s) |
97.3 | 98.0 | 93.2 |
| % Change | 0.8% | -4.1% |
Table 1: File copy comparison – RAID 5
The DS710+ based RAID 1 results in Table 2 are a surprise, showing the speed of an all-DX510 RAID 1 volume about 7% higher for write, but only 2% for read.
| DS710+ RAID1 | DS710+ RAID1 in DX510 | |
|---|---|---|
| Write (MB/s) |
87.5 | 94.0 |
| % Change | 7.4% | |
| Read (MB/s) |
97.1 | 99.4 |
| % Change | 2.3% |
Table 2: File copy comparison – RAID 1
I wouldn’t read too much into the differences these results show, however. Test accuracy is probably somewhere in the +/- 3% range due to the techniques and limited test runs. And, in the end, the likelihood of detecting a 5% or so difference in performance in real-world use is pretty slim.
Closing Thoughts
I’ve seen some complaints about the $500 cost of the DX510. And based on manufacturing cost, I agree that it seems that Synology must be making a good profit on this product. But when you have a captive audience and have to suffer constantly diminishing profits on most of the products you make, what manufacturer doesn’t grab any chance it can get for putting more money in their pocket?
That aside, Synology has produced a nice trio of products in the DS710+, DS1010+ and DX510. You can start small with the DS710+ and add storage and RAID levels later or start big using the DS1010+ and go even bigger. Either way, you won’t get away cheap. But you won’t sacrifice performance by taking a pay-as-you-grow approach.

