Introduction
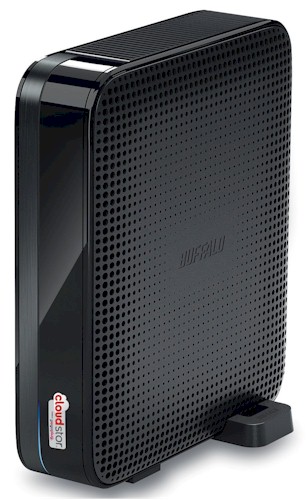
| At a Glance | |
|---|---|
| Product | Buffalo CloudStor Solo Personal Cloud Storage [CS-WX1.0/1D] |
| Summary | Single drive, Marvell Kirkwood-powered NAS running modified Pogoplug OS that combines cloud and standard NAS features |
| Pros | • Gigabit Interface • Extremely easy setup • Quiet operation • Supports HTML5 media streaming • No monthly subscription • Aggregates media by media type • Can be used for Time Machine Backups • Free mobile clients for iOS and Android devices |
| Cons | • No USB port for printer sharing or storage expansion • Relatively poor file copy performance • No included backup software |
Many people want mobile access to all, or at least part, of their files. This has led to the increasing number of cloud storage providers. But what if you don’t want to pay a monthly fee? Buffalo’s line of CloudStor products could be your answer.
Buffalo’s CloudStors provide the benefits of a NAS for local storage and, through a partnership with Pogoplug, give you access to your own "personal cloud". Since you own the device and it is using your network connection (and bandwidth), you have access to all of your files both locally and remotely, for no monthly fee.
Last year, Tim and Matt Smollinger reviewed the performance and features of Buffalo’s original dual-drive CloudStor (CS-WX1.0/1D). This product was Buffalo’s first entry into the cloud storage market. Now, Buffalo has introduced the CloudStor Solo, a single drive version with reduced cost and a reduced feature set.
Like all of Buffalo’s cloud-based NAS products, the CloudStor Solo derives its cloud features from a customized version of Pogoplug’s software. And, like other CloudStor products, the Solo functions as a traditional NAS to provide you with local network access via SMB – ie, you don’t have to map your drives using Pogoplug’s software. And, if you’re a Mac owner, the CloudStor Solo can act as a Time Machine target – even for OSx 10.7 (Lion).
To help you sort through their cloud offerings, Buffalo has provided a handy comparison chart shown in Figure 1.
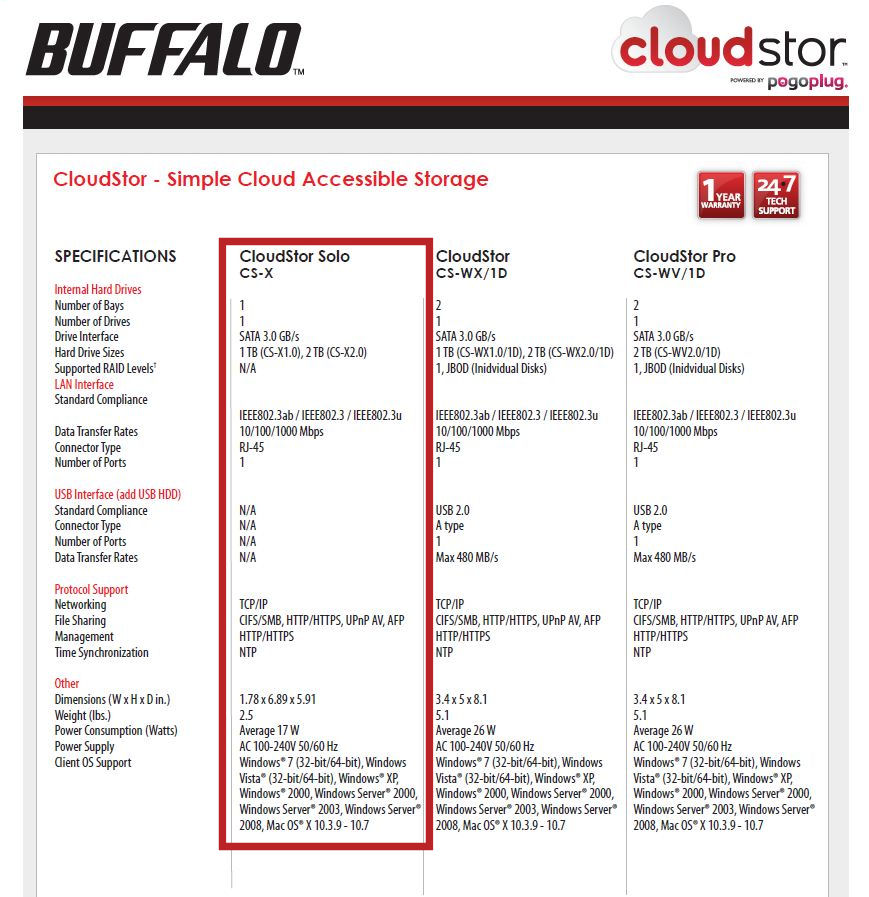
Figure 1: Buffalo CloudStor product comparison
What really jumps out in this chart is that as compared to the other products, the Solo is a single drive device and lacks a USB port.
Under the hood, the Solo features the same Marvell Kirkwood 88F6281 CPU running at 600 MHz and the same amount of RAM (128 MB) that you find in the dual drive CS-WX/1D. The 1 TB drive in the Solo is a Seagate Barracuda 7200.12 (ST31000524AS).
If you’re into indicator lights, the Solo will disappoint you. On the front panel, just below the CloudStor label (if you have the device laying flat on your desk), you’ll see a dim blue light. The light blinks during boot up, and is solid during normal operations. There are no indicators for disk activity.
The back panel is also spartan, just a power connector, single 10/100/1000 Ethernet port and a security slot for Kensington-compatible cable locks. There are no link or connection speed indicators on the Ethernet port. But if you look carefully, you’ll be able to see a green network activity light inside the case.
The case is well ventilated and provides adequate cooling for the Solo. There is no fan to make noise or consume power. Power consumption, according to my Kill-o-watt meter, measured between 12 and 13 W with a large file copy running. While there is no scheduled or idle time drive spin down feature, you can create a schedule to put the Solo in sleep mode as shown in Figure 2.
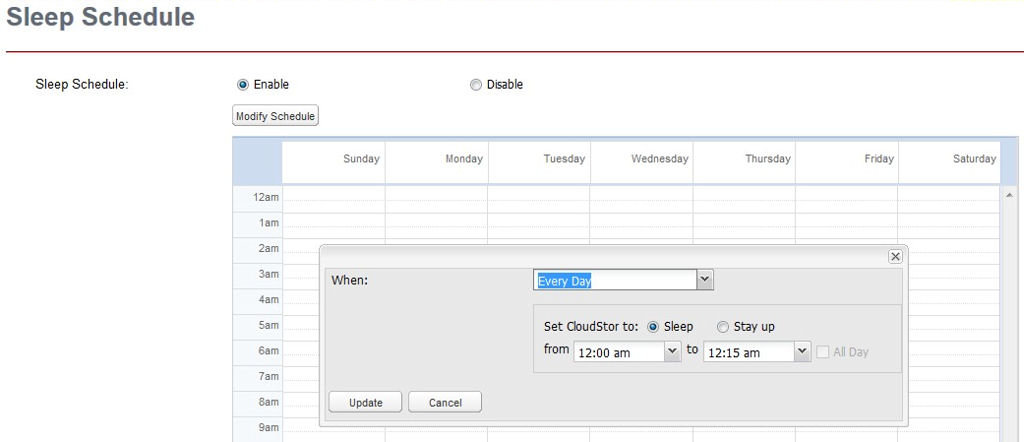
Figure 2: Sleep Schedule configuration
Setup
Setting up the CloudStor Solo is a very different experience compared to setting up a traditional Buffalo NAS. With a non-cloud Buffalo NAS, you install a “NAS Navigator” application from a supplied CD and then run the application to find your device. To configure the NAS, you then connect to the IP address of the NAS on your local network.
With the CloudStor Solo, there is no supplied software. The Quick Start Guide doesn’t even instruct you how, simple as it is, to connect your device to your network and power. Instead, you are directed to launch your browser and connect to http://cloudstor.pogoplug.com/activate. If you want to see the setup procedure, check the gallery later on.
If all goes well, your device will be located and you’ll be ready to create your account on Pogoplug. Since I have reviewed other Pogoplug-enabled devices, I already had a Pogoplug account. So I entered my email and password credentials, Pogoplug recognized that I already had an account and just added the CloudStor Solo to it.
I was pleased to see that Pogoplug had given me 5 GB of free cloud storage (Figure 3).
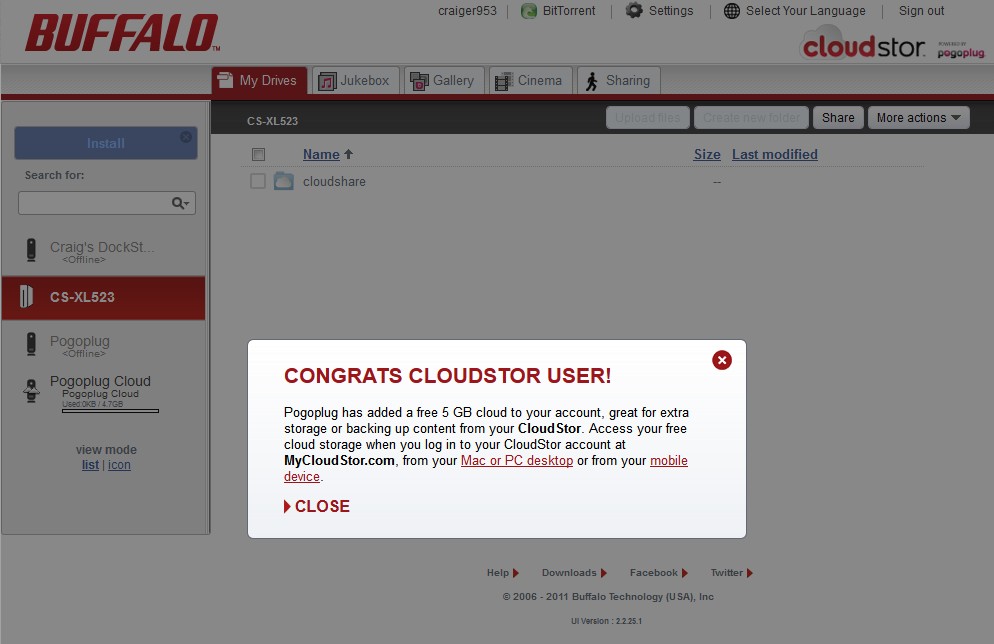
Figure 3: My Devices tab
Once setup is complete, you log in at either http://my.pogoplug.com or http://cloudstor.pogoplug.com.
If you log into the first URL, you will see Pogoplug’s generic interface. In order to have full access to your CloudStor Solo, however, you should log into the cloudstor.pogoplug.com URL instead. Using the CloudStor URL will let you completely configure your device’s NAS features as if you had logged on locally using the Solo’;s IP address.
When you log into cloudstore.pogoplug.com, you’ll land at the page shown in Figure 4. In this image, you’ll see that I have created multiple shares. By default, the CloudStor Solo is preconfigured with a public share named cloudshare. On your local network, no credentials are required to access this share unless you change the defaults. Currently, My Drives for the selected CloudStor (CS-XL523) shows the available shares on my CloudStor.
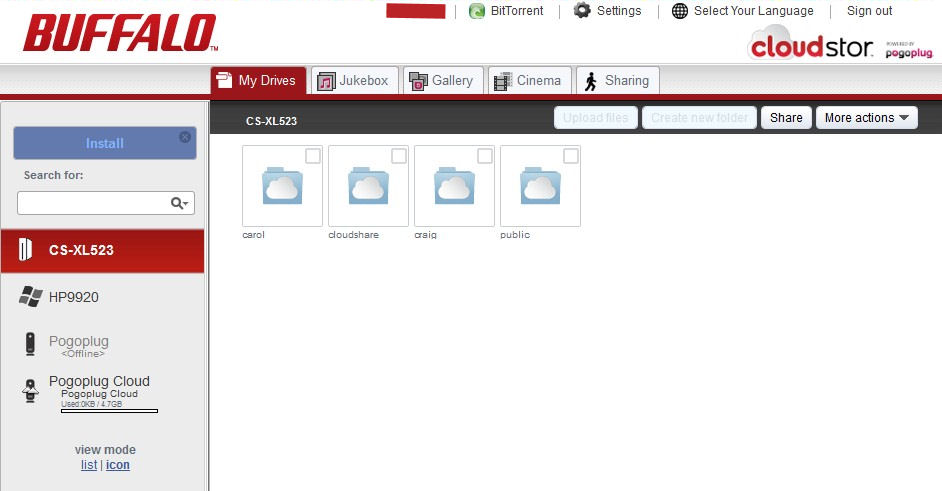
Figure 4: My Drives view
As you load the CloudStor with media files, it automatically reads the meta tags embedded in the files and collects media by media type. You don’t really need to know anything about directories and subdirectories. The image gallery below walks you through a description of the Jukebox, Gallery, Cinema and Sharing tabs.
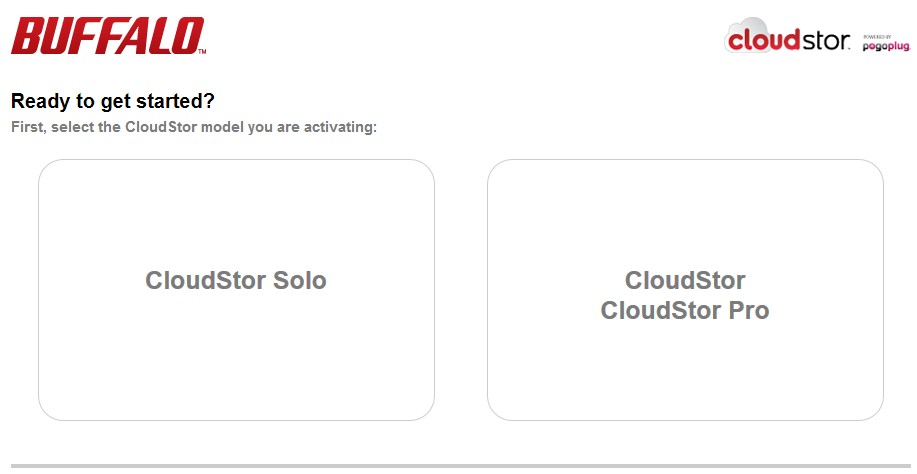
First select your CloudStor model
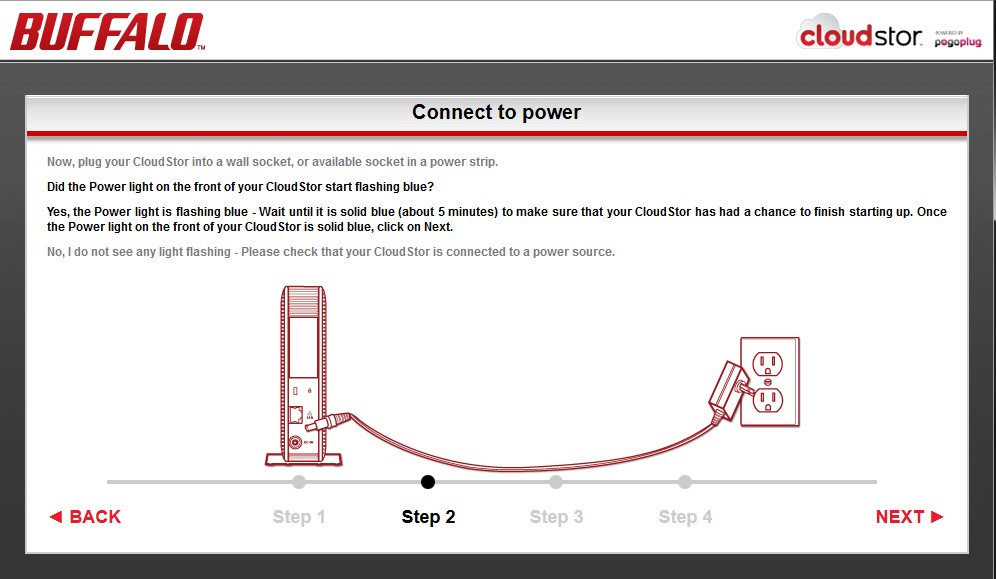
Step 2 instructs you to connect the power and wait for the device to initialize before clicking on Next
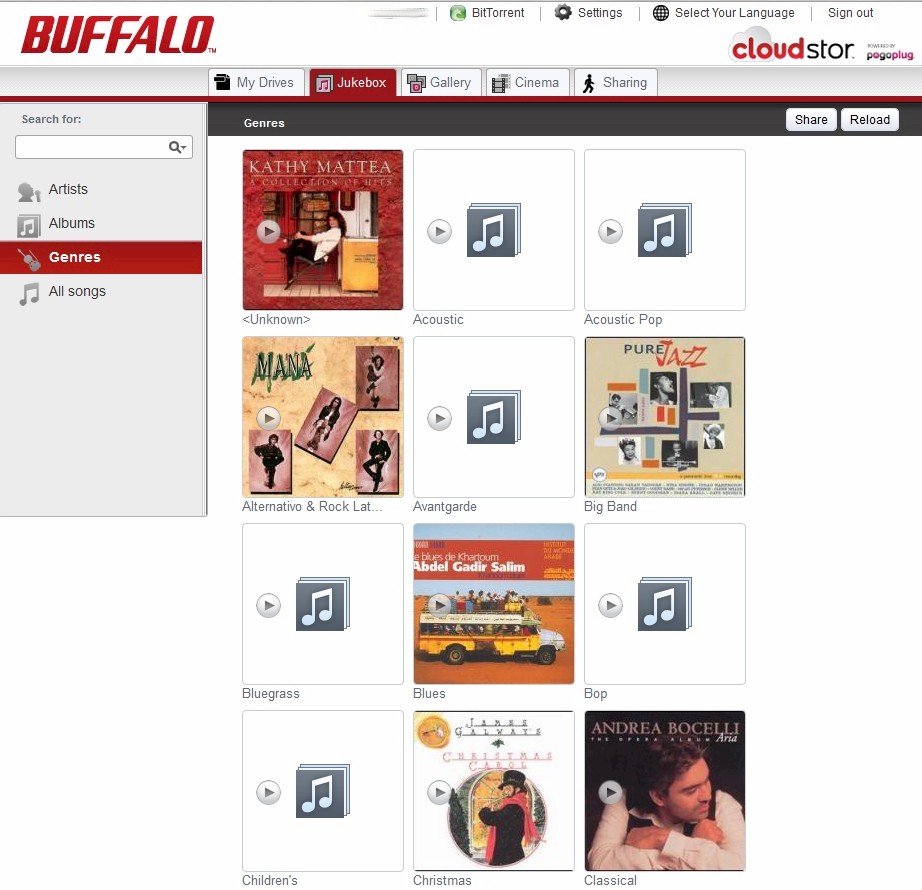
Music is aggregated and indexed by Artist Name, Album, Genre or a listing of all songs. You can also share an individual song with friends, send a link to Facebook, play a song or album, download it or copy it
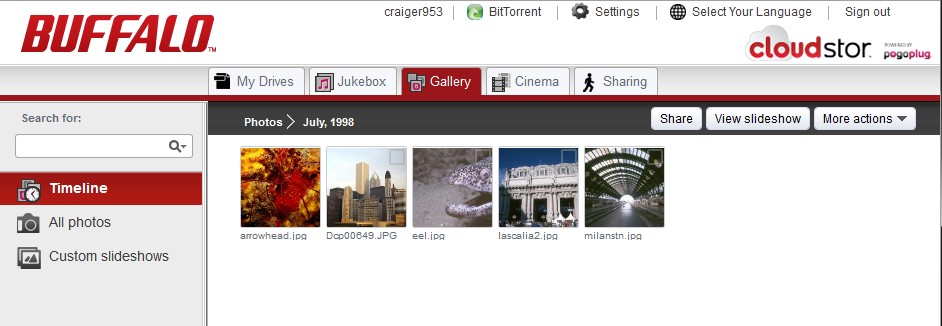
The Gallery tab shows your photos in either a timeline presentation or all photos. If you click on a month or year, you can view the corresponding photos as a slideshow, share the folder and copy or download selected photos. You also have the option of creating custom, shareable slideshowsThe Cinema tab provides similar functionality for movie content
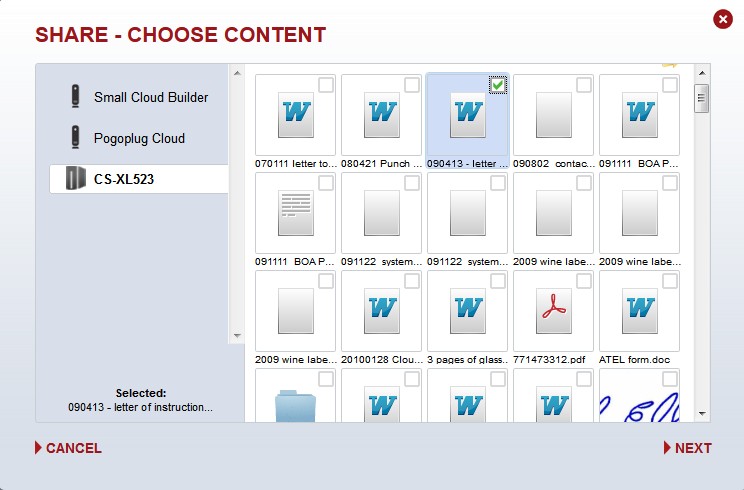
The Sharing tab lets you share content from your Solo, other Pogoplug cloud storage or any other share to which you have been granted access
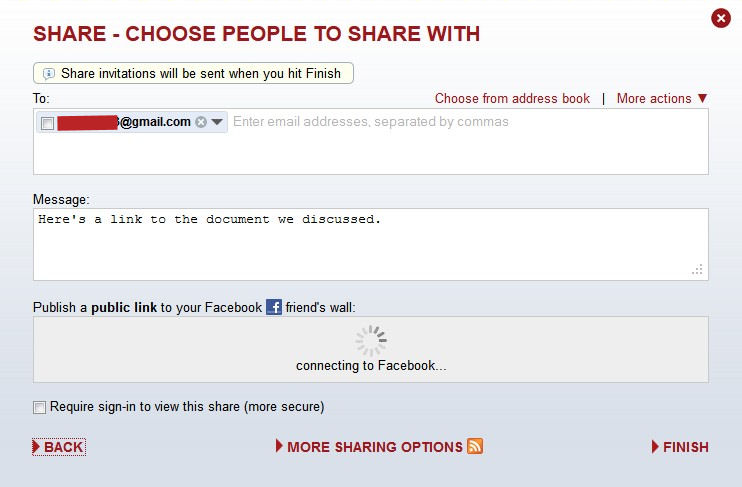
Create a link to share content. Shared links expire after two weeks unless the recipient creates a free account on Pogoplug using the email address originally used for the link
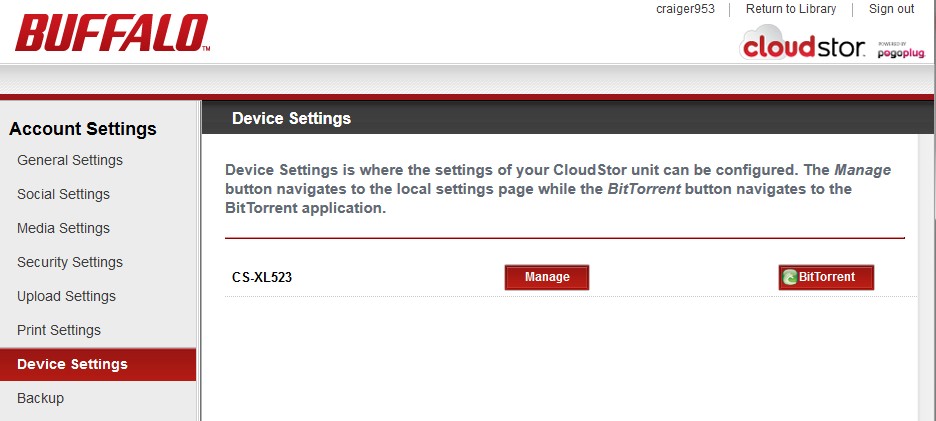
Managing via cloudstor.pogoplug.com
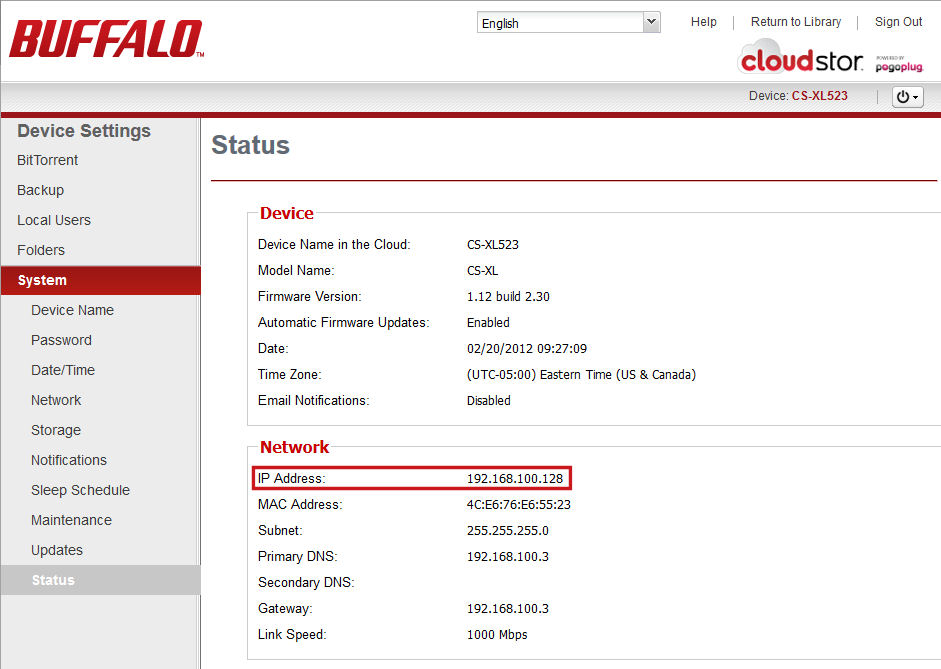
Getting the Solo IP from the Status page. You can then administer by logging in at that IP
Managing
You manage your CloudStor device two ways: From your cloudstor.pogoplug.com account page or the Solo’s IP address.
An alternate method of managing your Solo is to enter this IP address into your browser and access it directly. The user interface for managing the Solo’s NAS features is identical whether you log in directly, or through cloudstor.pogoplug.com.
Of course, if you want to manage features associated with your CloudStor account, you need to login into cloudstor.pogoplug.com. (Note: if you have a traditional Buffalo NAS, NasNavigator will also discover the IP address of the CloudStor Solo)
Most of the functions are fairly self-explanatory, so I’ll comment on them only briefly.
BitTorrent – enable or disable BitTorrent and select a folder for BitTorrent downloads.
Backup – enable or disable Time Machine and select a folder for Time Machine Backup files.
Local Users – create, edit or delete users
Folders – create, edit or delete folders. By default, the Solo has a single public share named cloudshare. You can create additional folders and assign read-only or read/write access to each local user. You can also enable/disable each folder as a BitTorrent and/or a Time Machine target. Optionally, you can choose whether to share each folder with the cloud (Figure 5).
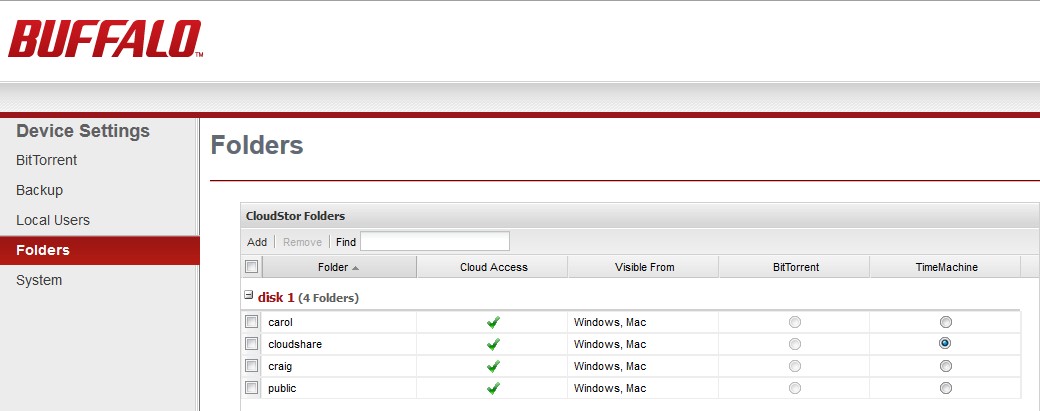
Figure 5: Folder options
System – the submenus allow you to configure system-related settings on your CloudStor. Frankly, most of the submenus could have been collapsed into one or two screens.
- Device Name – change the name of your CloudStor
- Password – create/change administrative password
- Set Time zone and choose manual (use local time/date) or automatic (NTP).
- Select Automatic (DHCP) or configure IP addresses manually
- Storage – shows disk health and percentage used/free statistic
- Notification – enable/disable daily drive status, and disk errors by email at a specified time.
- Sleep Schedule
- Maintenance – restore to factory default and optionally erase data; Force rebuild of media library
- Updates – enable/disable automatic firmware updates
- Status
More Features
For more fun, you can download Pogoplug Software for your Mac or Windows machine. The software gives you a convenient window that you can use to drag and drop files to your cloud storage. You can also specify files or folders on your local computer to make available via Pogoplug. Figure 6 shows that I’m already sharing a folder named Small Cloud Builder on my PC, and I have opened the dialog box to add another folder.
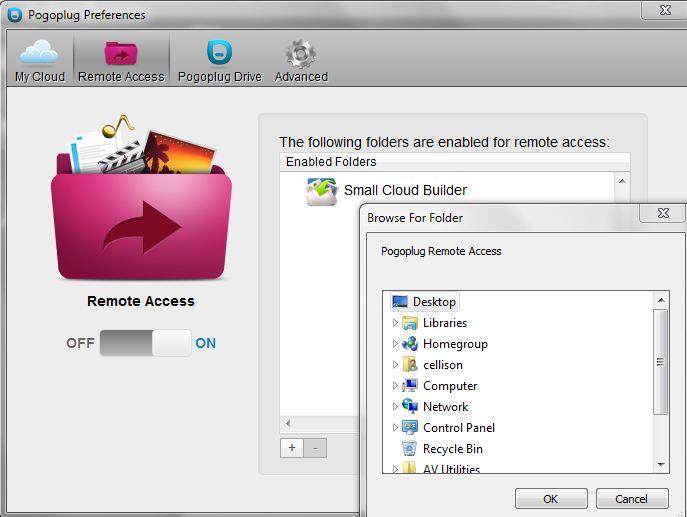
Figure 6: Remote access enable
Pogoplug software also supports drive mapping to each of the folders on your Pogoplug cloud account. If you’re running out of drive letters like I am, you can map all of your folders to a single drive letter. Figure 7 shows that I’ve mapped all of my folders to drive P. This shows up as a local drive.
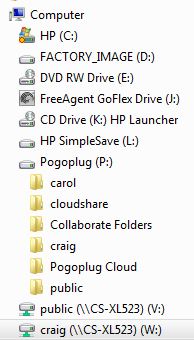
Figure 7: CloudStor folder mapping
What is really nice about drive mapping is that no matter where I may travel, as long as I am running the Pogoplug software, the drive mappings for my CloudStor folders, shared folders and my Pogoplug Cloud storage will be the same. The connection is made using WebDAV over HTTPS. The only difference is that I’ll just be accessing the files using a slower network connection (Internet) rather than my local LAN. (Note: I also mapped drives “V” and “W” through Windows.)
Hands On
The CloudStor Solo is one of the simplest NAS/Cloud devices I’ve ever set up. After it booted, I was set up and running in minutes. You don’t have to deal with port forwarding or Dynamic DNS for remote access to work. It just works. Set up of private folders and creating additional users took only a couple of additional minutes.
Since there is no included software, if you’re not connected to the internet, it would be difficult for a novice to figure out the IP address of the device to configure the NAS features of the product. Arguably, however, you are purchasing the CloudStor Solo because you are connected to the internet and really want your own personal cloud.
During testing, I uploaded close to 80,000 files and about 320 GB of data to the Solo. New owners should note that while all of their files will be available immediately, they won’t play immediately through a web browser.
As noted earlier, the Solo aggregates media by type. But in addition to indexing and building libraries, the Solo also generates thumbnails of all of your images, and transcodes all of your videos. Most popular video codecs are supported. Video is transcoded into H.264 and stored in a hidden folder on your CloudStor Solo.
Under media settings, (Figure 8) you have the option of when to transcode videos (always, never, on demand), and the option of viewing them using HTML5 (iPhone/iPad).
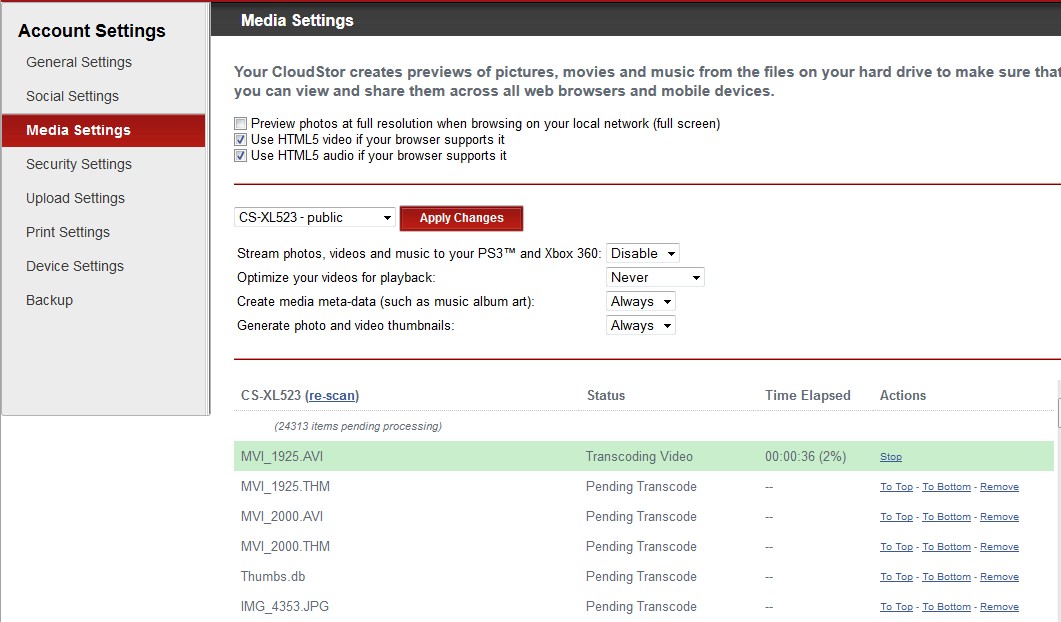
Figure 8: Media settings showing transcoding progress and options
Note that if you have a lot of photos and videos, especially videos, it can take days, not hours, to fully transcode all of your media. A full length two hour movie could take up to 15 hours to transcode. This is due to the relatively low-powered Kirkwood processor running at 600 MHz.
According to Buffalo, the CloudStor Pro (CS-WV/1D) models, which run a much faster 1.6 GHz processor, transcode at about twice the speed of the slower processor found in the CX models. But that would still mean 8 hours to transcode a single 2 hour movie!
App Access
In addition to web access, you can access your personal cloud using the free Pogoplug iOS and Android apps. I downloaded and installed the Android app for my Droid X. Figure 9 shows the opening screen.
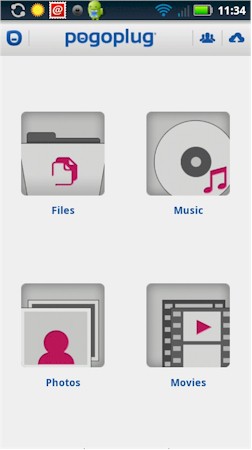
Figure 9: Pogoplug Android app
If you click on Files, you can see all of your Pogoplug cloud devices. (Figure 10).
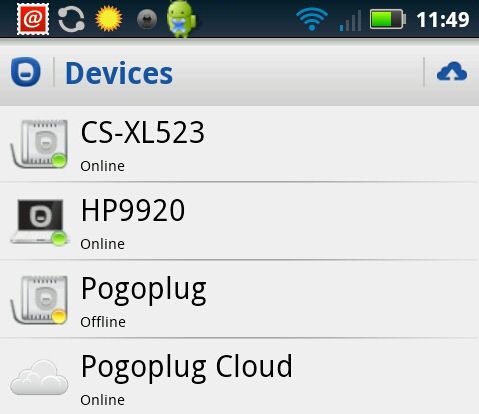
Figure 10: Pogoplug app device list
I was able to browse my files, and yes, even edit this review on my Droid. I also could play music, steam video that had been transcoded, and view photos. Photos and videos were presented in a timeline view by year/month. For music, you can choose song, album, artist or genre views.
Performance
Tim ran the Solo through the standard NAS test suite and posted the results in the SmallNetBuilder NAS performance charts. The firmware loaded was 1.12 build 2.30, which was posted back in November 2011. The benchmark summary in Figure 11 isn’t particularly impressive.
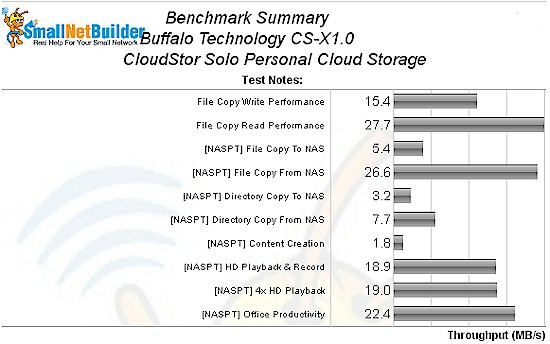
Figure 11: CloudStor Solo performance benchmark summary
If you filter the NAS Charts for single drive NAS products, you’ll see (Figure 12) that the CloudStor Solo, based on file write copy performance, comes in near the bottom of the pack, with only three other products posting poorer write performance.
If you compare the features of the lowest ranking single drive NAS products as well as the once that rank just above the Solo on the chart, you’ll see that there’s a direct correlation between performance and processor. The Kirkwood 88F6281 running at 600 MHz turns in slightly poorer results than other NAS products using the same processor clocked at 800 MHz.
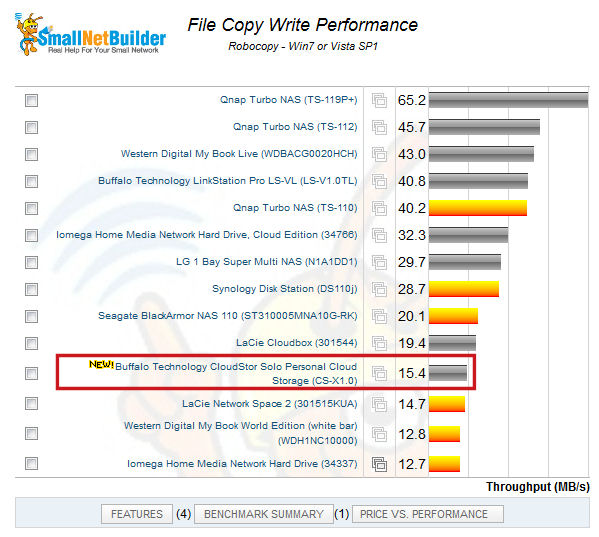
Figure 12: CloudStor Solo write performance ranking
The story gets a little bleaker for relative read performance as it drops almost to the bottom of the chart (Figure 13). But note that read performance is almost twice write performance. The Solo’s read performance is also 4X better than Tim measured on the original dual-drive CloudStor (CS-WX1.0).
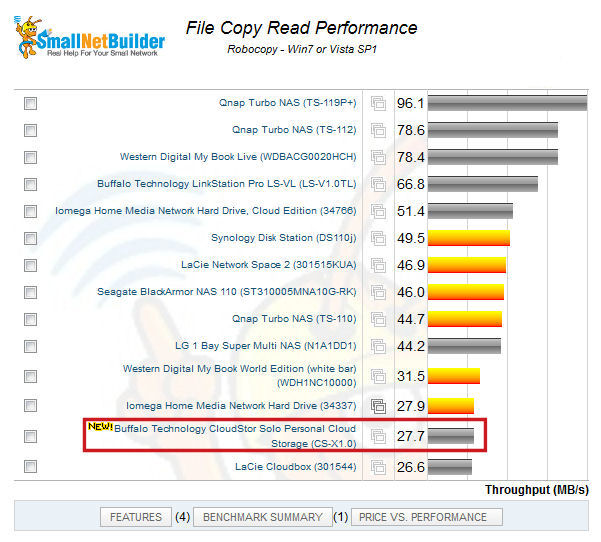
Figure 13: CloudStor Solo read performance ranking
Note that the same version 2.30 firmware is posted for download for the original CloudStors. One would hope that fixes the miserably low 6.3 MB/s read performance measured for the dual-bay CS-WX1.0/1D with the original 1.00 build 1.17 firmware.
Final Thoughts
If you’re looking for remote access to your files, you have a number of choices. You can purchase a traditional NAS that has some remote access features. Or you could buy cloud storage (or live within the free 5 GB account offered by many vendors) and copy your most important “stuff” to the cloud. You could also purchase a Pogoplug device and external drive to go with it, or you could consider the CloudStor Solo.
You can think of the CloudStor Solo (and its dual drive siblings) as a hybrid – it combines the flexibility of Pogoplug’s cloud system with the features of a standard NAS. Buffalo has positioned the CloudStors as primarily cloud devices. But they have also included a number of “value adds” to differentiate themselves from a “cloud only” solution.
In addition to the Pogoplug-powered cloud features, the CloudStor Solo provides full SMB support for local LAN access. You can create local users and additional shared folders. For each shared folder you can decide if it’s going to be published as part of the cloud or whether to make it a Time Machine backup target or a BitTorrent target. BitTorrent fans will appreciate that the built-in client is based on the latest uTorrent stack and has RSS feed capability.
The Solo is not without its downsides, however. It lacks a USB port for either storage expansion or printer sharing. And, as a single drive device, it’s not fault tolerant. If you were buying the CloudStor Solo strictly as a NAS for local network storage, the relatively poor performance could be a problem, depending on how you use the device. But as a device that you would use for local backups for a home network as well as your own personal cloud device for remote access, the performance for many will be more than adequate.
If you’ve decided to buy, the current pricing makes for some interesting purchasing decisions. The 1 TB CloudStor Solo is currently available on Amazon for $160 with the 2 TB version costing only $33 more. However, the CloudStor Two-Bay device (CS-WX2.0/1D ) with a single 2 TB drive is available right now for only $135.99!
If you need 2TB of storage, you’d be crazy not to purchase the CS-WX2.0/1D rather than the 2TB Solo. You get the added advantage of a USB 2.0 port for printer sharing or additional storage. And, with the single-drive 2 TB version, you have an empty drive bay that you could use for additional storage or configure for RAID 1 fault tolerance.
Bottom line: I like the platform and features, but I wish the performance were better. For me, the single disk 2-Bay CloudStor is the sweet spot. It has the additional NAS features I want (expandability, printer sharing and fault tolerance) and offers a good value and good cloud experience. The only question is whether the latest firmware fixes its horrible read performance.
