Trying Ubuntu Server
In Part 1, we got a basic Intel Atom-powered NAS up and running, using FreeNAS as its operating system. Read performance was good, write performance, so-so, but speeds were far from being limited by drive and network speeds.
So, taking another suggestion from the SNB Forums, I loaded up Ubuntu Server and gave it a spin. Ubuntu Server edition might look big and enterprisey from its webpage description, but it’s perfectly usable for SOHO and SMB NAS use. The key is to add two more pieces: the Webmin administration GUI; and Neil Brown’s mdadm Linux RAID utility.
Webmin is the Linux-world standard for GUI-based server administration. My first exposure to Webmin was years ago when I briefly set up my first Linux LAMP server for local website development. It was really a godsend to me as a Linux newbie and sure beat the hell out of editing Apache and other config files!
In a similar way, mdadm is the Linux world’s solution for software RAID arrays. It allows you to create, tweak, grow and reconstruct RAID arrays and supports linear and RAID 0, 1, 4, 5 and 6 arrays. Forms of combination striped and mirrored arrays (variously referred to as RAID 0+1, 1+0, 01, 10) can also be created. (I found the MythTV Wiki to be the most informative about this.)
Since this isn’t just a download, install and go process, I’ll spend some time showing you how to put it all together.
Software Installation
I first downloaded Ubuntu Server 8.0.4.1 and installed it on the Atom NAS. The install did not go well with several attempts, each one eventually hanging before completion. After some Googling, I found that there is a bug related to the Realtek RTL8102EL chip driver.
Since I was going to be using the Intel gigabit NIC anyway, I took the suggestion I found here. Once I disabled the onboard NIC, the install went as smooth as buttah! Note that when you reach the point in the Ubuntu install where you are asked which servers to install, just select the "Samba File server" option.
Installing mdadm was very easy. All I had to do was log into Ubuntu and type the following at the command prompt (with a working Internet connection, of course):
sudo apt-get update sudo apt-get install mdadm
Webmin doesn’t appear to be in the standard apt-get or aptitude databases. So you either need to add the webmin download site into the apt-get sources list or download the package from the Webmin site and install it.
Following the Webmin Debian install instructions, I opted for the apt-get method (Using the Webmin APT repository section). So I opened up /etc/apt/sources.list in the vi editor (command summary here) and added this line:
deb http://download.webmin.com/download/repository sarge contrib
After saving the edited file, I then installed by entering:
sudo apt-get update sudo apt-get install webmin
With everything now installed, pointed my browser to the Atom NAS’ IP address like so:
https://10.168.3.249:10000/
Note that you must specify port 10000 since Webmin won’t auto-forward. But if you forget to specify a secure connection, you will get an error page with a proper clickable link. When you successfully connect, you should see the Webmin home screen shown in Figure 1.
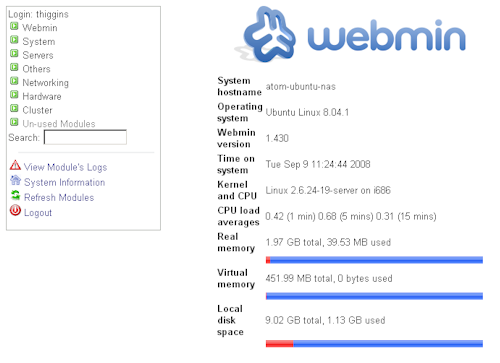
Figure 1: Webmin Home Page
Note that the install would have fit nicely on a 2 GB flash drive. But I used an old 10 GB Maxtor IDE drive that I salvaged from a long-gone system.
Setup Overview
The overview of the RAID creation process for the Ubuntu Server / mdadm / Webmin combination is similar to the one used in FreeNAS. Here is the outline, with the appropriate Webmin modules referenced (including links to the online documentation pages):
- Partition Disks [Hardware > Partitions on Local Disks]
- Create Disks Filesystem [Hardware > Partitions on Local Disks]
- Create the RAID device [Hardware > Linux RAID]
- Create the RAID device filesystem [Hardware > Linux RAID]
- Create the Mount directory [Others > File Manager]
- Mount the RAID device [System > Disk and Network Filesystems]
- Configure File Sharing [Servers > Samba Windows File Sharing]
Note: If you don’t see the Linux RAID module in the Webmin left-hand menu, try clicking Refresh Modules.
1- Partition Disks
You start by creating a Linux RAID partition on each of the disks that will be used in the array. Go to the Hardware > Partitions on Local Disks page, click on the drive name, then on Add primary partition on the next page to reach the screen shown in Figure 2. Select Linux RAID from the drop-down menu and click the Create button. Repeat for the other drive(s).
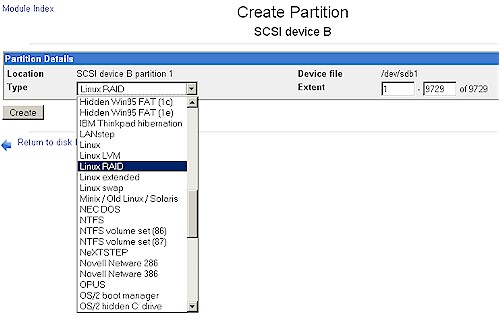
Figure 2: Partitioning a disk for RAID
2- Create Drive Filesystem
Now you need to create a filesystem (format) each drive. Click the disk name again to reach the Edit Partition screen (Figure 3), select New Linux Native (ext3) and click the Create Filesystem button.
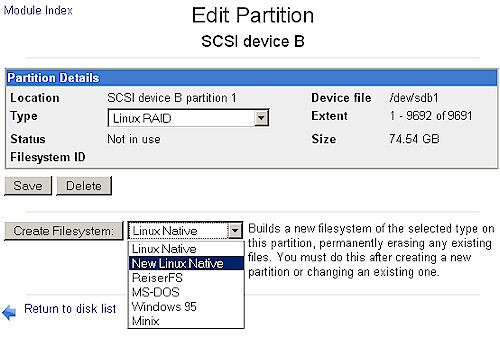
Figure 3: Creating a filesystem on each drive
Your screen will then look something like Figure 4. Repeat for the other drive(s).
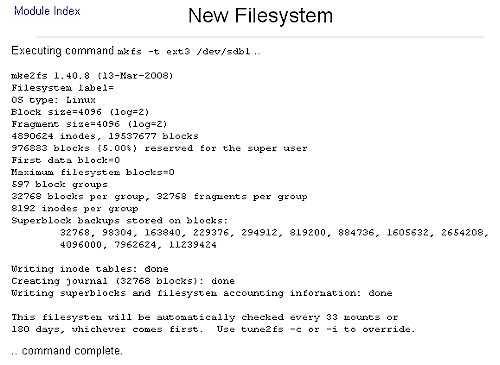
Figure 4: Drive filesystem created
3- Create RAID Device
The formatted drives now must be configured into a Linux RAID device. Go to the Hardware > Linux RAID menu and use the drop-down to select the array type. Figure 5 shows a RAID0 array being created.
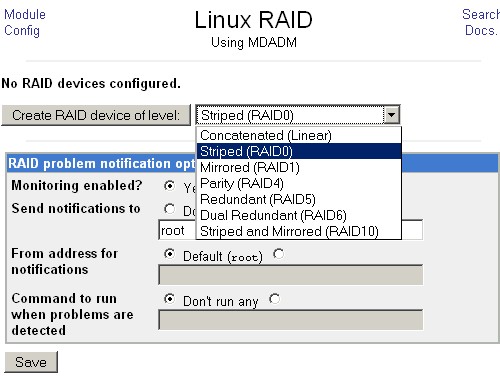
Figure 5: Creating a RAID0 RAID device
After clicking the Create RAID device of level button, you should see a screen like Figure 6. If the Partitions in RAID section does not appear, you should try rebooting the server since sometimes new partitions are not recognized until reboot.
Once you get the Partitions in RAID section to appear, select the desired partitions and click the Create button. Note that I set the Chunk size to 32 kB, based on this recommendation.
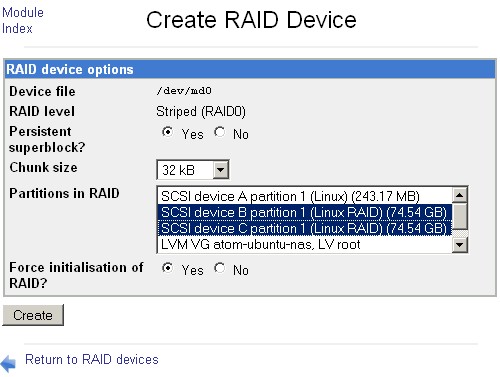
Figure 6: RAID device creation
If all goes well, your screen will look like Figure 7.
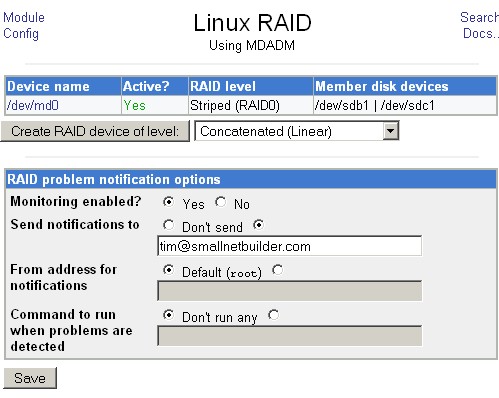
Figure 7: RAID0 array device successfully created
4- Create RAID Device filesystem
Once you create the RAID "device", it also needs to be formatted. This is the step that I usually forget and then waste time wondering why my RAID won’t mount. All you need to do is click the device name in Figure 7, set the Create filesystem of type: dropdown to New Linux Native as shown in Figure 8 and click the Create filesystem of type: button. You’ll get a screen that logs the results of the format and just wait a bit until it shows that the format has completed.
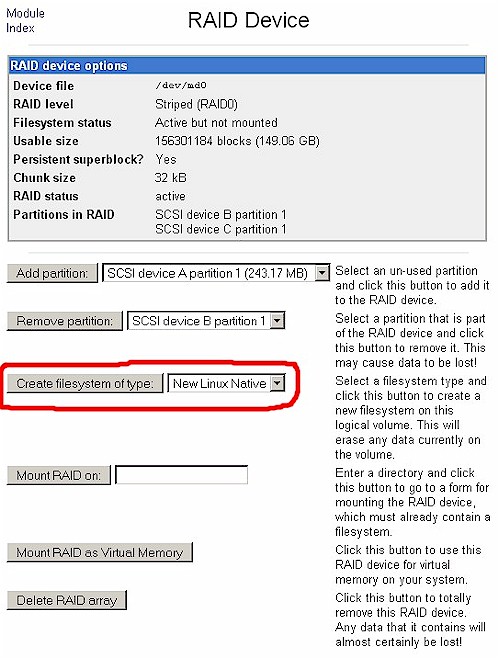
Figure 8: Creating the RAID filesystem
5- Create the Mount directory
Now that we have our RAID device, it needs to be mounted so that it can be used. This means that it needs to be linked to a directory someplace in the filesystem. I spun my wheels a bit here also, because the Webmin Add mount function doesn’t work as described in the documentation and doesn’t automatically create mount directories.
I wanted to create a "public" directory that had read/write access for everyone without requiring any sort of login. And I didn’t want to use the administrator level directory that the Ubuntu install process created under /home, so I had to create a new directory.
The easy way would have been to log in and run a sudo mkdir command to create the required directory. But I wanted a way to do it entirely in Webmin and fortunately, the Java-based File Manager module did the trick.
File Manager is found under the Others menu and clicking it launches a Java applet that provides a Windows Explorer flavor file browser. I decided to put my mount point under the /mnt directory, using a nested directory of /mnt/raidarr/public.
Figure 9 shows that I clicked on the mnt folder in the left hand pane, then clicked the New folder icon to pop up a small window where I could enter my new folder name. Note that I had to first create the raidarr directory, then the public directory in it.
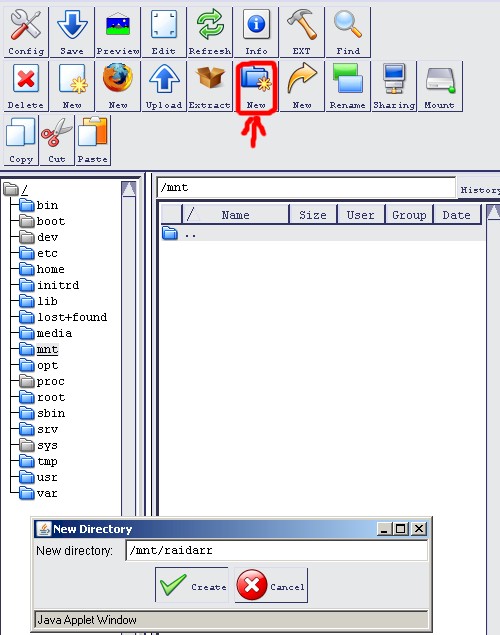
Figure 9: Creating a new directory with Webmin File Manager
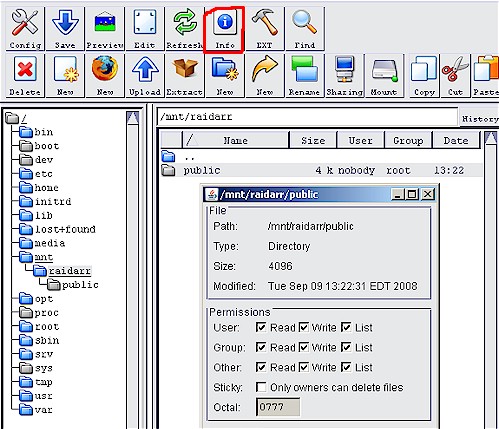
Once the directory was created, I had to set its permissions. This is a bit tricky since it only works when you select the folder in the right-hand pane! But once you get the folder to appear, just click on the Info icon and set the permissions as shown in Figure 10. The full-sized image shows that I also set the folder Ownership to user nobody and group nogroup.
Figure 10: Setting public folder permissions
6- Mount the RAID device
With the mount directory created, you use the Disk and Network Filesystems module to mount the RAID array to it. Figure 11 shows the correct dropdown selection and Figure 12 the window that results.
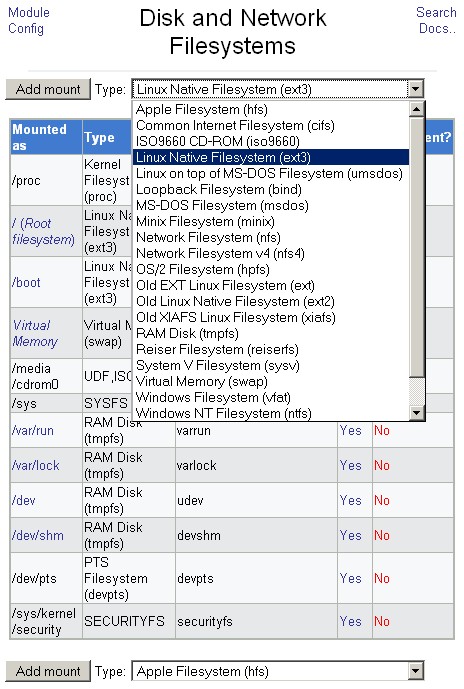
Figure 11: Creating an ext3 mount
The changes on this page are circled in red. Mounted As points to the mount directory, RAID Device is set to the created RAID array and Allow Users to Mount this Filesystem is selected.
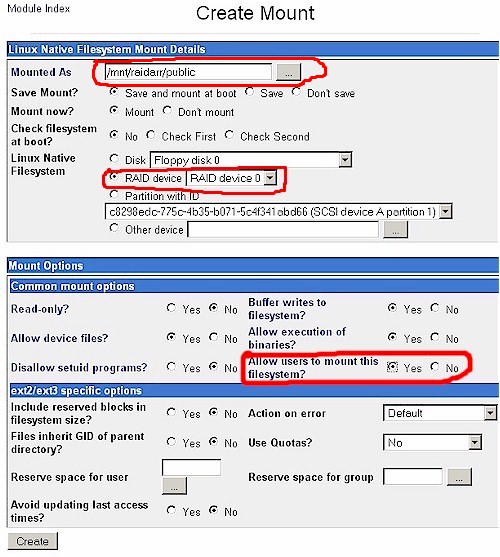
Figure 12: Linux Native Filesystem (ext3) Mount Details
If you have set everything correctly, you won’t get an error when you click the create button and will be rewarded with a screen that looks like Figure 13.
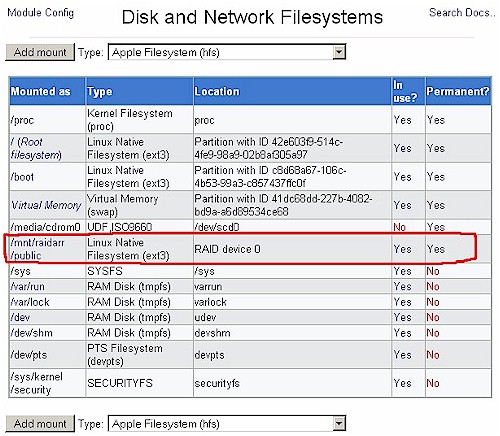
Figure 13: RAID array successfully created and mounted
Setup Step 7 – Enable File Sharing
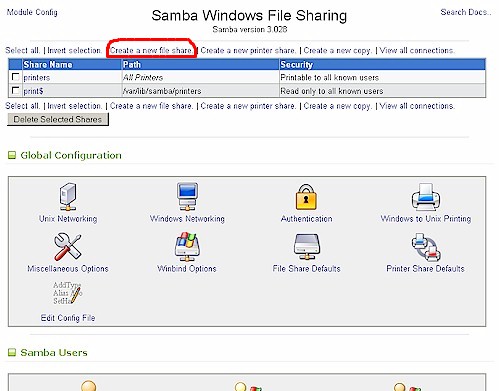
There are books and websites devoted to Samba, so I’m not going to try to make you (or me!) an expert. I’ll just walk through the steps required to set up the previously-created "Public" folder for read/write access to anyone without requiring a login. Figure 14 shows the main screen of Webmin’s Samba Windows File Sharing module. We’re going to visit the Windows Networking screen first.
Figure 14: Samba main screen
The only changes you need to make in Figure 15 are the Windows Workgroup name (if it is not "Workgroup") and to disable the Master Browser function. The latter is optional, but probably a good idea to prevent Master Browser battles that can mess up Windows Network browsing. Make the changes and click the Save button.
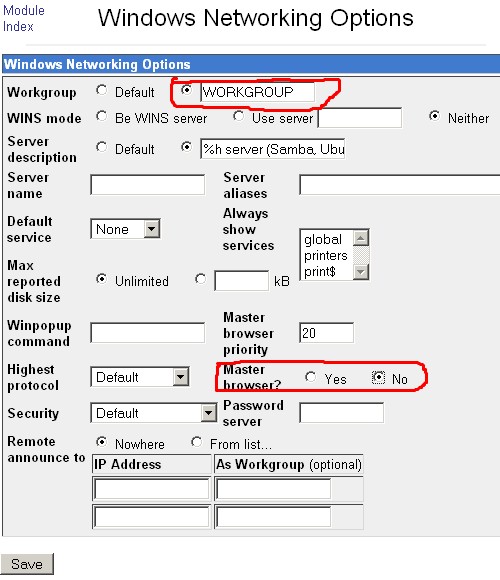
Figure 15: RAID array successfully created and mounted
You should now be back at the main Samba screen. Click the Create a new File Share link at the top of the page to open the page shown in Figure 16. I named the share "public" and navigated to the previously-created /mnt/raidarr/public folder.
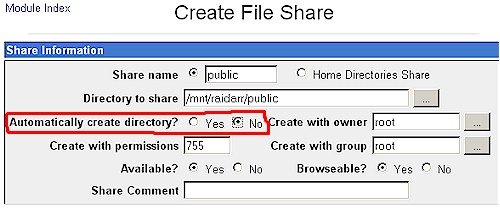
Figure 16: Create Samba file share
Note that I have set the Automatically create directory button to No. I originally tried creating a share this way, but it didn’t work. You can also enter a comment if you like. Click the Save button and your screen should look like Figure 17.
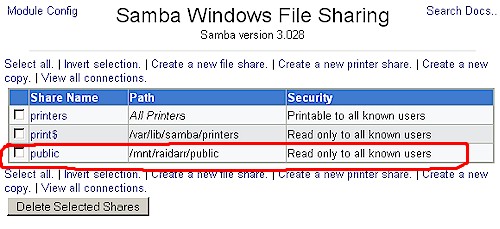
Figure 17: File share created
But we’re not done yet! Click on the share name to open the Edit File Share screen (Figure 18), then click on the Security and Access Control icon in the Other Share Options area. The changes here are to set Writable to Yes, Guest Access to Guest only. Leave the Guest Unix user set to nobody. Save the changes and the main Samba screen should now show the share security as Read/write to everyone.
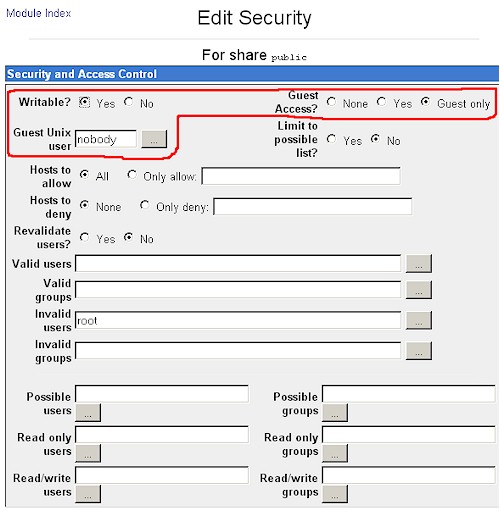
Figure 18: Setting File Share Security
All you need to do now is to browse to the share. You should be able to open it and not get a login popup. Drag a file over to test writing, open it to test reading, then delete it to test, well, deleting! We’re finally done! Now we can see if the switchover to Ubuntu was worth it!
Performance
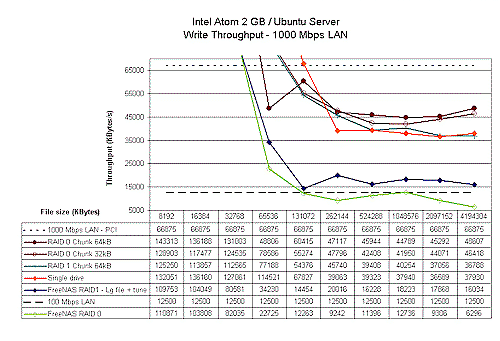
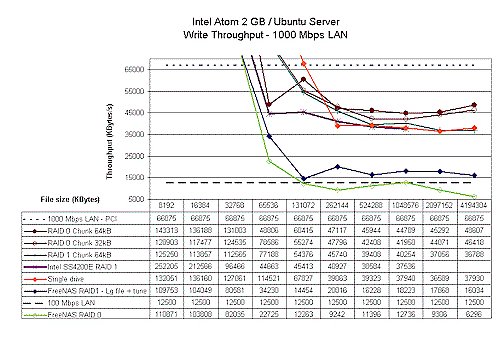
Figure 20 shows a composite of FreeNAS and Ubuntu Server write test results. All testing was done with the iozone testbed system used in this series running Vista SP1 and with 512 MB of memory. A gigabit LAN connection was used with no jumbo frames. The tests shown are:
- RAID 0 Chunk 64 kB – Ubuntu RAID 0 with chunk size set to 64 kB
- RAID 0 Chunk 32 kB – Same as #1, but chunk size set to 32 kB
- RAID 0 Chunk 64 kB – Ubuntu RAID 1 with chunk size set to 64 kB
- Single drive – Ubuntu w/ single ext3 formatted drive
- FreeNAS RAID 0 – FreeNAS RAID 0
- FreeNAS RAID 1 – Lg file + tune – FreeNAS RAID 1 w/ Large read/write and Tuning options enabled
Figure 19: Atom Write performance – Ubuntu Server and FreeNAS
The Y axis has been expanded to show the 66.9 Mbps measured PCI gigabit transfer rate reference line. Basically, Ubuntu Server blows the doors off of FreeNAS, with at least 2X write performance in all modes.
Note that using the suggested 32 kB chunk size actually reduced performance somewhat over using 64 kb chunks. I didn’t try any other chunk sizes, but it looks like something that might be worth playing with.
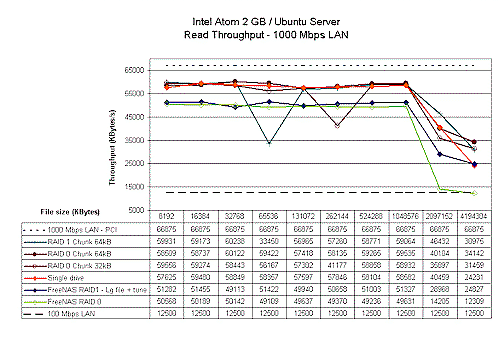
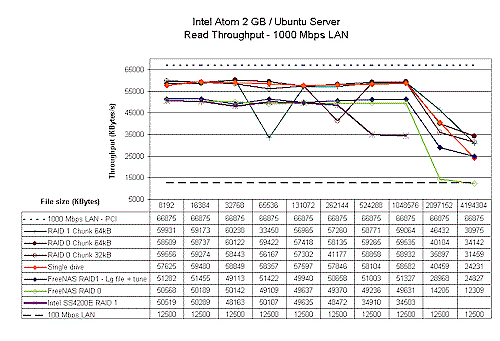
The read results in Figure 20 also show Ubutnu server beating out FreeNAS, but by not as wide a margin. It also appears that RAID 0 is providing no speed advantage over single drive or RAID 1, contrary to the results presented here. Since the speeds are beginning to bump up against the PCI gigabit limit, that could be the problem.
Figure 20: Atom Read performance – Ubuntu Server and FreeNAS
I didn’t bother adding the D-Link DNS-321 plot line to either of the plots, since its low teens speed is no comparison with the Ubuntu results. Instead I plotted the RAID 1 results that I took for the Intel SS4200-E, which currently tops the RAID 1 NAS Charts.
Figure 21: Atom Write performance – Ubuntu Server, FreeNAS, Intel SS4200E
You can see in Figure 21 that the SS4200E’s write performance is more like Ubuntu Server’s than FreeNAS’, even without the benefit of being tested on Vista SP1. But Figure 22 shows that its read performance is more like FreeNAS’, but keep in mind this is with iozone running on an XP client.
Figure 21: Atom Read performance – Ubuntu Server, FreeNAS, Intel SS4200E
Chosing Thoughts
At the close of Part 1, I asked if the performance that I obtained with FreeNAS was all that an Atom-based platform could deliver. Given the results that I obtained using Ubuntu Server and mdadm based RAID, I think I the answer is a definite "No"!
As the testing showed, I obtained a 2X write speed improvement and 15% read speed improvement simply by changing the OS used in the Atom NAS. While the combination of Ubuntu Server, mdadm and Webmin might not be as easy to use as FreeNAS, the improved performance definitely makes it worth the switch.
I wanted to see what the performance was like for the Ubuntu combo and a Windows XP client. But when I went to restore the Ghost image, I ran smack into the gotta-load-the-SATA-driver-on-a-system-with-no-floppy-drive hassle. Such is the price I pay for having an too-old version of Ghost (which I hardly ever use). So it looks like I better set aside a day to set up a dual-boot XP / Vista system to make this easier for future testing.
Stepping back to look at the big picture of Atom’s possible place in future consumer NASes, I don’t think you’ll be seeing it on lower-cost products. Given that Atom is more a general-purpose computing platform vs. a dedicated NAS controller, I’d have to say that it may be hard for an Atom-based system to be cost-competitive with a NAS based on, say, Marvell’s Orion.
So Atom is more likely to find a place in the higher-end RAID 5 systems like the Intel SS4200-E, QNAP TS-509 Pro and Thecus N5200 Pro, which all use Intel’s Celeron M 420 or the Synology DS508, which is based on a Freescale MPC8543.
As for building your own NAS with the only currently-available Atom mobo from Intel, there is both good and bad news. The good is that it will probably produce a dual-drive NAS that has performance higher than any off-the-shelf product that you can buy. I say "probably" because my Ubuntu tests all used a Vista SP1-based client, which would probably also produce a performance boost for the RAID 1 products close to the top of the NAS Charts. I can’t know whether the Thecus N3200‘s (the current leader if you take out the quad-drive Intel SS4200E) 20 Mb/s average write and 24 MB/s average read speeds would increase to anywhere near what I got with the Atom NAS unless I test it. And that product has gone back to Thecus.
The other good news is that building your own dual-drive NAS with Intel’s board won’t cost you that much more than buying an off-the-shelf alternative, as long as you’re not fussy about the case used. If you already have a case that can take a mini-ITX board, then your cost will definitely be less.
The bad news is that Intel’s board has design tradeoffs that result in a less than optimal NAS solution. The Northbridge chip is responsible for a lot of the 50W power that is 2X what other dual-drive NASes draw. And the fan that’s required to cool it means one more thing to cause noise. The other limitation is the onboard 10/100 Ethernet that forces you to use the single PCI slot for a gigabit NIC. But, as we have seen, a PCI gigabit NIC caps your possible throughput to a little under 70 Mb/s. So if you’re looking to make the most of a gigabit LAN connection, you won’t do it with this board.
Still, if you’re looking for better performance than you can get with current off-the-shelf RAID 1 NASes and don’t mind putting in a little sweat equity, the combination of Intel’s Atom mobo, Ubuntu Server, mdadm RAID and Webmin can make for a sweet little NAS.

