Introduction
| At a Glance | |
|---|---|
| Product | Buffalo TeraStation Pro II(1.0 TB TS-H1.0TGL/R5 ) |
| Summary | Four SATA Drive NAS with support for RAID 0, 1, 5 and 10. Available in 1, 2 and 3 TB models |
| Pros | • Gigabit Interface • LCD information status panel • Easy setup wizard • Quiet operation • Multiple notifications of disk errors • Built-in backup to other Buffalo NAS Devices • Support for DFS |
| Cons | • Drives not hot swappable • Rebuilding RAID requires manual intervention after replacing drive • No support for Daylight savings or authenticated SMTP mail • “Middle of the pack” performance • USB drives didn’t mount and share as expected |
As storage capacities of NAS (Network Attached Storage) units continue to grow, so does the need for fault tolerance. Of course, simple, single drive NAS boxes such as Buffalo’s LinkStation Live or LinkStation Pro provide no fault tolerance. Mid-priced NAS products tend to be dual drive systems that typically support RAID 1 mirroring. Larger capacity systems, typically aimed at the business market, have four (or more) drives and support additional RAID configurations—all of which provide fault tolerance, and in most cases, high data availability.
Buffalo Technology, a well-known vendor in the NAS market, announced its new top-of-the-line NAS, the TeraStation Pro II, at CES in January. Buffalo announced the 3.0 TB version in May to complement the original 1.0 and 2.0 TB capacities. According to Buffalo, the Pro II is not replacing the original TeraStation Pro; however, Buffalo’s site listed no reseller links for the 1.0 TB version of the Pro. The two models look almost identical, but the original TeraStation Pro is labeled as TeraStation and the Pro II is labeled TeraStation Pro.
The Basics
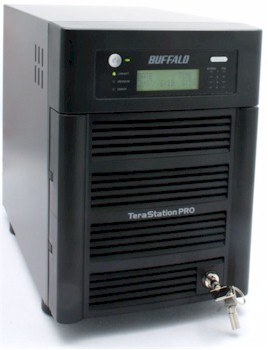
The TeraStation Pro II contains four SATA drives. Depending on the model, the drives are 250 GB, 500 GB, or 750 GB. Our evaluation unit was equipped with four Samsung SP2504C 250 GB drives. The front panel is equipped with a lock to prevent un-authorized access to the drives.
Unlike the LaCie Ethernet Disk Raid that I recently reviewed, the TeraStation Pro II is equipped with an LCD panel that displays configuration and status information (Figure 1). Information displayed includes time/date, RAID configuration, drives in use, link speed, and the current IP address. When fault conditions exit, the display also shows error codes and drive status. In addition to the power indicator, the TeraStation Pro II has 11 LEDs. There’s an individual LED to indicate Link/Activity, Error, and Messages. For each of the four drives, there’s an LED for activity and one to show drive failure.

Figure 1: TeraStation information screen showing degraded mode due to failed drive
On the rear of the NAS, there are two USB 2.0 ports that you can use to expand your storage with external USB drives. I tested the USB ports with the same USB drives that I used to test on the LinkStation Live and found that they were recognized but not mounted. The USB drives also did not show up on a dropdown list as an available volume to create a share. So a feature that worked well on the LinkStation Live appears to be broken on the TeraStation Pro II.
Inside Details
The Pro II features a new high performance architecture based on Marvel Orion processor with 128 MB of RAM and 256 KB of flash. Figure 2 shows a close up of the main board, which also includes an NEC D720101 USB 2.0 controller and D78F0511 8 bit flash-based microcontroller. Power consumption was measured at around 67W, higher than other RAID 5 NASes we’ve tested. Note that the Pro II doesn’t support a power-save mode.
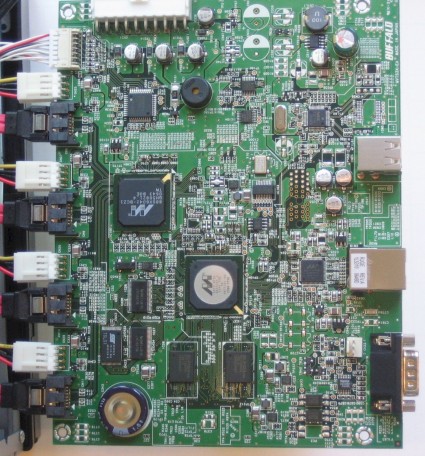
Figure 2: Pro II main board
![]() Check out the slideshow for an inside tour of the Pro II.
Check out the slideshow for an inside tour of the Pro II.
The Basics – more
The rear panel (Figure 3) also has a male DB-9 connector for UPS connection. The manual, without specifying which brands/models, says that the TeraStation Pro II also supports a “number” of USB UPSs. Interestingly, the rear of the TeraStation Pro II lacks a slot for a security cable found on the back of the LinkStation Live NAS.
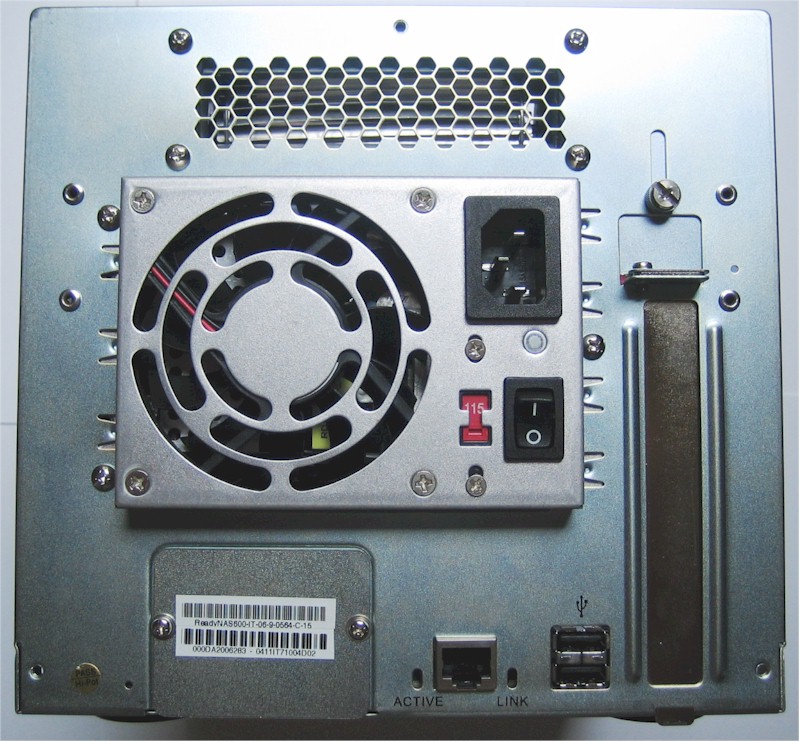
Figure 3: Rear panel of the TeraStation Pro II. Though the fan is large, it makes almost no noise.
The drives for the TeraStation Pro II mount in trays for easy replacement. But I was surprised to find that the drives are not hot-swappable like those in the LaCie EDR and many other RAID 5 NASes. Instead, the drives are what Buffalo terms “quick swappable”.
It was also a surprise that rather than having the trays mate into a connector built into the back of the drive cage, a standard SATA data cable and a power connector attach to the drive (Figure 4).
So to replace a drive, you have to shut down the NAS, pull the tray out, disconnect the cables, and reconnect them to a new drive. You then reboot the TeraStation.
This “quick swappable” design is definitely a step back from the bar that has been set by other vendors of RAID 5 NASes. The hot-swappable capability found on the LaCie EDR and many other RAID 5 NASes is better, as you never have to shut down the NAS to replace a drive and you never lose access to your data.
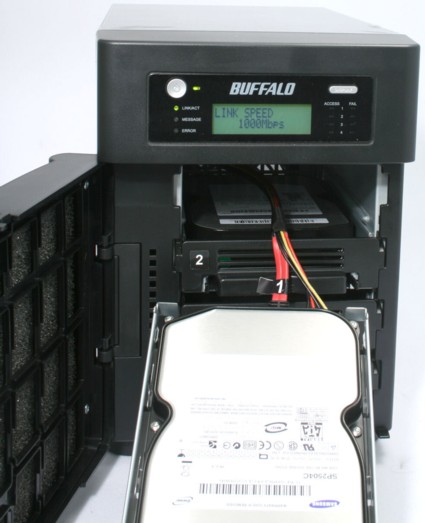
Figure 4: TeraStation Pro II showing Samsung drive and data/power connectors
What’s New?
If you’re like me, you’re probably asking, “What’s the difference between the Pro and the Pro II?” There are a few main differences:
- Capacity – The Pro II is available in 1, 2, 3, and soon, 4 TB models. The Pro is only available in 1 and 2 TB models.
- RAID – The PRO II supports RAID 0, 1, 5, and 10. The Pro supports RAID 0, 1, 5 and JBOD.
- DFS – The Pro II supports Distributed File System when used in conjunction with other TeraStation Pro IIs or other DFS-capable devices. The original Pro does not support DFS.
Setup
The TeraStation Pro II is shipped with a Windows-only setup utility called TeraNavigator (Figure 5). The setup utility prompts you through hooking up your TeraStation to your network and powering it up, and walks you through the initial basic configuration parameters, such as device name, password, and RAID configuration. It lets you map a drive to the TeraStation.
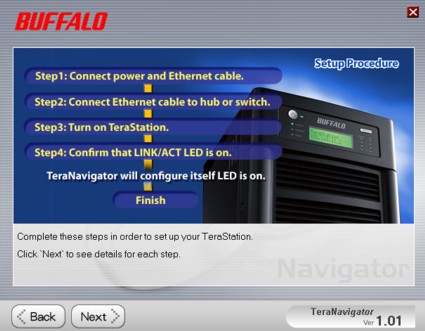
Figure 5: Simple setup utility helps you quickly configure the TeraStation Pro II
The utility installs another Windows utility called NAS Navigator that will scan your local network for LinkStations and TeraStations (Figure 6). For each device found, it shows you its IP address, capacity, and disk usage, and lets you view shares. Optionally, you can choose to install the supplied Memeo backup software.
Alternatively, you can bypass this whole setup scheme and just type in the TeraStation’s IP address that is displayed on the front panel after the NAS boots. By default, the Pro II’s DHCP client is set to automatically retrieve an address.
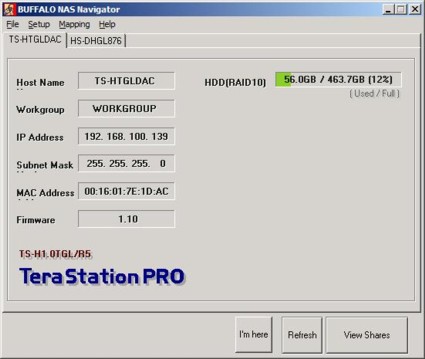
Figure 6: NAS Navigator discovers your LinkStations and TeraStations and lets you map shares
User Interface
Buffalo didn’t break any new ground with the user interface on the Pro II. It’s virtually identical to the UI found on LinkStation Live. Of course, some menus, such as those pertaining to RAID configuration, are different, and you won’t find menu entries for PCAST or Web Access on the Pro II. I’ll comment on each menu item only briefly.
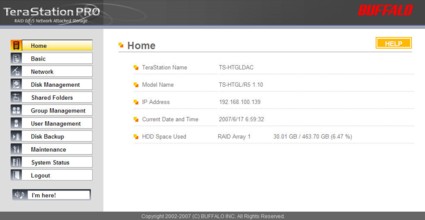
Figure 7: Buffalo TeraStation Pro II Home page
Home – Top-level page that summarizes IP address, time/date, and usage (Figure 7).
Basic – Lets you change the name of the Pro II, set time/date, configure language and NTP server settings. A populated drop-down list of US-based NTP servers would be nice, instead of the default Japanese NTP server. And someday, Buffalo will support daylight savings time.
Network – Basic network configuration settings. In this menu, you can choose one of three jumbo frame sizes. (9694 bytes max.) This menu also lets you set workgroup, domain, or active directory parameters.
Disk Management – This menu lets you see the status of your RAID and individual disk status. You can also reconfigure your RAID (but you’re warned that you’ll lose your data), and set up a RAID scanning schedule. Other disk functions such as Check, Format, and Erase are also found on sub menus.
User Interface – more
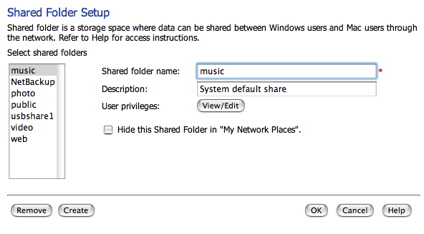
Shared Folders – Here you can create shares (Figure 8), assign rights, set up services for a share (such as AppleTalk) and set up the Distributed File System (if you have other DFS capable devices).
Figure 8: Shared Folder setup on the TeraStation Pro II
Group Management – Set up groups to minimize user administration.
User Management – Create and administer users. Unless you are using NT domain or Active Directory, there’s no way to enforce password policies.
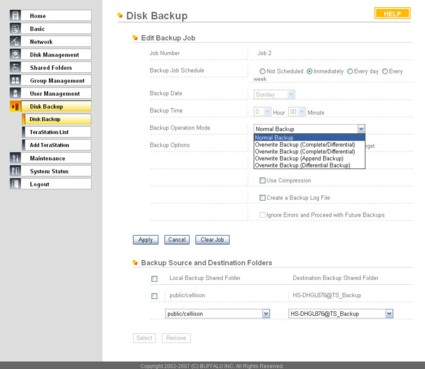
Disk Backup – This is a nice feature of Buffalo NAS products. You can create a share on many Buffalo NAS products, including LinkStations, and define them as a backup share (Figure 9). Using the built-in software, you can back up a share on one NAS directly to a partition defined for backup on another NAS. You have multiple scheduling and backup options. I tested this between the TeraStation Pro II and the LinkStation Live, and it worked very well.
Figure 9: Disk Backup function showing backup options. I backed up to a LinkStation Live.
Maintenance – In this menu, you can set up email alerts that trigger on System alerts, disk failures, fan failures, completed backups, or a daily HDD status report. Someday, Buffalo will update the SMTP mailer to allow for SMTP authentication, but for now, only unauthenticated SMTP mail is supported.
Another sub menu lets you configure your UPS settings. You can also set up sound alerts for various conditions, as well as configure the LCD status panel. You can even configure the panel and LED brightness and a schedule for LED sleep and wakeup times. Unfortunately, there’s not an option for configuring drive spin down times—they run continuously. From the maintenance menu, you can also gracefully shut down the system, initialize it, and set up syslog transfers.
System Status – Sub menus show basic system info, USB details, Network information, and log info. The Pro II does let you manually save log files for system, FTP and SMB, but it’s a fairly unusable format.
Hands On
Except for the RAID features, using and configuring the TeraStation Pro II is a very similar experience to using either of the LinkStations (Pro or Live). However, as noted above, I was disappointed that the USB drives I used in testing the LinkStation Live didn’t mount properly.
To further test the device, I intentionally failed a drive. I shut down the TeraStation Pro II and pulled the data/power connector from Drive 1 (Figure 10). I then rebooted the NAS. As expected, it detected the error condition upon boot up.
There was no shortage of notification of the disk error. First, both the message light and the error LEDs to the left of the display illuminated. In addition, the fail LED for drive one turned on. The display status also let me know about the drive failure and notified me that it was running in a degraded mode. You can see shots of these LCD panel messages in the slideshow.
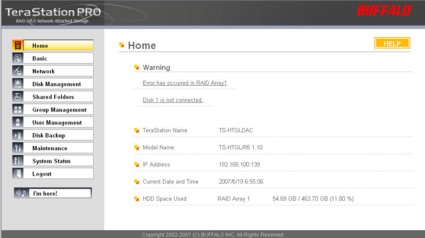
Since I had configured Email notification, I got an email notifying me of the problem. Finally, when I logged into the user interface, the error condition was displayed at the top of the home page (Figure 11). Without SNMP support, you really can’t expect better notification.
![]() Check out the slideshow more disk error notifications.
Check out the slideshow more disk error notifications.
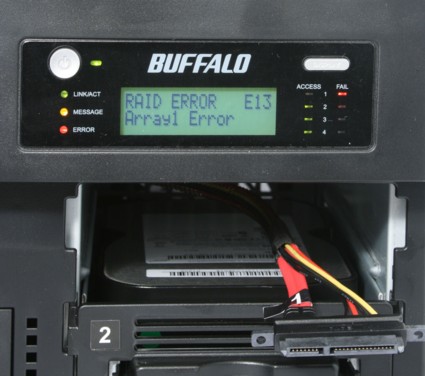
Figure 10: TeraStation Pro II with Drive 1 removed to simulate a failure. Note the status panel and error indicator LEDs.
Figure 11: TeraStation Pro II home page showing RAID error and Drive 1 disconnected.
After simulating the drive failure, I rebooted the Pro II and wrote some additional data to the degraded RAID. I then shut it down, reconnected the “failed” drive, and rebooted. The Pro II recognized that the drive had been reconnected, but it didn’t automatically start to rebuild the mirror. I had to log into the management console and select Disk 1 to add it to the array. I was warned that I might lose data, and had to type in a four-digit confirmation code matching one generated by the Pro II to confirm that I wanted to add the drive to the RAID 10 array.
From a non-technical user’s perspective, I think I would have preferred the automatic rebuild found on the LaCie EDR. However, unlike the LaCie that seemed to take forever to rebuild the mirror, the TeraStation Pro II re-mirroring for this test completed in about an hour and a half.
Performance
It’s fair to say that the Buffalo TeraStation Pro II didn’t break any of our performance records. We tested using both 100 Mbps and 1000 Mbps LAN connections in RAID 0, RAID 5 and RAID 10 configurations. Standard and 4K jumbo frames were tested at with file sizes from 64 KB to 1GB.
TEST NOTES:
- Firmware version tested was 1.10
- The full testing setup and methodology are described on this page
- To ensure connection at the intended speeds, the iozone test machine and NAS under test were manually moved between a NETGEAR GS108 10/100/1000Mbps switch for gigabit-speed testing and a 10/100 switch for 100 Mbps testing.
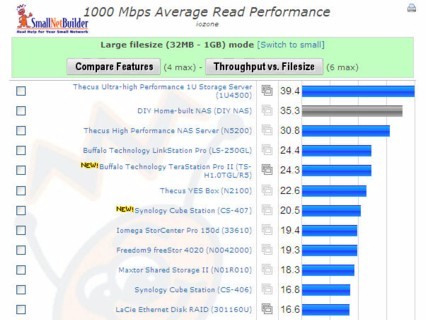
For the 1000 Mbps tests, the TeraStation Pro II generally performed in the middle of the pack. Its ranking ranged between third and seventh, but scored either third or fourth on five of the eight 1000 Mbps tests I reviewed. In fairness, the Thecus High performance NAS (N5200) and the Thecus Ultra-hi performance Storage server (1U4500) both put up some performance numbers that are hard to beat.
For example, on the 1000 Mbps Average write test, the Thecus Storage server placed first with 39.1 MBps of throughput. The Pro II came in fourth with 19.2 MBps. Similarly, the 1000 Mbps average read results (Figure 14) found the Thecus Storage server again in first place with 39.4 MBps. The TeraStation Pro II placed fifth at 24.3 MBps. You can create your own comparison charts for up to six products by going to the NAS charts.
Figure 14: The TeraStation Pro II placed fifth in 1000 Mbps Read Performance
Conclusion
Buffalo has a long history of designing and selling both direct and network attached storage devices. The products often have innovative features such as NAS-to-NAS backup or support for DFS, but they also sometimes miss the basics. At a time when the industry is trending towards hot-swappable SATA drives with cable-less connection, I was quite surprised to discover that the TeraStation Pro II’s design relied on an older “quick swappable” technology.
Still, the TeraStation offers a lot of storage with numerous configuration options and average performance at a good price. If you can live without constant data availability and can afford about five minutes of downtime when swapping out a drive, maybe quick swappable is good enough. With any luck, you won’t have to worry about swapping drives at all.

