Introduction
| At a Glance | |
|---|---|
| Product | HP MediaSmart Server (EX470 / EX475) |
| Summary | Server appliance running Windows Home Server aimed at non-networking savvy consumers. |
| Pros | • High performance • Flexible storage expansion • Selective folder backup • Tight integration into Windows |
| Cons | • Tight integration into Windows • No Print server • 10 User limit • No server backup • Limited control of client backup |
Microsoft and HP spent a lot of time and energy at the January 2007 Consumer Electronics Show getting people pumped up about their entry into the "home server" market. Microsoft handled the software end, extolling the wonders of its Windows Home Server (WHS), while the HP troops let people ooh and aah over the sexy design of its MediaSmart Server (MSS).
Well, as many of us learned from Christmases long past, anticipation is one thing, but reality is often quite another. And so it would seem for the MSS. I had the opportunity to spend a few weeks with the product back in August, having received a pre-production model in advance of a big September product launch.
But HP pulled the plug on the launch at the last minute and recalled all review samples back to the mother ship, citing the need to rework the MSS software to make it more user-friendly to general consumers. And so, I put the review aside until HP finally decided to unleash the product. That unleashing appeared to happen last week, with the product quietly appearing for pre-order from Amazon, Best Buy and other retailers.
After doing some checking to see how much the product had really changed (hardware hasn’t; software incorporates the WHS September update), I decided to not wait for my number to come up in the review sample queue and finish this review. It’s based on the August review unit, so there may be minor differences between what I describe here and what is in the product that will ship at the end of this month.
But since the product hasn’t been significantly tweaked, I think that what you’ll in this review to be a fair representation of what some of you may be placing (or thinking about placing) pre-orders for. I’ll handle any major changes that I find once I receive my review unit with a follow-on article.
One more point before I start. While it may irk the HP and Microsoft marketeers, I’ll often refer to the MSS as a NAS in this review. See this for my reasons why.
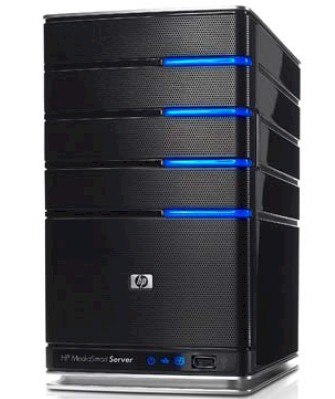
The MSS definitely wins the prize for best-looking NAS, ensconced in a case with glossy-black plastic sides and a black metal fine mesh front. Although it’s a mini-PC, the MSS is smaller than many of the four-drive NASes that I’ve seen. It’s about the same height as the latest Harry Potter tome, about twice as wide and a third again as deep. The case’s top is a little over an inch longer than the bottom and the cover is tapered accordingly, giving the product a forward-leaning profile. In all, it is a handsome package the oozes style and elegance.
The front panel / door is accented with plastic "light-bars", which you can see in the product "beauty shot" above, that are actually light pipes that turn the little drive status LEDs into an aesthetic design feature. The light-bars can assume one of three colors: blue, purple or red, depending on drive status. Unfortunately, for those of us with red-green color blindness, the difference between purple and blue is hard to tell. The good news is that you won’t see purple very often since it indicates an uninitialized drive.
There are three additional indicators—Power, Network and Health—on the lower front panel (Figure 1), along with a recessed Status/Recovery button and USB 2.0 port. Only the Health LED is bi-color, turning solid or blinking red when the MSS is feeling poorly.
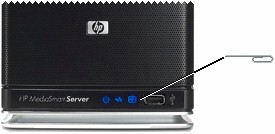
Figure 1: MSS Status indicators
Note that neither the light bars nor the Network light blink to indicate drive or network activity. This design "feature" is probably intended to make the MSS not be a visual distraction when it is parked in your living or media room. You can even dim or shut off the front panel lights if you like.
The two variable-speed fans are pretty quiet, as is the small power supply fan. However, the review MSS that HP sent had only two drives. Previous experience with four-drive NASes tells me that when the MSS is fully populated and under heavy use, you would want it tucked away from your media listening/viewing area.
Figure 2 shows the MSS rear panel with power switch and connectors, which include power, three USB 2.0 ports, one 10/100/1000 Ethernet and one eSATA port.
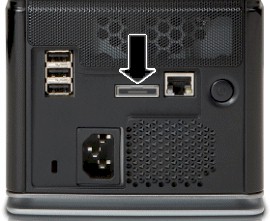
Figure 2: MSS Rear panel
The USB and eSATA ports can be used to add additional storage to the MSS (more about that shortly). But forget attaching printers or flash drives, since the MSS has no built-in print server and only supports flash drives for BIOS recovery.
![]() See the slideshow for more admin screens and internal details.
See the slideshow for more admin screens and internal details.
Inside Details
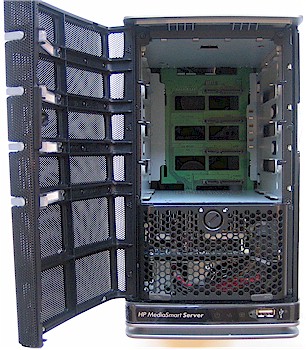
As you might expect from a company with HP’s design prowess, the MSS is as elegantly designed inside as out. The front view with drive trays removed in Figure 3 provides a view of the drive backplane on top and the power supply / CPU assembly on the bottom behind a removable grille.
Figure 3: MSS front view – drives removed
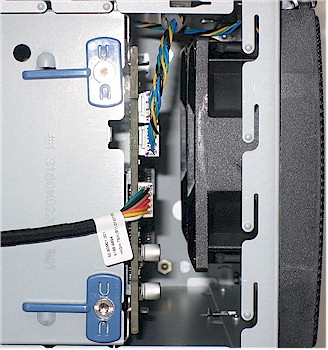
The MSS has a total of three fans. Two 3-inchers are mounted on the rear panel behind the drive backplane and a 1.5" in the power supply. Figure 4 is a close-up showing a detail of the backplane and 3" fans. The two blue pieces are the latches that secure the backplane when it is plugged into the main board.
Figure 4: Close-up of backplane and fans
The drive trays themselves are pretty slick, featuring a tool and fastener-less design outlined in Figure 5. The trays even have a built-in movable air dam to optimize airflow with empty trays. Only the bottom-most "system drive" can be locked in place with a quarter-turn latch.
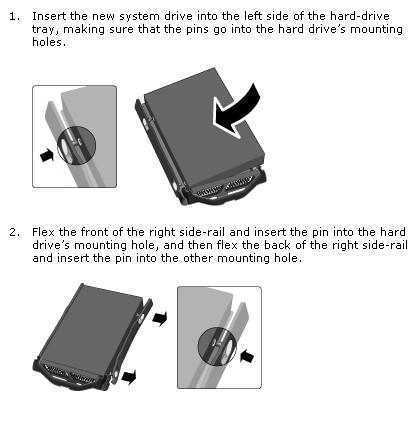
Figure 5: Drive tray details
Inside Details – more
I started to remove the sides in an attempt to get to the main board. But it turned out that access was much simpler. All I had to do was take off the front cover, remove two tiny cross-head screws, lift off the front grill assembly (after disconnecting a cable), remove the top cover panel (the catch is accessed from inside the empty drive bay), lift the drive backplane assembly out of the connector on the main board (after turning two latches), remove two screws holding the assembly in place, then slide it out. (It’s easier than it sounds).
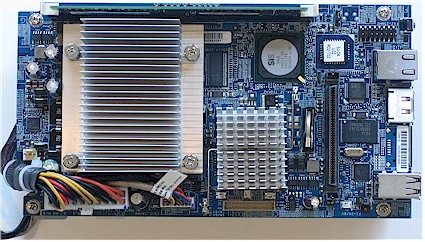
Figure 6 shows the main board / power supply assembly, which is, again, a pretty nice piece of design.
Figure 6: Main board / power supply assembly top view
The AMD Sempron 3400+ CPU is under the large heatsink, with the heatsink-less SiS966 South Bridge and what is probably a SiS 741CX North Bridge under the smaller heatsink. Other key parts are a SiS196 handling the gigabit Ethernet port and a Marvell 88SE6111 SATA controller.
The Qimonda HYS64T64000HU-3S-B DIMM at the top edge of the board is 512MB of DDR2 PC2-5300 unbuffered RAM. It’s all powered by a 200W HIPRO HP-U200EF3 supply with universal AC input. The supply slides into a pocket in the same bracket that holds the main board and is secured by three screws.
HP’s documentation regarding maximum capacity has a few oddities. The MSS (EX475) came with two Seagate ST3500630AS 500 GB Barracuda 7200.10 7200 RPM SATA drives with 16MB cache and the lower-priced EX470 comes with only one 500 GB drive.
HP’s data sheet says the maximum storage space is "only limited by number of hard drive bays (4) and USB ports (4)", neglecting to mention the eSATA port. Then a footnote on this HP page refers to "expansion capacity up to 6TB of storage" with asterisks noting the use of 750GB drives. So while I’d like to believe the "Maximum storage space: unlimited" spec in the MSS User’s Guide, I suspect that at some point, you’ll hit a maximum that won’t be "unlimited".
The whole shebang drew around 55 W (with the two drives), which is on the high side of my 15 W / drive rule of thumb for NAS power consumption. In all, the MSS looks to be designed for both easy manufacture and service.
The software running the MSS is, of course, Windows Home Server, which is based on Windows Server 2003 SP2. It’s not strictly a subset of Server 2003, since WHS contains some features that Server 2003 doesn’t have. WHS comes set to accept Remote Desktop Connections. So if you have XP Pro or another OS that supports the Remote Desktop client, you can log in and give yourself a tour. Note that upon first login after starting up the MSS, you’ll be greeted by a full-screen browser window with the warning shown in Figure 7. ’nuff said!
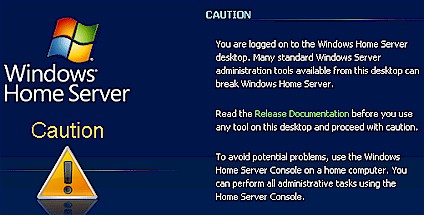
Figure 7: Proceed with caution
No RAID
Although the MSS supports multiple drives, it does not support RAID. Instead, it uses what Microsoft calls "folder duplication" to provide enhanced file robustness. Folder Duplication lets the user select folders that get copied onto a second hard drive. But you can’t control the drive used—WHS hides all that from the user.
A key advantage of Folder Duplication is allegedly more efficient use of drive space. Available space in my two-drive review system with two 500 GB drives was reported as 931.32 GB. If RAID 1 were used, I would have had only about half that shown as available, since RAID 1 copies all files. (Note that "System" use was reported as 20 GB.) But if you’re not comfortable with choosing which of your files are expendable when one of the drives eventually goes belly-up, Folder Duplication won’t save you any space.
Folder Duplication works with another technology called "Drive Extender" that allows addition of multiple drives—internal, USB or eSATA—of varying capacities to increase storage. The additional storage is merged into a single "folder namespace" so that you don’t have to (actually, you can’t) keep track of which files are stored where.
Drive Extender (DE) is definitely targeted at consumers who think RAID is something you keep under the kitchen sink and don’t want to be asked to pick a mode when adding more capacity to their MSS. But if you like your storage divided into volumes and want to control how your NAS is protecting your data, then DE—and the MSS—won’t be your cup of tea.
Setting Up
Installing the MSS feels more like installing a Windows application than a typical browser-administrated NAS. Granted, other NASes instruct you to install a Windows application that at minimum helps you find its IP address, but the MSS install is more involved.
In fact, the whole "MSS experience" feels more like dealing with Windows than with a NAS. Some users might like this, since Windows is familar territory and they don’t have to learn how to deal with a new type of device. But anyone who is comfortable administering and using a typical Linux-based browser-administered NAS will probably be more frustrated than pleased with the MSS. But I digress…
First, if your system doesn’t have HP Update, Windows Installer 3.1, or Windows.NET 2.0, they get installed first. Then the Windows Home Server Connector gets installed, which, in addition to handling backup, provides access to the Windows Home Server Console, which I’ll just call “Console” from here on. The Console provides the main administration interface to the MSS—there is no web interface.
Of course, each of these applications has its own automatic update process, which phones into its respective mother ship to update. There was a point where I got confused with requests from.Net, HP and WHS updates all flying at me. The last one was the most confusing because, at least to me, it was worded in such a way that I didn’t know whether it was asking to update the server, or the computer that the Console was running on.
After the update dust clears (or maybe before, depending on your timing and system software configuration), the Console launches and steps you through the Server setup. Since you’re actually initializing Windows Home Server, the process is very much like activating the other Windows versions you know and love. There are two things that stand out in the process, however.
First, you are warned that you can set your MSS name only during the MSS setup—there is no server name change option in the Console. But you actually can change the name—as you would any Windows machine—via a Remote Desktop connection.
Second, the setup forces you to set a strong server admin password, which Microsoft defines as:
"A strong password must be at least 7 characters long and must fulfill three of the following four character criteria: uppercase characters, lowercase characters, numbers, and symbols (such as !, @, #, and so on.) "
This is a bit of a pain, but good security practice. Strong password selection is also enforced for any users that require remote access.
If all goes well, you’ll finally get a page with a Start link that will transport you to the Console itself (Figure 8).
Figure 8: Windows Home Server Console – Server
You also get the pop-up "Suggested Configuration Steps" nag box (Figure 9), that thankfully you can dismiss and not have return.
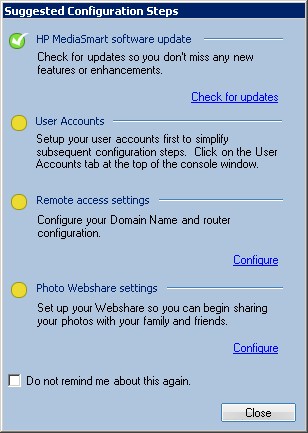
Figure 9: Another reminder
The Console has two "features" that I’d like to see HP change. First, it can’t be resized and takes up most of a 1024×768 screen. Probably not a problem for most desktop LCD monitors, but I found it annoying to run on an older notebook.
Second, the Console automatically forces disconnection of the current instance when a new user logs in. I guess the thinking is that only the MSS administrator will be logging in and she or he can only be in one place at a time. But if there multiple administrators, this behavior could get very annoying.
User Interfaces
You actually don’t have to run the HP Software Installation disk on your PC if you don’t plan to administer the MSS from that PC or to use the Backup feature. The MSS functions perfectly fine as an SMB/CIFS based NAS and can be accessed by Mac OS and Linux clients. (Yes, I actually confirmed this.)
But let’s assume that you do want to take advantage of all HP’s MSS goodness and run the software installer. What you’ll be left with after all of the installation and updating flurry are shortcuts on your desktop for the HP MediaSmart Server Control Center (which I’ll refer to as CC) and the default shared folders. You’ll also get a WHS System Tray icon that shows you what the WHS Connector application is up to.
The MSS goes a bit overboard in its efforts to accommodate users of different experience levels, providing multiple ways to access MSS features. Non-administrative users get the CC and Tray application, as well as web access to most user functions, which isn’t immediately obvious.
Administrators will primarily use the Console, which can be accessed via the Tray application or the CC. And as I mentioned earlier, there is also the option of Remote Desktop administration for the adventurous.
Figure 10 shows the window that comes up when you click on the CC desktop shortcut.
Control Center
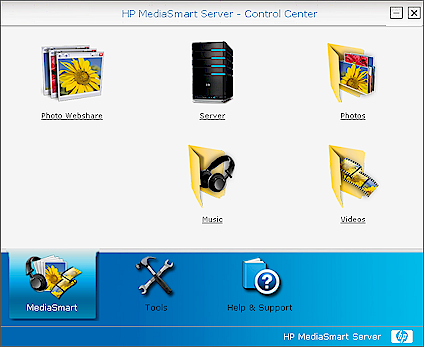
Figure 10: Control Center MediaSmart tab
The Server, Photos, Music and Videos icons are just single-click shortcuts that will open Folder windows to the server root and same-named default directories. You’ll first, however, get a login pop-up into which you can enter public for username and password, if you already haven’t set up users with directories of their own. Of course, you can also reach any of these folders through your normal network share browser.
Clicking the Photo Webshare icon will launch a web browser pointed to https://[SERVERNAME]/Webshare/ ([SERVERNAME] = whatever you named your server, of course), which is the gateway for the MSS’ built in photo-sharing application. I’ll come back to this later.
Clicking on the Tools tab changes the view to that shown in Figure 11. The Settings for iTunes is just a shortcut to the same item that is in one of the Console Settings menus, while the other two are links to items that can be reached directly from the Tray application.
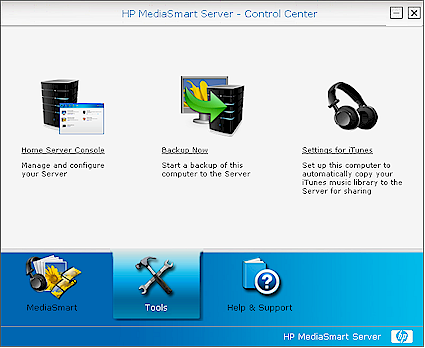
Figure 11: Control Center Tools tab
In all, the CC icon can be safely deleted from your desktop without losing access to any features.
Tray Application
The Tray application has an odd mix of user and admin functions. Of the menu options shown in Figure 12, I consider the Server Console and Display Network Health Notifications to be administrative, while the others are for users.
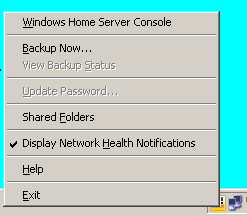
Figure 12: WHS Tray application menu
Actually, the "Health" notifications (Figure 13) can considered both user and administrative, since they’ll pop up problems both with the local machine and any other problem clients on the network. I wish there were an option to filter messages about other machines, since most users will not care that some other machine on the network failed its backup. In fact, the "Network Health at Risk" status could send some users into a panic, especially because there is no way to find out what the problem is, if you happen to miss the pop-up message.

Figure 13: WHS Tray application alert
I happened to stumble across another failing of the Tray application when I caught the Server having to reboot after an automatic update. First, there was no "system going down" message sent to all clients to warn of the impending reboot. Then, when the system went offline, there was no pop-up to indicate the change in status. The icon did change color and if you hovered the mouse over the icon you got a "Not connected to server" tooltip. But if it can pop-up a "Network Health is as risk warning" every time the Tray app and server reconnect, it should to the same when the server goes bye-bye.
Feature Tour
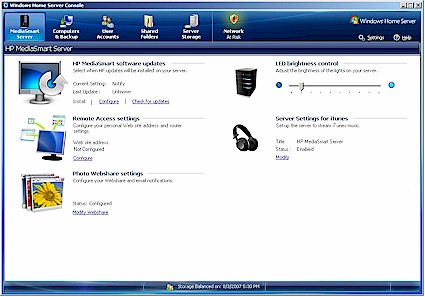
The Console is the best place to explore most of the MSS’ features. Figure 14 once again shows the Server tab, which provides access to some key configuration options. However everything here, except for the LED Brightness Control, is just a shortcut to an item on the Settings window, which I’ll cover later.
Figure 14: Windows Home Server Console – Server
![]() See the slideshow for more Console screenshots.
See the slideshow for more Console screenshots.
The Computers & Backup tab provides an overview of clients that have the MSS client software installed and is where you manage and configure automatic backup. I’ll come back to backup later since the story there is a bit involved.
Most of the action in the User Accounts window is in the Properties menu. Everything in Figure 15 is self-explanatory, but note that Remote Access itself is set up in the Settings window.
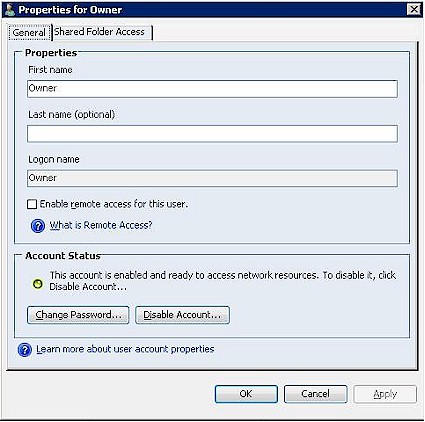
Figure 15: User Properties – General
Shares are managed through the Shared Folders tab, which is pretty straightforward. Added shares have Folder Duplication enabled by default, but you can choose to disable it by unchecking the selection box in the folder Properties window. The User Access tab in the folder Properties window lets you change User access permissions.
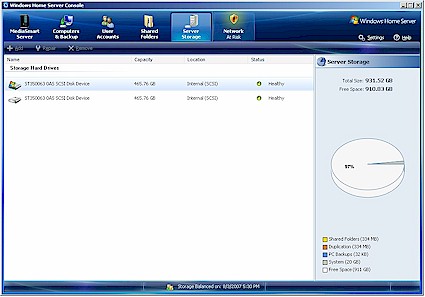
Server Storage (Figure 16) shows an overview of the drives connected to the MSS. When you connect a drive to the MSS, it initially shows as "Not Added". Selecting a drive and clicking Add launches a Wizard that formats the drive and adds it into the one, big, happy, storage pool.
Figure 16: Windows Home Server Console – Storage
Conversely, clicking Remove launches another wizard that first checks the consequences of the removal and asks for confirmation. For example, you might want to remove a smaller drive and replace it with a larger one. The Remove Wizard first tries to see if it has space on other drives to accommodate the files on the drive to be removed. If it doesn’t, it will tell you what will be deleted if you proceed with the drive removal, which you can still do.
I tried a drive removal with only about 30 GB of storage used and it completed within a few minutes. Of course, if the Wizard had a lot of file moving to do, the process could take hours to complete. Once the removal was complete, I had only a single drive system left, which changed the shield icon in the Console to the Network at Risk shown in Figure 19.
Clicking on the icon brought up multiple warnings about folders not able to be duplicated due to the lack of a second drive. But after I disabled Folder Duplication on each share, the warnings went away and the shield turned back to its green "Network Healthy" mode.
Settings
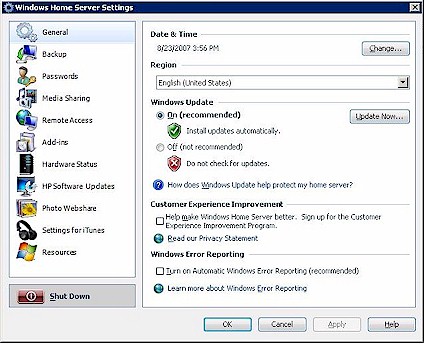
The controls for some of the MSS’ most interesting features lie behind the Console Settings link. Figure 17 shows the first, General, page and other Settings categories.
Figure 17: Console Settings – General
![]() See the slideshow for a tour of most Settings pages.
See the slideshow for a tour of most Settings pages.
Media Serving
With the general tour over, it’s time to delve more deeply into the MSS’ three key features: Media Serving, Backup and Remote Access.
Media Serving is supported through a Windows Media Connect (WMC) server for media serving to media players supporting WMC and those supporting only UPnP AV. The only configuration available for this feature is to enable / disable Media Library sharing on the Music, Photo and Video folders.
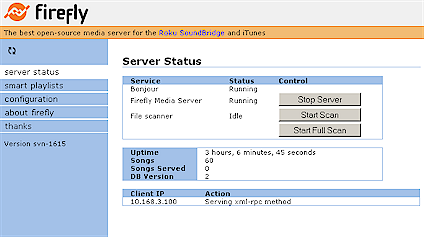
The iTunes server is actually handled by the Firefly media server, the open source media server previously known as mt-daapd that also supports the Roku SoundBridge audio player. The server runs on port 9999 and has a web interface (Figure 18) that can be reached there. You can login in as administrator with password firefly.
Normally, however, you’ll use the Settings for iTunes Settings via the Console or CC to enable / disable the server, password protect access and set the scan interval for database refresh.
Figure 18: Firefly server web admin interface
I manually copied some of my ripped CD’s to the MSS’ Music folder, launched iTunes and all of the copied music was ready for play under the HP MediaSmart Server icon that appeared in the iTunes Source pane.
I don’t normally use iTunes, so didn’t have much in the iTunes library except some Windows Media Player sample files. But I entered my computer’s username and password and set the scan time for 5 minutes and waited. After the scan time passed, the files were added to the MSS and I was able to select and play them from the iTunes MSS Source item.
Photo Websharing
In addition to music sharing, the MSS’ Photo Websharing feature is exactly as it sounds—the ability to access photos stored on the MSS via a web browser. Actually the "photo" album supports both still (.jpg,.gif,.png,.bmp) and video formats (.mpg,.avi,.mov.wmv), but I only tried out still images.
But the implementation is disappointing, especially when compared to the built-in photo sharing features on NASes like the Synology DS107 series [reviewed] and Qnap TS-209/109 Pro [reviewed].
The most glaring omission is the inability of the MSS to auto-build a web-album from images that are already stored in its Photo folders. Instead, you have to browse to a location to upload photos. If you’re running IE and agree to install an ActiveX control when prompted, you get an interface (Figure 19) that allows multiple files to be selected easily.
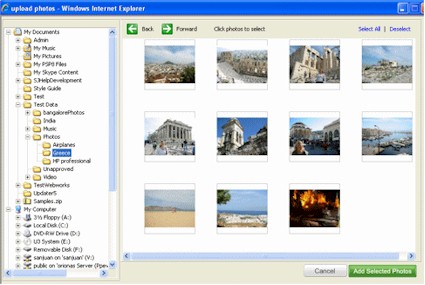
Figure 19: Uploading photos with IE
But if you’re running FireFox or another browser that blocks or doesn’t support ActiveX controls, you get the interface shown in Figure 20, which is painful to use if you have a lot of photos to upload.
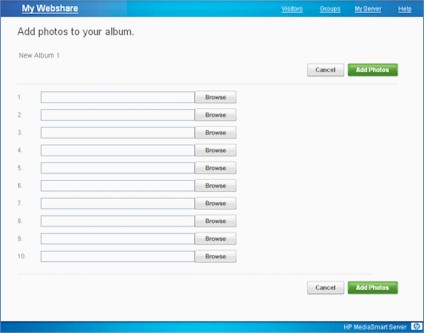
Figure 20: Uploading photos with FireFox or without ActiveX plugin
Once the files are uploaded, browsing an album is straightforward, with both "filmstrip" and forward / back navigation controls (Figure 21).
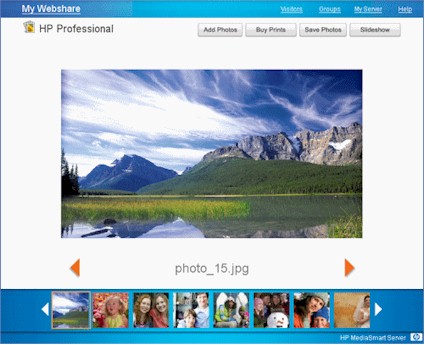
Figure 21: Browsing a photo album
There are a few other features to note:
- Add Photos – You can set permissions so that "Visitors" can add photos to albums. These can be added automatically or held for admin approval.
- Buy Prints – You can select photos to be printed and returned to you via Snapfish.
- Save Photos – Select photos to download. (Much easier than uploading!)
- Slideshow – Starts a slideshow (you can set the time between slides).
Backup
One of the reasons people purchase networked storage is for backup. NAS vendors have tried to meet this need primarily by bundling in a backup application. But installation and setup is left for the user to figure out and isn’t required to get the NAS up and running.
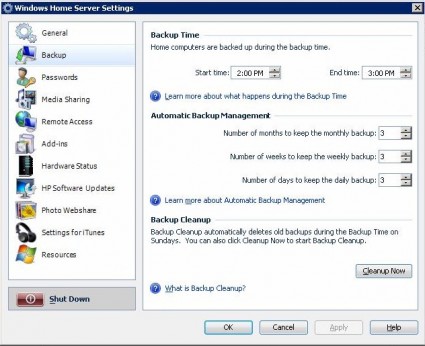
The MSS also takes the application-level approach to backup, but makes it a mandatory part of the MSS software installation process. Backup is done by a combination of a program that is part of the WHS Connector that runs on each Windows computer and a service running in the MSS. Backup configuration is done via the Backup tab in the Windows Home Server Settings (Figure 22).
Figure 22: Backup configuration
The backup process takes a different approach from most backup utilities in that it works at the filesystem cluster level. Here’s an edited excerpt from a WHS Forum post that explains:
Unlike most backup products that operate at the file level, the Windows Home Server computer backup solution works on "clusters". Clusters are the lower level constructs of the file system. They are usually 4k bytes in size on most NTFS disks.
The Windows Home Server makes sure that any particular cluster is stored only once on the server…even if that cluster is found on multiple disks and within multiple files. This is known as "single instance storage".
The first backup of each computer usually takes quite awhile, but subsequent backups go more quickly, depending on how much has changed since the last backup. Backup restores can be done on an entire drive image, or individual files or folders.
While I appreciate HP and Microsoft’s efforts to make backup a regular event, the implementation has room for improvement. My main beef is that you can schedule only a single period during which only Windows machines that are running the WHS Connector will be backed up. You can always invoke a manual backup using the "Backup Now" option in the WHS Tray application. But that’s not automatic, is it?
Since I don’t like redoing even a small amount of work if I can help it, my current NAS is set to automatically back up my work folders every four hours during the workday. This approach is certainly overkill for the MSS’ target audience of home users, but not unusual for home businesses and telecommuters. I should note that my backup is server-initiated and doesn’t require an application running on my computers—an approach I definitely prefer.
My bigger problem is the backup feature’s refusal to back up a volume that has any errors. One of my Win XP machines, which runs perfectly fine, threw the error message in Figure 23 during its backup, despite my following its advice to run chkdsk /f /r multiple times.
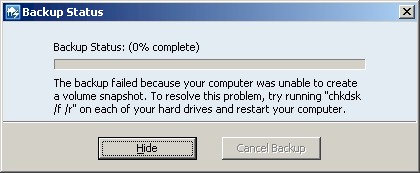
Figure 23: Backup configuration
The need for a "perfect" drive probably stems from the cluster-level backup approach. But if the problem drive is about to die (it’s still running fine, thanks), I sure as hell would like it to be backed up…perfect or not! I also found the instruction to run something from the command line to be an interesting approach for a product that is designed for non-geeks.
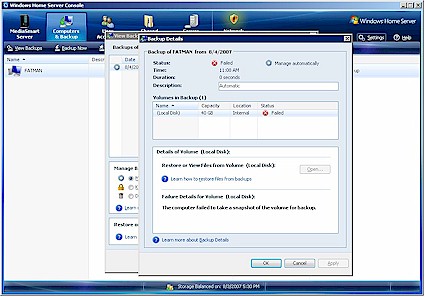
If you miss the error pop-up or want more details on how a backup went, you can access the Backup Details screen via the Console Computers & Backup tab, View Backups (Figure 24).
Figure 24: Backup details
Note that backup will not work remotely (even if you’re connected via the Remote Access feature) or if your computers are local, but on a different subnet.
Remote Access
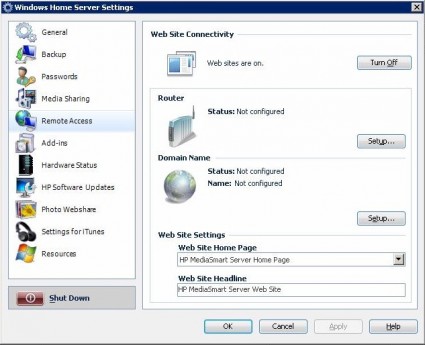
The MSS includes some Remote Access features, which allow secure access to file browsing, upload and download and accessing the Photo Sharing feature via a secure HTTPS web connection. Remote Access is disabled by default, and is enabled via the Web Site Connectivity control in the Remote Access Server settings (Figure 25).
Figure 25: Remote Access Settings
Remote Access settings include a wizard to sign up for dynamic DNS accounts from Windows Live or TZO via the Domain Name control. The wizard provides three alternatives for setting up a domain name: TZO.COM Custom Domain Name, HP Personal Domain Name by TZO.COM and Windows Live Custom Domains.
The TZO Custom Domain Name is the most flexible option, since it provides the option of using any domain name that isn’t already registered. It also allows you to automatically notify Photo Webshare visitors when new photos are available via email without having to set up an SMTP email server and ensures that you can reach your MSS even if your ISP blocks the standard HTTP port 80. This option costs $24.95/yr plus a one-time $14.95 domain registration fee.
The HP Personal Domain Name by TZO.COM option is free for the first year, then $9.99 per year after that. It’s more restrictive of the domain names that you can register, limiting them to subdomains of hphomeserver.com or hpshare.net—MyFamily.hphomeserver.com, for example.
There isn’t much information available about the Windows Live Personalized Domain Name option, other than it exists.
Since running any Internet-accessible server behind your router requires opening ports, the MSS tries to make that easy for folks who have never ventured into their router’s admin screens. Clicking the Router button will attempt to open the ports required for remote access (TCP 443, 4125) in your router’s firewall via UPnP. But of course, that requires a router that supports UPnP and has it enabled.
Many routers now support UPnP, but some ship with it disabled by default (which I still think is a good thing). So clicking the Router button might not do the trick. In fact, this Computerworld article says that the need to tweak the automatic Router setup feature was one of the reasons for HP’s delay of MSS shipments. So if clicking the Router button doesn’t work for your router, you’ll need to get into its settings anyway.
Performance
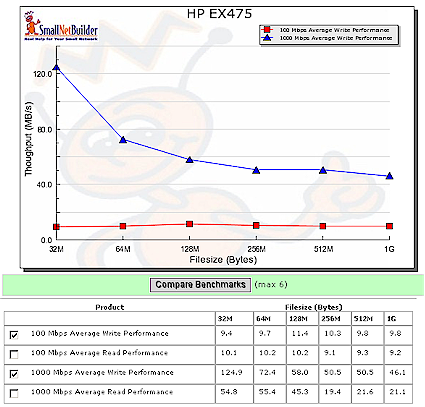
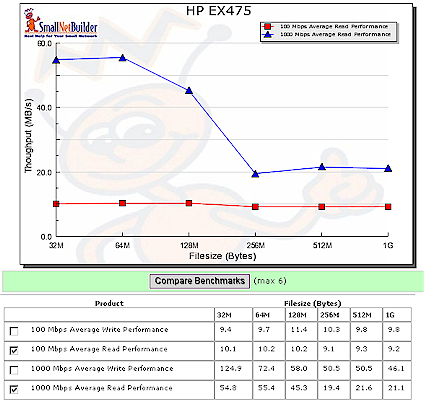
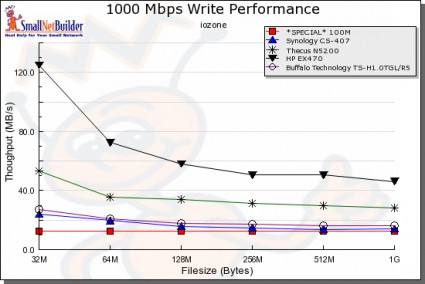
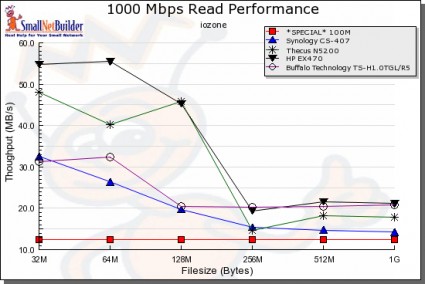
I ran the MSS through our standard testing procedure and found the MSS’ performance to be quite good. Figures 26 and 27 are composite read and write throughput vs. filesize plots for the two benchmark tests we ran. These were generated using the NAS Chart Compare Benchmarks feature. Remember that the MSS doesn’t support RAID and it doesn’t support jumbo frames. So the only benchmarks ran were with 100 and 1000 Mbps LAN connections.
Figure 26: Write performance comparison
The plots show that you definitely want to run the MSS with a gigabit connection since a 100 Mbps LAN will significantly limit its performance. The MSS has the typical drop in performance with increasing filesize seen with most NASes
Figure 27: Read performance comparison
Fans of small filesizes will find that the MSS ranks at the top of the NAS Charts for all four benchmarks run. The MSS’ 512MB of memory certainly contributes to this, but there are probably other optimizations at work in the WHS OS, too.
I also used the NAS Charts to compare a few four drive NASes from the top of the 1000 Mbps charts: the Synology CS407, Thecus N5200 and Buffalo Terastation Pro II. Figure 28 shows that the MSS dominates the group in write performance, with the Thecus N5200 coming in second. Even though it’s about a year old now, the N5200’s performance continues to hold up well against newer designs.
Figure 28: Write performance competitive comparison – 1000 Mbps LAN
The MSS’ read performance isn’t as clearly superior. It’s the best for 32, 64 and 128 MB filesizes, but runs neck-and-neck with the Buffalo TeraStation Pro II for larger filesizes.
Figure 29: Read performance competitive comparison – 1000 Mbps LAN
You can also generate your own charts to look at other modes and compare products.
Closing Thoughts
Maybe its just me, but I don’t feel that the MSS is the breakthrough product that Microsoft and HP would have us believe. In fact, it pales in comparison with other "server" NASes from much smaller companies such as Qnap and Synology, which have tiny development budgets compared to HP and Microsoft.
The biggest and most curious omission is the lack of a print server. This is especially puzzling given HP’s desire to dominate the consumer printing market. Although producing a print server that supports printing from multiple OSes and even just a handful of printers is a daunting task, I would have expected at least a token effort from HP.
Here is the perfect opportunity to support only HP printers and even upsell (or bundle in) select HP printers with the MSS, and HP is taking a pass. Hell, they could even get away with supporting Windows printing only, given the Windows-centric design of the MSS. This omission leaves me scratching my head.
You would also think that the MSS would provide support for Flash drives other than using them for BIOS recovery. How about being able to plug in a flash drive and have it automatically backed up, or even a (HP) camera?
Or how about support for automatic downloading, like the built-in Torrent, FTP and HTTP clients that are found in an increasing number of NASes? Yeah, the whole file downloading thing still has the faint stench of illegality wafting around it. But I’m sure that between HP and Microsoft, they could find some partners willing to throw in to promote their media download services.
The MSS even misses the boat for little things, like idle disk spin down and programmable shut down and start up. And if I can dim those lovely front-panel light bars, why can’t I get them to blink to indicate disk activity?
My last beef is that the MSS ignores the whole issue of server backup. Sure, all those clients may be safely backed up to the MSS. But what happens when the MSS power supply dies or the MSS gets killed by fire, flood or theft?
If you’re really going to pitch Mom and Pop on data security, why don’t you offer them the assurance of some sort of automatic offsite backup service. Or even just provide the ability for automatic MSS to MSS backup? Unfortunately, HP’s only answer to this is in its MSS FAQ, which suggests selective manual file backups to an external drive and offers that the WHS Folder Duplication is a form of "internal backup".
Maybe some of these holes will be plugged by WHS Add-Ins that Microsoft is trying to promote the development of. But the first three resulting from Microsoft’s Code2Fame challenge don’t address the issues above and it will take time for more to appear.
Pricing is a mixed bag. Street pricing looks like it will be around $750 for the 1TB EX475 and $600 for the 500 GB EX470. You can get a Terabyte two-drive NAS for under $300, while four-drive RAID 5 capable products start around $600. On the other hand, Netgear is currently trying to get almost $1000 for its four drive ReadyNAS NV+ with two 500 GB drives—the same configuration as the EX475.
I have to believe there is a premium for the Windows Home Server OS in the MSS’ price somewhere, but it doesn’t seem too obvious. If you’re on a budget, the 500GB EX470 is probably a better deal, since you can pick up a 500 GB SATA 3.0Gb/s, 7200 RPM, 16MB cache drive for a little under $100. This is less than the $140 – $150 difference in current pre-order pricing.
So would I buy it? All things considered, no, I wouldn’t. While it is a nice looking product, with performance that places it near the top of our charts, its feature set falls far short of what you can get from many less-expensive products. In my case in particular, its once-a-day approach to backup doesn’t meet my needs and I’m definitely not a fan of all the crap stuff I have to install on my system to even administrate the little beastie.
Of course, if you’re a WHS fanboy—and judging from the links in the official Windows Home Server Blog and posts in the WHS Forum, you’re out there—your wait for HP’s pretty box and an early Christmas is almost over. As for me, I’ll wait for Santa.

