Introduction
| At a Glance | |
|---|---|
| Product | Iomega StorCenter Network Hard Drive – 1TB (33872) |
| Summary | Dual-Drive NAS with RAID 0, 1 Support and Gigabit Ethernet |
| Pros | • Inexpensive • RAID 0, 1 Support • Gigabit Ethernet Support |
| Cons |
• Destructive RAID 1 Recovery • No Logging or Alerts |
Earlier this year, I checked out a Network Attached Storage (NAS) device from Iomega that was designed for small-business use. I found the StorCenter Pro 150d
to be a full-featured device with
RAID
5 support and hot-swappable drives. The 150 was primarily geared toward small-business or power-users, but now Iomega has come out with a NAS device more targeted toward home users.
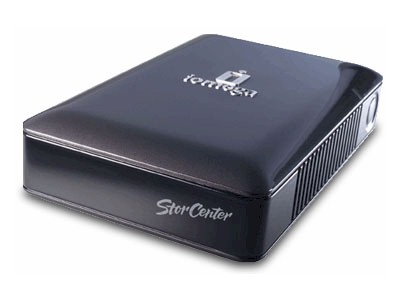
In this review I’ll try out Iomega’s one-terabyte StorCenter, a dual-drive, gigabit-capable NAS device that supports RAID level 1. This model has fewer features than the NAS devices in Iomega’s “Pro” line, but on the plus side, it offers basic NAS functionality and can be picked up for under $400 for a Terabyte of storage!
It’s also available in a 500 GB model with street pricing as low as $240.
Setup
The StorCenter is a bit of a departure in size from other Iomega NAS models. It’s more comparable in size to a child’s shoe-box as opposed to the “cinder-block” size of Iomega’s Pro line.
Like most consumer NAS devices, setting up the StorCenter was as simple as plugging it into the network and turning it on. When the unit powered up, I subjectively judged the noise level to be in the “medium” range. I wouldn’t want to place it in a quiet room, but it wouldn’t sound out of place in a room with other fan cooled computers. A power draw measurement showed the unit using 20–22 W when active. I tried waiting for the five minute drive power save mode that I set to kick in so that I could measure power draw in that mode. However, the drive never seemed to spin down; or, if it did, I saw only a 2W difference.
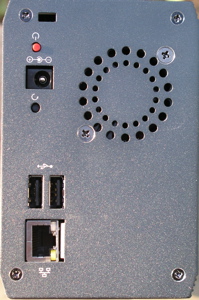
Figure 1: Back Panel
Figure 1 shows the back of the StorCenter. You can see a fan vent, a power button, a gigabit Ethernet connection, and two USB 2.0 ports that can be used for storage expansion or for sharing a printer on the network.
Iomega advertises installation support for Windows, Apple, and Linux computers, so I plugged the included CD into my preferred system, a MacBook Pro laptop. Figure 2 shows the installation software as it’s searching for the StorCenter on my network.
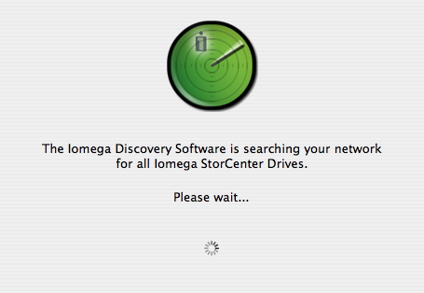
Figure 2: Software installation
Once the device is located, the installation software will let you mount a default “public” share, or it will spawn off your browser for more configuration. If all you need is the public share, you’ll be online in five minutes or less.
Setup – more
For more advanced users, your web browser can be used to set up all parameters. Note that for logging into the configuration web page, only HTTP connections are supported, not the more secure HTTPS connections. Figure 3 shows the view from my web browser once I had logged into the StorCenter configuration web page.
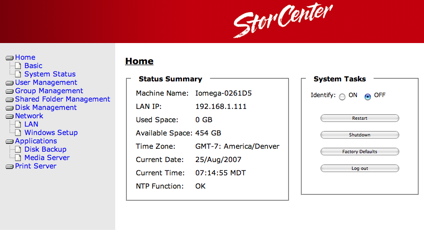
Figure 3: Web configuration page
This initial screen gives basic status such as space used, date, IP address, etc. The identify button causes an LED to blink on the front panel, so you know which unit you’re logged into—in case you happen to have multiple units on your LAN. To make changes to the configuration, I started exploring the menu options. Figure 4 shows the “Basic” configuration screen where several options can be set.
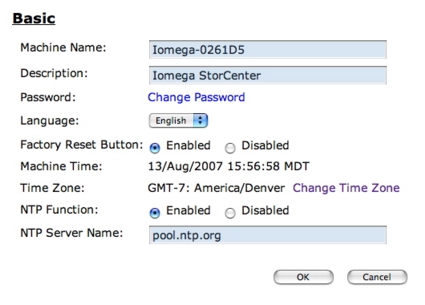
Figure 4: Basic configuration
I was pleased to see an option to specify the NTP
server used for setting time on the StorCenter. When I reviewed the 150d, I found that one could use NTP, but there was no way to specify which server to use.
The “System Status” option from the top-level page was little more than a re-hash of the same info found in the initial “home” page, with the exception of an option to allow updating of the StorCenter firmware. I was also pleased to see this update option. With the 150d, the only way to update the firmware was by running a Windows executable—a definite downside to Apple and Linux users like me.
For controlling access to the StorCenter, individual users and user groups can be defined. Figure 5 shows the user creation page, where users can be created and assigned specific share privileges.
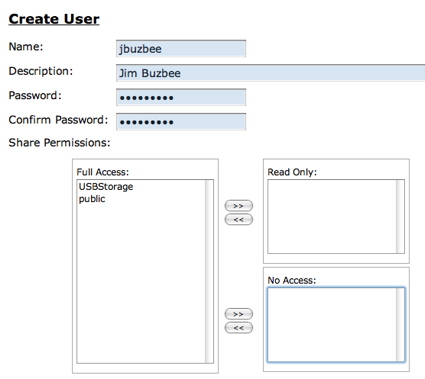
Figure 5: User creation
If you need the ability to manage a lot of users, you can also create groups, and then assign group privileges to the various shares. Figure 6 shows the group creation screen.
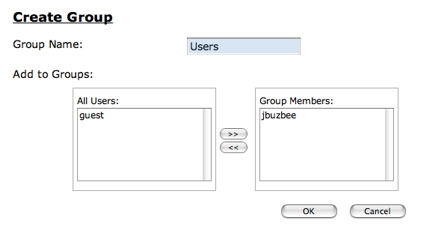
Figure 6: Group Creation
Many users will want to create more than the pre-defined public network share. Figure 7 shows the share creation screen.
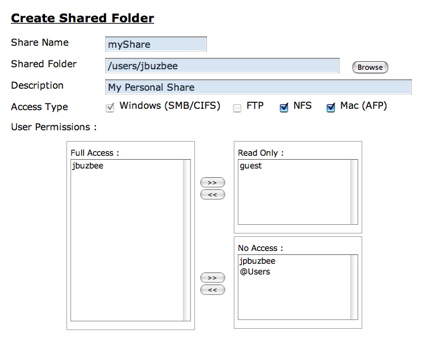
Figure 7: Network share creation
Note the support for a number of different file-sharing protocols in this screen; however, the default Windows protocol can’t be turned off, and the FTP support is only available on one share at a time. For Linux and Apple users, the share can be exported via NFS and AFP, which is nice to see. When NFS is selected, an additional screen appears that allows NFS-specific parameters to be set. From my Mac, I was able to mount shares using all of the above protocols.
RAID Capabilities
As mentioned earlier, the StorCenter has RAID support on the internal drives. Figure 8 shows the disk-format screen where the RAID level can be specified.
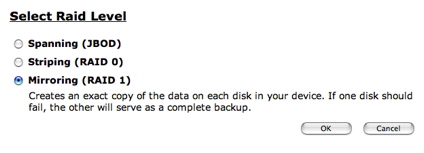
Figure 8: RAID Setup
In spanning mode, the two internal drives are treated as one big drive. In striping mode, access to the drives is split, giving increased performance but no fault tolerance. In Mirroring mode, each drive is a copy of the other, giving increased security in case of disk failure and increased read performance, with the downside being your total storage space is halved.
To test the capability to recover from a disk failure, I shut the system down, opened up the case, unplugged the SATA cable from one drive, and powered it back up.
When the system powered back up, the documentation indicated that I should see alternating red and blue LEDs on the front panel to indicate a disk failure, but instead there was no indication that anything was wrong. I could still access my shares and use them normally. The capacity of the drive was as before.
Only when I dug a bit deeper and displayed the “Disk Management” display did I notice an inconspicuous status showing that now the unit was in “Spanning” mode instead of “Mirroring” mode. This was the only indication that one of the drives was missing (Figure 9).
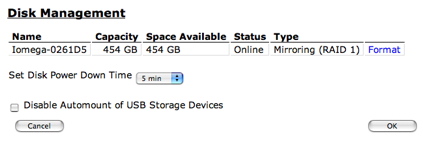
Figure 9: Disk Management
If you weren’t specifically looking for an issue, you’d never know that a drive had died. This is where a good logging and alerting subsystem would be beneficial, but unfortunately the StorCenter has neither logs or alerts.
To check out the recovery capability of the drive, I shut it back down, reconnected the second drive, and powered back up. As before, there was no obvious indication that anything had changed. The “Disk Management” screen looked the same as before, except now the status read “offline” (Figure 10).
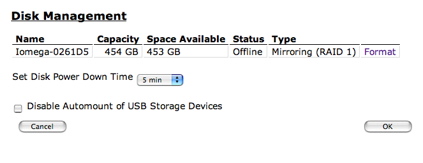
Figure 10: RAID Offline
I thought there would be a “repair” option, but the only option available was a destructive “format.” So I guess if you need to recover, it will be up to you to back up your data before reconstructing the RAID mirror.
When I selected the format option, I was warned that it was a destructive operation, but I went ahead. While the format was occurring, a red LED blinked on the front of the StorCenter, and the Disk Management screen showed a percentage complete message. The whole operation took around two-and-a-half hours, which made me think that maybe it really was re-mirroring my data; however, when it completed, everything I had stored was deleted. In addition, all my user accounts, groups, and shares were gone.
As far as other options available under the “Disk Management” menu (Figure 10), you can see the ability to set a spin-down time for drives, which is nice for people like me who have systems that are idle most of the time. Unfortunately, as mentioned earlier, this mode either doesn’t work or doesn’t save much power.
You can also see an option that allows USB drives to be mounted automatically when plugged in. Iomega advertises support for drives formatted in FAT, FAT32, and NTFS in a read-only mode.
Network Setup
Under network setup there are the various options you’d expect, such as DHCP vs. manual setup, workgroup name or domain name, etc. And since this is a gigabit-
capable unit, you can also turn on jumbo-frame support (Figure 11).
Note that only a 9K jumbo frame size is available, instead of the selectable sizes available in other products.
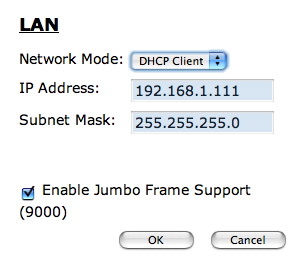
Figure 11: LAN setup
Network Setup – more
Under the applications menu, the StorCenter has options for a couple of different backup methods. You can schedule backups of your internal drives to a USB drive, or you can back up to another SMB network share (Figure 12).
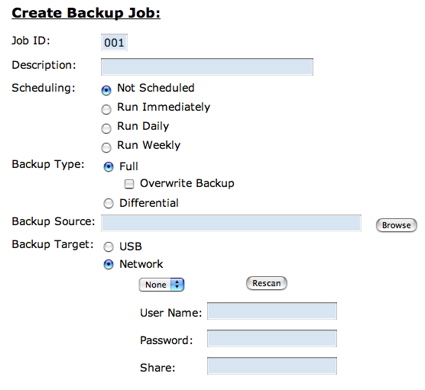
Figure 12: Backup options
Note also that Iomega includes both Windows and Apple backup software to back up your data to the StorCenter. Linux users are on their own.
The other option under Applications is a UPnP Audio/Video server, so if you have a UPnP A/V player on your network, the StorCenter can server up content to it. The final configuration menu allows users to configure the StorCenter as a network print server.
After working my way through all the menus, I found the feature set fairly complete for a consumer-class NAS device. The one main omission was any type of logging and/or alert mechanism. When a disk fails, or fills up, I’d like to get an alert, but as it stands now, you have to actively monitor the StorCenter.
Performance
To get a feel for performance of the StorCenter, we ran the unit through our standard testing procedure. You can generate your own plots
comparing various modes and features with other units, but I ran a few myself to give some basic numbers and to compare the StorCenter against other comparable units that I’ve tested.
NOTES:
- Firmware version tested was v20.20
- Keep in mind that the maximum raw data rate for 100Mbps Ethernet is 12500 KBytes/sec (12.5 MBytes/sec) and 125000 KBytes/sec (125 MBytes/sec) for gigabit
- Full test setup and methodology are described here.
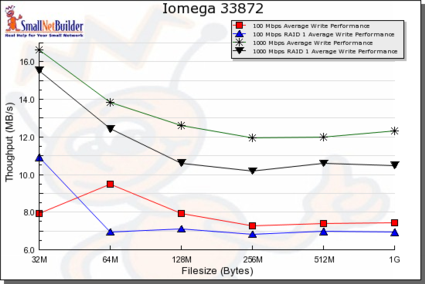
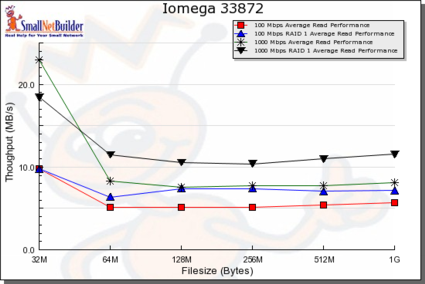
Figures 13 and 14 are composite write and read throughput vs. filesize plots for all the benchmark tests we ran. These were generated using the NAS Chart Compare Benchmarks feature.
Figure 13: Comparison of all write benchmarks
Comparative performance is as expected, ranging from fastest for gigabit JBOD to slowest for 100 Mbps RAID 1.
Figure 14: Comparison of all read benchmarks
Performance – more
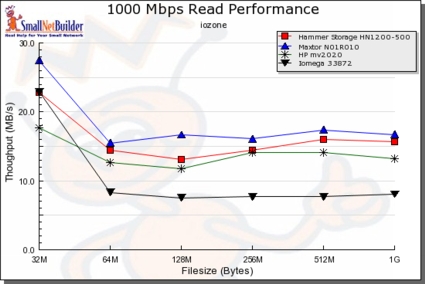
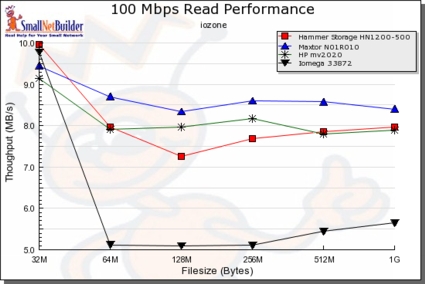
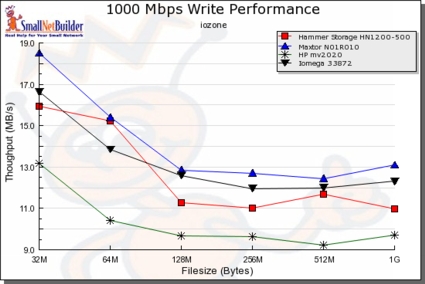
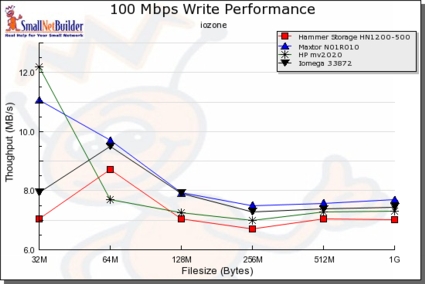
Figures 15 through 18 compare the Iomega with other dual-drive products supporting gigabit LAN connections, including the Hammer myshare, Maxtor Shared Storage II and HP Media Vault.
In the figures below, you can see that in general, the StorCenter seems to lag behind the others in read speed while it’s generally in the middle of the pack for writing. Specifically note the comparative 100 Mbps read test in Figure 16 where the StorCenter falls well short of the others.
Figure 15: Comparative 1000 Mbps Read Performance
Figure 16: Comparative 100 Mbps Read Performance
Figure 17: Comparative 1000 Mbps Write Performance
Figure 18: Comparative 100 Mbps Write Performance
To do a bit of a real-world testing, I did a drag-and-drop test, moving files back and forth to the StorCenter with the unit in Mirror mode. For this test, I used my MacBook Pro, 2 GHz Intel Core Duo with 1.5 GB of RAM running Windows XP SP2 natively. The directory tree I copied contained 4,100 files, using just over a gigabyte. As you can see in the table below, there was little difference in write speed vs. read speed, which is a bit unusual.
| 1000 Mbps LAN | 100 Mbs LAN | |
|---|---|---|
| Write to StorCenter | ~ 178 sec (5.75 MB/s) | ~ 227 sec (4.5 MB/s) |
| Read from StorCenter | ~ 184 sec (5.56 MB/s) | ~ 227 sec (4.5 MB/s) |
Table 1: StorCenter Windows XP Drag-and-Drop Filecopy times
Under the Covers
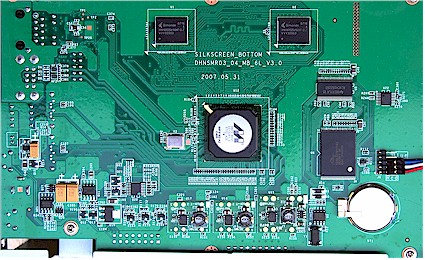
Figure 19 shows the main board of the StorCenter.
Figure 19: StorCenter main board
There’s not a whole lot to see, because most of the functionality is embedded in an "Orion" Media Processor SoCfrom Marvell
that has little documentation available on the web. To find out more, we’ll have to get to the StorCenter’s command shell.
Software-wise, this unit, like most NAS devices, runs Linux internally. Iomega provides GPL source code for the StorCenter on the included CD, but to really find out what’s going on in the unit, I wanted to get more information.
My first attempt to get some visibility was an attempt to share the operating system directory instead of just a data partition. The normal approach I take for this “hack” is to bypass the validity checks in the share creation screen to specify a top-level directory. I started down the path of using a cgi argument-modifying HTTP proxy, but I quickly noticed that there was no validation going on. In the “Create Shared folder” screen shown back in Figure 7, there was nothing to keep me from specifying that the top-level directory “/” should be shared. Very unusual.
Once I had the root level directory shared, I could mount it using the NFS protocol and see most everything in the StorCenter’s operating system, including an unused telnet daemon. When I looked around to see if I could take it a step further, I noticed that the permissions on some of the critical directories and files were wide-open. This included both the “/etc” directory and the “/etc/passwd” file. Oops.
Using this vulnerability, I was able to first create a telnet daemon startup script in the /etc directory and then edit the password file to create a root-level user. After I made these changes, I rebooted the StorCenter, fired up a telnet client, and was greeted with the display shown in Figure 20.
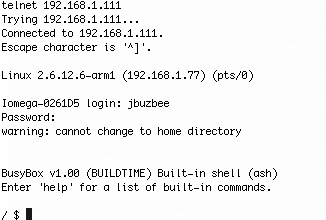
Figure 20: Logging into the StorCenter
Bingo! I’m in as a root-level user. I usually have to work a lot harder than this to get a command line. Anyway, this screen tells us a few things. The StorCenter is using a Linux 2.6.12 kernel, and is using busybox
for utilities. Looking around a bit more revealed other common utilities such as
Samba
for Windows file sharing, and
boa
for a web server. The UpnP/AV support is courtesy of Mediatomb.
The CPU embedded in the Marvell SOC is identified as an
Arm 926ej
, which Iomega advertises as running at 400 MHz. The Ethernet is via Marvell. Memory-wise, the StorCenter has 64 MB of RAM.
Note that to take advantage of the vulnerabilities that let met get a command shell, I had to have admin login privileges for the configuration console. However, since the StorCenter ships without an administrator password at all, and since secure HTTPS connections are not available, there is still some level of risk that a user on your local LAN could take advantage of the unit.
Conclusion
I found the StorCenter to be a decent little unit, but there wasn’t a whole lot to make it stand out from the pack of comparable NAS devices. It was nice to see support for Windows, Apple, and Linux systems, and I appreciated the inclusion of backup software, but I was a bit disappointed in the way it handled and “recovered” from a mirrored disk failure. I also would like to have seen some sort of status logs and alerts for notification of problems.
As for speed, there seemed to be some issue with read performance—at least in comparison to the units I tested against.
The one thing the StorCenter does have going for it is price. You can pick up a one terabyte StorCenter at Iomega’s online store for $389, which I find pretty cheap. However, if Iomega wants to really make the StorCenter stand out, they have a bit of work to do.

