Introduction

| At a Glance | |
|---|---|
| Product | NETGEAR ReadyNAS OS 6.2 [website] |
| Summary | Upgraded NAS OS focusing on cloud and backup/sync features |
| • Web-based UI with Drag N Drop • Share files via e-mail links • Multiple private Time Machine targets • Easy remote access based on Leaf Network’s VPN • ReadyCLOUD desktop app for Windows provides backup and sync |
|
| Cons | • iOS and Android apps provide only basic media capabilities • No Mac OS desktop app (yet) • User manual for OS 6.2 still not available for download. |
It’s been almost a year and a half since we last looked at the features of NETGEAR’s ReadyNAS OS 6.0 operating system. On November 17th of this year, NETGEAR rolled out the latest release, version 6.2. While the latest version is only a “point” upgrade, there are many new features that merit a refresh of our original review.
First of all, it’s important to note that this upgrade is mandatory if you are a ReadyCLOUD user. When you log into ReadyCLOUD, you are intercepted by a page that prompts you to upgrade your ReadyNAS OS. You can upgrade using the “Upgrade Now” button, or through the local web admin interface.

NETGEAR OS 6.2 is a mandatory upgrade for ReadyCLOUD users
Many of the new features of OS 6.2 are focused on ReadyCLOUD portal features, such as private cloud, mobile photo backup and synchronization. But even if you don’t use ReadyCLOUD, there are still some under-the-hood features that make OS 6.2 an important and worthwhile upgrade. In addition, this release includes updated mobile apps for iOS and Android that are available at their respective app stores.
Finally, there’s a new ReadyCLOUD desktop app for Windows. The new app combines the features previously found in ReadyNAS Remote and ReadyDROP and adds new backup and synchronization features. Several important notes:
- With this release, NETGEAR officially dropped support for Windows XP
- While there’s currently not a Mac OS desktop version available, NETGEAR plans to release one in early 2015.
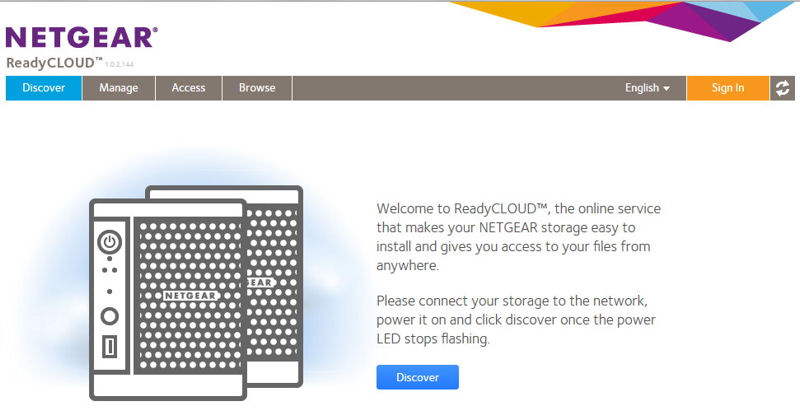
Once you upgrade, the landing page will look much like the original ReadyCLOUD page. For new NAS owners, you can discover and set up your NAS just as you did using the earlier OS 6.x versions. In the image below, I left in the browser address line and tab to show you that I’m using Chrome. While I normally use Firefox, Chrome seems to work better with some features of ReadyCLOUD as we’ll discuss shortly.

NETGEAR ReadyCLOUD landing page
New Features
Once you log into your ReadyCLOUD account, you’ll be on your home page and see public shares and shares you have the right to access. The image below shows the home page. Below the Home icon, there are icons that allow you to see a tree view of folders, add folders, upload and download to/from folders and delete files. Above the folder icons, you have options to view in Grid, Icon or Tile view.

NETGEAR ReadyCLOUD Home page
One of the new features in the web UI is Drag and Drop. You can drag and drop files and folders just as you would normally with Windows Explorer or Mac OS finder. If you are using ReadyCLOUD on your local network, your file transfers will be at LAN Speed. If you are accessing your ReadyNAS remotely, the file transfer speed will be dependent on the speed of your internet connection.
In my initial drag-and-drop tests, I used Firefox. While file transfers worked fine, I discovered that I couldn’t drag and drop folders. I contacted NETGEAR and they recommended I try the same tests with Chrome. They explained that their web UI is dependent on HTML 5, and that Chrome more closely adheres to HTML 5 standards. The folder drag-and-drop worked as expected using Chrome.
When you click on an individual file, you have all the options shown in the image below. Depending on your browser and extensions/plugins, you can also select multiple files to include in your email. While I had problems selecting multiple files using Chrome, I was able to select and email links to multiple files using Firefox. If you right click on a folder, your options are limited to Browse, Rename, Cut, Copy and Delete.

NETGEAR ReadyCLOUD file options
One of the new features is email as a link. When you click on the E-Mail as Link icon, the dialog box shown below opens up. You can change the message, require a password and make the link expire after a specified number of downloads. The “Expires After” is a dropdown box the lets you specify an expiration date instead of number of downloads. Should you require a password, a complex one is generated for you, which you can provide to the recipients “out of band” (such as a text message) since the password isn’t included with the email. You can also choose to be notified when your recipient(s) click on the link. You can delete any of your shared links from the “Manage” tab you’ll find near the top of the Home screen.

Dialogue box for sharing a file via an e-mail link
I selected an individual file and sent it to one of my email addresses, as a test. I could access the linked file either from my local network or using a public Wi-Fi hotspot. The email containing the link is sent in HTML format, and, in Outlook 2013, looks like this:

Email received from link sent via ReadyCLOUD
ReadyCLOUD Backup
Backup and Sync are two major features added in ReadyNAS OS6.2. These features are available in the Windows ReadyCLOUD desktop app mentioned above. You can download and install the app directly from the “Get the ReadyCLOUD app” icon at the bottom of the ReadyCLOUD home page shown below.

NETGEAR ReadyCLOUD – Get desktop app
When you install the desktop app, it also installs the Leaf Network virtual network adapter, which provides remote access. This isn’t new; it was part of the previous ReadyNAS Remote and the ReadyDROP applications. If you take your notebook on the road with ReadyCLOUD installed, you can access all of your shares from anywhere with Windows Explorer. The ReadyCLOUD client needs to be running and you need to be logged into ReadyCLOUD within the application.
The application sits in your system tray, so don’t look for it to appear on your desktop. When you click on the NETGEAR icon in your system tray and log in, you’ll see the all of the shares to which the admin has granted you rights. It looks like this. (My user ID is grayed out for security).

ReadyCLOUD desktop app share listing
If you click on “Backup PC Folder”, a box will appear that lists the folders in your Windows client directory – ie, c:\Users\username. It was a design decision on NETGEAR’s part to limit the backup function to folders found in client’s directory. On my computer, it looked like this:

ReadyCLOUD PC Backup
I had created a directory named Test Documents and put some files in it. For backup, it’s important to note that the backup is one-way—you back up the file only from your PC to the ReadyNAS. After the initial backup, any files that you put into folder defined for backup will be immediately be backed up to the NAS. However, files deleted from the local backup folder will not be deleted from the NAS.
For each folder on your PC that you back up, the ReadyCLOUD app creates a new share off of the root of the ReadyNAS data volume named using the following format: ComputerName-Folder name. You can only grant rights to top level shares, not folders within a share. NETGEAR believes creating shares off the root provides maximum flexibility to further share those folders with others – either locally or via email links. The image below shows that the backup of Test Documents has completed and that the backup for a second folder that I had selected is in progress.

ReadyCLOUD PC Backup – one up to date and one in progress
ReadyCLOUD Sync
ReadyCLOUD Sync is very similar to backup. The difference is that you select one of your shares ( excluding backup shares), click on the little horizontal bars on the right and select Sync Files. The ReadyCLOUD app creates a new folder on your computer at c:\user\username\readycloud\sharename and copies the files from the share to your computer. In addition, a favorite with the share name and (NAS Name) is created in your list of Favorites to provide quick access to your synced folders.
Sync differs from backup in that the synchronization is two way. Since you can share network shares with virtually anyone, you can easily set up group collaboration.
For this test, I created a share named “NETGEAR” and populated it with some vacation photos. I shared the synchronized share (NETGEAR) with several people in marketing and development at NETGEAR. It was up to them if they wanted to set up synchronization on their end. As soon as I dropped a file into the synchronized folder on my computer, it was synched to my ReadyNAS and the people at NETGEAR had instant access to it. They also dropped some files onto the share (I granted them read/write rights), so I was able to see some of their photos, too.
The composite image below shows starting a PC sync with the share named “NETGEAR" (left panel), the favorite link created (center panel), and finally, that all files are up-to-date (right panel). Folders with arrows pointing the opposite direction are sync folders; folders with a counter-clockwise circular arrow are backup folders.

ReadyCLOUD PC Sync
Mobile Apps
While there are updated mobile apps for iOS and the Android platforms, there’s really only one “killer” feature. On both platforms, the apps can automatically upload your photos to a location that you specify on your ReadyNAS. It works exactly the same way as Dropbox does. On the iOS platform, after you grant access to your camera roll and specify a target share/folder on your ReadyNAS, the uploads begin. Both platforms function the same way.
I was disappointed that although you could play individual video, audio or view image files, there were no advanced features such as playlists or slideshows. Photos in the directory view weren’t thumbnailed, either.The gallery below shows a walkthrough of the iOS mobile app.
Go to http://readycloud.netgear.com. When the power light quits blinking, click on discover.

If your NAS and your browser connected computer are on the same network, the device will be discoverd.

To continue online setup, select Join Now and click Next
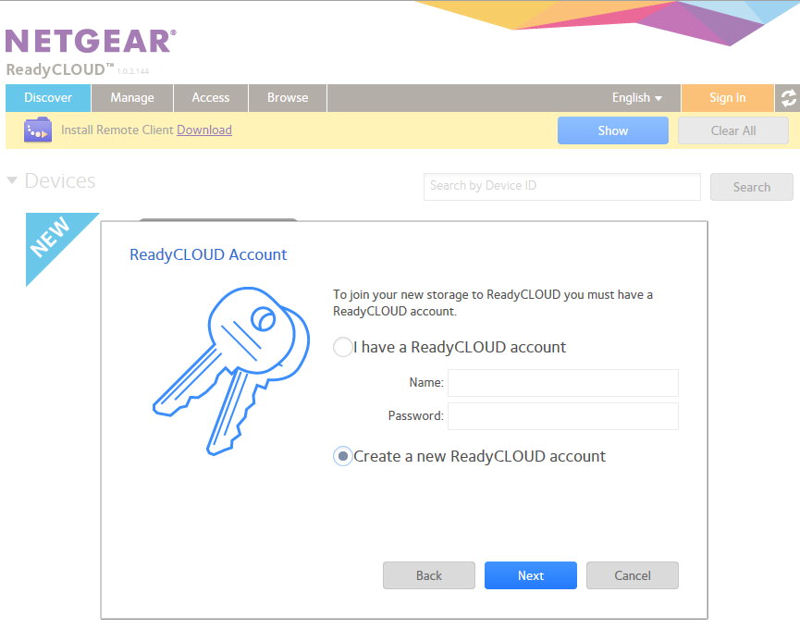
Either sign into an existing account or create a new account.
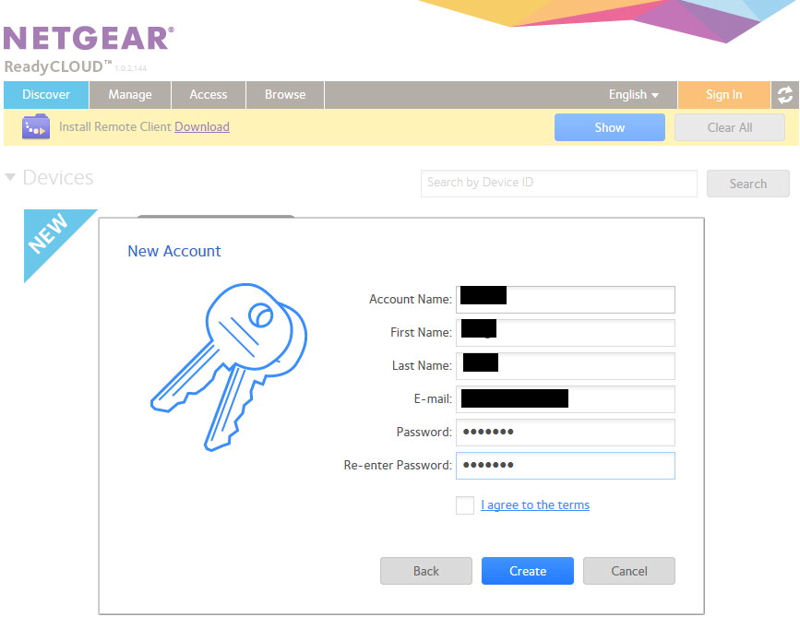
Enter in account information, agree to terms and click Create
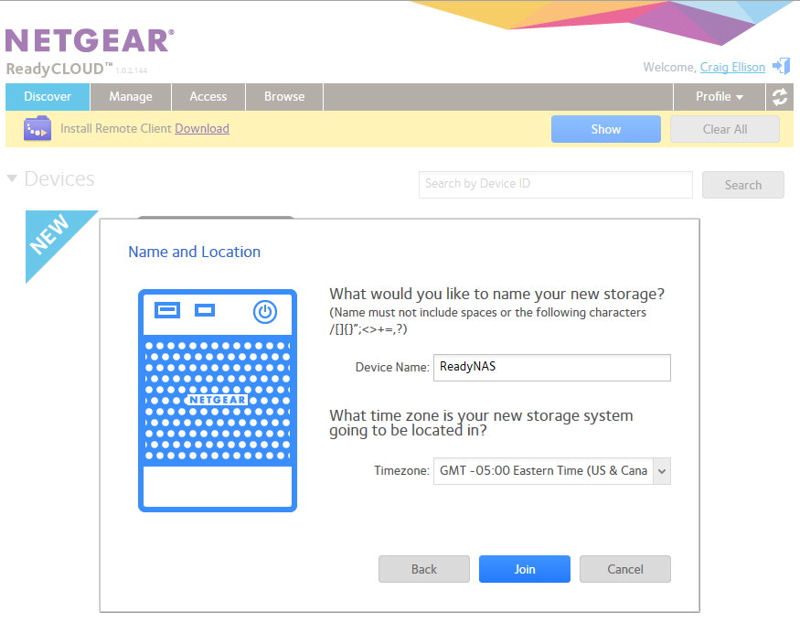
Create a device name and select your time zone.
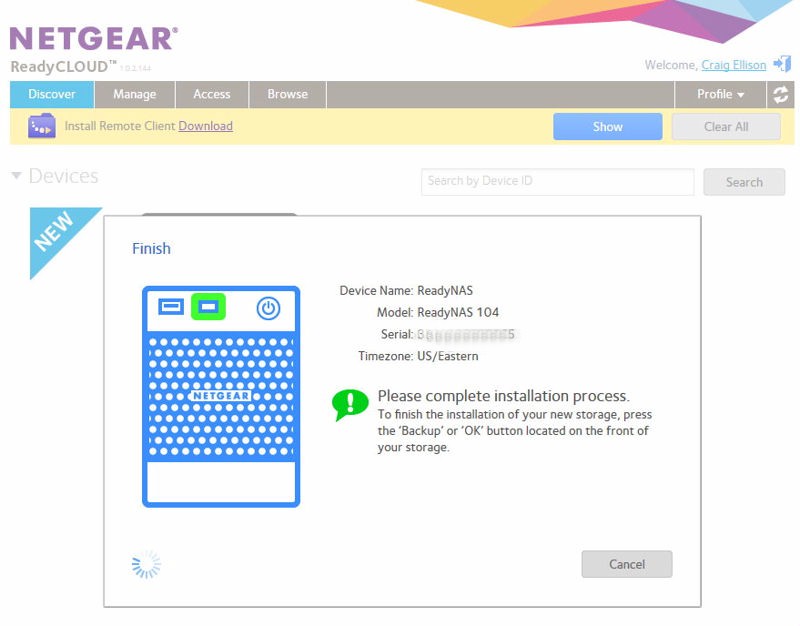
Press the backup or OK button to complete installation. This is a security measure to ensure that you have physical access to the device.
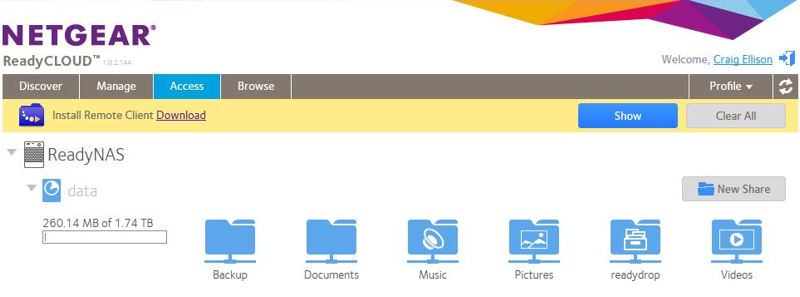
Click Access to browse public shared folders. Click on Manage to go to the management UI.
Other Updates
OS 6.2 includes a number of under-the-hood updates that I’ll touch on briefly below:
Multiple private or shared TimeMachine targets
For each user, local or remote, you have the option of creating a private Time Machine target and setting a quota. You access this new feature under the local admin Backup->Time Machine tab.

NETGEAR ReadyNAS OS 6.2 Multiple Private Time Machine setup with quotas
On your MAC, to access these private shares, you just select the appropriate share from your Time Machine preferences shown below.

Select Time Machine target from Time Machine Preferences
Disk Spin-down and Power Timer
In the System -> Power menu, you now have the option to spin down the disks or power the device on/off. In addition, you can enable Wake on LAN (WOL). The image below shows the menu for the Power Timer. On/Off increments are one hour, and you can set a schedule for each day of the week. A similar schedule grid scheme is used for configuring Disk Spin-down.

NETGEAR ReadyNAS OS6.2 Power Timer
Default User Profile
By having some of the basic user attributes set to defaults, you can save some time when creating users.

NETGEAR ReadyNAS OS6.2 User Profile Defaults
iTunes/DLNA
While the earlier versions of the ReadyNAS OS both had iTunes and DLNA servers, in OS 6.2, those services are now treated like protocols, and can be enabled or disabled for individual shares. This provides an easy way of controlling the multimedia content that is scanned by the two servers. You might not want photos/music/videos from private files to be part of a public media server.
For those of you who prefer Plex, there is a Plex app available under the App tab in the web admin interface. I tested the DLNA server, the Plex server and the iTunes server on multiple platforms, and they all worked as expected.

NETGEAR ReadyNAS OS 6.2 – iTunes and DLNA are treated like protocols
Bit Rot Protection
This is a new feature to me, but it makes sense. This feature addresses the phenomenon of storage media gradually decaying over time. On redundant RAID volumes, NETGEAR can detect and correct data corruption due to media degradation. It can be enabled on a share basis. For the short period that we have to review a product, there’s really no way to test this feature, so I have to trust NETGEAR that it works.
Private Share Snapshots
In my original review, I said I really liked the BTFRS file system that allowed for multiple data snapshots. Unfortunately, it only worked for default shares and shares that you create. Private shares, the ones that probably users care most about, were excluded from the Snapshot feature. Snapshots for private shares was on my wish list for a future version of ReadyNAS, and that wish got granted with OS 6.2. Like Bit Rot Protection, you can enable Snapshots on a per share basis, including private shares. You can also optionally grant user access to the snapshots. The image below shows my private share (cellison) with Bit Rot protection enabled, Snapshots enabled, and access granted to the Snapshots.

NETGEAR ReadyNAS OS 6.2 – Share properties
Gone and Forgotten
In the Gone and almost Forgotten category, the Genie App store was removed from ReadyNAS OS 6.2. The Genie App store required a separate login in order to download add-on apps, such as Plex, which run on the ReadyNAS and add capabilities. Apps now can be downloaded directly from Available Apps on the Apps tab.
Closing Thoughts
Even though it is a “point” upgrade from OS 6.0, ReadyNAS OS 6.2 adds a lot of features. I like the new desktop ReadyCLOUD application with its Backup and Sync features. Also, it’s a plus that NETGEAR simplified many of the “ReadyXXX” apps into a single ReadyCLOUD app. Unfortunately, Mac OS users will have to wait a while longer to enjoy the backup, sync and remote access that Windows users can enjoy now with the new ReadyCLOUD.
I was disappointed that a month after OS 6.2’s release, there’s still not a user guide available. In the meantime, NETGEAR has posted a series of videos that covers some of the new features. I strongly recommend you watch them before you waste time figuring things out for yourself.
NETGEAR focused a lot of its efforts in OS 6.2 on backup and data security. The previously mentioned backup and sync functions of the READYCLOUD Windows client is a real plus for Windows users. And the sync feature adds the potential for cloud-based collaboration with local and remote users. Bit Rot protection, along with Snapshot technology adds several layers of data protection not found in other competing NASes – especially ones targeted at the SOHO market.
The new iOS and Android mobile apps, while providing only barebones media playback capabilities, do an excellent job of backing up photos to your own personal cloud. It works just like Dropbox, but you don’t incur monthly subscription costs to back up an unlimited number of photos to your own ReadyNAS. I only wish that the mobile apps had a more robust set of features for media playback, like those found in Synology and QNAP’s mobile apps.
If you haven’t already upgraded your ReadyNAS OS6.x to OS6.2, why wait? The upgrade is stable, adds layers of data protection and improves NETGEAR’s cloud offerings. Best of all, it’s free.