
| At a glance | |
|---|---|
| Product | Hive Smart Home System () [Website] |
| Summary | Smart Home system with hub, color tunable bulbs, thermostat, plug, motion sensor, door/window sensor and Wi-Fi security camera. |
| Pros | • Simple setup • Support for Amazon Alexa, Google Assistant, and IFTTT • Motion and door sensor alerts via mobile app or email • Desktop (browser), iOS and Android support • Expandable via other Hive-branded products • Knowledgeable US-based phone and Email support |
| Cons | • Bugs in Alexa/Google Assistant integration • Thermostat is missing features found in competing products • No sunrise/sunset-based schedules |
Typical Price: $350
Introduction
If you’re thinking about turning your home into a "smart" home and are just starting out, you face a smorgasbord of products from a lot of vendors. You have to decide what you want to automate, such as lights and smart plugs, and how you can add on in the future.
If you don’t want to worry about comparability among multiple vendors’ products, one simple way to approach your purchase is to buy everything from a single vendor. That way, you know that what you’re buying will interoperate with all products of the same brand. If that sounds like a good plan, say hello to Hive from Centrica Connected Home.
According to Wikipedia, Hive was created in 2012 by British Gas, which is owned by Centrica. The first product was, naturally, a smart thermostat to control heating and hot water. Since then the Hive product line has grown and U.S. distribution started last year.
Hive simplifies your entry into home automation with four preconfigured bundles of products called “Packs“. Each Pack contains a different mix of Hive products designed to meet different needs. The most popular pack and the one featured in this review is the Welcome Home Pack. It sells for $349.99 or you can also purchase it for $14.58/month for 24 months charged to your credit card. The Welcome Home Pack contains the following products:
- Hive Hub
- 2 Hive Active Light Cool to Warm White LED bulbs
- Hive Motion Sensor
- Hive Active Plug
- Hive Window/Door Sensor
- Hive active thermostat
The Hive Starter Pack, $199.99 (or 24 payments of $8.33/month) includes the Hive Hub, 2 Hive Active Light cool to Warm White LED bulbs, one Hive Active Plug, and two Window/Door Sensors
If all that you’re interested in is a Smart Thermostat, the Hive Heating and Cooling Pack ($229.99 or 24 payments of $9.58/month) contains the Hive Hub (required) and Hive Active Thermostat.
Finally, the Hive Close to Home Pack also $349.99 (or 24 payments of $14.58/month), includes the Hive Hub, one Hive Window/Door Sensor, one Hive Active Light Cool to Warm White, and one Hive View camera. I’ll be looking at the Hive View camera separately later in the review.
You can add to your smart home by purchasing additional Hive products. Other products available, but not included in any of the packs, include a dimmable bulb, a color bulb,and the Hive Camera.
With the exception of the two models of Hive cameras, all of the other Hive products require a Hive Hub. Rather than connecting directly to your Wi-Fi network, these products connect to the Hive Hub using the ZigBee wireless protocol. The Hive Hub connects to your wired Ethernet network and bridges the ZigBee products to the Internet.
Setup
Setup is very simple. You can create an account with your web browser at the Hive website, or you can download Android or iOS mobile apps. For those of you with an Apple Watch, there is also a Watch app.
If you don’t create an account using your browser, you can create one within the Hive app on your mobile device. You are prompted for an email address and contact information. You’ll get an activation link via email that will activate your Hive account.

Hive Welcome Home Hub
The first device you set up is the Hive Hub. Just connect it to your Ethernet wired network and apply power. Using either the Hive website or mobile app, just click on Hive Hub to install it as shown in the two screenshots below. You will be prompted for the six-digit number on the bottom of the hub. Enter it, and your Hive Hub will connect to the Hive servers. Note: After the initial connection, you may be prompted to allow a firmware upgrade.

Hive Welcome Home Hub Setup
Though not included in the printed Users guide, I found a key to the LEDs in one of the online FAQs.

Hive Welcome Home LED key
Next, just start installing your devices. Hive recommends that you install them one at a time. Just click on Install devices. The hub will start searching for unconfigured devices. A ten-minute countdown timer will appear on the screen along with a list of the devices discovered so far. For the two light bulbs, power them up one at a time. For the motion sensor and window/door sensors, just remove the plastic tab to activate the battery. For the Hive plug, just plug it into a grounded power socket. The Hive Active Thermostat needs to be installed into your cooling system before you can configure it.
After discovery, you’ll have an opportunity to rename each device, or, you can skip renaming for now and rename them later. The two screenshots below show the starting of the discovery process and the completion of discovery of the five devices. All five devices were discovered in less than 10 minutes. Each device took slightly less than a minute to be discovered after powering up.

Hive Welcome Pack Device Installation
App Overview
We’ll take a brief tour through the user interface using screenshots from my Samsung S7. Here’s the Home page

Hive Main Menu – Android
For those using an iPad, your screen will look like the one below. The iOS app takes advantage of the additional screen real estate to make the user interface more approachable. Note, however, that the functions are arranged in a very similar manner to the Android app.

Hive Main Menu – iPad
My Hive Home – In the Android app, tapping on the My Hive Home displays a screen showing installed devices. On either platform, tapping on the device allows you to control it and configure schedules for active devices such as lights and plugs. The status of each device is shown and you can tap and hold an icon to re-arrange it on the screen.
Manage devices – This screen shows the status of each device, signal strength of the connection to the hub, power source and, for sensors, battery status. You can also rename each device or remove it from your list of installed devices.
Install devices – This puts your Hive Hub into discovery mode to install additional devices (light bulbs, sensors, plugs) or install a camera or thermostat.
Actions – Actions allow you to create rules to control active devices when conditions of sensors change. In the gallery below, I created an action for my Motion detector. When the motion detector, named Stairwell detects motion, then the light named Hive Light 2 will turn on and, as configured, will stay on indefinitely.
You can also change the duration to 30 seconds, 1, 3, 5, 10, or 15 minutes. Additionally, you can configure a schedule during which actions run. By default, they always run. You might, for example, only want to detect motion during non-business hours. In addition to turning on/off lights and plugs, you can also configure actions to notify you through in-app notifications or email notifications. SMS notifications are not currently supported.
Settings – This menu allows you view your account details, change your Hive password, and to create a PIN lock to protect access to the application.![]()
Help & Support – Help provides access to searchable articles for all Hive products as well as contact information for customer support. Email and 7-day phone support is provided. If you have an idea for product improvement, you can also post it using this menu.
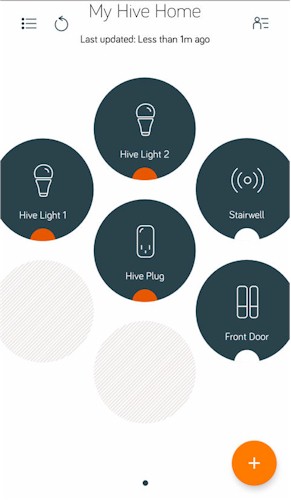
Tap on devices to control/configure. Icon shows device status
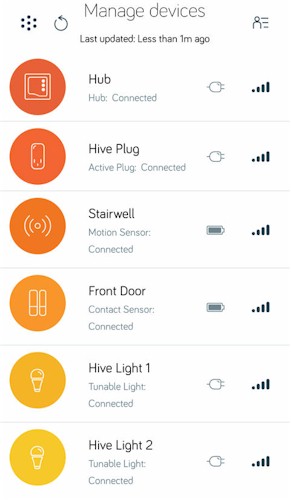
Status of devices is shown. Rename or delete devices here.
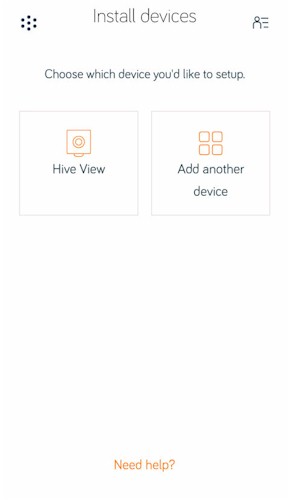
Install more device from this menu
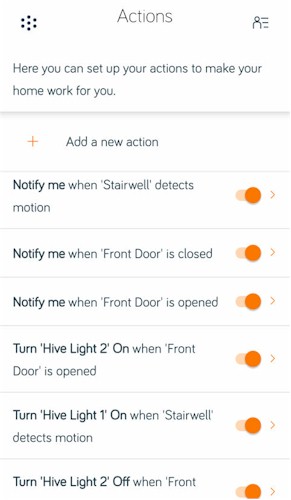
Shows currently configured Actions and enabled/disabled state.
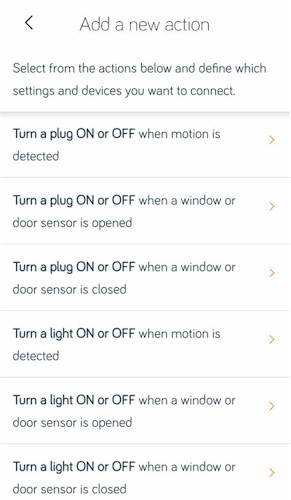
Select action type to configure

Select active device, action, duration, and optionally, schedule.
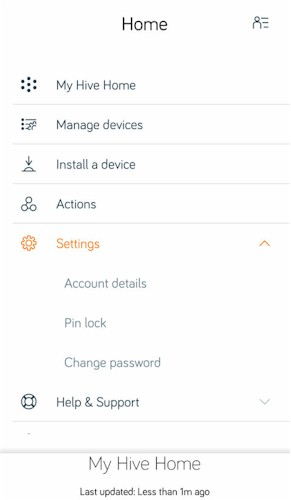
Check account details, enable Pin Lock, Change Hive password.
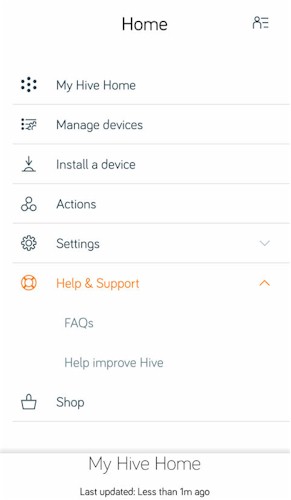
Search FAQs and submit feedback.
Let’s take a closer look at each of the products in the Pack.
Hive Active Light

Hive Active Light
The Hive Active Light has a standard US threaded screw base and is a 60W equivalent LED light. It produces 805 Lumens and has a color range from warm white (2700K) to daylight (6500K). It has an estimated life of 25,000 hours and a beam angle of 230 degrees. If you want to purchase additional bulbs, this one costs $29.99. Hive also offers a less expensive, non-tunable white light (2700K) with the same power consumption and output as the tunable white bulb for $17.99. If you want a color (16 million colors) Hive bulb, it will set you back $49.99.
For these screenshots, again, I have used the Android version of the app as the screen layout lends itself better to composite side-by-side images. If you tap on one of the light bulb icons in the My Hive Home screen, you see a screen that looks like the one on the left below. Taking a quick tour of the screen, at the top left of the screen, you’ll see a circular “re-sync” icon. tapping that will force the application to resynchronize with the Hive’s servers. (In the iOS version, you tap and pull down the screen to synchronize.) Below the “Last updated” notice there are three choices for Control, Edit Schedule, and Action. We’ll look at Schedule shortly.

Welcome Home Pack LED Light control
In the center of the screens are the controls. On the left, you can control the brightness by tapping one of the orange dots. Adjustments are only in 10 % increments. The brightness changes to correspond to the changed setting. Tapping on the center of the light bulb icon turns the light on/off. On the right, to adjust the color temperature, just drag the outer colored circle clockwise or counter-clockwise. To change controls, tap either on the Tone icon (left) to change to color control, or the Dimmer icon (right) to change back to the dimmer mode.
Both screens have a mimic mode. The mimic mode allows you to give your home a “lived in” look while you’re away. To enable the mimic mode, tap on the icon, select which bulb you want to participate in the action and set a schedule. The mimic mode will turn light on/off at various times during the mimic schedule within the set schedule. Note: If the mimic mode is enabled, you can’t manually control the lights.
At the bottom of the screen, there’s a control that shows the next scheduled action for the light bulb. If you toggle it to Manual, all schedules for the light are disabled. On the iOS version of the app, there’s a notice at the top of the screen that indicates whether the schedule for the selected bulb is active or not.
The Actions icon takes you to a screen that shows in which actions the selected device (Hive Light 1) participates. From that screen, you can add new actions, turn on/off the action and edit parameters. It’s worth noting that this feature is only available on the Android version of the Hive app. It’s missing on the current version of the iOS app. However, you can create actions on both platforms. It looks like the Android app may have been upgraded first and the iOS app will catch up.
The screenshot on the left below shows the “Edit Schedule” screen. You can select the day of the week to display the schedule for that day. The icon to the left of each schedule shows both the brightness and the color of the light during the schedule period. If you tap on the “+” icon at the bottom of the screen you have the option of creating another time slot, resetting the currently selected day’s schedule, or copying the currently selected day’s schedule to any (or all) of the other day’s schedules.

Welcome Home Pack LED Light schedule
If you tap on a scheduled time, the edit screen shown on the right appears. You can edit the brightness and tone as well as the start and end times for the schedule. Toggling the “Light Tunable” switch enables/disables the schedule. Hive might want to consider re-labeling the control.
One feature missing that I frequently use in my home with competing smart home products is scheduling based on sunset or sunrise times. It’s nice to set a schedule once, say for sunset or 15 minutes after sunset, to turn on lights and have the schedule automatically adjust throughout the year.
Motion Sensor

Hive Motion Sensor
The Hive Motion Sensor is a passive device that can’t be controlled. So there’s not a lot to the device detail page. The composite below shows the status and the most recent events. (left) If you tap Today’s log, you can view logs from the last seven days. (right) Notice on the historical logs for Monday that there is a gray bar from 3:09 pm to 3:50 pm.
I had the motion sensor in my office and apparently was moving frequently enough that the motion was registered as a single continuous event. Only one alert was sent until the next motion was detected at 3:58 pm. It would appear that it takes about 5 minutes of no motion before a new motion will trigger a new event and notification.

Welcome Home Pack Motion sensor
For testing, I set up an action that would turn on one of the Hive lights for 30 seconds when motion was detected. The green LED located just below the PIR sensor flashes briefly when motion is detected. If motion was detected before five minutes of no motion, the light would come on again for 30 seconds, but a second alert wasn’t sent.
You can purchase additional Hive Motion Sensors for $34.99 each.
Hive Plug

Hive Active Plug
The Hive Active Plug is designed for indoor use only and plugs into a conventional grounded AC outlet. It’s rated at 15 Amps. The wall plug is located directly behind the switched socket on the front, so you’ll probably want to use the top socket in your wall outlet. The wall plug is located towards the bottom of the product so that if you do use the top outlet, the Active Plug doesn’t block the bottom outlet.
Since the Hive plug is an active device, it shares many of the properties of the light bulb. On the control tab (left), tapping the orange icon toggles the plug on or off. Looking at the Edit Schedule tab (right), you’ll note the interface looks the same as the Edit Schedule interface for the Hive Light bulbs. Most of the scheduling features are the same. However, there isn’t the mimic feature found on the light bulbs for the Active Plug. That’s a feature that Hive might want to consider adding as people often plug lamps into smart plugs.

Hive Active Plug
In addition to scheduling the Active plug and having it controlled by actions triggered by sensors, you can manually turn on the plug by pushing the button. When the socket is energized, the ring surrounding the button is illuminated white.
Unlike some similarly-priced smart switches from manufacturers like TP-Link and Belkin, the Active Plug does not offer energy monitoring. Each additional Hive Active Plug costs $44.99.
Hive Window or Door Sensor

Hive Window or Door Sensor
The Window/Door Sensor is another passive device and can’t be controlled. The larger piece mounts to your door or window frame with supplied double-sided tape. The magnet mounts to your door or window frame. It’s important that you pay attention to how you mount the magnet relative to the sensor. It only works in one direction.
The red highlight in the image above shows that there is a slight difference in the finish in the plastic cases. It’s important that these two areas of shiny plastic line up or the sensor won’t work. You could also try it both ways. When the two pieces are oriented correctly and brought together or separated, the bottom green light will flash indicating a change of state.

Hive Welcome Home Pack Window or Door Sensor
The Control tab shows the current status (as of the last update) of the Window or Door sensor along with the latest log entries. If you tap Today’s log, scrollable history appears for seven days. The log file only records door open events; it doesn’t show door close events. Unlike the motion sensor, there is no delay between events. If you rapidly open and close a door or window, each individual event will be logged, and, if you have a notification action configured, you’ll get multiple notifications.
You can expand your Hive system with additional Hive Window or Door Sensors for $34.99 each.
Hive Active Thermostat

Hive Active Thermostat
I saved the Hive Active Thermostat for last as it’s the only product in the Welcome Home pack that I did not install and test. I already have a competing smart thermostat (Ecobee4) installed, and I didn’t want to disrupt my heating system while it’s cold outside.
Unlike the other smart thermostats on the market, the Hive Active Thermostat does not use Wi-Fi. Any interactions with the outside world, such as Alexa or notifications, are done through the Hive Hub. As with any smart thermostat, the installation is more complicated than your traditional consumer electronic product as it requires removal of your existing thermostat and installation of the new thermostat. However, Hive provides everything you need with the exception of a screwdriver.
All smart thermostats require a “C” wire in order to provide power. If your heating system runs on 24 VAC, but without the “C” (common, or ground return), you won’t be able to power up your thermostat. You’ll need to remove the cover from your current thermostat to determine which wires and terminals are currently connected. (It’s also a good idea to snap a photo). Hive provides a widget on the thermostat product page that will help you to determine the compatibility of the Hive Active Thermostat and your heating/cooling system. The widget also provides a support email address and a phone number if you’d like to contact a “Hive Helper”.
I contacted Hive and asked what to do if I don’t have a C wire and they strongly recommended that I contact an HVAC technician or check with a hardware store for “add-a-wire” kits. They also provided a helpful link to a FAQ with two tested C wire solutions, but no link to their respective websites.
Once you determine that you are going to install the Hive Active Thermostat, you are instructed to remove the old thermostat. (Be sure to turn off the breaker to disconnect power from your HVAC system.) If the hole in your wall is larger than the Hive thermostat, you probably won’t have to patch your wall. Hive thoughtfully included a plastic bezel.

Hive Welcome Home Pack Active Thermostat wall plate
Once you install the wall plate (if needed) you then attach the thermostat to the backplate using the screws and wall anchors provided. A convenient built-in level helps you to mount it straight.

Hive Welcome Home Pack Active Thermostat backplate
Next, feed the wires through the hold in the backplate and connect them as detailed in the Quick start guide. Finally, snap the thermostat into place and restore power to your HVAC system. You finish your installation using either the Hive mobile apps or the Hive online dashboard. Just follow the “install devices” to pair the thermostat with your Hive Hub. After paring, follow the on-screen instructions.
The callouts below show you the layout of the front panel of the thermostat.

Hive Welcome Home Pack Active Thermostat callouts
The Hive Active Thermostat supports daily schedules for heating and cooling. Though I don’t have screenshots, I’m assuming it uses the same scheduling interface as found in all of the other products that use the Hive app. You can also set a vacation schedule so that when you return home, it will be at a comfortable temperature. Of course, you can change temperatures and schedules and view the current status of your Active Thermostat using your mobile devices remotely.
The Hive Active Thermostat lacks features found in other popular smart thermostats. There aren’t any logging or tracking features to provide historical, graphical information on how your HVAC system is performing and how much money you are saving. It also lacks a motion sensor, so it can’t tell whether you’re home or away. The Ecobee4, for example, detects when you’re away from home and can automatically enter a “Smart Away” mode that temporarily resets the temperature to save you money. Similarly, the Ecobee4 supports remote temperature sensors that can help you balance heating or cooling to avoid hot or cold spots in your home.
The Active Thermostat works with Alexa, but functionality is limited to setting temperatures. The Active Thermostat is included in the Welcome Home and Heading & Cooling Packs. If you purchase one of the other Packs, you can add the Hive Active Thermostat to your system for $179.99.
Alexa/Google Assistant Integration
Hive has an Alexa skill that lets you add the Hive Active Lights, Active Plug and Active Thermostat to Alexa. Currently, there is Google Assistant support for only the Hive Lights and the Plug. I installed the Hive Alexa skill and added the Hive device to the Google Home app, and both platforms recognized the three active products that I had installed. Both platforms correctly turned on and off each of three devices individually. I put the three devices into Groups (Alexa) or Rooms (Google Home), and all responded appropriately to voice commands, as well. The lights dimmed as expected using voice commands issued to either smart speaker.
Within the Alexa app, you can control your devices to turn them on/off, adjust brightness, and adjust color. However, I ran into a small problem with Alexa integration. Normally for other products like the TP-Link tunable bulbs, after issuing a voice command to change the bulbs settings, the status shown in the application is updated to match the new settings. When changing a setting on the Hive active devices by voice command, the change was executed properly, but the status within the Alexa app wasn’t updated. Instead, the Alexa app reported there was a problem. I reported this problem to Hive Tech support.

Alexa integration problem
One other problem surfaced, but with Google Assistant integration. Within Alexa, you can change the color temperature of the bulb to one of the five presets below. Voice commands to Alexa for each of the supported presets changed the color temperature of the Hive bulbs as expected.
With Google Home, Soft White and Daylight White were not supported. In addition, the color temperatures between the two platforms differed. I issued a command to Alexa to set both of the Hive Active bulbs to Warm White and both lights changed to the same yellowish white color that you’d expect for 2700K. I then asked Google to set one of the bulbs to warm white, and the color of the light got significantly cooler.

Alexa supported presets for the Hive Active Light (Cool to Warm White)
IFTTT support
There are a handful of IFTTT applets for the Hive products: ten for the Active Lights, five the Hive Active Plug and 13 for the Hive Active Thermostat. Unfortunately, it looks like you can’t create your own IFTTT applets any more.
For the Hive Active Plug, I modified an existing applet to turn on the plug at sunset. For the Active lights, I modified an applet to turn on one of the Hive bulbs as I approach home. Here’s a partial list of my applets including one that emails the weather forecast at 8:00 am every morning. That one has been running for many years. It would be great if there were more Hive applets available that would give you more control over scheduling actions on your Hive active devices.

Hive Welcome Home IFTTT integration
Hive View

Although the new Hive View smart camera is not part of the Welcome Home Pack, Hive included a Hive View for review.
The $200 Hive View is available in the two colors shown above. The Hive View view camera is designed in the shape of a cube approximately 2 1/4″ on a side. It features a magnetic base and stands about 5.4 inches tall. An included mounting bracket adds about 0.3 inches. Power is supplied from a wall transformer rated at 5.2 VDC @ 2.5 amps. The white flat power cable is 3 meters long and plugs into the base with a micro USB connector.
One unique feature is the “Grab and Go” design. The camera attaches to the arm rising out of the base using a magnet. The camera can swivel up and down to provide flexibility when setting up the camera. Two pins on the support arm make contact with the camera to supply power. To remove it, simply grab and pull lightly. The camera has a built-in 2100 mAh Li-ion battery that can keep the camera operational for about an hour.
The camera supports either 720p or 1080p HD video. There’s a built-in microphone used for sound detection as well as a speaker. However, two-way audio hasn’t been implemented in the Hive View. You can hear audio from the microphone, but you can’t send audio to the speaker – at least not yet. 2-way audio is a feature that users are requesting on the Hive Forums.
As you would expect, the Hive View is integrated into the Hive mobile apps. However, there isn’t desktop browser-based support for the Hive View yet. Setup for the Hive View is a little different than for the other Hive Products. Unlike all of the other Hive products that require the Hive Hub, the camera uses Wi-Fi. However, for setup, you must use a mobile device with Bluetooth. Setup is done using the Hive mobile app (Select Add Camera), but the discovery of the camera is done using Bluetooth. Once discovered, you choose your Wi-Fi network (both 2.4 and 5 GHz are supported), enter the Wi-Fi password and the Hive View is registered to your Hive account.
The composite screenshot below shows the Hive View has been added to My Hive Home (left) and the Control view with the Hive View device opened (right). The Live view is currently displayed. Below the image on the right, there’s the icon for settings and the privacy shield icon. With privacy enabled, the screen goes blank and all monitoring ceases. If you rotate the screen into landscape mode, the video appears full screen – either in live mode or in playback mode. The bottom of the screen is dedicated to a scrolling log of recorded events.
 and Hive View Control")
Hive View in My Hive Home (l) and Hive View Control (r)
There are a lot of settings options and the screen scrolls down. So the composite screenshot below shows the settings side by side so that you can see them all.

Hive View Settings
Several settings are worth noting. Under the Detection heading, you can control both motion detection and sound detection.
- The Motion detection lets you choose “People” so that motion such as ceiling fans and pets don’t trigger a recording. You can also trigger on sound. The log shows you whether sound or motion triggered each recording.
- Camera – “Include audio” controls whether audio is recorded with the video
- Notifications: You can choose to be notified either via Email or through application notifications. SMS notification isn’t supported.
The image below shows a recording of an event triggered by a person (left). “Person” is shown at the top of the screen along with a time stamp that increments in seconds during the recording. The image on the right shows the Scheduling tab. You can schedule times during which monitoring isn’t active. Note that the scheduling for this device works that same way as it does for all of the other Hive devices.
 and Scheduling (r)")
Hive View – “Person recording”(l) and Scheduling (r)
Setup was a snap. It took me longer to get it out of the box than to set it up with My Hive Home. Both the 720p and the 1080P videos were sharp and crisp and the 130-degree lens captured a good field of view. The recordings played back smoothly both on the local network and when I tested away from home. However, if you do frequent remote viewing over a slow Internet connection, you might want to set the resolution to 720p.
Recordings are stored in the cloud. The price of the product includes free storage for a rolling 24 hours of recordings. If you need to keep your recordings longer, you can purchase the Hive Video Playback plan for $5.99 per month. The plan provides for a rolling 30-day camera history for up to two cameras. Hive provides a one month free trial.
Motion and sound triggering worked as expected. People detection seemed to work fairly well. It even detected people on the TV screen when there was no other motion in the room. Sound detection, even set to Medium, also worked well. Once while I was away, my smoke detector decided it was time for a new battery and started to chirp every 15-20 seconds. I was surprised when I looked at the log and saw almost continuous “Sound”-triggered recordings.
Closing Thoughts
If you’re looking for a simple way to turn your home into a smart home, the Hive product Packs provide bundles of products that are simple to set up and operate. The mobile apps, with minor differences, operate the same way whether you are in the Android or Apple camp. And, you can also use the website dashboard on your desktop – a feature not found in many smart home systems. Both the mobile apps and the desktop dashboard do a good job of providing centralized control of most, but not all of your Hive products. (There’s no desktop support for the Hive View camera yet).
But like all smart home systems, Hive’s downside is that it doesn’t interoperate with ZigBee-based products from other manufacturers. But that may be less of a problem given its integration with Alexa and Google Assistant. For example, I currently have smart home products from seven different manufacturers running in my home. While you need to use each manufacturer’s application to configure their products, once configured, you can control all of them using voice commands.
I like the Hive sensors, plug and bulbs and its ecosystem. But if I were going to consider purchasing a Hive Pack, I would probably start off with the $199.99 Starter Pack and add sensors, plugs and lights as needed. As noted earlier, I think that the Active Thermostat is the weakest product in the bundle. It lacks many of the advanced tracking, monitoring and analysis features that I’ve grown accustomed to having in my ecobee thermostat. I just wouldn’t be happy with a lesser-featured device. And since most other smart thermostats are Wi-Fi-based, they’ll work fine with the other Hive products.
For an initial release of a new product, the Hive View seems like a very solid, albeit expensive, product. I liked the industrial design and the ease of installation. The video quality was good and the night view did a good job of illuminating the scene when the lights were low or off. However, there are features missing that I think should be in the product to be competitive:
- Two-way audio – Many cameras on the market have 2-way audio. Heck, even my doorbell has two-way audio. There is a speaker built into the camera, so I’m guessing that this is a feature that they could add to a future firmware upgrade.
- Include the date in the date stamp – without the date included, you’ll have no idea when the recording was made. If you’re using the recordings for evidence, the date really needs to be included.
- Use the built-in motion detection to trigger other Hive Products – The motion detection in the Hive View is significantly more sophisticated than the simple motion sensor, yet you can’t trigger actions on your other Hive devices. You can’t, for example, turn on a Hive Plug or Hive light if motion is detected by the Hive View. At minimum, a few IFTTT skills should be supported to bridge the gap.
These are more in the would-be-nice category, since no other cloud-based camera has them either:
- Provide for public cloud-based storage – With my Office 365 subscription, I’ve got 1TB of cloud storage available. I’ve also got 15GB of storage on Google and a Dropbox account, too.
- Provide for local storage – My primary office storage is on a NAS which has its own built-in fault tolerance and private cloud features. I could have virtually unlimited storage history at no additional cost and not have to worry about losing recordings after 30 days. And, for those who are security-minded, I’m sure that they would prefer to store video recordings where the storage is under their own control.
- Export capability – currently you can’t export your video. It’s stuck in the cloud and you can’t download it. About all you can do is take a screenshot if you want to keep an image before it rolls off of your cloud storage history.
I understand that from the manufacturer’s perspective, at some point in time you have to stop adding new features and actually ship a new product. And perhaps the feature set included at the product’s launch is all you really want/need from a camera. For me, I’d hold off spending the $200 until I see which, if any, of the additional features above are added.