Introduction
| At a Glance | |
|---|---|
| Product | Business Internet Video Camera with Audio and PoE (PVC2300) |
| Summary | Internet camera with Power over Ethernet option and VGA (640X480) resolution |
| Pros | • 802.3af Power over Ethernet • Two-way audio • Dual video codecs • HTTP and HTTPS browsing • I/O ports including TPZ support • Multiple alert options |
| Cons | • Poor audio quality from built-in microphone • Camera can’t save directly to network share • PC running monitor application required for monitoring and capturing clips longer than 10 seconds • Video stored in non-standard video format that requires using the playback application |
Many small businesses overlook the need for video
surveillance. Whether you need to monitor the activities at a cash register or
provide security for an inventory storage area, Internet cameras can be an
attractive option when compared to installing cameras with a dedicated video surveillance server.
Internet cameras are similar to web cameras that are in popular use for video chats. However, instead of plugging into a computer, Internet cameras have a complete operating system, typically Linux-based, some amount of onboard memory, and a built-in web server that allows you to connect to it and view images, and, in some cases, hear audio, from anywhere on the web. With the proper configuration of firewall and port settings, a small business manager or owner could monitor his or her business anywhere there’s an Internet connection.
In this review, I’ll be taking a look at the PVC2300 Business Internet Video Camera with Audio and PoE from Linksys. Whew, that’s a long name; hereafter, I’ll refer to it as just the PVC2300. I’m not
sure what’s up with manufacturers of Internet cameras and long names. Last
year, I reviewed the TRENDnet TVIP301W, and it had a similarly long formal product name.
Linksys also sells the WVC2300, a wireless version of our
review unit. In addition to the features found on the PVC2300, the WVC2300 can
connect using its built-in 802.11g wireless network adapter. It includes all of
the security options you’d expect in a modern wireless network including WEP,
WPA/WPA2 personal, and WPA/WPA2 enterprise with authentication to an external
RADIUS server. According to Linksys, it’s the first wireless Internet camera to
be Wi-Fi certified. Priced at $399.99, it sells for $50 more than the PVC2300.
Product Tour
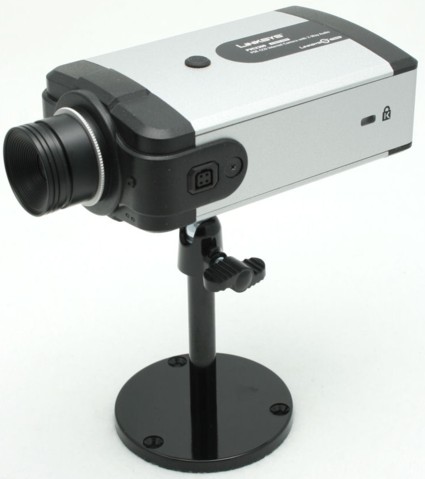
The PVC2300 is housed in an attractive black and matte aluminum case. It measures 4.72″ X 0.99″ X 1.81″ (120mm X 76mm X 46mm) and weighs in, according to my scale, at 555 g or just a little under 1.25 pounds. It comes with a weighted stand that you secure with three screws (supplied) and a ball and socket swivel that allows you to easily position the camera.
In the product shot above, you can see that Linksys also wisely included a slot for securing the camera. The supplied lens is an f1.7 lens with a 60-degree field of view. The camera uses a standard CS mount for the lens, so you can replace it with other CS mount lenses commonly used in video surveillance. In addition, the 4 Pin IRIS port can adjust brightness if you’re using a DC-Iris type lens.
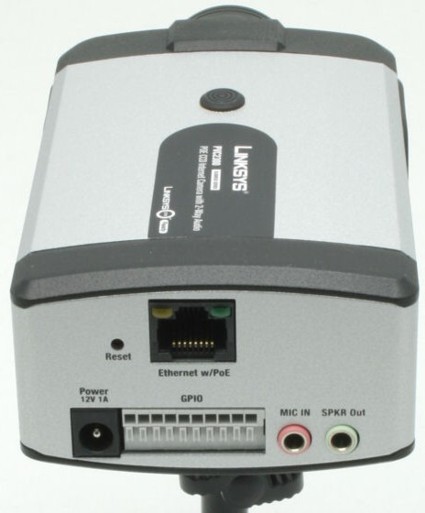
Figure 1: PVC2300 rear view
On the rear of the camera, there are five pairs of pin
connectors. One pair is reserved for RS485 that’s used for Tilt/Pan/Zoom camera
mounts. The RS485 port supports the standard Pelco-D commands. Two pairs are
used for input trigger ports, and the remaining two pairs are used for output
ports. Input trigger ports could be connected to either IR motion detectors or perhaps switches on doors.
Output ports, which can sink a maximum of 100 mA, could be connected to a relay that turns on a flashing light or sounds an audible alarm. There is also an audio input jack for an external microphone as well as a speaker output jack for powered speakers.
Product Tour – more
There are two ways to power the PVC2300. First, the device
is supplied with a 12VDC 1 A power supply. However, more importantly, you can
power the camera using IEEE 802.3af PoE (Power over Ethernet).
So what’s the big deal about PoE? Well, in many environments where you’d want
to install a camera, there’s often not a nearby power outlet to plug in the
wall transformer. For example, cameras mounted high on a wall (overlooking, say, a cash register) or in the ceiling won’t have access to power.
Rather than spending hundreds of dollars to have an
electrician bring an electrical circuit to the camera location, you can power
the camera via PoE. The Ethernet cable carries power along with the data using
a “phantom power” technique, similar to that used to power condenser microphones.
The source of the power can be either an 802.3af compliant
switch that supplies the PoE, or a PoE power injector. For our tests, we
connected the camera directly to a Linksys SRW2008MP switch. The SRW2008MP switch is virtually identical to the
SRW2008 previously reviewed
except that it is capable of delivering full 802.3af PoE power to all eight ports simultaneously.
On the Inside
The PVC2300 is very easy to disassemble, though there’s not
really too much to see on the inside. To disassemble it, you merely remove the
two small Phillips screws located on either side of the front black lens
assembly. The primary reason I took the camera apart was when I first picked it
up, I heard something rattling around the inside. (Plus, I wanted to provide interior pictures).
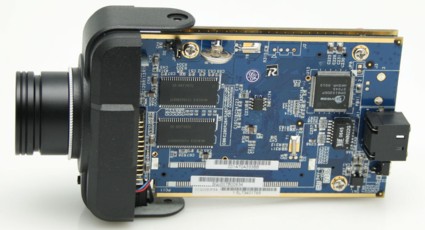
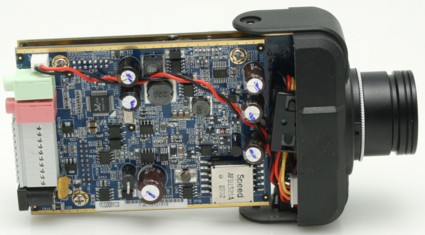
Once open, I found that one of the PCB mounting screws had come loose. I re-fastened the loose screw and shot the pictures below:
Figure 2: PVC2300 Top PCB
Figure 3: PVC2300 Bottom PCB
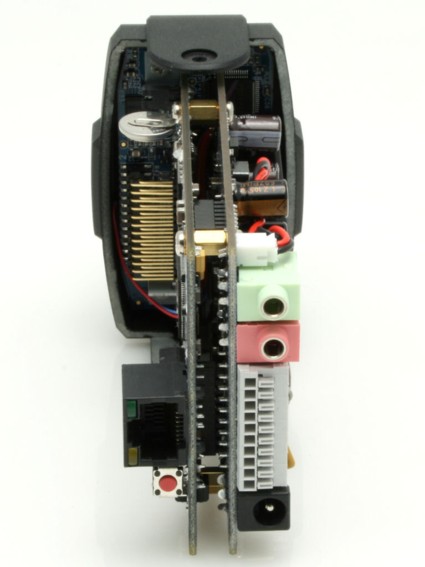
Figure 4: PVC2300 Rear open view
Linksys declined to specify the processor and amount of memory
in the PVC2300, but said that the processor is adequate to power simultaneous
dual codecs, and the memory is sufficient for the pre and post capture buffers.
The chip I could identify is for the Ethernet interface. It’s a Davicom
PM9102D single chip Fast Ethernet controller. To achieve the small overall case
size, you can see that Linksys used stacked circuit boards that connected to a third board that houses the ¼” progressive 1.4 lux (@ f1.7) CCD sensor.
Setup
The basic setup of the PVC2300 is quite simple. By default,
the PVC2300 acquires its address via DHCP. If you have a network monitoring
tool like Network Magic that will detect a new device coming onto your network,
or if your router shows you DHCP leases, you can go directly to the web browser interface on the camera’s IP address.
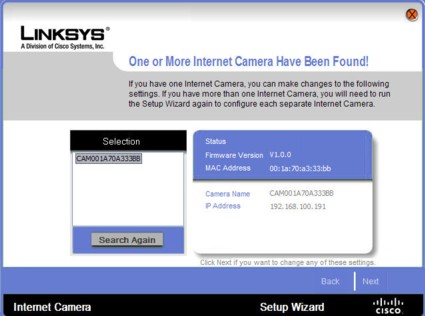
Most people will want to use the included discovery wizard. When
the wizard starts up, it searches for cameras on your local network. For those
of you who are interested, the wizard “arps” on port 916 at 255.255.255.255. Here’s a screen shot of the found camera:
Figure 5: PVC2300 Setup Wizard finds the camera on my network
The wizard also lets you assign a static address, set the time and date, and name the camera. After this initial, basic configuration, you configure the balance of the PVC2300’s through the browser interface.
When you first log into the camera’s web management
interface, you are prompted for a user name/password (admin/admin). Next, you
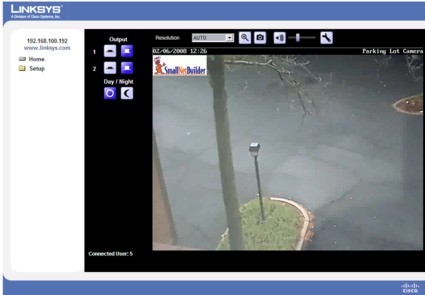
are prompted to download and install an ActiveX control from the camera that lets you view the camera’s image. Here’s what the home page looks like:
Figure 6: PVC2300 Home Page
As administrator, you have full privileges including
configuration, toggling output ports, changing resolution, taking a snapshot, changing
between day and night modes, and using the digital zoom (2X or 4X). Note that
the zoom option, implemented with an ActiveX control, is not available when using Safari on a Mac.
In this photo, I set the camera to monitor the parking lot outside my condo. I also used one of the customizing features to put the SmallNetBuilder logo in the upper left corner.
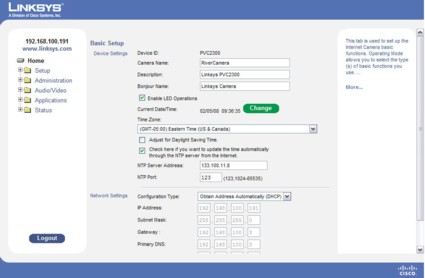
The setup menu is also fairly straightforward. I’ll comment briefly on each of the five menu categories separately.
Figure 7: PVC2300 Settings menu
Setup—First, a generic comment. I found the user interface to be slightly annoying, because many of the screens required you to scroll down in the window in order to save options. In addition, some scroll boxes required left/right scrolling. There was plenty of screen real estate on my screen to allow viewing complete pages without scrolling. The frame could have been sizeable.
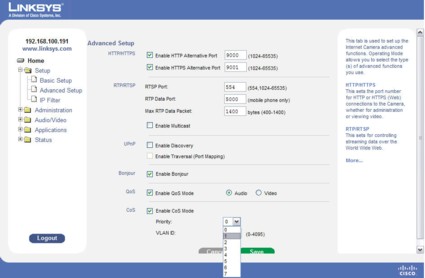
The basic setup provides access to standard networking configuration parameters, such as IP address, mask, NTP server, etc. The advanced page lets you enable secure HTTPS access, as well as change RTSP (real time streaming protocol), RTP (real time protocol) and RTP packet size. For those in the Mac world, you can enable Bonjour discovery.
Setup – more
The PVC2300 also supports video or audio QoS, and if you are using a managed switch such as the SRW2008MP, you can enable CoS (Class of Service) mode and assign the camera to a VLAN.
Figure 8: PVC2300 advanced setup page
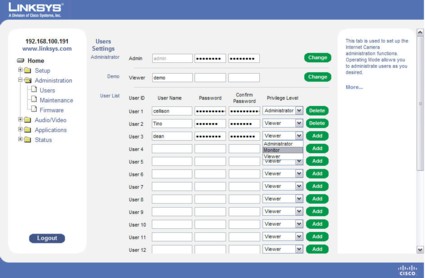
Administration—This menu lets you set up users,
restart the camera, upload new firmware, and save your configuration files. The
camera supports up to 20 users, and each user can be assigned administrator
privileges (complete control), monitor (tilt/pan, if used with a TPZ mount, toggle day/night and output ports) or viewer (view video only).
Figure 9: PVC2300 Administration Menu
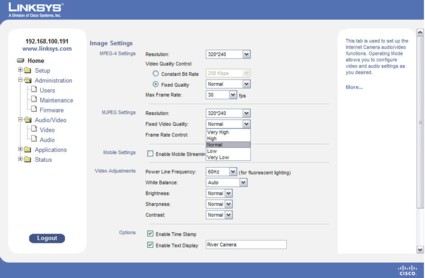
Audio/Video—The video menu lets you set the default
resolution for both MPEG-4 and MJPEG. For each codec, you can select the view
quality. The menu also lets you enable the time stamp and camera name so that
it appears in the video, as well as setup a custom logo for your camera. If you
need the camera to switch between day and night modes, this menu lets you schedule the day/night periods. For that option, you have to scroll down.
The audio menu lets you enable audio modes (simplex listen only, simplex talk only, half-duplex talk/listen, or full duplex talk/listen).
Figure 10: PVC2300 Video Configuration
Applications—This menu has the most options.
Figure 11: PVC2300 menu showing Applications tab expanded
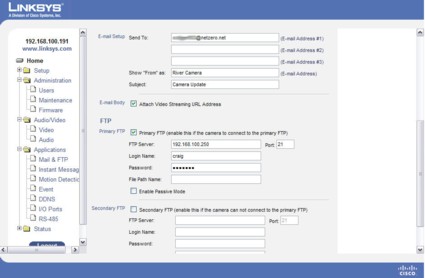
Mail and FTP—lets you set up login
credentials for both email notifications and FTP server file uploads. For each
server type, there’s a primary and secondary server. SMTP servers support authenticated login as well as POP before SMTP.
Instant messaging—the PVC2300 supports instant messaging notification through a Jabber server.
Advanced Features
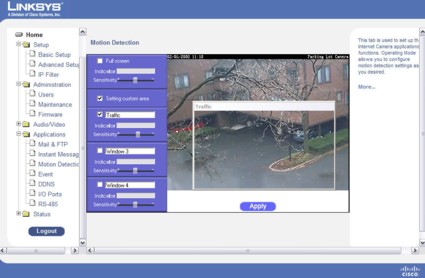
Motion Detection—You can
choose to trigger based on motion in the entire screen or set up to three
custom trigger areas. Each trigger area has its own sensitivity setting. In the
photo below, I was only interested in vehicles passing through the camera field
of view, so I created a custom area to exclude the tree branch which otherwise
would also have triggered the camera. Note that creating the motion detection
windows is done with an ActiveX control, so this feature is not available to those on a Mac using Safari.
Figure 12: Motion Detection setup
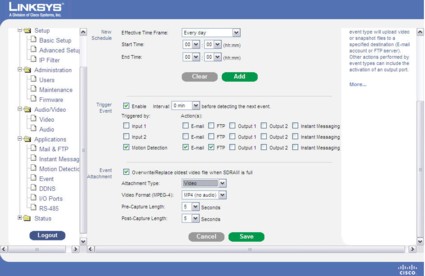
Event—This menu lets you
configure what happens when changes of inputs 1 or 2 or motion detection occurs.
For each trigger event, you have the option of email notification, FTP file
upload, change output 1 or 2 or send an instant message. Each is a check box
selection, so you can have any or all. You can also choose whether to attach
video or snapshots to email. The FTP file upload uses the same attachment option.
Figure 13: Event options
DDNS—You have the choice of DYNDNS, TZO, or 3322 as dynamic domain name service providers.
I/O Ports—here you
configure trigger conditions for input ports (high/low/rising/falling) and
output port default state (low/high) and output state (high/low/pulse/none). For
manual control of the output state, you can set whether “on” maps to high or low.
RS485—This allows you to configure RS485 settings. We didn’t have an RS485 TPZ base, so we couldn’t check this.
Status—This menu provides a summary of settings, lets you set up syslog settings, view the log list, and view files stored on the built-in memory.
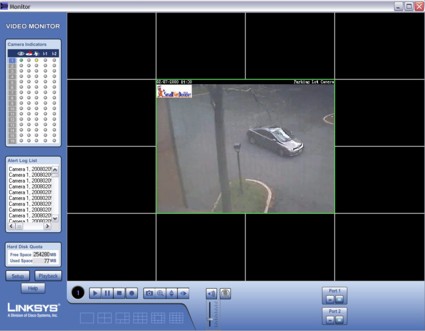
In addition to the built-in web management utility, the PVC2300 is supplied with a monitor application (Windows only – 98SE, ME, 2000, XP & Vista) that can monitor up to 16 cameras. The application has pre-built views for 1, 4, 6, 9, 13, or 16 cameras. For different layouts, you can simply drag the image for each camera to the screen location you want.
Figure 14: PVC2300 monitor application showing the 13 camera view
The application also lets you specify where to save video
files, create instant videos, take snapshots, and schedule recording times for
each camera. For my tests, I chose to save the video to a mapped network drive on one of my NAS devices, and to limit video file storage to 300 MB.
Playback
The companion program to the monitor program is the playback
program. You can launch it either from within the monitor program, or from a
separate desktop icon. It includes controls for searching for events (triggered
or input) or by specifying a time period. This search feature is for each controlled camera.
Figure 15: Video playback control panel
You can view video clips in real time or adjust the playback speed up to +/- 16X. Interestingly, the video controls included fast forward, but not rewind.
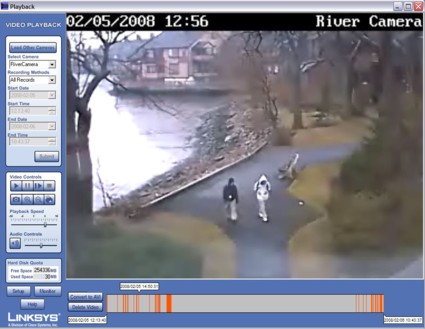
Figure 16: PVC2300 Playback screen
The image above shows the video playback screen. Across the bottom,
you can see indications of video activity represented by orange strips on the
timeline. A time/date “balloon” that you can drag helps you speed through an
extended timeline. In the image above, I was shooting through a window. Some of
the fuzziness at the top of the screen was caused by raindrops on the window. For
this test, I set the motion detection to capture motion on the path, and the camera caught these two people taking a rainy stroll.
Hands On
The instruction manual indicated that the lens is fixed
focus, but the lens on our evaluation unit had a focus adjustment. In fact, the
focus seemed fairly sensitive, and turning it just a few degrees in either direction made a large difference in the focus.
For my tests, I connected the camera to a 50-foot Ethernet
cable so I could move it to different windows. When I moved it to a downstairs
window, I found myself running back up the steps to check the focus on my
monitor. Ultimately, I ended up taking a wireless notebook to the camera location so I could focus it without running back to my lab.
The PVC2300 is intended as an indoor device. It has an
operating temperature range of 32–122F and operating humidity of 10–80%. Linksys
also cautions that changing lighting conditions outdoors could cause the motion
detection to trigger. Indeed, I did note that changes in brightness, such as a cloud passing in front of the sun, could trigger the motion detector.
I tested both the email and the FTP functions. Using the
MPEG-4 video format with video attachments yielded the best notification
results. I set the pre and post trigger settings to the maximum of 5 seconds,
which resulted in 10-second video clips being sent to my email and my FTP
server. If you choose JPEG as the attachment type, with the default settings, you’ll get emails with dozens of attachments—each being about 10K.
Your email and FTP notifications are limited to 10 seconds. In order to record video longer than the 10-second notification clips, you must run the monitor application on a separate computer. Note that the camera does not directly capture to a network share. Files are stored in a data subdirectory under a directory with the camera’s name.
In my test environment, the path was u:\media\video\Linksys PVC2300\RiverCamera\data. The video is stored with a .sef file
extension that doesn’t really correspond to a standard video file format. A
search for.sef indicated that it might be a “Steganos Encrypted file.” Though
the playback utility does allow you to convert your video into a.avi file, it would have been nice for the video to be recorded in a standard video format.
Final Thoughts
Priced at $349.99, the PVC2300 is clearly a tool aimed at
businesses that need to add video surveillance to their security plan. It does
include features that make it an attractive option to deploy, such as Power
over Ethernet and dual video codecs. Though it features input/output ports for
external triggering and notification, the instruction manual really doesn’t explain in much detail how to use them.
I was disappointed at the video quality at the default
settings, but cranking the video quality up to “very high” and increasing the
resolution to the highest level supported by the camera, 640 X 480 improved the
video quality significantly. Of course, that dramatically increases the
bandwidth usage, but for monitoring on a local network, that’s really not much of an issue.
If the audio quality coming from the camera is important,
this isn’t the camera for you. The audio from the built-in microphone seemed
fairly distorted when I tested it with the default audio codec. For email and
FTP alerting, the camera works well as a stand-alone device, but since it can’t
record video directly to a network share, you’ll need to plan on having a PC to
run the monitor application if you’re considering the camera as part of a surveillance system.

