![]() This article is sponsored by Edimax.
This article is sponsored by Edimax.

RADIUS provides an extra measure of security in a wireless LAN by requiring user-based authentication. However, it typically requires a special server to be set up and configured, which puts it beyond the reach of many home and small-business users.
However, Edimax has built a RADIUS server into its Pro line of access points [reviewed], bringing higher security within reach for even small to mid-sized wireless networks.
This How-To will show you how to configure RADIUS in an Edimax Pro access point in both standalone and controller modes. We will also cover configuring a Windows wireless connection to use RADIUS.
Standalone AP Mode
Below are the steps for an Edimax Pro WAP1750 in AP Mode. Note, values in bold italic are your choice. Configurations start with default settings. The gallery below shows screenshots for each step.

Edimax AP Mode
- Wireless Settings – 2.4GHz – Basic. SSID1 = RADIUSWiFi5. Click Apply.
- Security: Set Authentication Method = WPA-EAP; WPA Type = WPA/WPA2 mixed mode-EAP; Encryption Type = TKIP/AES mixed mode. Click Apply. Repeat steps 1 and 2 for 5GHz.
- RADIUS Settings: On RADIUS Settings screen, set RADIUS Server for both radios to Internal. Click Apply.
- RADIUS Internal Server: Set Internal Server = Enable; Shared Secret = Test1; Termination-Action = Reauthenication [sic]. Click Apply.
- RADIUS Accounts: Enter User Name = user1. Click Add.
- RADIUS Accounts: Select user1, click Edit, enter password = test123. Click Apply.
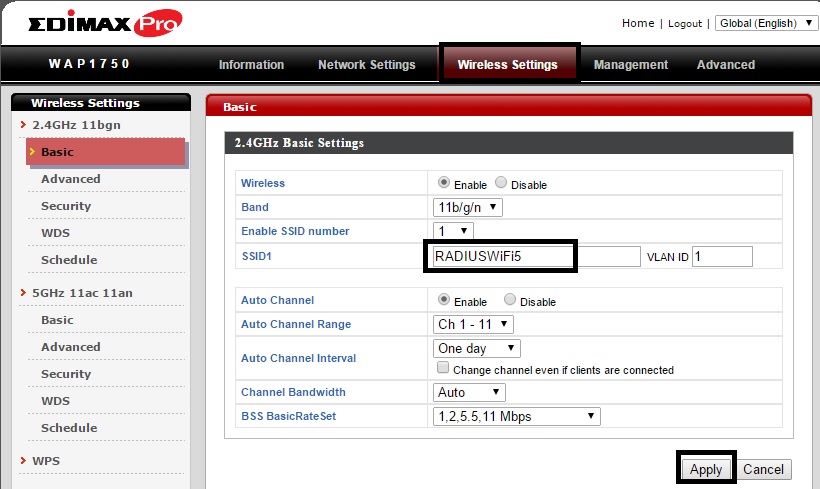
Wireless Settings – 2.4GHz – Basic. SSID1 = RADIUSWiFi5. Click Apply.
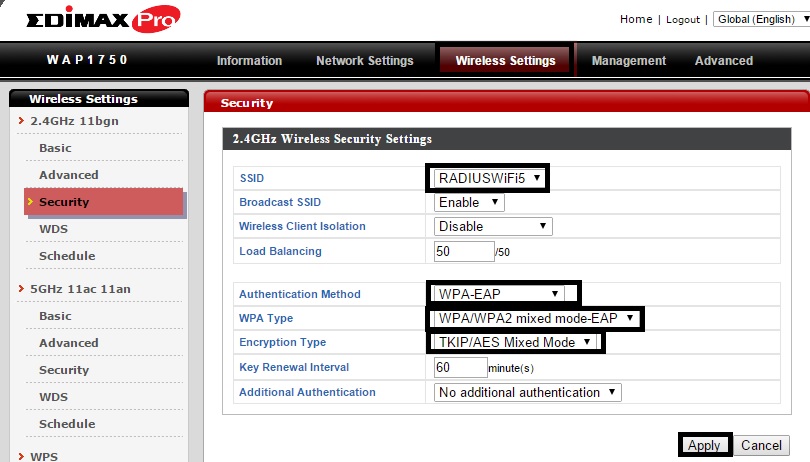
Set Authentication Method = WPA-EAP; WPA Type = WPA/WPA2 mixed mode-EAP; Encryption Type = TKIP/AES mixed mode. Click Apply. Repeat steps 1 and 2 for 5GHz.
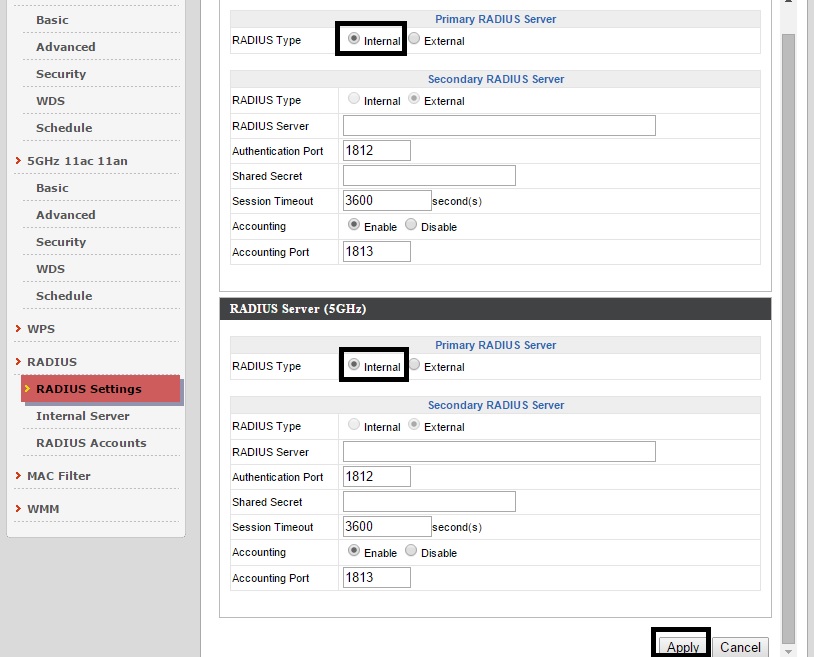
On RADIUS Settings screen, set RADIUS Server for both radios to Internal. Click Apply.
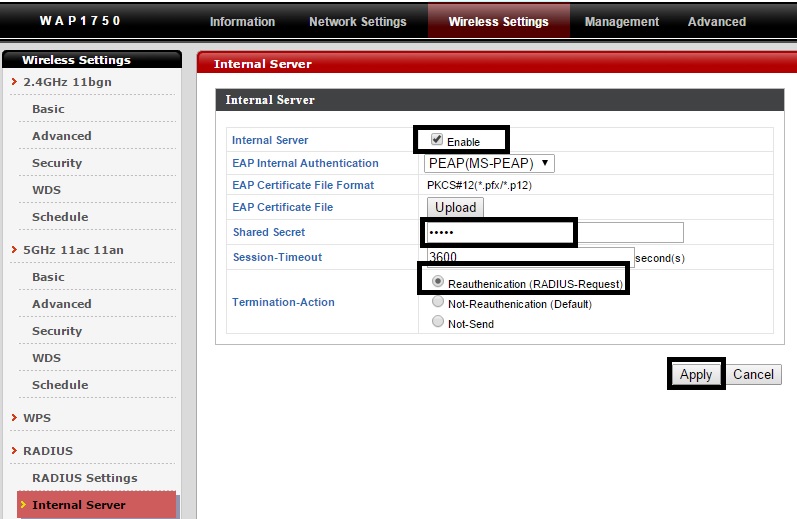
Set Internal Server = Enable; Shared Secret = Test1; Termination -Action = Reauthenication [sic]. Click Apply.
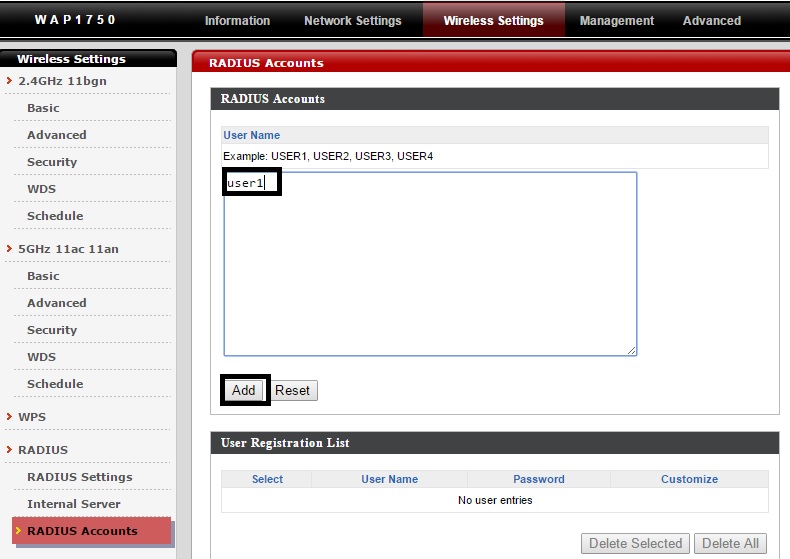
Enter User Name = user1. Click Add.
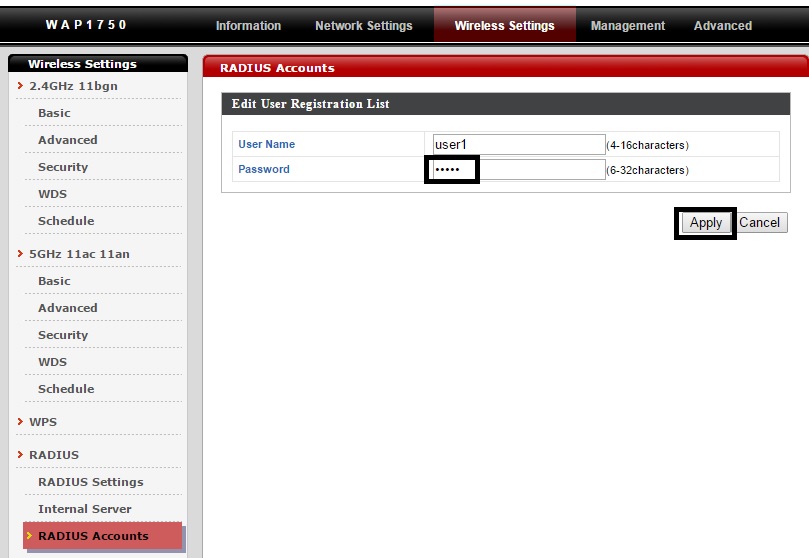
Select user1, click Edit, enter password = test123. Click Apply.
Standalone AP mode
Controller Mode
You can also use the internal RADIUS server in Controller Mode. I used an Edimax Pro CAP1200 in Controller Mode with two WAP1750s in Managed Mode. Prior to entering the RADIUS configs, I defaulted all devices and used the Edimax configuration Wizard to get the Edimax Pro network up and running. Again, values in bold italic are your choice. The gallery below shows screenshots for each step. These settings are all done on the NMS Settings page in the AP that is in Controller mode.

Edimax AP Controller Mode
- On RADIUS > Internal RADIUS Server: Click Add, Name = RADIUS-Doug; Shared Secret = Test1 ; Termination-Action = Reauthenication [sic] Click Apply.
- On RADIUS > RADIUS Account: Click Add, User Name = user1, Click Add.
- Set Password =test123, Click Apply.
- On Select RADIUS > RADIUS Group: Click Add, Group Name = RADIUSGroupDoug, set 2.4GHz and 5.0GHz RADIUS Primary = RADIUS-Doug, check the box next to user1. Click Apply.
- On NMS Settings> WLAN> WLAN : Click Add, Name/ESSID = RADIUSWiFi6, Authentication Method = WPA-EAP, WPA Type = WPA/WPA2 mixed mode-EAP, Encryption Type = TKIP/AES Mixed Mode, Click Apply.
- On WLAN> WLAN Group: Select and Edit Wizard WLAN Group 1.
- On WLAN> WLAN Group: Select RADIUSWiFi6 and click Apply.
- On Access Point> Access Point Group: Select and Edit Wizard AP Group 02.
- Scroll to Profile Group Settings, RADIUS Group, click Override Group Setting, select RADIUSGroupDoug, Click Apply.
- Reboot Controller and APs. Note, you must reboot after adding user accounts!
Wireless Settings – 2.4GHz – Basic. SSID1 = RADIUSWiFi5. Click Apply.
Set Authentication Method = WPA-EAP; WPA Type = WPA/WPA2 mixed mode-EAP; Encryption Type = TKIP/AES mixed mode. Click Apply. Repeat steps 1 and 2 for 5GHz.
On RADIUS Settings screen, set RADIUS Server for both radios to Internal. Click Apply.
Set Internal Server = Enable; Shared Secret = Test1; Termination -Action = Reauthenication [sic]. Click Apply.
Enter User Name = user1. Click Add.
Select user1, click Edit, enter password = test123. Click Apply.
Controller mode
Windows RADIUS Setup
Most operating systems support WLAN RADIUS authentication. Below are the steps for Windows. Windows 7 and Windows 8 are the same after Step 1.

Windows
- Windows:
- Windows 7 = Control panel> Network and Sharing Center> Manage wireless networks> Add> Manually create network profile.
- Windows 8 = Control panel> Network and Sharing Center> Setup new connection or network> Manually connect to wireless network> Next.
- Enter SSID, Security Type = WPA2-Enterprise Click Next.
- Click Change connection settings.
- Select Security tab. Click Settings
- Uncheck Verify the server’s identity…, leave Enable Fast Reconnect checked.
- On same screen, click Configure and uncheck Automatically use my Windows Logon… in the EAP MSCHAPv2 Properties window. Click OK then OK again.
- Click Advanced, Click Specify authentication mode, select User authentication and Click OK, OK again. Close window.
Wireless Settings – 2.4GHz – Basic. SSID1 = RADIUSWiFi5. Click Apply.
Set Authentication Method = WPA-EAP; WPA Type = WPA/WPA2 mixed mode-EAP; Encryption Type = TKIP/AES mixed mode. Click Apply. Repeat steps 1 and 2 for 5GHz.
On RADIUS Settings screen, set RADIUS Server for both radios to Internal. Click Apply.
Set Internal Server = Enable; Shared Secret = Test1; Termination -Action = Reauthenication [sic]. Click Apply.
Enter User Name = user1. Click Add.
Select user1, click Edit, enter password = test123. Click Apply.
Windows RADIUS configuration
Windows 7 has a graphical utility under Manage wireless networks for displaying configured Wi-Fi profiles, which enables you to edit or delete a Wi-Fi profile. Windows 8 uses the command line to list configured Wi-Fi profiles with netsh wlan show profiles and delete a Wi-Fi profile with netsh wlan delete profile name=”SSID name".
Fortunately, Windows 8.1 restored an easier to use method. Click on the network icon in the System Tray to bring up the Networks panel, click on View Connection Settings, then Manage known networks in the next screen that opens. The image below is a composite of the two screens of interest.

Windows 8.1 wireless network management
You’ve now configured a RADIUS-authenticated Wi-Fi profile. When you attempt to connect, you’ll be prompted for your RADIUS user name and password. Entering those credentials will connect you to your RADIUS authenticated Wi-Fi network.