For wireless products tested after July 24, 2011, see this article.
For wireless products tested between March 2007 and June 19, 2008, see this article.
For wireless products tested after November 2005 to before March 2007, see this article.
For wireless products tested before October 1, 2003, see this article.
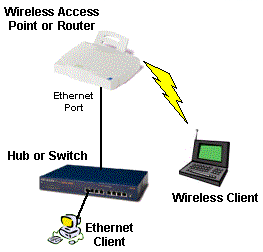
We use Ixia‘s free Qcheck utility and IxChariot network peformance evaluation program to put wireless network gear through their paces. We use the simple test setup pictured below to run our tests under four different conditions.

Test Conditions
Testing is done in recently constructed wood frame two floor residence. Home has heating/cooling metal ductwork and sheetrock walls throughout. The Access Point (AP) or wireless router is placed on a table away from metal cabinets and RF sources in a corner upper level room for all tests. A set of measurements is then taken at each of the four locations.
- Location #1: AP and wireless client in same room, approximately 6 feet apart.
- Location #2: Client in room on same level, approximately 30 feet away from AP. Two sheetrock walls between AP and Client.
- Location #3: Client in lower level, approximately 40 feet away from AP. One wood floor, no sheetrock ceiling, no walls between AP and Client.
- Location #4: Client on same level, approximately 50 feet away from AP. Three interior, one exterior wall between AP and Client.
Tests Run
NOTES:
• Wireless Performance tests on a Wireless Router all take place on the LAN side of the router. They do not reflect any performance limitation due to the router part of the product.
• Tests are run with data sent from wireless client to Ethernet-LAN based test partner via a wireless access point.</hp>
1) Transfer Rate – More commonly known as Throughput, this test is a measure of how fast data moves between a wired client, Access Point or router, and wireless client. The test sends a file from point to point, measures how much time it takes, and calculates the result in Mbps (Megabits per second).
Chariot’s Throughput.scr script (which is an adaptation of the Filesndl.scr long file send script), is used to run a 1 minute test in real-time mode. The test sends 100,000 Bytes of data for 802.11b or 200,000 Bytes of data for 802.11g testing and loops until one minute is up. We report the average throughput calculated by the test. Of course, higher throughput numbers are better.
We also run this test with 128 bit WEP enabled for Condition #1 to see if there is any throughput degradation. For devices supporting Wi-Fi Protected Access (WPA), we also test throughput with WPA-PSK mode enabled.
2) Response Time – This test measures the delay (also known as lag, or latency) in the test setup, and is essentially what you’d measure by using the ping command.
We use Qcheck’s Response Time test with 100 Byte Data Size and 10 Iterations, run it three times and average the average and maximum times output by Qcheck.
Lower numbers are better, especially for gaming and any voice or video applications, but anything under 10ms (milliseconds) is fine.
3) UDP Stream – This test measures how well a continuous stream of data is handled. In addition to giving an indication of whether you’ll have trouble listening to Internet audio or watching video program streams, it tends to show whether there is a high bit error rate, or poor speed autoranging algorithm.. It uses the connectionless UDP protocol, which has less overhead and error recovery mechanisms than the TCP protocol (picture a fire hose being turned on vs. a water bucket brigade).
Our test setup uses Qcheck to push data at a 500 kbps (0.5Mbps) rate for 10 seconds and results in two numbers. You want the Actual Throughput number to be as close to 500 kbps as possible and the Lost Data to be ideally zero. We usually run the test three times and average the results.
4) SNR (optional) – We prefer to record the Signal to Noise reading in dB, if it’s provided by the client adapter’s utility program. If this is not available, we record whatever reading that the client adapter’s utility program provides that we feel is the most representitive of the signal quality of network connection. The value used is described in the test results notes.
Equipment Used
We tend to use the same computers to run the tests, with the Ethernet client running Win98SE or WinXP, and having 733MHz or better processor speed and memory configurations in excess of 256MB. The test laptop, however, has a 1GHz Celeron, with 128MB of memory, running WinXP Home. The test machines have no other applications running during testing.
